1. はじめに
This manual provides essential information for the safe and effective operation of your Mastech MS8301A Digital Multimeter. Please read this manual thoroughly before using the device to ensure proper functionality and to prevent potential hazards. Keep this manual for future reference.
2. 安全情報
Always adhere to the following safety precautions to avoid electric shock or personal injury, and to prevent damage to the multimeter or the equipment under test.
- 手順を読む: Understand all instructions and safety information before use.
- 定格巻tage: 定格容量を超えて塗布しないでくださいtage, as marked on the multimeter, between the terminals or between any terminal and ground.
- テストリード: テストリードに損傷した絶縁材や露出した金属がないか点検してください。損傷している場合は交換してください。
- Circuit Disconnection: 回路の電源を切り、すべての高電圧を放電しますtag抵抗、導通、ダイオード、または静電容量をテストする前にコンデンサを使用します。
- 機能の選択: 実行される測定に対して機能スイッチが正しい位置にあることを確認します。
- ライブサーキット: Do not measure current on a live circuit with the test leads connected in parallel.
- 動作環境: Do not operate the multimeter in explosive gas, vapor, or damp 環境。
- 個人用保護具: Always wear appropriate personal protective equipment, such as safety glasses, when working with electrical circuits.
- 安全性評価: This device is rated for CAT III 600V. Do not exceed this rating.
3.製品オーバーview
3.1 特徴
The Mastech MS8301A Digital Multimeter offers a range of features for various electrical measurements:
- 画面: 2000カウント
- データ保持: 記録に便利なように、表示された読み取り値を固定します。
- Battery Tester: For 1.5V and 9V batteries.
- コンパクトなデザイン: Product Size: 150mm x 74mm x 48mm (5.9" x 2.9" x 1.7")
- 軽量: Product Weight: 220g (0.48lb)

Image: Detailed features and specifications of the Mastech MS8301A multimeter, including display count, data hold, battery test function, and physical dimensions.
3.2 コンポーネント
The Mastech MS8301A package typically includes the following components:
- Mastech MS8301A Digital Multimeter Unit
- テストリード(赤と黒)
- AAA Batteries (2x1.5V)
- 校正証明書(該当する場合)
- クイックスタートガイド
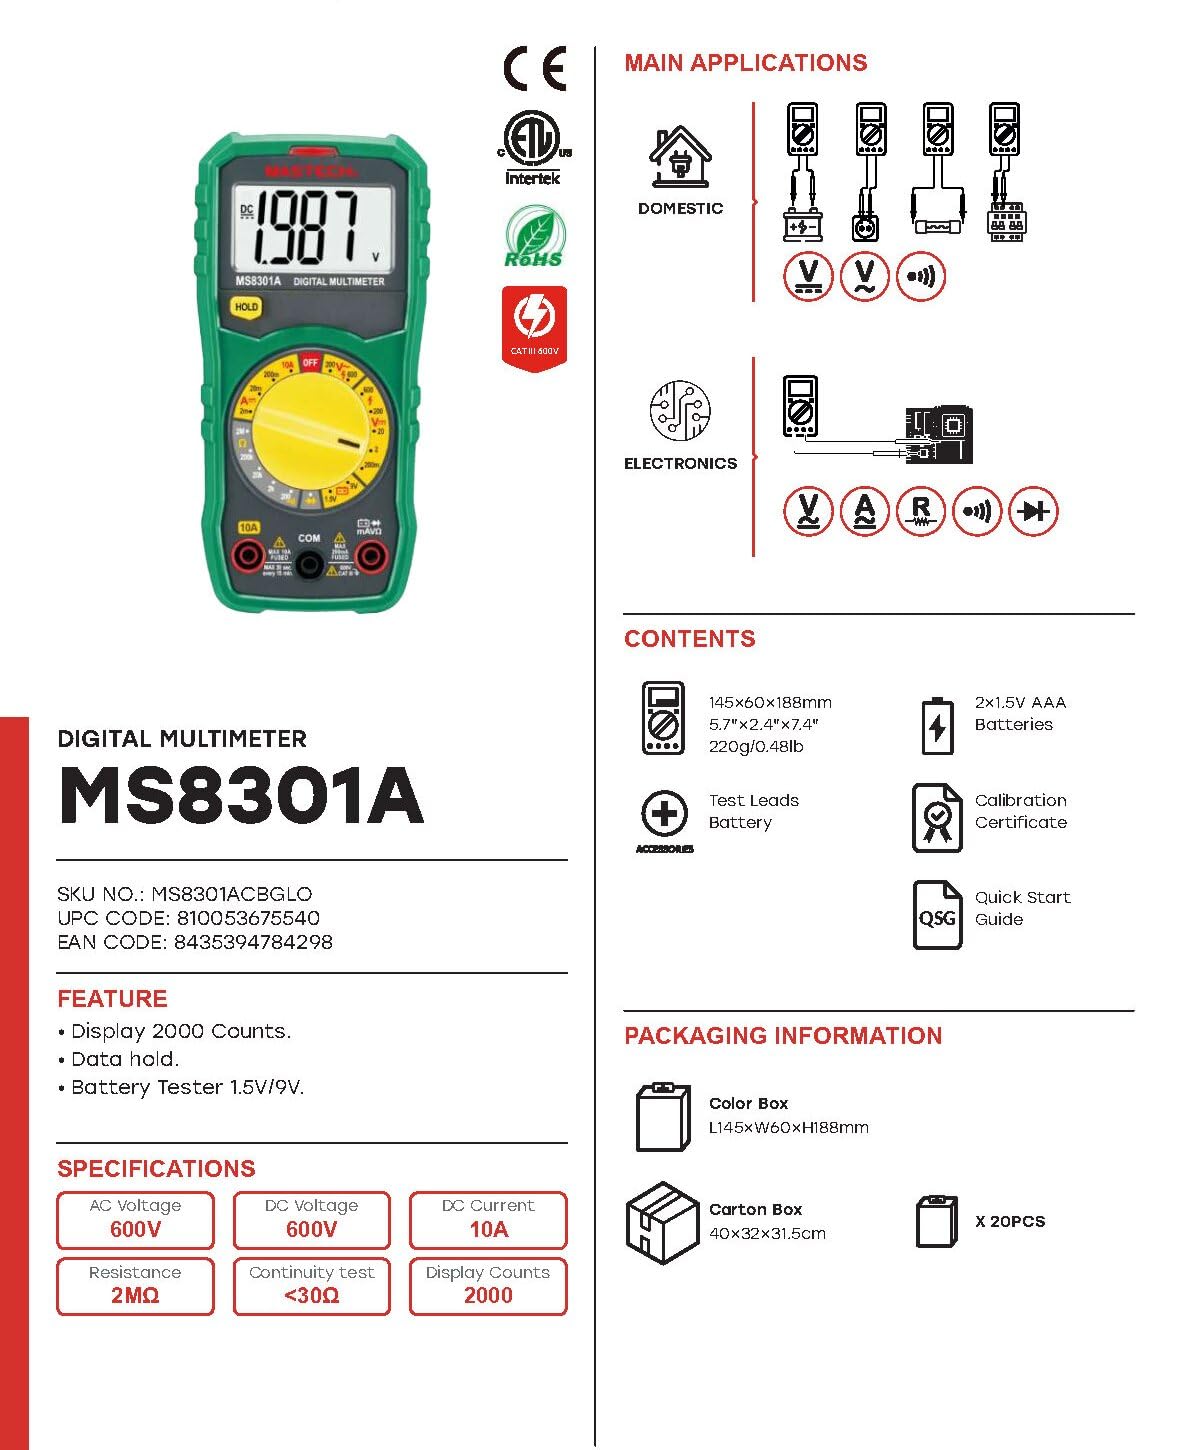
Image: The Mastech MS8301A Digital Multimeter showing its front panel, rotary switch, display, input jacks, and a list of included accessories such as test leads and batteries.
4. セットアップ
4.1 バッテリーの取り付け
- マルチメーターの電源がオフになっていることを確認し、テストリードをすべて取り外します。
- マルチメーターの背面にある電池ケースのカバーを見つけます。
- 固定ネジを外してカバーを取り外します。
- 電池ボックス内に表示されている正しい極性 (+ と -) に注意しながら、1.5V AAA 電池を 2 本挿入します。
- 電池ボックスのカバーを元に戻し、ネジで固定します。
4.2 テストリードの接続
テスト リード線をマルチメーターの適切な入力ジャックに接続します。
- 挿入する 黒 テストリードを コム (一般的な)ジャック。
- ほとんどの測定(Voltage, Resistance, Diode, Continuity, Temperature, Battery Test), insert the 赤 テストリードを VΩmA ジャック。
- 高電流測定(最大10A)の場合は、 赤 テストリードを 10A ジャック。
5. 操作手順
測定を行う前に、テスト リードが正しく接続され、ロータリー スイッチが目的の機能に設定されていることを確認してください。
5.1 DC電圧の測定tage (V=)
- Set the rotary switch to the desired V= range (e.g., 20V for measuring up to 20V DC).
- 赤いテストリードを回路のプラス (+) 側に、黒いテストリードをマイナス (-) 側に接続します。
- 巻を読むtagディスプレイ上のe値。
5.2 AC電圧の測定tage(V〜)
- Set the rotary switch to the desired V~ range (e.g., 200V for measuring up to 200V AC).
- テストリード線をAC電圧に接続しますtag電子ソース。
- 巻を読むtagディスプレイ上のe値。
5.3 直流電流の測定(A=)
- 重要: マルチメーターを直列に接続する前に、回路の電源を切断してください。
- Set the rotary switch to the desired A= range (e.g., 200mA or 10A). Remember to move the red lead to the 10A jack for high current.
- 電流を測定する回路を開きます。
- Connect the multimeter in series with the circuit, ensuring the current flows through the multimeter.
- 回路に電力を供給し、ディスプレイ上の電流値を読み取ります。
5.4 抵抗(Ω)の測定
- 重要: 抵抗を測定する前に、回路の電源が切断され、すべてのコンデンサが放電されていることを確認してください。
- Set the rotary switch to the desired Ω 範囲。
- 測定するコンポーネントにテスト リード線を接続します。
- ディスプレイの抵抗値を読み取ります。
5.5 ダイオードテスト(→|)
- 重要: ダイオードが回路から切断されていることを確認してください。
- ロータリースイッチをに設定します ダイオード試験 位置。
- 赤いテストリードをダイオードのアノードに、黒いテストリードをカソードに接続します。ディスプレイには順方向電圧が表示されます。tageドロップ。
- リード線を逆に接続してください。正常なダイオードの場合、ディスプレイに「OL」(オープンループ)と表示されるはずです。
5.6 導通テスト())))
- 重要: 回路の電源が切れていることを確認してください。
- ロータリースイッチをに設定します 導通テスト 位置。
- テスト対象のコンポーネントまたはワイヤにテスト リード線を接続します。
- 抵抗値が約30Ωを下回ると、ブザーが鳴り、導通を示します。ディスプレイには抵抗値も表示されます。
5.7 Battery Test (1.5V/9V)
- ロータリースイッチをに設定します 1.5V or 9V battery test position, corresponding to the battery type.
- 赤いテストリードをバッテリーのプラス (+) 端子に接続し、黒いテストリードをマイナス (-) 端子に接続します。
- バッテリーの巻を読むtagディスプレイ上のe。
5.8データ保持
「HOLD」ボタンを押すと、ディスプレイ上の現在の測定値が固定されます。もう一度押すとホールド機能が解除され、測定値の表示が再開されます。
6. 仕様
| 測定 | 範囲 | 解決 |
|---|---|---|
| DCVol。tage | 200mV / 2V / 20V / 200V / 600V | 100µV / 1mV / 10mV / 100mV / 1V |
| ACVol。tage | 200V / 600V | 100mV/1V |
| 直流電流 | 2mA / 20mA / 200mA / 10A | 1µA / 10µA / 100µA / 10mA |
| 抵抗 | 200Ω / 2kΩ / 20kΩ / 200kΩ / 2MΩ | 0.1Ω / 1Ω / 10Ω / 100Ω / 1kΩ |
| 導通テスト | Buzzer sounds at <30Ω | — |
| ダイオード試験 | フォワードvoltageドロップ | — |
| バッテリーテスト | 1.5V / 9V | — |
一般仕様
- 画面: 2000カウント
- 電源: 2V AAA電池1.5本
- 寸法: 150mm X 74mm X 48mm(5.9 "×2.9"×1.7 ")
- 重さ: 220g(0.48ポンド)
- 安全性評価: CATIII 600V
- 材料: アクリロニトリルブタジエンスチレン(ABS)
- 色: 青

Image: A table detailing manual ranging specifications for various Mastech digital multimeters, including the MS8301A, showing display counts, safety ratings, and measurement capabilities.
7. メンテナンス
7.1 電池の交換
When the battery low indicator appears on the display, replace the batteries immediately to ensure accurate readings. Follow the steps outlined in Section 4.1 for battery installation.
7.2 クリーニング
広告でケースを拭くamp 布と中性洗剤を使用してください。研磨剤や溶剤は使用しないでください。マルチメーターを使用する前に、完全に乾いていることを確認してください。
7.3 ストレージ
If the multimeter is not used for an extended period, remove the batteries to prevent leakage and damage to the device. Store in a cool, dry place away from direct sunlight.
8。 トラブルシューティング
| 問題 | 考えられる原因 | 解決 |
|---|---|---|
| 画面が表示されない、または画面が暗い | Dead or low batteries; incorrect battery polarity. | 電池を交換します。電池の向きを確認してください。 |
| 「OL」(オーバーロード)表示 | Measurement exceeds selected range; open circuit. | Select a higher range; check for open circuit in the component or leads. |
| 誤った測定値 | Incorrect function selected; poor test lead connection; damaged test leads. | Verify function switch position; ensure secure lead connection; inspect and replace damaged leads. |
| 導通ビープ音なし | Open circuit; resistance too high. | Check for breaks in the circuit; ensure resistance is below 30Ω. |
9. 保証とサポート
Mastech products are designed for reliability and performance. For specific warranty information, please refer to the warranty card included with your product or contact Mastech customer support. Keep your purchase receipt as proof of purchase.
For technical support or service inquiries, please visit the official Mastech webサイトをご覧いただくか、認定サービス センターにお問い合わせください。