1. はじめに
This manual provides detailed instructions for the installation, operation, and maintenance of your Elprico H310 LGA 1151 Micro ATX DDR4 Motherboard. Please read this manual thoroughly before proceeding with installation to ensure proper setup and optimal performance.
2. 安全情報
- コンポーネントの取り付けまたは取り外しを行う前に、必ず壁のコンセントから電源を抜いてください。
- 静電気放電 (ESD) によるコンポーネントの損傷を防ぐために、静電気防止リスト ストラップを着用してください。
- 敏感な部分に触れないように、コンポーネントの端を持って取り扱ってください。
- 過熱を防ぐために、PC ケース内の換気が適切であることを確認してください。
- マザーボードを湿気や極端な温度から遠ざけてください。
3.製品オーバーview
The Elprico H310 LGA 1151 Micro ATX DDR4 Motherboard is designed for desktop computers, supporting Intel 8th and 9th Generation Core processors. It features a stable power supply, high-speed H310 chipset, and rich expansion ports for versatile computing tasks.
主な特徴:
- 幅広いCPU互換性: Supports LGA 1151 socket for Intel 8th and 9th Generation Core processors.
- Dual-Channel DDR4 Memory: Two DDR4 DIMM slots supporting up to 32GB of RAM with effective frequencies of 1066/1333/1600 MHz.
- 安定した電源供給: Features a three-phase power design with all solid-state capacitors and 24+8 pin power connectors for reliable operation.
- 高速チップセット: Utilizes the Intel H310 chipset for stable and reliable performance.
- 統合グラフィックス: Equipped with an integrated graphics processor and multiple display outputs (DVI, HDMI compatible, VGA).
- Rich Expansion Ports: Includes SATA 6Gb/s ports, NVME M.2 slot, PCIe X16 slot, PCIe X1 slot, USB 3.0/2.0, PS/2, RJ45 1000Mbps, and audio ports.
マザーボードのレイアウト:
Below are images illustrating the various components and ports on the motherboard.

図3.1: トップダウン view of the motherboard, showing the LGA 1151 CPU socket and the Intel H310 chipset area.
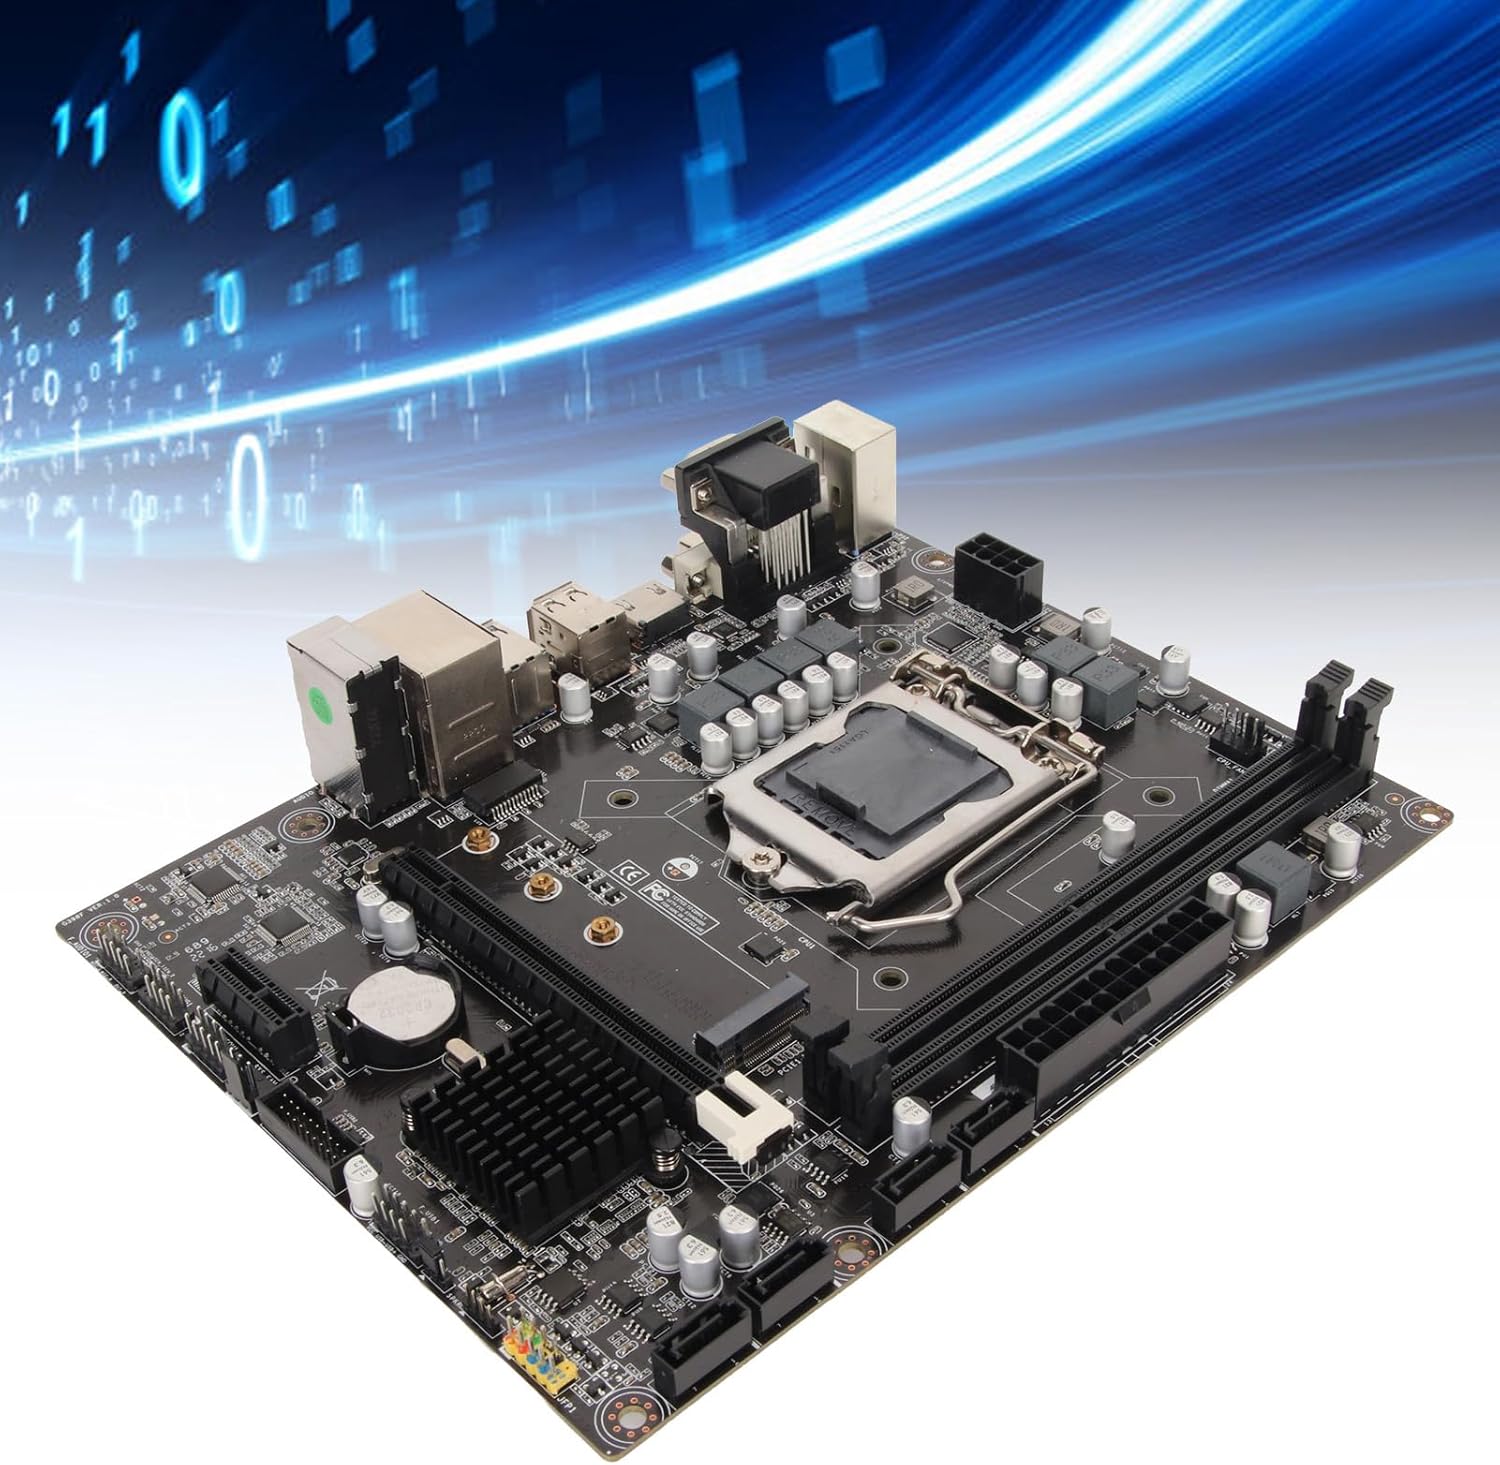
Figure 3.2: Component diagram highlighting the CPU socket, DDR4 memory slots, H310 chipset, and SATA 3.0 (6Gb/s) ports.
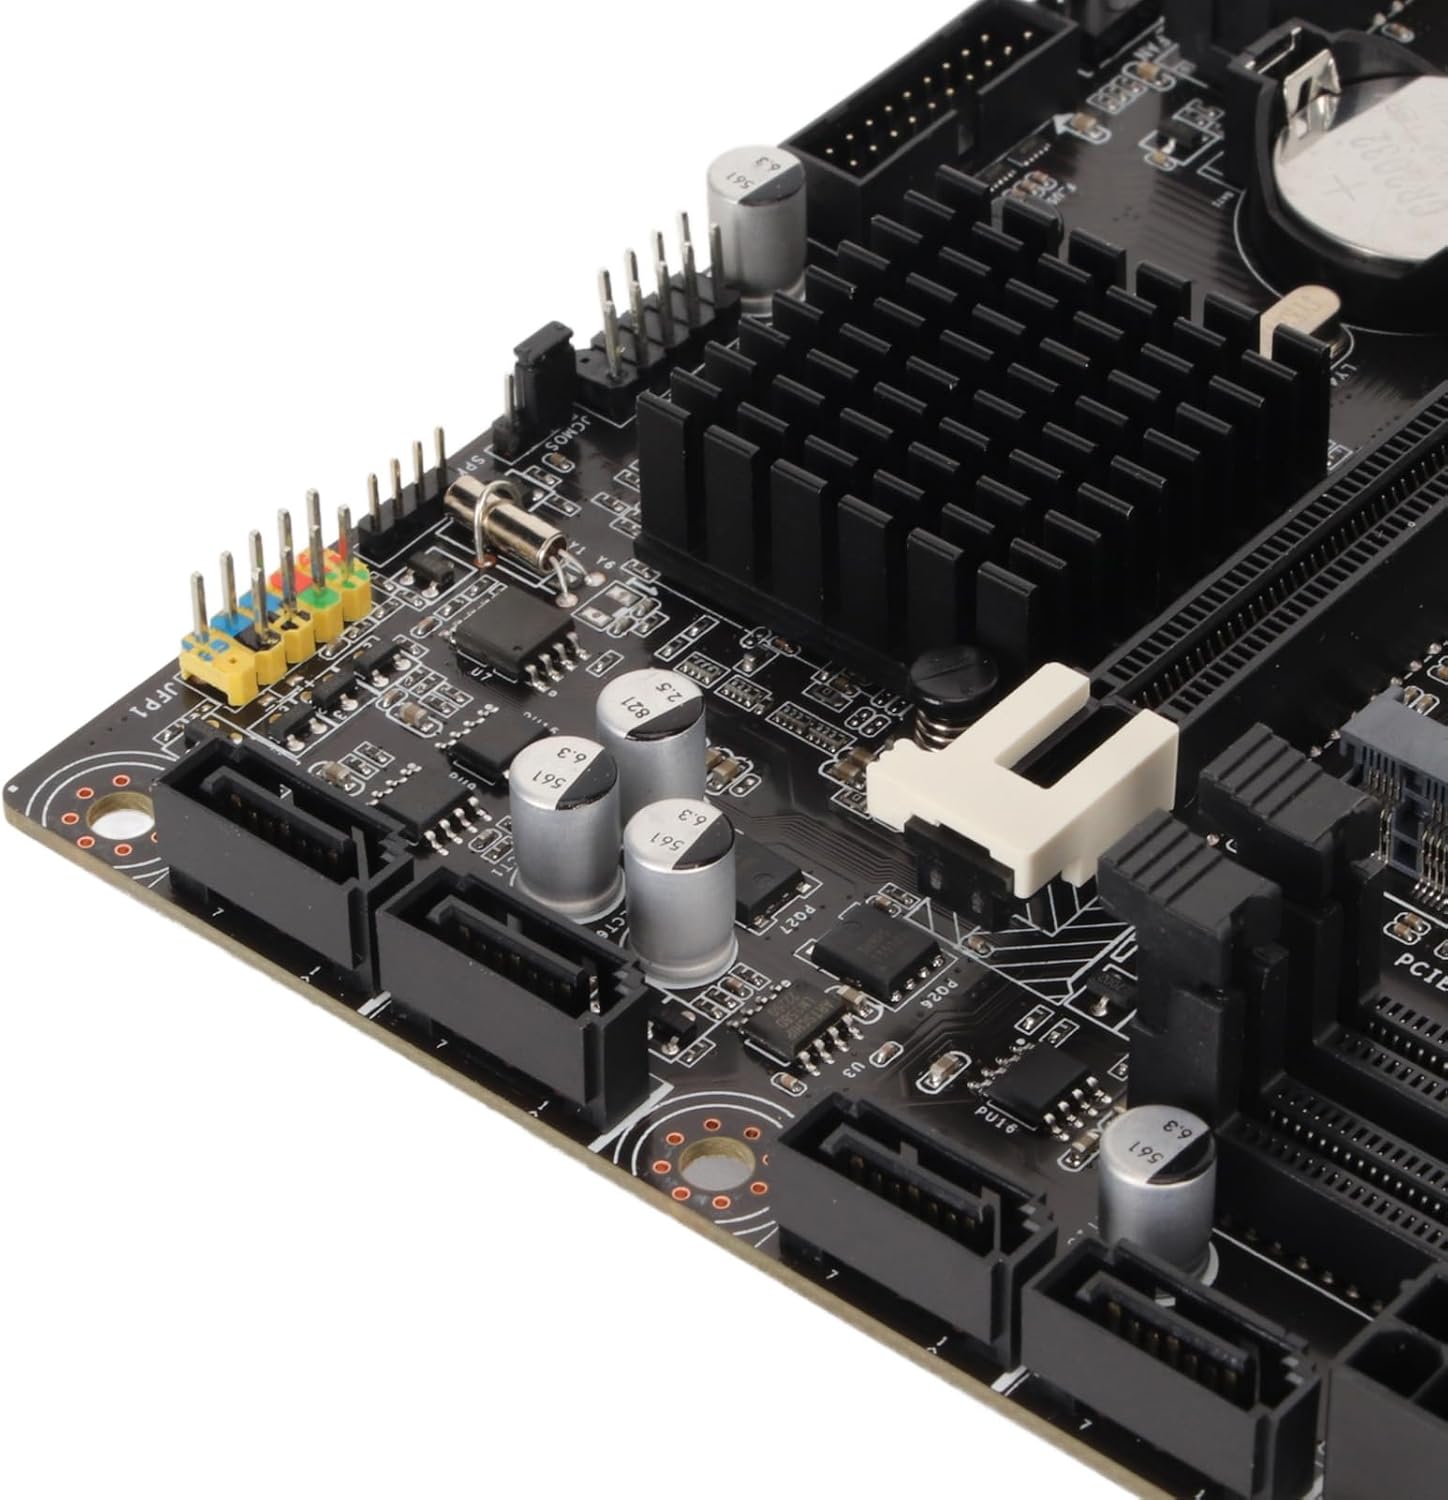
図3.3:詳細 view of the rear I/O panel, featuring DVI, HDMI, VGA, USB 2.0/3.0, LAN, and audio jacks.
4. インストールガイド(セットアップ)
マザーボードとそのコンポーネントをインストールするには、次の手順に従ってください。
4.1 CPUの取り付け
- マザーボード上の LGA 1151 CPU ソケットを見つけます。
- ロード レバーをゆっくりと押し下げて横に引いて、CPU ソケット カバーを開きます。
- Align the triangular mark on your Intel LGA 1151 processor with the corresponding mark on the socket.
- 無理に力を入れずに、CPU をソケットに慎重に挿入します。
- ソケット カバーを閉じ、ロード レバーをカチッと音がするまで元の位置に戻します。

Figure 4.1: CPU socket area, showing the mechanism for processor installation.
4.2 RAMのインストール
- 2 つの DDR4 DIMM スロットを見つけます。
- メモリスロットの両端のクリップを開きます。
- DDR4 メモリ モジュールのノッチを DIMM スロットのキーに合わせます。
- クリップがカチッと音がするまで、メモリ モジュールをスロットにしっかりと挿入します。
4.3 ストレージのインストール
The motherboard supports both SATA and NVMe M.2 storage devices.
SATAドライブ:
- SATA データ ケーブルの一方の端をマザーボード上の SATA 6Gb/s ポートに接続します。
- SATA データ ケーブルのもう一方の端を SATA HDD/SSD に接続します。
- 電源装置から SATA HDD/SSD に SATA 電源ケーブルを接続します。
NVMe M.2 SSD:
- マザーボード上の M.2 スロットを見つけます。
- M.2 スタンドオフ ネジを取り外します。
- Insert the NVMe M.2 SSD into the slot at a 30-degree angle.
- SSD をゆっくりと押し下げ、M.2 スタンドオフ ネジで固定します。
4.4 拡張カードの取り付け (PCIe)
- Locate the PCIe X16 or PCIe X1 slots.
- PC ケースから対応する拡張スロット カバーを取り外します。
- Align your expansion card (e.g., graphics card) with the chosen PCIe slot.
- カードがスロットに完全に収まるまでしっかりと押し下げます。
- カードをネジでケースに固定します。
4.5電源接続
- 電源装置の 24 ピン ATX 電源コネクタをマザーボード上のメイン 24 ピン電源ソケットに接続します。
- 電源装置の 8 ピン ATX 12V 電源コネクタを CPU の近くにある 8 ピン電源ソケットに接続します。
4.6 フロントパネルの接続
Connect the cables from your PC case's front panel (USB, audio, power button, reset button, LED indicators) to the corresponding headers on the motherboard. Refer to the motherboard diagram for exact header locations.
4.7 マザーボードの取り付け
- Install standoffs in your PC case according to the Micro ATX form factor.
- Carefully place the motherboard onto the standoffs, ensuring the rear I/O ports align with the case's I/O shield.
- マザーボードをネジで固定します。

図4.2: 全般 view of the motherboard, illustrating its Micro ATX form factor and component placement.
5. 操作手順
5.1 最初の起動
After completing all hardware installations, connect your monitor, keyboard, and mouse. Power on your system. The system should display the BIOS/UEFI splash screen.
5.2 BIOS/UEFIセットアップ
BIOS/UEFIセットアップユーティリティに入るには、 削除 or F2 key repeatedly during the initial boot sequence. Here you can configure boot order, system time, and other advanced settings.
5.3 ドライバのインストール
After installing your operating system, install the necessary drivers for the chipset, integrated graphics, LAN, and audio. These drivers are typically provided on a support CD or can be downloaded from the manufacturer's webサイト。
6. メンテナンス
6.1 クリーニング
Regularly clean your PC case and motherboard to prevent dust buildup, which can lead to overheating. Use compressed air to remove dust from fans, heatsinks, and other components. Ensure the system is powered off and unplugged before cleaning.
6.2 BIOS アップデート
定期的にメーカーの website for BIOS/UEFI updates. Updates can improve system stability, add support for new hardware, or fix bugs. Follow the provided instructions carefully when updating the BIOS to avoid system damage.
7。 トラブルシューティング
7.1 よくある問題
- 電源なし: Check all power connections (24-pin, 8-pin CPU, GPU, SATA) and ensure the power supply is switched on.
- 表示なし: Verify monitor connection, ensure graphics card (if dedicated) is properly seated and powered, and try reseating RAM modules.
- システムの不安定性/クラッシュ: Check CPU and GPU temperatures, ensure RAM is correctly installed, and verify driver versions.
- ブートデバイスが見つかりません: Check SATA/M.2 connections, verify boot order in BIOS/UEFI, and ensure the operating system is properly installed on the drive.
7.2 エラーコード
If your motherboard has a diagnostic LED display or emits beep codes, consult the motherboard's specific documentation (if available) for the meaning of these codes. Common beep codes often indicate issues with RAM, CPU, or graphics.
8. 仕様
| 特徴 | 仕様 |
|---|---|
| ブランド | エルプリコ |
| モデル名 | Elpricop91byt60k7 |
| CPUソケット | 1151 号線 |
| 互換性のあるプロセッサ | Intel 8th Generation, 9th Generation Core Processors |
| チップセットタイプ | インテル H310 |
| RAMメモリ技術 | DDR4 |
| メモリスロット | 2 (Dual-Channel) |
| Maximum RAM Size | 32ギガバイト |
| メモリクロック速度 | 1600 MHz (Effective) |
| 対応デバイス | デスクトップコンピュータ |
| USBポート合計 | 14 (Various types, including USB 3.0/2.0) |
| フォームファクター | Micro ATX (Approx. 21.5 x 17 cm / 8.5 x 6.7 inches) |
| 内蔵バッテリー | CR2032(240mAh) |
9. 保証とサポート
9.1 メーカー保証
この製品には、 製造上の欠陥に対する1年間の保証. Please retain your proof of purchase for warranty claims. For specific terms and conditions, refer to the warranty information provided at the time of purchase or contact the seller.
9.2 テクニカルサポート
For technical assistance, troubleshooting, or further inquiries, please contact your retailer or the manufacturer's support channels. Information regarding spare parts availability and software updates is currently unavailable.