1. はじめにview
The Neoteck 0-1" Digital Dial Indicator Table Saw Gauge is a precision tool designed for accurate alignment and calibration of various workshop machinery, including table saws, band saws, and drill presses. It ensures your equipment operates at its best condition, providing precise measurements for critical adjustments.
Key features include a professional design suitable for standard miter grooves (3/8 inch x 3/4 inch), an accurate digital dial indicator with a 0-1 inch (0-25.4 mm) measuring range and high resolution up to 0.0005 inch (0.01 mm), and durable CNC-machined anodized aluminum bars. The indicator offers switchable inch/mm units and a zero-setting function for convenient use.

Figure 1.1: Neoteck Digital Dial Indicator Table Saw Gauge with 3/4" (19mm) Width Aluminum Alloy Bars, highlighting its range and resolution.
ビデオ1.1: オーバーview of the Neoteck 0-1" Digital Table Saw Gauge, demonstrating its features and applications.
2. 箱の中身
Your Neoteck Digital Table Saw Gauge Set includes the following components:
- デジタルダイヤルインジケーター x 1
- 1 x裏表紙
- プラムブロッサムナッツ 2個
- スプリングプランジャー2個
- 六角穴付きナット2個
- 六角ソケットレンチ2本
- 2 x Metal Shop Bars
- ユーザーマニュアル x 1
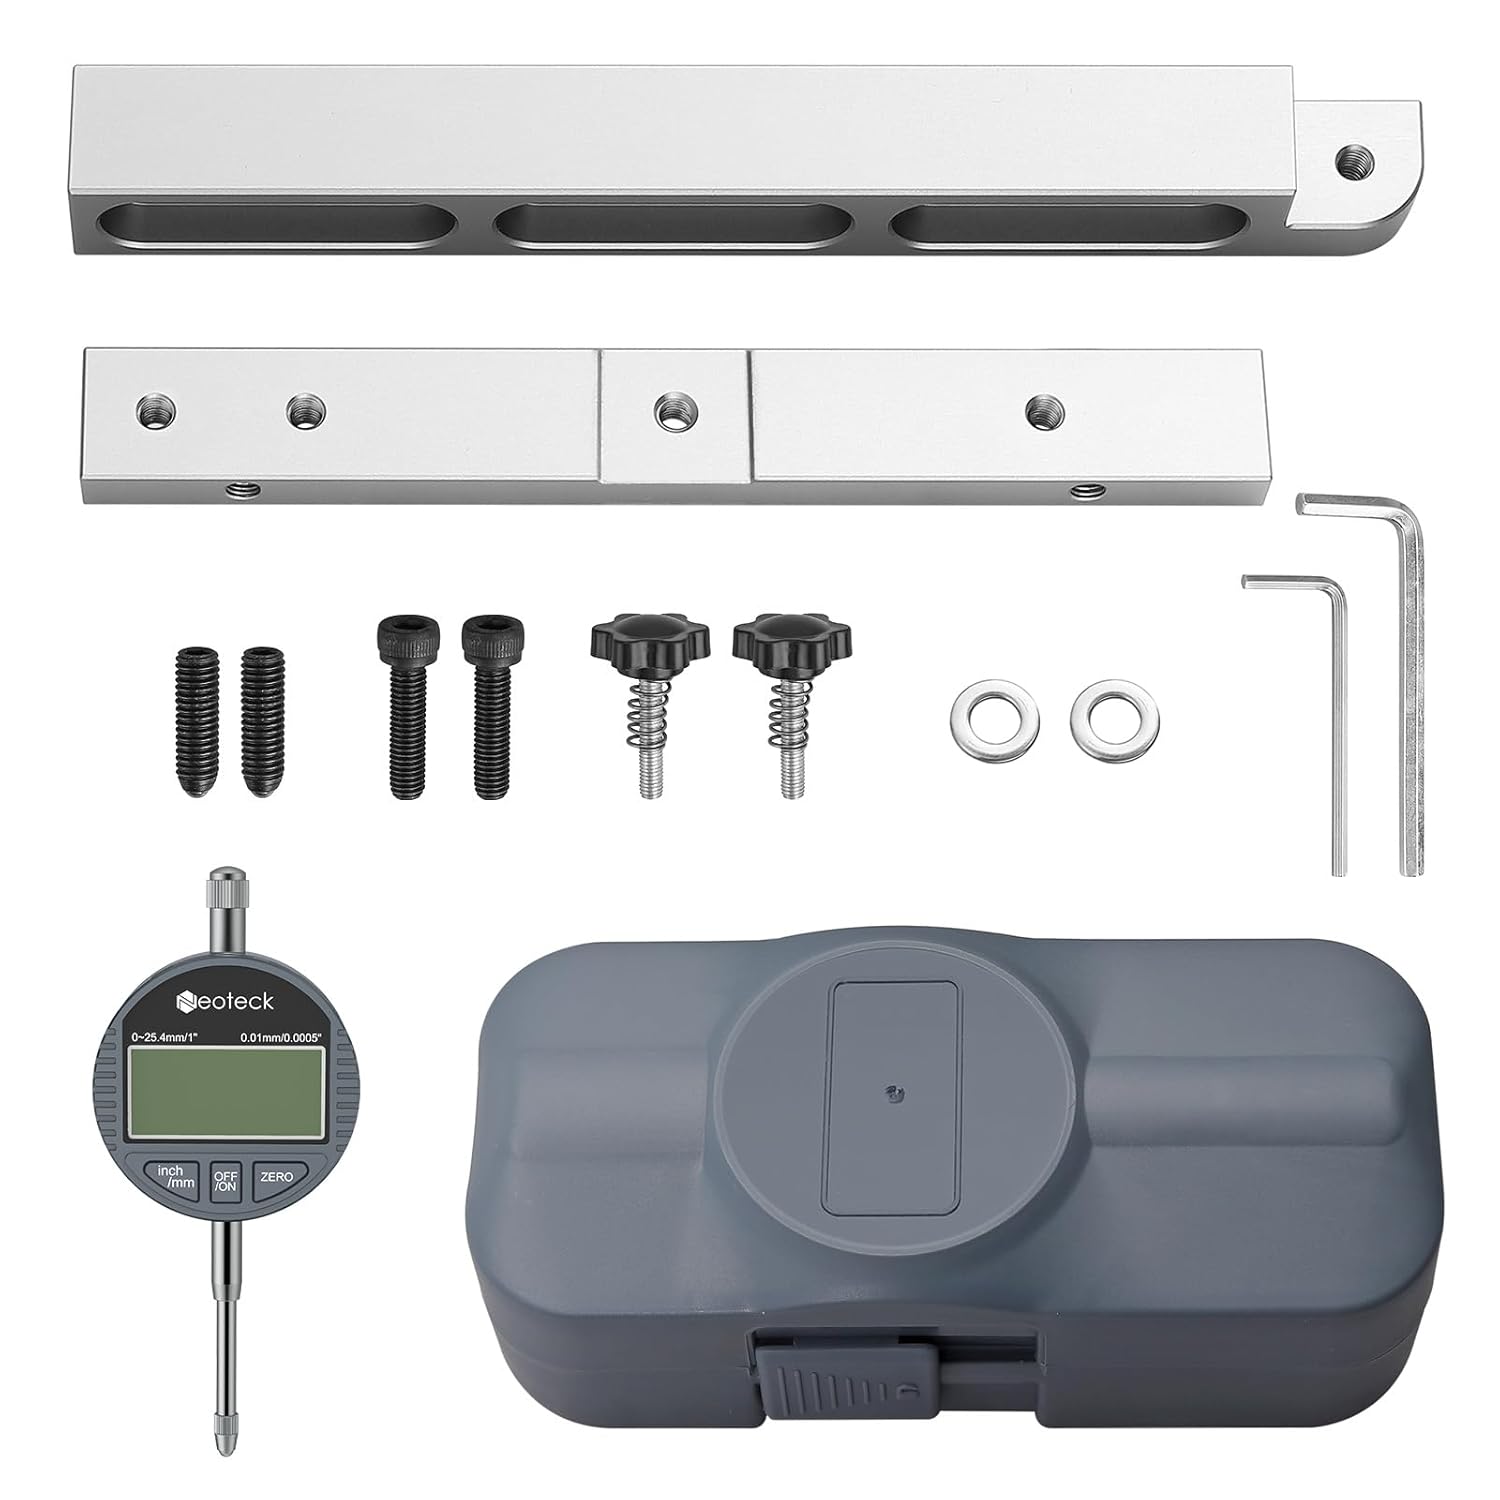
Figure 2.1: All components included in the Neoteck Digital Dial Indicator Table Saw Gauge Set.
Video 2.1: An unboxing video demonstrating the contents of the Neoteck table saw gauge package.
3. セットアップ手順
Neoteck デジタル ダイヤル インジケーター テーブルソー ゲージを組み立てて使用できるように準備するには、次の手順に従ってください。
- Assemble the Bars: Use the included hexagon socket wrench to set up the two aluminum bars, forming a cross-frame structure. Ensure they are securely fastened.
- スプリングプランジャーを調整します: Tighten the plum blossom nuts to adjust the spring plungers. This allows you to change the width and height of the chamfered groove rod, ensuring a snug fit in miter slots of 3/4" (19mm) or more. Adjust via screws for optimal fit if the groove width exceeds 3/4" (19mm).
- デジタルインジケーターのインストール: Attach the digital dial indicator to the end of the assembled bar using the provided back cover and hexagon socket nut. Ensure it is firmly secured.
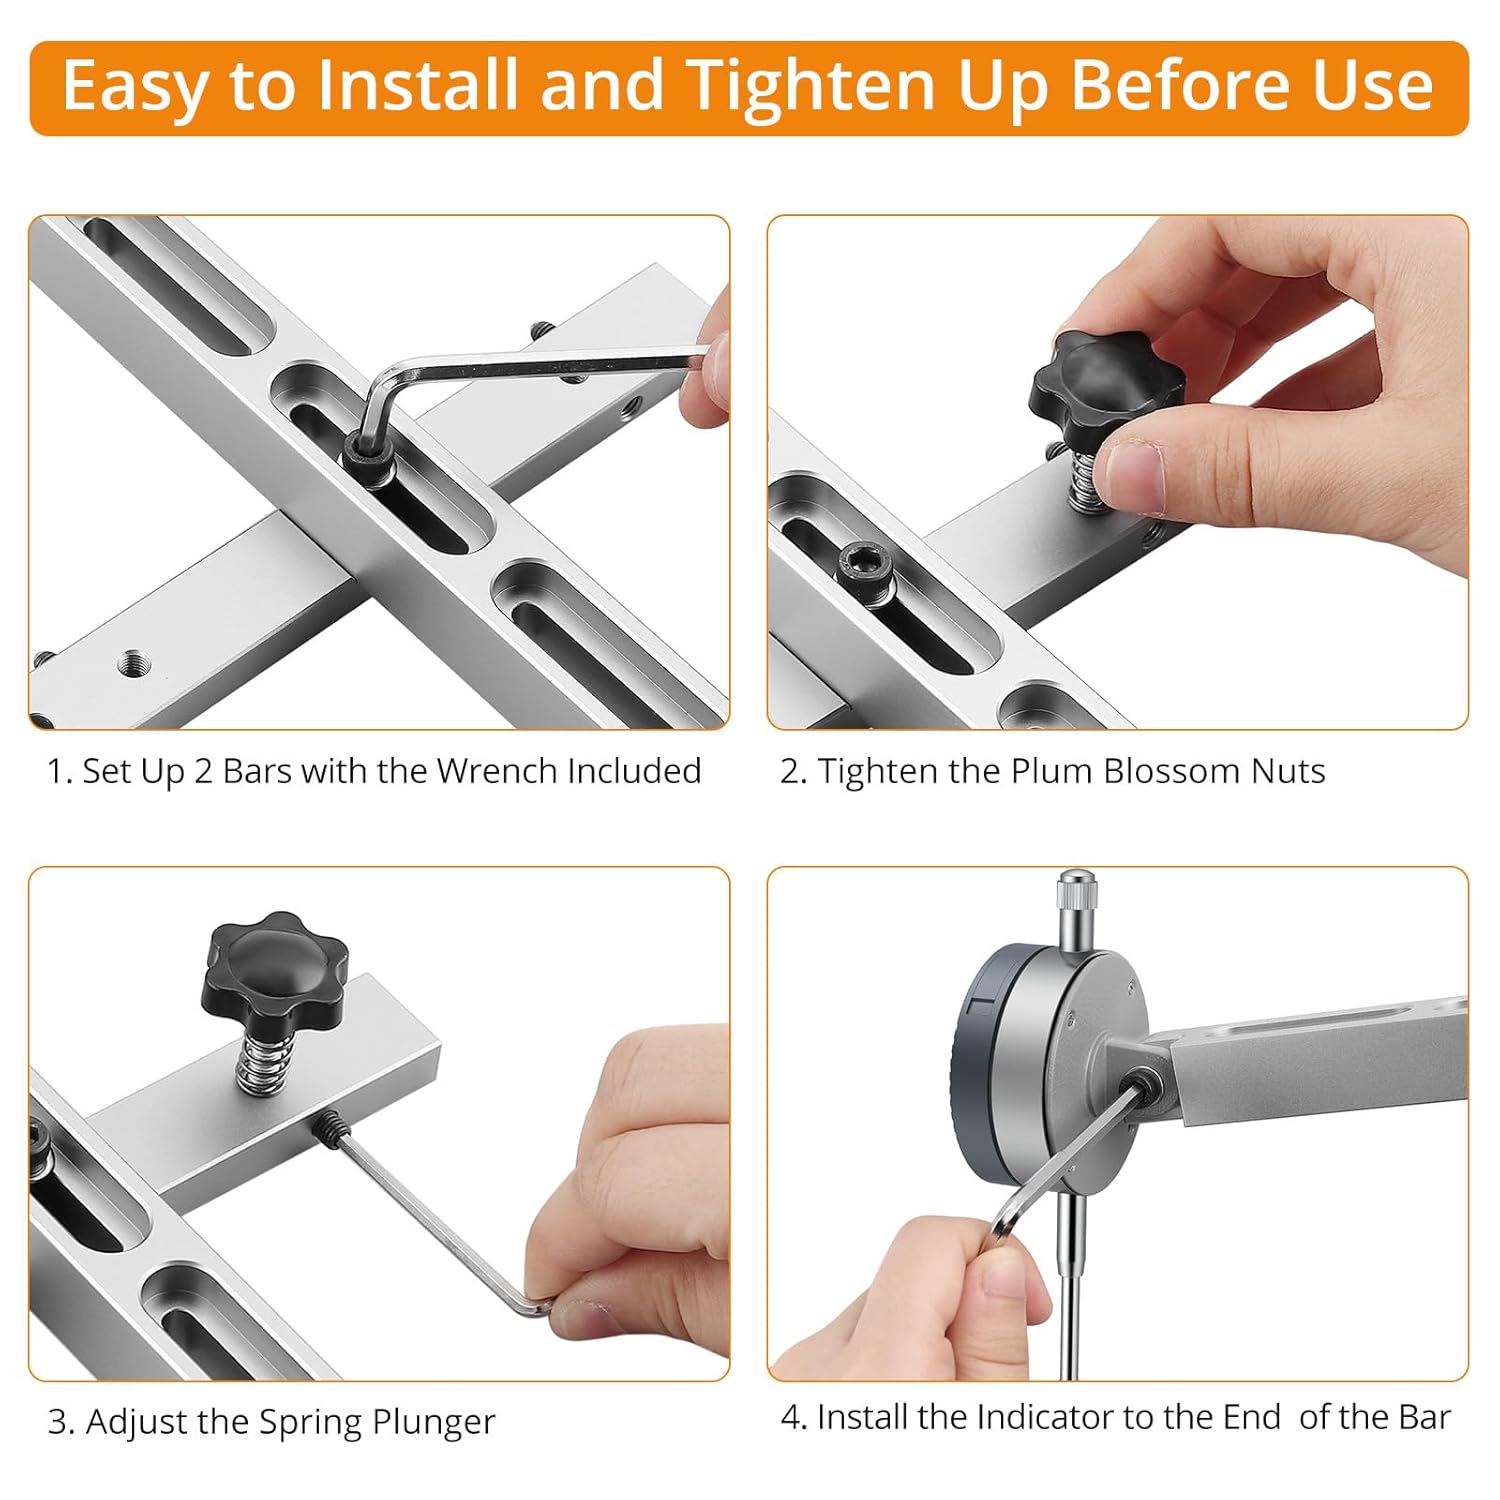
Figure 3.1: Visual guide for installing the bars, tightening nuts, adjusting spring plungers, and installing the indicator.

Figure 3.2: Detail of the built-in spring screw and adjustable nuts for customizing the gauge's fit.
Video 3.1: A demonstration of how to assemble and set up the digital table saw gauge.
4. 操作手順
The digital dial indicator provides precise measurements for various alignment tasks:
- 電源オン/オフ: Press the 'ON/OFF' button to turn the indicator on or off.
- 単位変換: Press the 'inch/mm' button to switch between imperial (inches) and metric (millimeters) units.
- ゼロ設定: Press the 'ZERO' button to reset the display to zero at any point. This allows for relative measurements.
- Checking Saw Blade Alignment: Insert the assembled gauge into your table saw's miter slot. Position the indicator's contact point against the saw blade. Gently move the gauge along the miter slot, observing the digital display for any variations in measurement. This indicates blade run-out or misalignment.
- Checking Fence Straightness: Place the gauge against your table saw fence and move it along the fence's length to check for straightness and parallelism to the blade.
- その他の用途: The gauge can also be used to check drill chuck run-out, jointer depth of cut, and other precise measurements for various workshop machines.

Figure 4.1: The 0-1" / 0-25.4 mm indicator with 0.0005" / 0.01mm accuracy, showing convenient ports, contact point type, and anti-dust cap.

Figure 4.2: Demonstrations of checking saw blade alignment and run-out, fence straightness, drill chuck run-out, and jointer depth of cut.
Video 4.1: A demonstration of the digital indicator's on/off, inch/mm conversion, and zero-setting functions.
Video 4.2: A demonstration of how to use the table saw gauge to check blade alignment.
5. 仕様
| 属性 | 価値 |
|---|---|
| ブランド | ネオテック |
| モデル番号 | WT392 |
| 材料 | アルミニウム |
| 製品寸法 | 長さ4.8インチ x 幅0.75インチ |
| 範囲 | 0-1 Inches (0-25.4 mm) |
| 測定精度 | 0.0005インチ(0.01 mm) |
| 電池の数 | LR44 1個(付属) |
| アイテム重量 | 1.3ポンド |
| 初回利用可能日 | 30年2022月XNUMX日 |
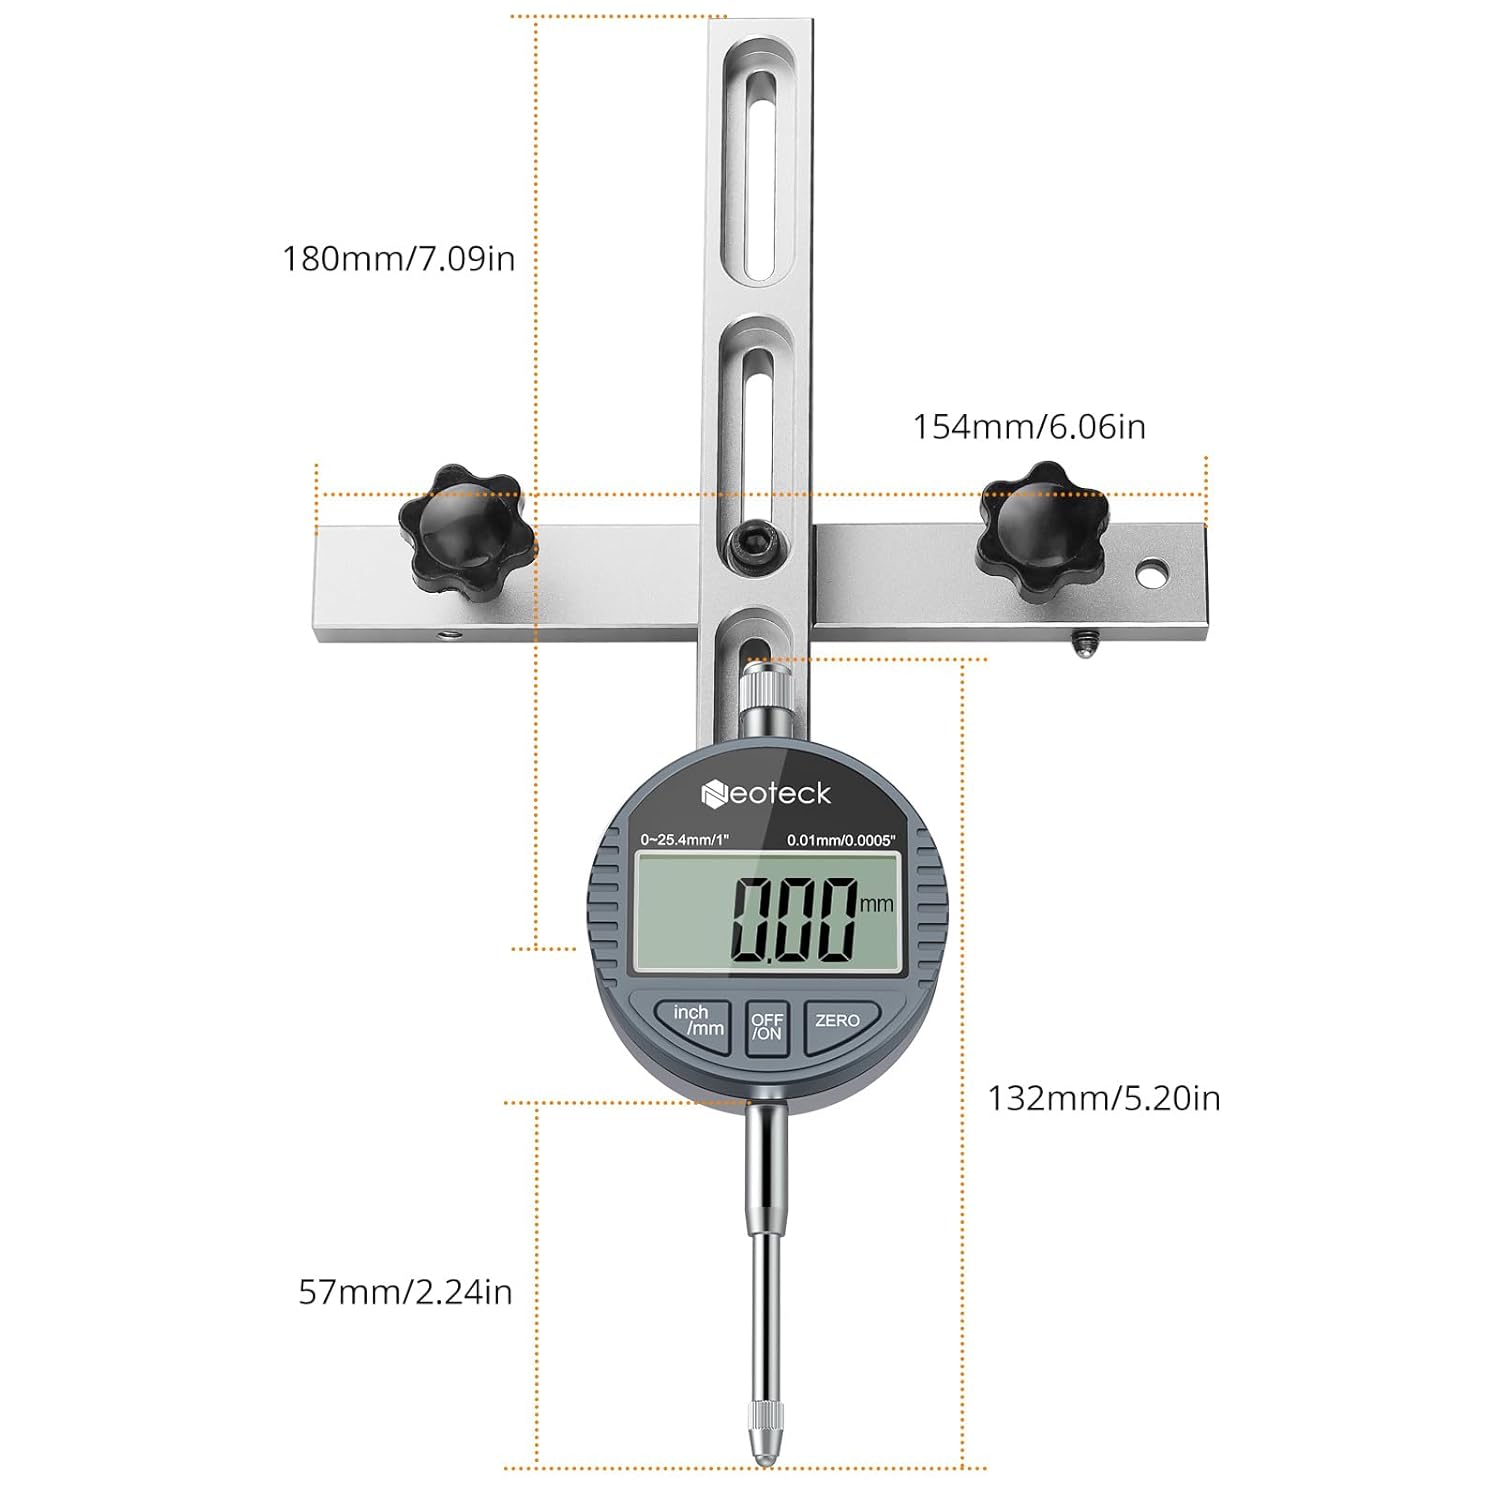
Figure 5.1: Detailed dimensions of the Neoteck Digital Dial Indicator Table Saw Gauge components.
6. メンテナンス
To ensure the longevity and accuracy of your Neoteck Digital Dial Indicator Table Saw Gauge, follow these maintenance guidelines:
- クリーニング: Regularly wipe down the gauge and its components with a soft, dry cloth. Avoid using harsh chemicals or abrasive materials that could damage the finish or electronic components.
- ストレージ: Store the gauge in its protective case when not in use to prevent dust accumulation and physical damage. Keep it in a dry environment away from extreme temperatures.
- バッテリー交換: The digital indicator requires one LR44 battery. Replace the battery when the display becomes dim or unresponsive. Refer to Figure 4.1 for the battery compartment location.
- 取り扱いにはご注意ください: Avoid dropping or subjecting the gauge to strong impacts, as this can affect its calibration and accuracy.
7。 トラブルシューティング
If you encounter issues with your Neoteck Digital Dial Indicator Table Saw Gauge, consider the following:
- 不正確な読み取り:
- Ensure the contact point is clean and free of debris.
- Verify that the gauge is securely installed in the miter slot and the indicator is firmly attached.
- Check for any physical damage to the indicator or bars.
- Perform a zero-setting calibration before taking measurements.
- ディスプレイが動作しない:
- バッテリーが正しく取り付けられているか確認してください。
- LR44電池を新しいものと交換してください。
- Ensure the 'ON/OFF' button is pressed firmly.
- マイタースロットの緩いフィット:
- Adjust the plum blossom nuts and spring plungers to achieve a tighter fit.
- Confirm your miter slot width is 3/4" (19mm) or more, as specified.
さらにサポートが必要な場合は、Neoteck カスタマー サポートにお問い合わせください。
8. 保証とサポート
Neoteck products are designed for quality and reliability. For information regarding warranty coverage, product support, or to report any issues, please refer to the contact information provided with your purchase or visit the official Neoteck webサイトでご確認ください。保証請求の際は購入証明として領収書を保管してください。