
LUXMAN LXV-OT6
LUXMAN 真空管ハーモナイザー LXV-OT6 ユーザーマニュアル
Model: LXV-OT6
1. はじめに
Thank you for choosing the LUXMAN Vacuum Tube Harmonizer LXV-OT6. This device is designed to enhance your audio experience by introducing the warm, rich sound characteristic of vacuum tubes. It processes audio signals to add a subtle, pleasing even-order harmonic distortion, making digital audio sources sound more natural and engaging.
This product is an assembled kit version of the LXV-OT6 harmonizer, originally released as an appendix to a MOOK (magazine-book) by Ongaku no Tomo Sha. This manual provides essential information for its safe and effective use.
2. 安全情報
デバイスを操作する前に、すべての安全に関する指示をよくお読みください。
- 電源: Use only the specified AC100V 50/60Hz power source. Ensure the power cable is securely connected and not damaged.
- 換気: Do not block ventilation openings. Ensure adequate space around the unit for proper heat dissipation. Operating the unit in an enclosed space can lead to overheating.
- 水分と液体: Keep the unit away from water, moisture, and high humidity. Do not place liquid-filled objects on or near the unit. In case of liquid spillage, immediately disconnect power and consult a qualified technician.
- 異物: Do not insert any foreign objects into the unit's openings. This can cause electric shock or damage.
- 真空管: The vacuum tube operates at high temperatures. Avoid touching the vacuum tube during operation or immediately after turning off the unit. Allow sufficient time for cooling before handling.
- 分解: Do not attempt to disassemble or modify the unit. There are no user-serviceable parts inside, except for the vacuum tube replacement as described in this manual. Unauthorized disassembly voids the warranty and poses a risk of electric shock.
- 配置: Place the unit on a stable, level surface. Avoid placing it in direct sunlight, near heat sources, or in areas with excessive dust or vibrations.
3.製品オーバーview およびコンポーネント
The LXV-OT6 Vacuum Tube Harmonizer is a compact audio device designed to enrich your sound. Below are the key components and their functions.
3.1フロントパネル

図3.1: 前面 view of the LXV-OT6 Harmonizer.
This image shows the front of the harmonizer. On the left, there is a toggle switch labeled "POWER" for turning the unit on and off. To the right, a rectangular window allows visibility of the internal vacuum tube, which glows orange when the unit is powered on. The top surface has "Stereo Luxman VACUUM TUBE HARMONIZED AMPLIFIER LXV-OT6" printed on it.
- 電源スイッチ: A toggle switch located on the front panel to turn the unit ON or OFF.
- Vacuum Tube Window: A transparent window allowing visual confirmation of the vacuum tube's operation and glow.
3.2 背面パネル
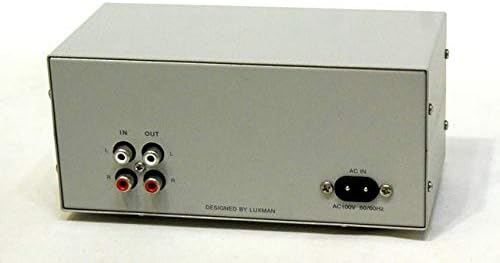
図3.2:背面 view of the LXV-OT6 Harmonizer.
This image displays the rear panel of the harmonizer. On the left side, there are two pairs of RCA jacks: "IN" (input) and "OUT" (output), each with red (right channel) and white (left channel) connectors. On the right side, there is a standard IEC C8 power inlet labeled "AC IN" with "AC100V 50/60Hz" printed below it. The text "DESIGNED BY LUXMAN" is visible at the bottom center.
- IN (Input) Terminals: RCA jacks (Left/Right) for connecting your audio source (e.g., CD player, PC sound card, DAC).
- OUT (Output) Terminals: RCA jacks (Left/Right) for connecting to your ampスピーカーまたはパワードスピーカー。
- AC IN (Power Inlet): For connecting the provided AC power cable.
3.3付属のアクセサリ

Figure 3.3: LXV-OT6 Harmonizer and accessories.
This image shows the complete package. The assembled LXV-OT6 harmonizer unit is visible in the foreground. To its left, a Japanese magazine/instruction manual titled "快音!真空管サウンドに癒やされる" (Pleasant Sound! Healed by Vacuum Tube Sound) is displayed. To the right of the harmonizer, a black AC power cable with a two-prong plug is shown.
- LXV-OT6 Vacuum Tube Harmonizer Unit (assembled)
- AC電源ケーブル
- Original Japanese MOOK/Instruction Manual (for reference)
4. セットアップ
Follow these steps to set up your LXV-OT6 Vacuum Tube Harmonizer:
- 配置: Choose a stable, flat surface for the harmonizer, ensuring good ventilation around the unit. Keep it away from direct sunlight, heat sources, and strong magnetic fields.
- オーディオソースを接続: Using RCA audio cables (not included), connect the audio output of your source device (e.g., CD player, PC sound card, DAC) to the "IN" (Input) terminals on the rear panel of the LXV-OT6. Ensure left (white) and right (red) channels are correctly matched.
- 接続する Amp講演者: Using another set of RCA audio cables (not included), connect the "OUT" (Output) terminals on the rear panel of the LXV-OT6 to an available input on your amplifier, receiver, or powered speakers. Again, ensure left and right channels are correctly matched.
- 接続電源: Insert the provided AC power cable into the "AC IN" inlet on the rear panel of the LXV-OT6. Then, plug the other end of the power cable into a standard AC100V 50/60Hz wall outlet.
- 初期チェック: Before powering on, ensure all connections are secure and correct. Make sure your amplifier's volume is set to a low level.
5. 操作
Operating the LXV-OT6 is straightforward:
- 電源オン: Flip the "POWER" toggle switch on the front panel to the ON position. The vacuum tube inside the unit will begin to glow, indicating that the unit is powered on.
- ウォームアップ時間: Allow approximately 30 seconds to 1 minute for the vacuum tube to warm up and stabilize. During this time, you may not hear sound or the sound quality may not be optimal.
- オーディオを再生: 接続されたソースデバイスからのオーディオの再生を開始します。
- 音量を調整: 音量を徐々に上げていきます amplifier or powered speakers to your desired listening level.
- Enjoy the Sound: The LXV-OT6 will process the audio signal, adding a subtle, warm, and rich characteristic to the sound, enhancing your listening experience. The harmonizer is designed to fix the even-order distortion rate for consistent performance.
- 電源を切る: When you are finished listening, flip the "POWER" toggle switch to the OFF position.
6. メンテナンス
Proper maintenance will ensure the longevity and optimal performance of your LXV-OT6 Harmonizer.
6.1 クリーニング
- 清掃する前に必ず電源ケーブルを外してください。
- ユニットの外側を拭くときは、柔らかく乾いた布を使用してください。
- Do not use abrasive cleaners, waxes, or solvents, as they may damage the finish.
- 液体をユニットに直接吹きかけないでください。
6.2 真空管の交換
The LXV-OT6 uses an ECC82 (12AU7) vacuum tube. While vacuum tubes have a long lifespan, they may eventually degrade or fail. Replacing the tube can restore performance or allow for sound customization with different brands of ECC82/12AU7 tubes.
Caution: Vacuum tubes can be hot. Always allow the unit to cool down completely before attempting replacement. Disconnect power before proceeding.
- 電源を切る: Ensure the unit is turned off and unplugged from the wall outlet.
- 冷却を許可します: Wait at least 15-30 minutes for the vacuum tube to cool down.
- Access Tube: The vacuum tube is typically accessible from the top or by removing the top cover (refer to the original Japanese manual for specific instructions if needed, as this is an assembled kit). Gently pull the tube straight up from its socket. Avoid wiggling it side-to-side, which can damage the pins or socket.
- 新しいチューブを挿入: Align the pins of the new ECC82/12AU7 vacuum tube with the holes in the socket. Gently push the tube straight down until it is firmly seated. Do not force it.
- 組み立て直す: If you removed a cover, reattach it securely.
- テスト: 電源を再接続してユニットをテストします。
Replacement ECC82/12AU7 tubes can be purchased from reputable audio component suppliers.
7。 トラブルシューティング
If you encounter issues with your LXV-OT6 Harmonizer, refer to the following common problems and solutions:
| 問題 | 考えられる原因 | 解決 |
|---|---|---|
| 音が出ない、または音の出力が非常に小さい。 |
|
|
| 音質が歪んだり悪かったりする。 |
|
|
| ハミング音またはブザー音。 |
|
|
| Vacuum tube not glowing. |
|
|
If the problem persists after trying these solutions, please contact your retailer or a qualified audio technician for assistance.
8. 仕様
| 特徴 | 説明 |
|---|---|
| モデル | LXV-OT6 |
| 動作原理 | Harmonized even-order distortion rate fixed |
| 真空管 | ECC82 (Chinese-made) |
| 抵抗器 | General-purpose metal film resistors 1/4W |
| Capacitors (Coupling, Power Supply, etc.) | Rubycon electrolytic capacitors |
| 入出力端子 | General-purpose RCA type |
| 消費電力 | 4W |
| 外形寸法(幅×高さ×奥行き) | 180mm x 80mm x 90mm(約7.1 x 3.1 x 3.5インチ) |
| 重さ | Approx. 800g (approx. 1.76 lbs) |
| 電力要件 | AC100V 50 / 60Hz |
9. 保証とサポート
As this product is an assembled kit, specific warranty terms may vary. Please refer to the original purchase documentation or contact the retailer from whom you acquired the unit for details regarding warranty coverage and support.
For technical inquiries or further assistance, it is recommended to consult the original Japanese MOOK/manual for detailed circuit diagrams or contact a qualified audio technician.
関連文書 - LXV-OT6
 |
Dominis Tavolino Cesare LXV Coffee Table - Assembly Instructions & Specifications Official instruction manual for the Dominis Tavolino Cesare LXV coffee table. Includes assembly steps, technical specifications, safety guidelines, product care, warranty, and disposal information. Available in multiple sizes. |
 |
Promptorium Parvulorum: A Medieval English-Latin Dictionary An Anglo-Latin dictionary compiled by Frater Galfridus Grammaticus in the 15th century, edited by Albertus Way for the Camden Society in 1865, based on medieval manuscripts. |
 |
Tabela de Preços LAPP Portugal - Abril 2026 Tabela de preços oficial da LAPP Portugal para cabos de cobre rígidos e flexíveis, cabos de alumínio e bobinas de madeira, atualizada em 7 de Abril de 2026. |
 |
Josué Sánchez Art Portfolio - Mueve Galería A comprehensive portfolio showcasing the diverse artwork of Josué Sánchez, a plastic artist from Huancayo, Peru. Featuring his expertise in mural painting, easel painting, monumental sculpture, and text illustration, with a focus on Andean cosmovision. |
 |
ピアッジオスクーターモデル生産年 ZIP、NRG、Vespa、Liberty、Typhoon、Fly などの人気モデルを含む、Piaggio スクーター モデルとその生産開始年および終了年の包括的なリスト。 |
 |
Tucano Urbano Termoscud Application List - Motorcycle & Scooter Fitment Guide Comprehensive application list for Tucano Urbano Termoscud, detailing compatible motorcycle and scooter models from various manufacturers including Aprilia, BMW, Honda, Yamaha, and more, with corresponding article numbers. |
Ask a question about this manual
Ask about setup, troubleshooting, compatibility, parts, safety, or missing instructions. Manuals+ will review the question and use this page’s manual context to help answer it.