Docooler XUH6362338938855GM
Docooler JINGSHA X99-8D3 Motherboard User Manual
Model: XUH6362338938855GM
1. はじめにview
The Docooler JINGSHA X99-8D3 is a high-performance ATX gaming motherboard designed for LGA2011 V3 processors. It features four-channel DDR3 memory support, an M.2 NVME slot for high-speed storage, and multiple PCI-E expansion slots, making it suitable for demanding computing tasks and gaming setups. This manual will guide you through the installation, configuration, and maintenance of your motherboard.
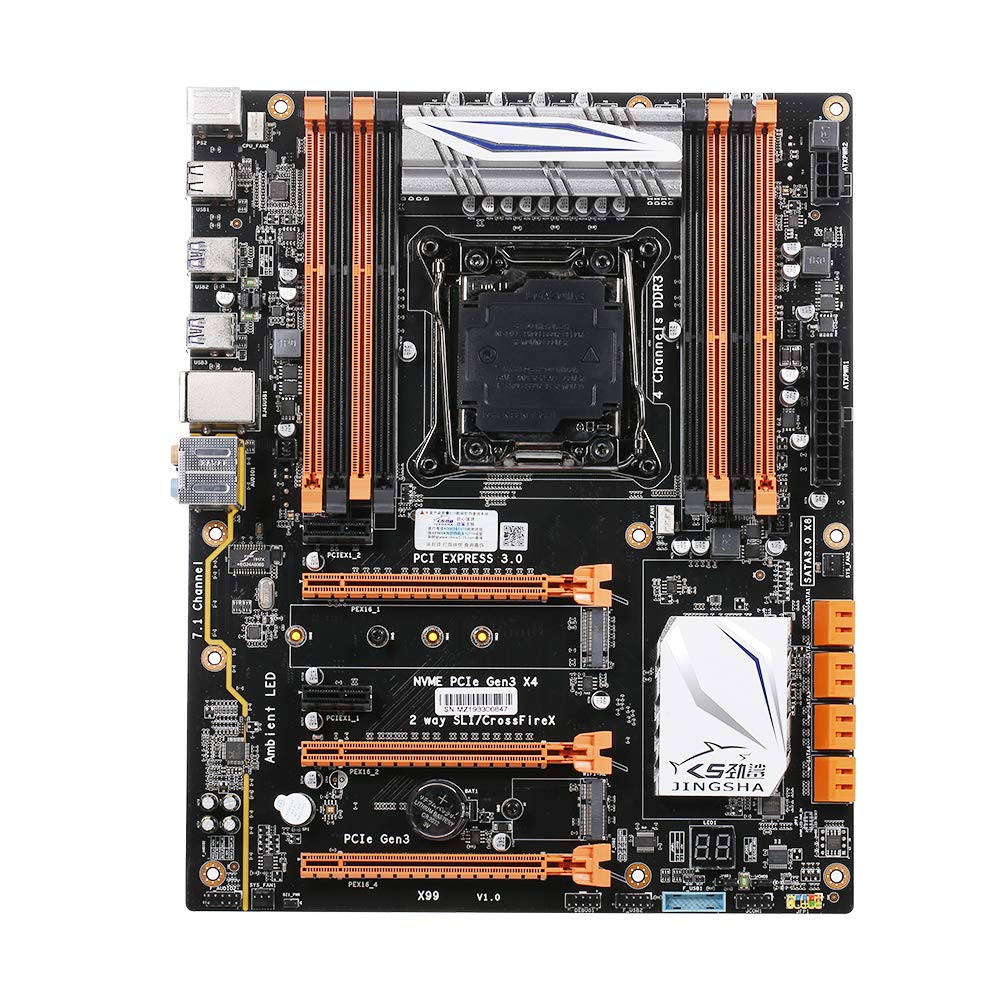
図1.1: トップダウン view of the Docooler JINGSHA X99-8D3 Motherboard, showcasing its layout with CPU socket, RAM slots, and various expansion slots.
2. 主な特徴
- M.2 NVME Support: Equipped with an M.2 hard disk port, supporting high-speed PCI-E NVME X4 for optimal operating system and application driver performance.
- Quad-Channel DDR3 Memory: Features 8 DDR3 memory slots across 4 channels, significantly improving capacity and performance, supporting up to 256GB.
- Digital Diagnostic Card: Integrated digital diagnostic card automatically tests hardware devices to ensure proper operation and assist in troubleshooting.
- Multiple PCI-E Expansion Slots: Provides 3 PCI-E expanded slots, configurable as X16/X8 to handle various workloads and multi-GPU setups.
- 耐久性のある構造: Built with a 10-layer PCB and high-quality capacitors for enhanced stability and heat resistance.

Figure 2.1: Diagram illustrating the six core technologies and features of the motherboard, including 4-channel DDR3*8, M.2 hard disk interface, digital diagnostic card, 7.1 channel audio, SATA3.0*8 interface, and Crossfire support.
3. パッケージ内容
以下にリストされているすべてのアイテムがパッケージに含まれていることを確認してください。
- 1x Docooler JINGSHA X99-8D3 Motherboard
- 1xSATAケーブル
- 1x I/O Baffle (Backplate)
- 1x CPU Fan Board
- A bag of screws
4. 仕様
| 特徴 | 仕様 |
|---|---|
| モデル | X99-8D3 |
| フォームファクター | ATTX |
| Graphic Slot | PCIE3.0 16X*3 |
| ネットワークカード | ギガビット ネットワーク カード |
| オーディオチャンネル | 7.1チャンネル |
| CPU Type Support | LGA2011 V3 (2629V3/2649V3/2669V3/2678V3/2696V3/2676V3/2673V3) |
| PCB レイヤー | 10 層 |
| メモリスロット | DDR3*8 |
| 最大メモリ容量 | 256GB |
| SATAインターフェース | SATA3.0*8, M.2 NVME |
| PS/2インターフェース | マウス/キーボード |
| 電源 | 8 PIN*1, 24 PIN*1 |
| USBインターフェース | USB3.0*6、USB2.0*6 |
| 拡張インターフェース | PCIE 1X*2, M.2 WIFI*1 |
| 商品サイズ | 30.2 x 24.4 cm (11.89 x 9.61 インチ) |
| アイテム重量 | 930.5g(32.82オンス) |

図4.1:詳細 view of the motherboard's rear I/O panel, showing PS/2 ports, USB 2.0, USB 3.0, Gigabit Network Port, and 7.1 Audio Ports.
5. セットアップとインストール
取り付けを始める前に、システムの電源がオフになっていること、および壁のコンセントからプラグが抜かれていることを確認してください。静電気放電を防ぐため、マザーボードの端を持って取り扱ってください。
5.1CPUのインストール
- Locate the LGA2011 V3 CPU socket on the motherboard.
- Gently push down the CPU retention lever and swing it open.
- Align the triangular mark on your CPU with the corresponding mark on the socket. Carefully place the CPU into the socket without forcing it.
- 保持レバーを閉じてCPUを固定します。
- CPU の上部に、熱伝導グリスを薄く均一に塗布します。
- Install the CPU cooler according to its manufacturer's instructions, ensuring proper contact and pressure.

図 5.1: 拡大図 view of the LGA2011 V3 CPU socket on the motherboard, ready for CPU installation.
5.2 Installing RAM Modules
- DDR3 メモリ スロットの両端のクリップを開きます。
- RAM モジュールのノッチをメモリ スロットのキーに合わせます。
- クリップがカチッと音がしてモジュールが固定されるまで、RAM モジュールの両端をしっかりと押し下げます。
- For optimal performance, install RAM modules in matching pairs across the four channels as indicated in the motherboard manual or silkscreen.

図5.2: View of the eight DDR3 RAM slots on the motherboard, showing their arrangement for quad-channel memory configuration.
5.3 Installing Storage Devices (M.2 NVME & SATA)
- M.2 NVME SSD: Locate the M.2 slot. Insert the M.2 SSD at an angle into the slot, then gently push it down and secure it with the provided screw.
- SATAドライブ: Connect your SATA SSDs or HDDs to the SATA 3.0 ports using SATA data cables. Ensure the power supply SATA power connectors are also attached to the drives.

Figure 5.3: Close-up of the M.2 interface on the motherboard, highlighting its position and the PCI-E Gen3 X4 connection for high-speed data transfer.
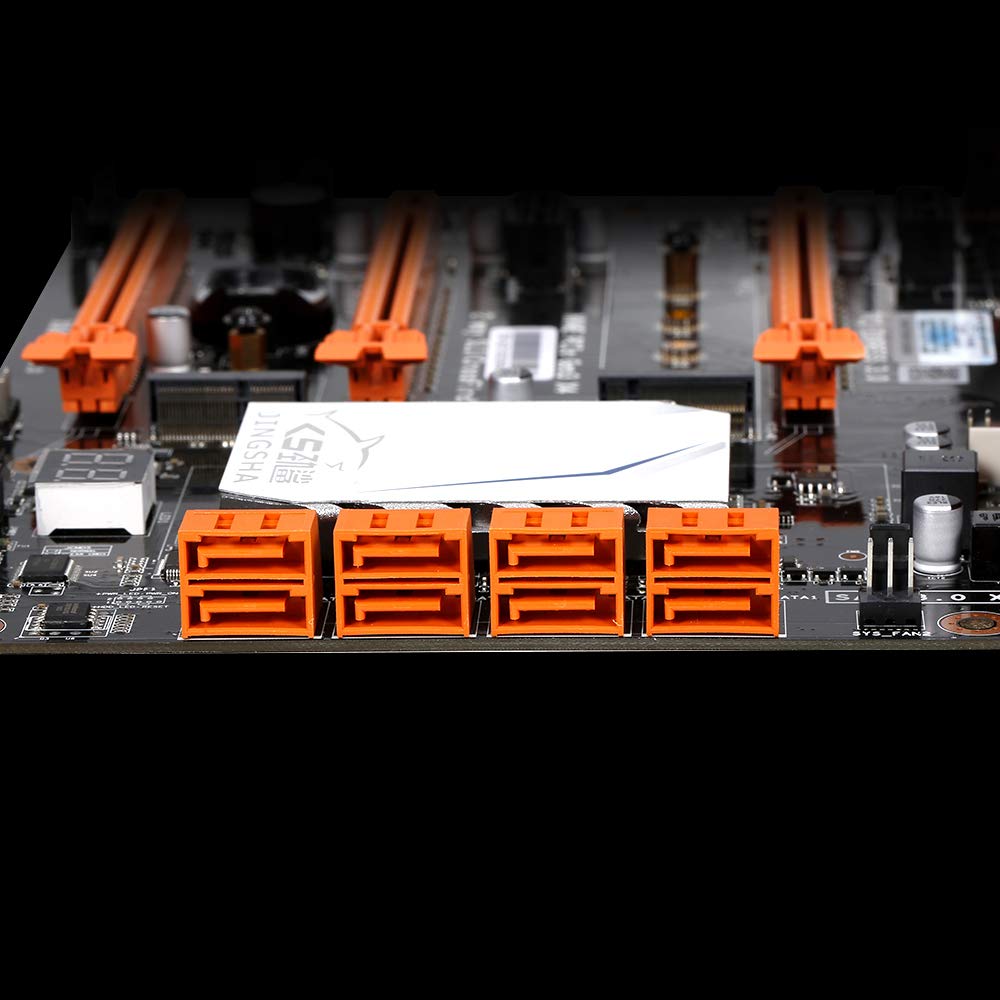
図5.4: View of the eight orange SATA 3.0 ports on the motherboard, providing ample connectivity for storage devices.
5.4 電源の接続
- 電源ユニット (PSU) の 24 ピン ATX 電源コネクタをマザーボード上の対応するポートに接続します。
- Connect the 8-pin CPU power connector (EPS12V) from your PSU to the 8-pin port near the CPU socket.
5.5 拡張カード(PCIe)の取り付け
- Locate the desired PCI-E 3.0 x16 or x1 slots.
- PC ケースから対応する拡張スロット カバーを取り外します。
- Align the expansion card with the slot and press down firmly until it is fully seated. Secure the card with a screw to the case.

図5.5: 角度付き view of the motherboard, highlighting the three PCI Express 3.0 x16 slots and the smaller PCIe x1 slots, ready for graphics cards and other expansion cards.
6. マザーボードの操作
6.1 最初の起動とBIOSセットアップ
- すべてのコンポーネントを組み立てたら、モニター、キーボード、マウスを接続します。
- システムの電源を入れます。最初の起動シーケンス中に、 削除 or F2 key (common for JINGSHA motherboards) to enter the BIOS/UEFI setup utility.
- BIOS で、インストールされているすべてのコンポーネント (CPU、RAM、ストレージ) が正しく検出されていることを確認します。
- ブート順序を構成して、オペレーティング システムのインストール メディア (USB ドライブまたは DVD) を優先します。
- 変更を保存してBIOSを終了します。システムが再起動します。
6.2 オペレーティングシステムのインストール
Follow the instructions provided with your operating system (e.g., Windows, Linux) to complete the installation process. Ensure you install all necessary drivers for the motherboard's chipsets, network, audio, and other components from the manufacturer's webサイトまたは付属のドライバー ディスクを参照してください。
7. メンテナンス
適切なメンテナンスを行うことで、マザーボードの寿命が長くなり、安定した動作が保証されます。
- ほこりの除去: マザーボードとコンポーネントの埃は、圧縮空気を使って定期的に除去してください。清掃の前に、システムの電源をオフにし、電源プラグを抜いてください。
- BIOS アップデート: Periodically check the Docooler or JINGSHA official website for BIOS updates. BIOS updates can improve compatibility, stability, and performance. Follow update instructions carefully to avoid damaging the motherboard.
- ドライバーの更新: 最適なパフォーマンスと新しいソフトウェアおよびハードウェアとの互換性を確保するために、システム ドライバーを最新の状態に保ってください。
- 環境条件: Operate the motherboard in a well-ventilated environment with stable temperature and humidity to prevent overheating and component degradation.
8。 トラブルシューティング
このセクションでは、発生する可能性のある一般的な問題について説明します。
8.1 電源なし/起動なし
- Ensure the 24-pin ATX and 8-pin CPU power connectors are securely plugged into the motherboard.
- Check if the power supply unit (PSU) is switched on and connected to a working power outlet.
- Verify that the front panel power button cable is correctly connected to the motherboard's header.
8.2 ディスプレイ出力なし
- Ensure your graphics card (if dedicated) is properly seated in its PCI-E slot and has all necessary power cables connected.
- Check that your monitor cable is securely connected to the graphics card or motherboard (if integrated graphics are used, though X99 typically requires a dedicated GPU).
- Try reseating your RAM modules. Incorrectly seated RAM is a common cause of no display.
8.3 POST Code Display (Digital Diagnostic Card)
The motherboard is equipped with a digital diagnostic card (POST code display) that shows a two-digit code during boot-up. Refer to the motherboard's detailed technical documentation (often available on the manufacturer's website) for a list of POST codes and their meanings. This can help pinpoint the exact component causing a boot failure.

図 8.1: 拡大図 view showing the integrated digital diagnostic card (POST code display) on the motherboard, which assists in identifying hardware issues during boot.
9. 保証とサポート
For warranty information and technical support, please refer to the documentation provided with your purchase or visit the official Docooler or JINGSHA webサイトでご確認ください。保証請求に備えて購入証明書を保管してください。
Ask a question about this manual
Ask about setup, troubleshooting, compatibility, parts, safety, or missing instructions. Manuals+ will review the question and use this page’s manual context to help answer it.