1.製品オーバーview
The Dino-Lite AM4025X is a 1.3-megapixel USB eyepiece camera designed to convert traditional optical microscopes into digital imaging systems. It captures high-resolution images and videos, allowing for digital observation, documentation, and analysis. This device integrates seamlessly with various traditional microscopes by fitting into standard eyepiece slots.

Image 1.1: The Dino-Lite AM4025X USB Eyepiece Camera, highlighting its compatibility with traditional microscopes, Windows & Mac software, USB 2.0 connectivity, and measurement capabilities.
2. 箱の中身
Upon unpacking your Dino-Lite AM4025X, please verify that all the following components are included:
- Dino-Lite AM4025X Eyepiece Camera with integrated USB cable
- Quick Start Guide and Software Download Link
- Carry Pouch for storage and transport
- Calibration Target for accurate measurements
- Various Adapters for different eyepiece diameters (23mm, 30mm, 30.5mm, C-mount)

Image 2.1: All components included in the Dino-Lite AM4025X package, including the eyepiece camera, cables, quick start guide, carry pouch, calibration target, and adapters.
3. セットアップ手順
Follow these steps to set up your Dino-Lite AM4025X eyepiece camera with a traditional microscope:
- 顕微鏡を準備する: Ensure your traditional microscope is stable and powered on. Remove one of the existing eyepieces from the microscope's ocular tube.
- 正しいアダプタを選択してください: Choose the appropriate adapter ring from the provided set that matches the diameter of your microscope's ocular tube (23mm, 30mm, 30.5mm, or C-mount).
- Install the Eyepiece Camera: Gently insert the Dino-Lite AM4025X camera, with the selected adapter, into the microscope's ocular tube. Ensure it is seated firmly and securely.
- コンピュータに接続します: Plug the USB cable from the AM4025X camera into an available USB port on your Windows or Mac computer.

Image 3.1: A hand demonstrating the installation of the Dino-Lite eyepiece camera into the ocular lens of a traditional microscope.
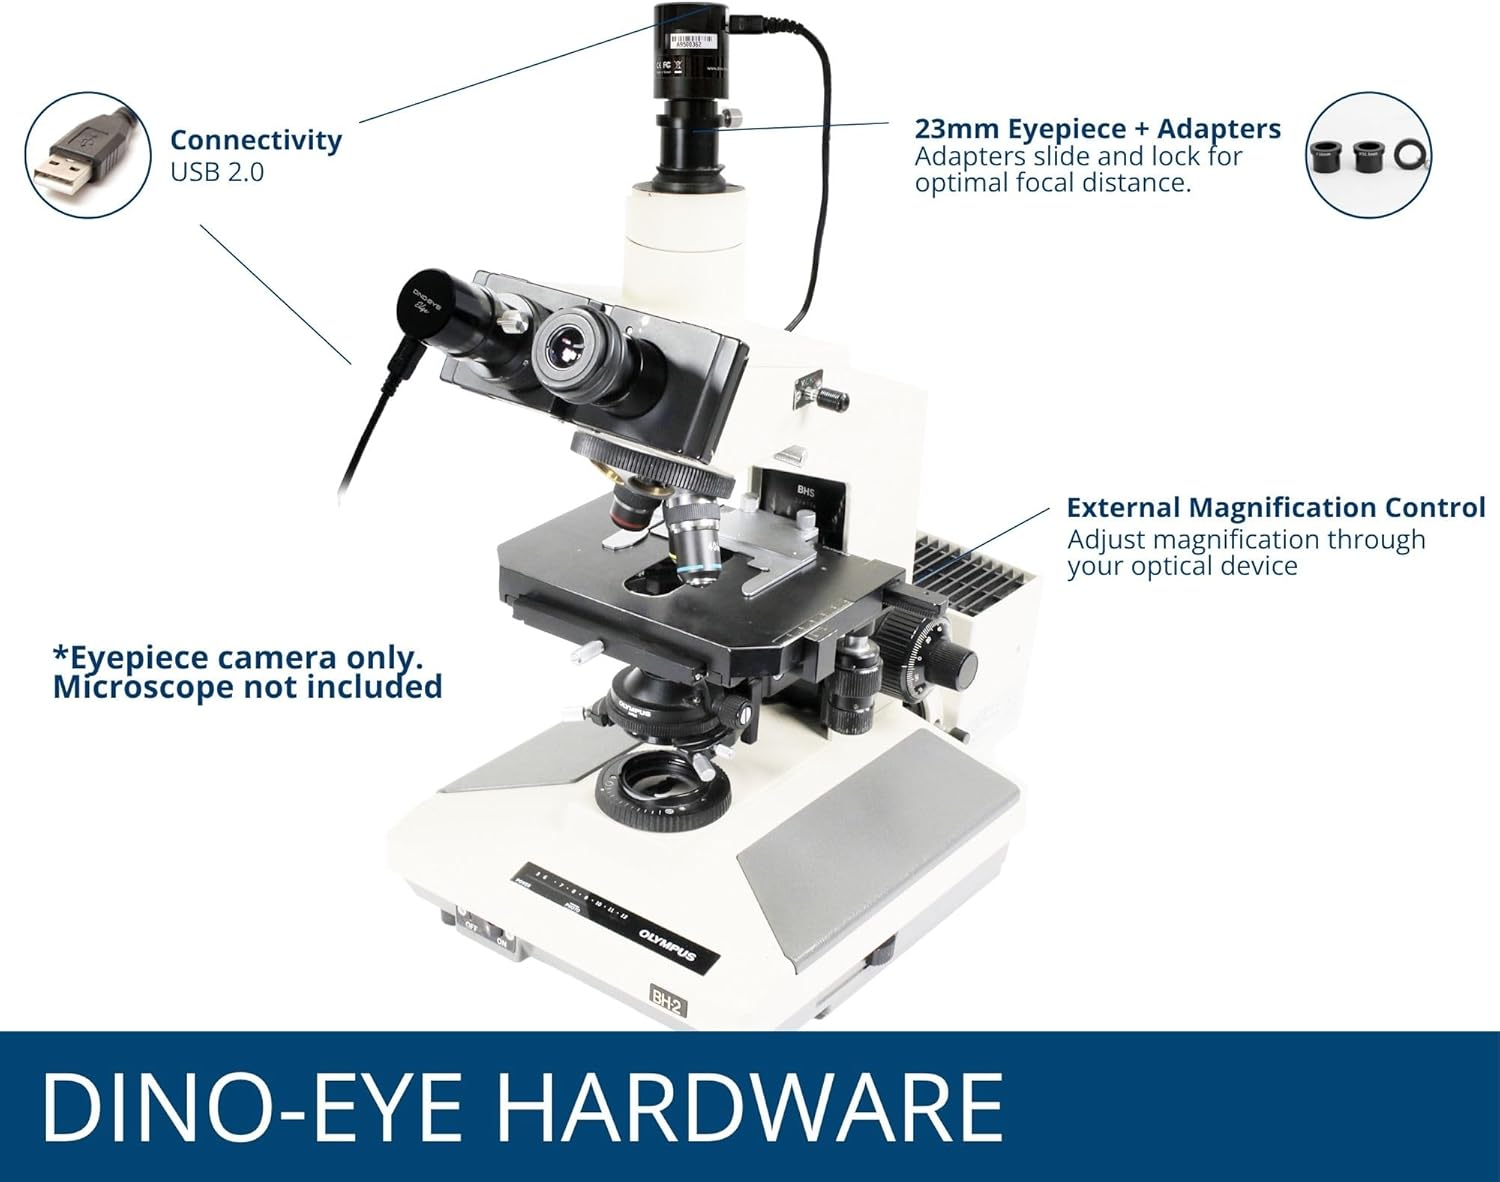
Image 3.2: The Dino-Lite AM4025X camera properly installed on a traditional microscope, showing the USB connection and adapter placement.
4. Software Installation and Use
The Dino-Lite AM4025X requires dedicated software for operation. The package includes a link to download the latest versions of DinoCapture for Windows and DinoXcope for Mac.
4.1. ソフトウェアのインストール
- ソフトウェアをダウンロード: Visit the provided software download link (usually found in the Quick Start Guide) and download the appropriate software for your operating system (DinoCapture for Windows, DinoXcope for Mac).
- ソフトウェアをインストールする: Follow the on-screen instructions to install the software. You may need administrator privileges.
- ソフトウェアの起動: Once installed, launch the DinoCapture or DinoXcope application.
4.2. 基本操作
With the camera connected and software launched, you should see a live image from your microscope on your computer screen.
- フォーカス: Use the coarse and fine focus knobs on your traditional microscope to bring the specimen into sharp focus on the computer screen.
- 倍率: Adjust the magnification by changing the objective lenses on your traditional microscope. The AM4025X utilizes the optical magnification of the microscope.
- 画像/ビデオキャプチャ: The software provides tools to capture still images (1280 x 1024 resolution) and record videos (30 FPS). Refer to the software's help documentation for detailed instructions on these functions.
- Measurement and Annotation: DinoCapture and DinoXcope offer advanced features for annotating images and performing various measurements directly on the live feed or captured images.

Image 4.1: The DinoCapture software interface displayed on a laptop, showing live microscope feed and various tools for image capture, annotation, and analysis.
5. 運用ガイドライン
To ensure optimal performance and longevity of your Dino-Lite AM4025X, observe the following guidelines:
- Always handle the camera and microscope with care to avoid damage to optical components.
- Ensure the USB connection is secure during operation to prevent interruptions.
- Use the microscope's built-in illumination for best image quality, as the AM4025X does not have an integrated light source.
- カメラを極端な温度や湿度にさらさないでください。

図5.1: 例ample digital images captured through the AM4025X, showing a pine needle cross-section at 4x, 10x, 40x, and 100x objective lens magnifications.
6. メンテナンス
Proper maintenance will help preserve the quality and functionality of your eyepiece camera.
- レンズの掃除: Use a soft, lint-free cloth specifically designed for optical lenses to gently wipe the camera's lens. For stubborn smudges, a small amount of lens cleaning solution can be applied to the cloth, not directly to the lens.
- 一般的な清掃: Wipe the exterior of the camera with a soft, dry cloth. Do not use harsh chemicals or abrasive cleaners.
- ストレージ: When not in use, store the camera in its carry pouch in a clean, dry, and dust-free environment. Avoid areas with extreme temperature fluctuations.
- ケーブルのお手入れ: USBケーブルを過度に曲げたり、折り曲げたりしないでください。破損を防ぐため、きちんと保管してください。
7。 トラブルシューティング
If you encounter issues with your Dino-Lite AM4025X, refer to the following common problems and solutions:
| 問題 | 考えられる原因 | 解決 |
|---|---|---|
| No image displayed in software |
|
|
| 画像がぼやけている、または焦点が合っていない |
|
|
| ソフトウェアがクラッシュまたはフリーズする |
|
|
| Poor image quality (dark, grainy) |
|
|
8. 仕様
Detailed technical specifications for the Dino-Lite AM4025X USB Eyepiece Camera:
| 特徴 | 仕様 |
|---|---|
| モデル番号 | AM7X |
| 画像解像度 | 1280 x 1024 (1.3メガピクセル) |
| ビデオフレームレート | 最大30FPS |
| 接続性 | USB2.0 について |
| Compatible Eyepiece Slots | 23mm、30mm、30.5mm、Cマウント |
| 互換性のあるオペレーティングシステム | ウィンドウズ、マック |
| ソフトウェア付属 | DinoCapture (Windows), DinoXcope (Mac) |
| 光源の種類 | From Traditional Microscope (No integrated light) |
| 最大倍率 | 50x (dependent on microscope objective) |
| 製品寸法 | 1.26 x 1.26 x 3.15インチ |
| アイテム重量 | 13.7 オンス (0.39 キログラム) |
| 材料 | プラスチック |
| 色 | 黒 |
| 巻tage | 5ボルト(USB電源) |
| 対物レンズの説明 | 無彩色 |
9. 保証とサポート
For warranty information, please refer to the documentation included with your product or visit the official Dino-Lite website. Dino-Lite provides customer support for technical assistance, software inquiries, and troubleshooting.
オンラインリソース:
- Official Dino-Lite Webサイト: www.dino-lite.com
- Dino-Lite Store on Amazon: Dino-Lite Store
When contacting support, please have your product model (AM4025X) and any relevant purchase information ready.