ドゥークオーディオ T3
Nobsound T3 MMフォノプリアンプampリファイアー
モデル: T3
1. はじめに
The Nobsound T3 is a Moving Magnet (MM) phono preamplifier designed to convert phono signals from a turntable to line-level signals. This device is essential for connecting a turntable to audio systems that lack a dedicated phono input, such as stereo amplifiers or active speakers. It features a volume control to adjust the output level.

Image: The Nobsound T3 phono preamplifier integrated into a home audio setup with a turntable and speakers.
2. 安全情報
- 電源アダプターの電圧を確認してくださいtage はお住まいの地域の電源に適合します。
- デバイスを湿気や極端な温度にさらさないでください。
- ユニットを分解しないでください。修理は資格のある担当者に依頼してください。
- 誤って落下するのを防ぐため、ユニットを安定した平らな面に置いてください。
- お子様の手の届かない場所に保管してください。
3. パッケージ内容
- Nobsound T3 MMフォノプリアンプampリファイアー
- DC 12V 電源アダプター
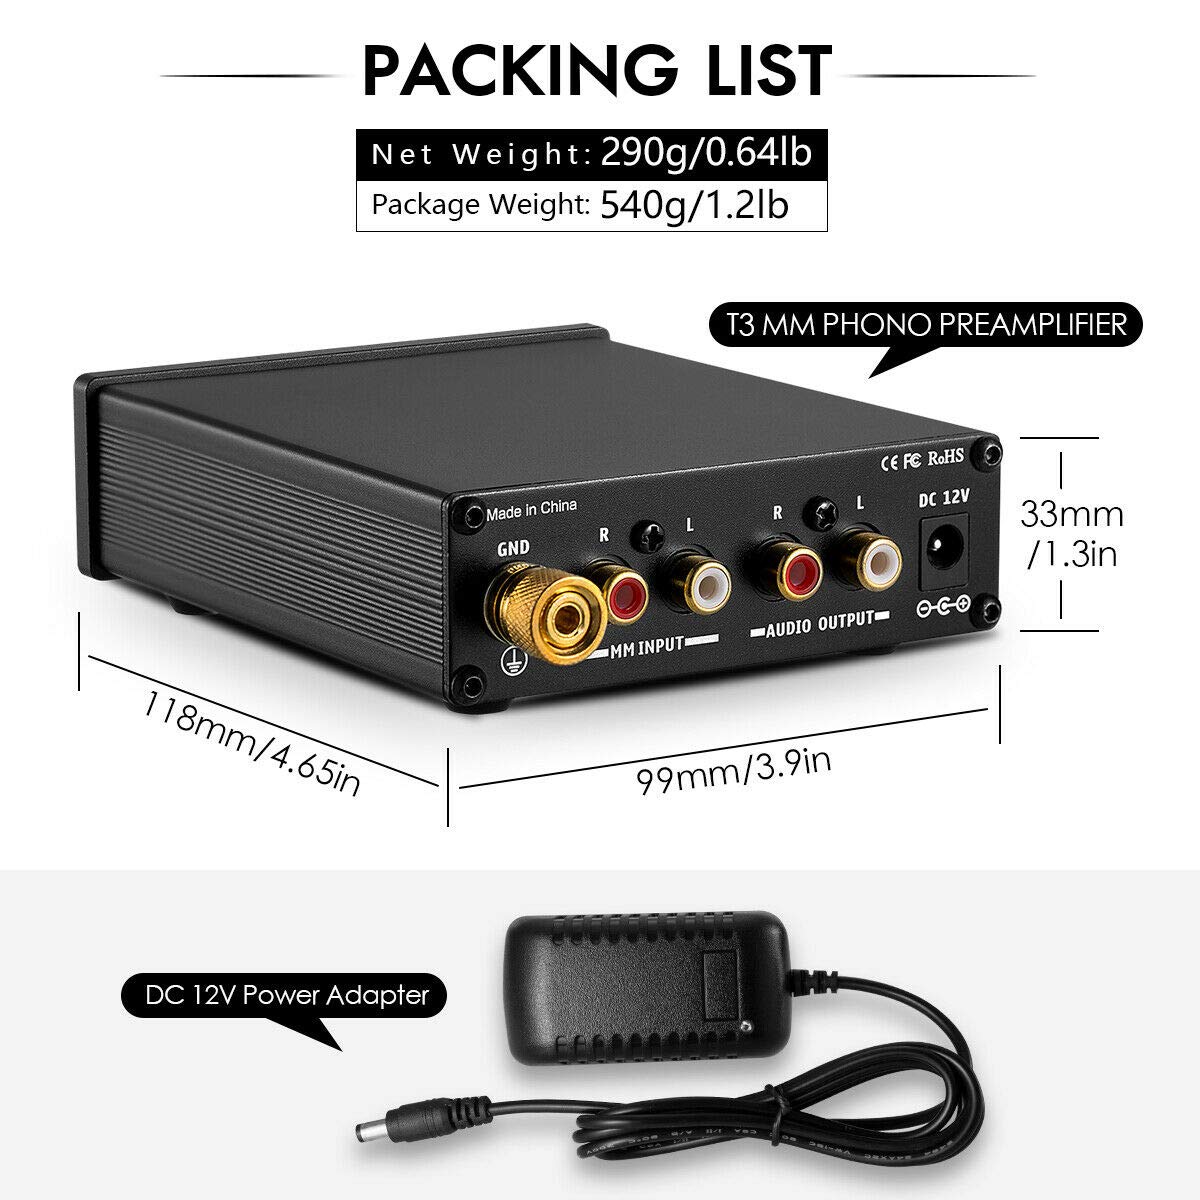
Image: The Nobsound T3 phono preamplifier and its included DC 12V power adapter.
4.製品オーバーview
The Nobsound T3 features a compact design with essential controls and connections for seamless integration into your audio system.
フロントパネル
- 電源スイッチ: Toggles the unit on/off. Features a red indicator light when active.
- ボリュームノブ: プリアンプの出力レベルを調整しますamplifier。
背面パネル
- GND端子: Ground connection for the turntable to reduce hum and noise.
- MM INPUT (R/L): RCA inputs for connecting your Moving Magnet (MM) turntable.
- AUDIO OUTPUT (R/L): RCA出力に接続します ampライファまたはアクティブスピーカー。
- DC 12V: 付属の 12V DC アダプターの電源入力。

画像: 詳細 view of the Nobsound T3's front panel (Power switch, Volume knob) and rear panel (GND, MM Input, Audio Output, DC 12V).
5. セットアップ
Follow these steps to connect your Nobsound T3 phono preampオーディオシステムへの接続:
- Connect Turntable to MM Input: Use RCA cables to connect the audio output of your MM turntable to the MM INPUT (R/L) jacks on the rear panel of the Nobsound T3. Ensure left (white) and right (red) channels are matched.
- アース線を接続する: Attach the ground wire from your turntable to the グランド terminal on the Nobsound T3. This helps to minimize hum and noise.
- 接続する Amp講演者: Use another set of RCA cables to connect the AUDIO OUTPUT (R/L) jacks of the Nobsound T3 to an available line-level input (e.g., AUX, CD, LINE IN) on your amplifier or active speakers. Do not connect to a phono input on your amplifier, as this unit already provides phono pre-amplification。
- 接続電源: DC 12V電源アダプターを DC12V input on the rear panel of the Nobsound T3, then plug the adapter into a power outlet.
- 電源オン: を押す 力 switch on the front panel to turn on the unit. The red indicator light will illuminate.

Image: Connection diagram illustrating how to integrate the Nobsound T3 into an audio system.
6. 操作手順
Once the Nobsound T3 is properly set up, operating it is straightforward:
- すべての接続が確実に行われ、ユニットの電源がオンになっていることを確認します。
- ターンテーブルでレコードの再生を始めます。
- 調整する 音量 knob on the front panel of the Nobsound T3 to achieve the desired output level.
- Further volume adjustments can be made using your amplifier or active speakers' volume control.
Video: An official demonstration of the Nobsound T3 Phono Preamp for MM Turntables, showcasin機能と操作について説明します。
7. メンテナンス
- 本体は柔らかく乾いた布で拭いてください。液体クリーナーや溶剤は使用しないでください。
- 適切な換気を確保するために、ユニットをほこりやごみから守ってください。
- すべてのケーブル接続部の締め付け具合や摩耗を定期的に確認してください。
8。 トラブルシューティング
音が出ない
- Ensure the Nobsound T3 is powered on (red indicator light is lit).
- Verify all RCA cables are securely connected to the correct input/output jacks.
- Check the volume level on both the Nobsound T3 and your ampライファ/アクティブスピーカー。
- 確認 amplifier/active speakers are set to the correct input source.
ハム音またはノイズ
- Ensure the turntable's ground wire is properly connected to the グランド terminal on the Nobsound T3.
- ケーブル接続が緩んでいないか確認してください。
- 干渉を引き起こす可能性のある他の電子機器から本機を離してください。
- Try using different RCA cables, as faulty shielding can cause hum.
9. 仕様
| モデル | T3 |
| 入力タイプ | MM (Moving Magnet) Phono |
| 出力タイプ | RCAラインレベル |
| 電源 | DC12V |
| 材料 | アルミニウム |
| 寸法(長さ×幅×高さ) | 約118mm x 99mm x 33mm(4.65インチ x 3.9インチ x 1.3インチ) |
| アイテム重量 | 約0.59kg(1.3ポンド) |

Image: The Nobsound T3 phono preamplifier shown in hand, highlighting its compact dimensions.
10. 保証とサポート
For warranty information and technical support, please refer to the documentation provided with your purchase or contact Douk Audio customer service. Keep your purchase receipt for warranty claims.
Ask a question about this manual
Ask about setup, troubleshooting, compatibility, parts, safety, or missing instructions. Manuals+ will review the question and use this page’s manual context to help answer it.