1. はじめに
The MASTECH MS8260E is a versatile 2000-count digital multimeter designed for a wide range of electrical and electronic measurements. It features a large LCD display, non-contact voltage (NCV) detection, and capabilities for measuring AC/DC voltage, AC/DC current, resistance, capacitance, and inductance. This manual provides essential information for the safe and effective operation, maintenance, and troubleshooting of your device.
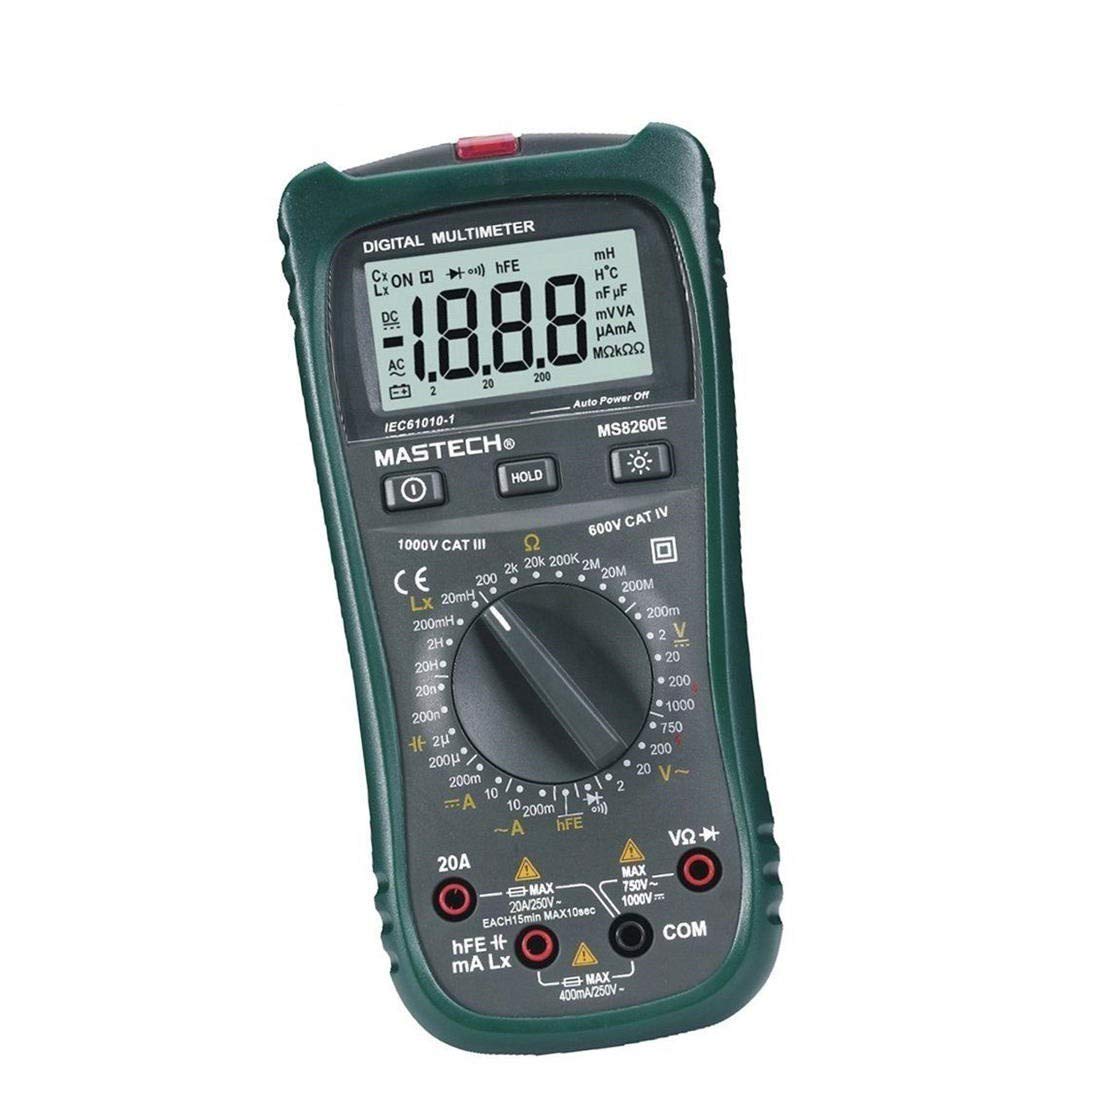
図1: 前面 view of the MASTECH MS8260E Digital Multimeter, showing the LCD display, function rotary switch, and input jacks.
2. 安全情報
メーターの安全な操作とサービスを確保するには、次の安全ガイドラインに従ってください。
- メーターを使用する前に、このマニュアルのすべての指示を読んで理解してください。
- 常に地域および国の安全規定に従ってください。
- メーターが損傷しているように見える場合、またはテスト リード線の絶縁が損なわれている場合は、メーターを使用しないでください。
- Observe the input limits for each measurement range to prevent electrical shock or damage to the meter. This meter is rated for CAT.IV 600V.
- ボリュームを扱うときは注意してくださいtag30V AC RMS、42Vピーク、または60V DCを超える電圧。これらの電圧はtag感電の危険があります。
- 必ず回路の電源を切り、高電圧の電気をすべて放電してください。tag抵抗、導通、ダイオード、または静電容量の測定を行う前に、コンデンサをテストしてください。
- 正確な測定を保証するために、電池残量低下インジケーターが表示されたら、すぐに電池を交換してください。
- 爆発性のガス、蒸気、または粉塵のある環境でメーターを操作しないでください。
3.製品オーバーview
The MS8260E multimeter is equipped with several features to facilitate accurate and convenient measurements:
- Large 2000 Counts LCD Display: 明確なデジタル表示を提供します。
- 非接触Vol内蔵tage (NCV) 検出器: AC vol を検出tage greater than 110V without physical contact, indicated by a flash warning.
- データホールド機能: 表示された読み取り値を固定して簡単に記録できます。
- ディスプレイバックライト: Improves visibility in dimly lit conditions.
- 自動電源オフ: Conserves battery life by automatically turning off the meter after a period of inactivity.
- 低バッテリー表示: バッテリーの交換が必要になるとユーザーに警告します。
- 極性表示: Automatically displays negative polarity.
- 30-Range Rotary Switch: Selects various measurement functions including AC/DC voltage, AC/DC current, resistance, capacitance, inductance, diode check, continuity test, and transistor (hFE) check.
4. セットアップ
4.1 バッテリーの取り付け
The MS8260E requires one 9V battery (NEDA 1604/6F22). To install or replace the battery:
- Ensure the meter is turned off and disconnect all test leads from the input terminals.
- メーターの背面にある電池ボックスのカバーを見つけます。
- 固定ネジを外してカバーを取り外します。
- Insert the 9V battery, observing the correct polarity.
- 電池ボックスのカバーを元に戻し、ネジで固定します。
4.2 テストリードの接続
Always connect the black test lead to the "COM" (common) input jack. Connect the red test lead to the appropriate input jack based on the desired measurement:
- ボリューム用tage, Resistance, Capacitance, Inductance, Diode, Continuity, and hFE measurements: Connect the red lead to the "VΩCAPHz" jack.
- For Current measurements up to 200mA: Connect the red lead to the "mA" jack.
- For Current measurements up to 10A: Connect the red lead to the "10A" jack.
Ensure test leads are fully inserted into the jacks before taking measurements.
5. 操作手順
Turn the rotary switch to the desired function. The meter will display "OL" (Overload) if no input is present or if the input exceeds the range.
5.1 DCVol。tage測定(DCV)
- Set the rotary switch to the desired DCV range (200mV, 2V, 20V, 200V, 1000V).
- Connect the black test lead to the "COM" jack and the red test lead to the "VΩCAPHz" jack.
- 極性に注意しながら、測定するコンポーネントまたは回路にテスト リード線を接続します。
- 巻を読むtagLCDディスプレイのe値。
5.2 AC ボリュームtage測定(ACV)
- Set the rotary switch to the desired ACV range (2V, 20V, 200V, 750V).
- Connect the black test lead to the "COM" jack and the red test lead to the "VΩCAPHz" jack.
- テストリード線をAC電圧に接続しますtag電子ソース。
- 巻を読むtagLCDディスプレイのe値。
5.3 DC電流測定(DCA)
- Set the rotary switch to the desired DCA range (200mA, 10A).
- For measurements up to 200mA, connect the red lead to the "mA" jack. For measurements up to 10A, connect the red lead to the "10A" jack. The black lead connects to "COM".
- 電流を測定する回路を開き、メーターを負荷と直列に接続します。
- LCDディスプレイで現在の値を読み取ります。
5.4 AC Current Measurement (ACA)
- Set the rotary switch to the desired ACA range (200mA, 10A).
- For measurements up to 200mA, connect the red lead to the "mA" jack. For measurements up to 10A, connect the red lead to the "10A" jack. The black lead connects to "COM".
- 電流を測定する回路を開き、メーターを負荷と直列に接続します。
- LCDディスプレイで現在の値を読み取ります。
5.5 抵抗測定(Ω)
- Set the rotary switch to the desired Ω range (200Ω, 2kΩ, 20kΩ, 200kΩ, 2MΩ, 20MΩ, 200MΩ).
- Connect the black test lead to "COM" and the red test lead to "VΩCAPHz".
- 回路の電源が切れ、すべてのコンデンサが放電されていることを確認します。
- テスト リード線を抵抗器またはコンポーネントに接続します。
- LCD ディスプレイで抵抗値を読み取ります。
5.6 Capacitance Measurement (CAP)
- Set the rotary switch to the desired CAP range (20nF, 200nF, 2uF, 200uF).
- Connect the black test lead to "COM" and the red test lead to "VΩCAPHz".
- テスト リードを接続する前に、コンデンサが完全に放電されていることを確認してください。
- テストリード線をコンデンサに接続します。
- LCD ディスプレイの静電容量値を読み取ります。
5.7 インダクタンス測定(L)
- Set the rotary switch to the desired Inductance range (20mH, 200mH, 2H, 20H).
- Connect the black test lead to "COM" and the red test lead to "VΩCAPHz".
- テストリード線をインダクタに接続します。
- Read the inductance value on the LCD display.
5.8ダイオードテスト
- ロータリースイッチをダイオード記号に設定します。
- Connect the black test lead to "COM" and the red test lead to "VΩCAPHz".
- 赤いリード線をダイオードのアノードに、黒いリード線をカソードに接続します。順方向電圧はtag電圧降下(シリコンダイオードの場合は通常 0.5V ~ 0.8V)が表示されます。
- Reverse the leads. The display should show "OL" for a good diode.
5.9導通テスト
- ロータリースイッチを連続性シンボルに設定します。
- Connect the black test lead to "COM" and the red test lead to "VΩCAPHz".
- テスト リード線を回路またはコンポーネントに接続します。
- 抵抗が約 30Ω 未満の場合はブザーが鳴り、導通を示します。
5.10 トランジスタ(hFE)テスト
- ロータリースイッチをhFEの位置に設定します。
- トランジスタのタイプ (NPN または PNP) とピン配置 (エミッタ、ベース、コレクタ) を識別します。
- Insert the transistor leads into the corresponding sockets in the hFE test socket on the meter.
- Read the hFE (DC current gain) value on the LCD display.
5.11非接触巻tage (NCV) 検出
- ロータリースイッチをNCVの位置に設定します。
- Hold the top front part of the meter near the AC voltag電源(例:電源コンセントまたは絶縁電線)に接続します。
- ACvolの場合tage greater than 110V is detected, the NCV indicator light will flash, and the buzzer may sound.
6. メンテナンス
6.1 クリーニング
広告でメーターを拭くamp 布と中性洗剤で拭いてください。研磨剤や溶剤は使用しないでください。使用前にメーターが乾いていることを確認してください。
6.2 電池の交換
When the "BAT" symbol appears on the display, the battery needs to be replaced. Refer to Section 4.1 for battery installation instructions.
6.3 ヒューズの交換
If the current measurement function fails, the fuse may need replacement. This operation should only be performed by qualified personnel. Refer to the service manual or contact customer support for fuse specifications and replacement procedures.
6.4 ストレージ
If the meter is not to be used for an extended period, remove the battery to prevent leakage and damage to the meter. Store the meter in a cool, dry place away from direct sunlight.
7。 トラブルシューティング
| 問題 | 考えられる原因 | 解決 |
|---|---|---|
| 表示なしまたはかすかな表示 | Low battery; Meter off | Replace battery; Turn on meter |
| 「OL」が表示された | Input exceeds range; Open circuit (for resistance/continuity) | Select higher range; Check circuit connection |
| 誤った測定値 | Low battery; Incorrect range selected; Poor test lead contact | Replace battery; Select appropriate range; Ensure good contact |
| 電流測定が機能しない | ヒューズが切れた | Replace fuse (by qualified personnel) |
8. 仕様
| 測定機能 | 範囲 | 正確さ |
|---|---|---|
| DCVol。tage(DCV) | 200mV、2V、20V、200V、1000V | ±0.5% (200mV-200V)、±0.8% (1000V) |
| ACVol。tage(ACV) | 2V、20V、200V、750V | ±0.8% (2V-200V), ±1.2% (750V) |
| 直流電流 (DCA) | 200mA、10A | ±1.5% (200mA), ±2.0% (10A) |
| 交流電流 (ACA) | 200mA、10A | ±1.8% (200mA), ±3.0% (10A) |
| 抵抗(Ω) | 200Ω, 2kΩ, 20kΩ, 200kΩ, 2MΩ, 20MΩ, 200MΩ | ±0.8% (200Ω-2MΩ), ±1.0% (20MΩ), ±5.0% (200MΩ) |
| 静電容量(CAP) | 20nF, 200nF, 2uF, 200uF | ±4.0% (20nF-2uF), ±5.0% (200uF) |
| インダクタンス (L) | 20mH, 200mH, 2H, 20H | ±3.0% |
| 可聴連続性 | Buzzer sounds at <30Ω | 該当なし |
| ダイオード試験 | 1mA、2.8V | 該当なし |
| トランジスタ(hFE) | 0 - 1,000 | 該当なし |
一般仕様:
- 画面: 2000カウント液晶
- 安全性評価: CAT.IV 600V
- 力: 9V battery (NEDA 1604/6F22)
- 重さ: Approximately 1 kg (including battery)
9. 保証とサポート
For warranty information, technical support, or service inquiries, please refer to the warranty card included with your product or visit the official Mastech website. Do not attempt to repair the meter yourself, as this may void the warranty and pose safety risks.