導入
This manual provides detailed instructions for the operation and maintenance of your BAOSHISHAN 500W Ultrasonic Plastic Welding Machine, Model ZQ-549B. Please read this manual thoroughly before operating the machine to ensure safe and efficient use.
The machine converts high-frequency electronic signals into high-frequency mechanical vibrations using a transducing system. These vibrations are then conducted to the plastic welding body, causing the plastic joint surface to rub rapidly at 28,000 cycles per second until melting occurs. This process results in plastic flow between the plastic body joints, completing the gluing process instantly.
安全情報
- 使用する前に必ず機械が適切に接地されていることを確認してください。
- 操作中は、安全メガネや手袋などの適切な個人用保護具 (PPE) を着用してください。
- Do not touch the welding tip during or immediately after operation, as it will be hot.
- 作業エリア内の換気が十分であることを確認してください。
- 作業エリアを清潔に保ち、可燃物を置かないようにしてください。
- Never operate the machine if any parts are damaged or missing.
- 作動中の機械に子供や関係者以外の人を近づけないでください。
- If the welding time is too long, the plastic film will be melted. Adjust the timer appropriately.
- Always place a protective metal plate on the desktop before welding to prevent damage to the surface.
製品終了view
The BAOSHISHAN 500W Ultrasonic Plastic Welding Machine is designed for efficient and precise plastic welding. It is suitable for thermoplastic materials, non-woven fabrics, nylon cloth, and similar materials for fusion, riveting, and spot welding applications. It is commonly used in textile, clothing, shoes, leather, electronics, toys, automotive parts, and other plastic-related industries.
主な特徴:
- High-quality imported ultrasonic transducer for strong power and good stability.
- Exquisite design with a compact volume, saving space.
- Low noise operation, contributing to an environmentally friendly working environment.
- Fast welding time, adjustable from 0.01 to 9.99 seconds.
- Strong and durable welds with excellent welding effect.
- Economical operation: no glue required, saving material and labor costs.
- Welding area: diameter 2mm - 8mm.
- Customizable welding head with diameters from 2mm-8mm, including mushroom head and special shapes.
- Supports fusion welding, riveting, spot welding, and boundary flower/dot applications.

Figure 1: BAOSHISHAN 500W Ultrasonic Plastic Welding Machine with handheld welding tool.
コンポーネントとコントロール
フロントパネル:

Figure 2: Front panel with Ammeter, Amplitude sheet (V-meter), and Time display.
- 電流計: Displays the ultrasonic amp明度。 の amplitude sheet shows the minimum value when the machine is not welding.
- V-meter: 巻tage meter. No-load current should not exceed 1A.
- タイマー表示: Shows the set welding time in seconds.
- SETボタン: Used to observe the V-table and test ampリチュード。
- 上/下ボタン: Used to adjust the timer settings.
後面パネル:

Figure 3: Rear panel with Cooling fan, Power switch, Fuse, Power plug, Amplitude adjustment knob, and Output socket.
- 冷却ファン: 動作中に適切な熱放散を保証します。
- 電源スイッチ: マシンの電源をオン/オフにします。
- ヒューズ: 過電流保護。
- 電源プラグ: Connects the machine to the power supply.
- Amplitude Adjustment Knob: Used to fine-tune the ultrasonic ampリチュード。
- 出力ソケット: Connects to the handheld welding tool.
Handheld Welding Tool:

Figure 4: Handheld welding tool with Welding mold (tip), Vibration handle, Working switch, and Power wire.
- Welding Mold (Tip): The part that contacts the material for welding. Customizable.
- Vibration Handle: 人間工学に基づいたハンドルで快適に使用できます。
- Working Switch: Activates the ultrasonic welding process.
- 電源線: Connects the handheld tool to the main unit's output socket.
セットアップ手順
- 開梱: すべての部品をパッケージから慎重に取り出し、損傷がないか確認してください。
- 配置: Place the main unit on a stable, level surface. Ensure there is adequate space around the cooling fan for ventilation.
- 電源コードを接続します: Plug the power cord into the main unit's power plug socket and then into a suitable electrical outlet (110V/220V, as per your model).
- ハンドヘルドツールを接続します: Connect the power wire of the handheld welding tool to the output socket on the rear panel of the main unit.
- 電源オン: Turn on the power switch located on the rear panel. The timer display should illuminate.
- Initial V-Table Check: Before welding, ensure the welding tip is not touching any items. Press the セット button on the front panel to observe the V-meter. The pointer should not exceed one large grid mark. If it does, proceed to the Amplitude Adjustment section.
Video 1: BAOSHISHAN Ultrasonic Plastic Spot Welder - Demonstrates initial setup and basic operation steps.
操作手順
1. Adjusting Welding Time:
- 使用 UP そして 下 keys on the front panel to adjust the desired welding time. The timer can be set from 0.01 to 9.99 seconds.
- Start with a shorter welding time and gradually increase if necessary to avoid melting the plastic.
2. Preparing for Welding:
- Place a protective metal plate on your workbench to prevent damage from the welding process.
- Position the plastic materials to be welded on the metal plate.
3. Performing a Weld:
- Hold the handheld welding tool firmly.
- Gently press the welding tip onto the desired welding point on the plastic material.
- を押す Working Switch on the handle to initiate the ultrasonic welding. Hold it for the set duration.
- リリース Working Switch and lift the tool.
- Inspect the weld. If the plastic is melted or damaged, reduce the welding time. If the weld is not strong enough, slightly increase the welding time.
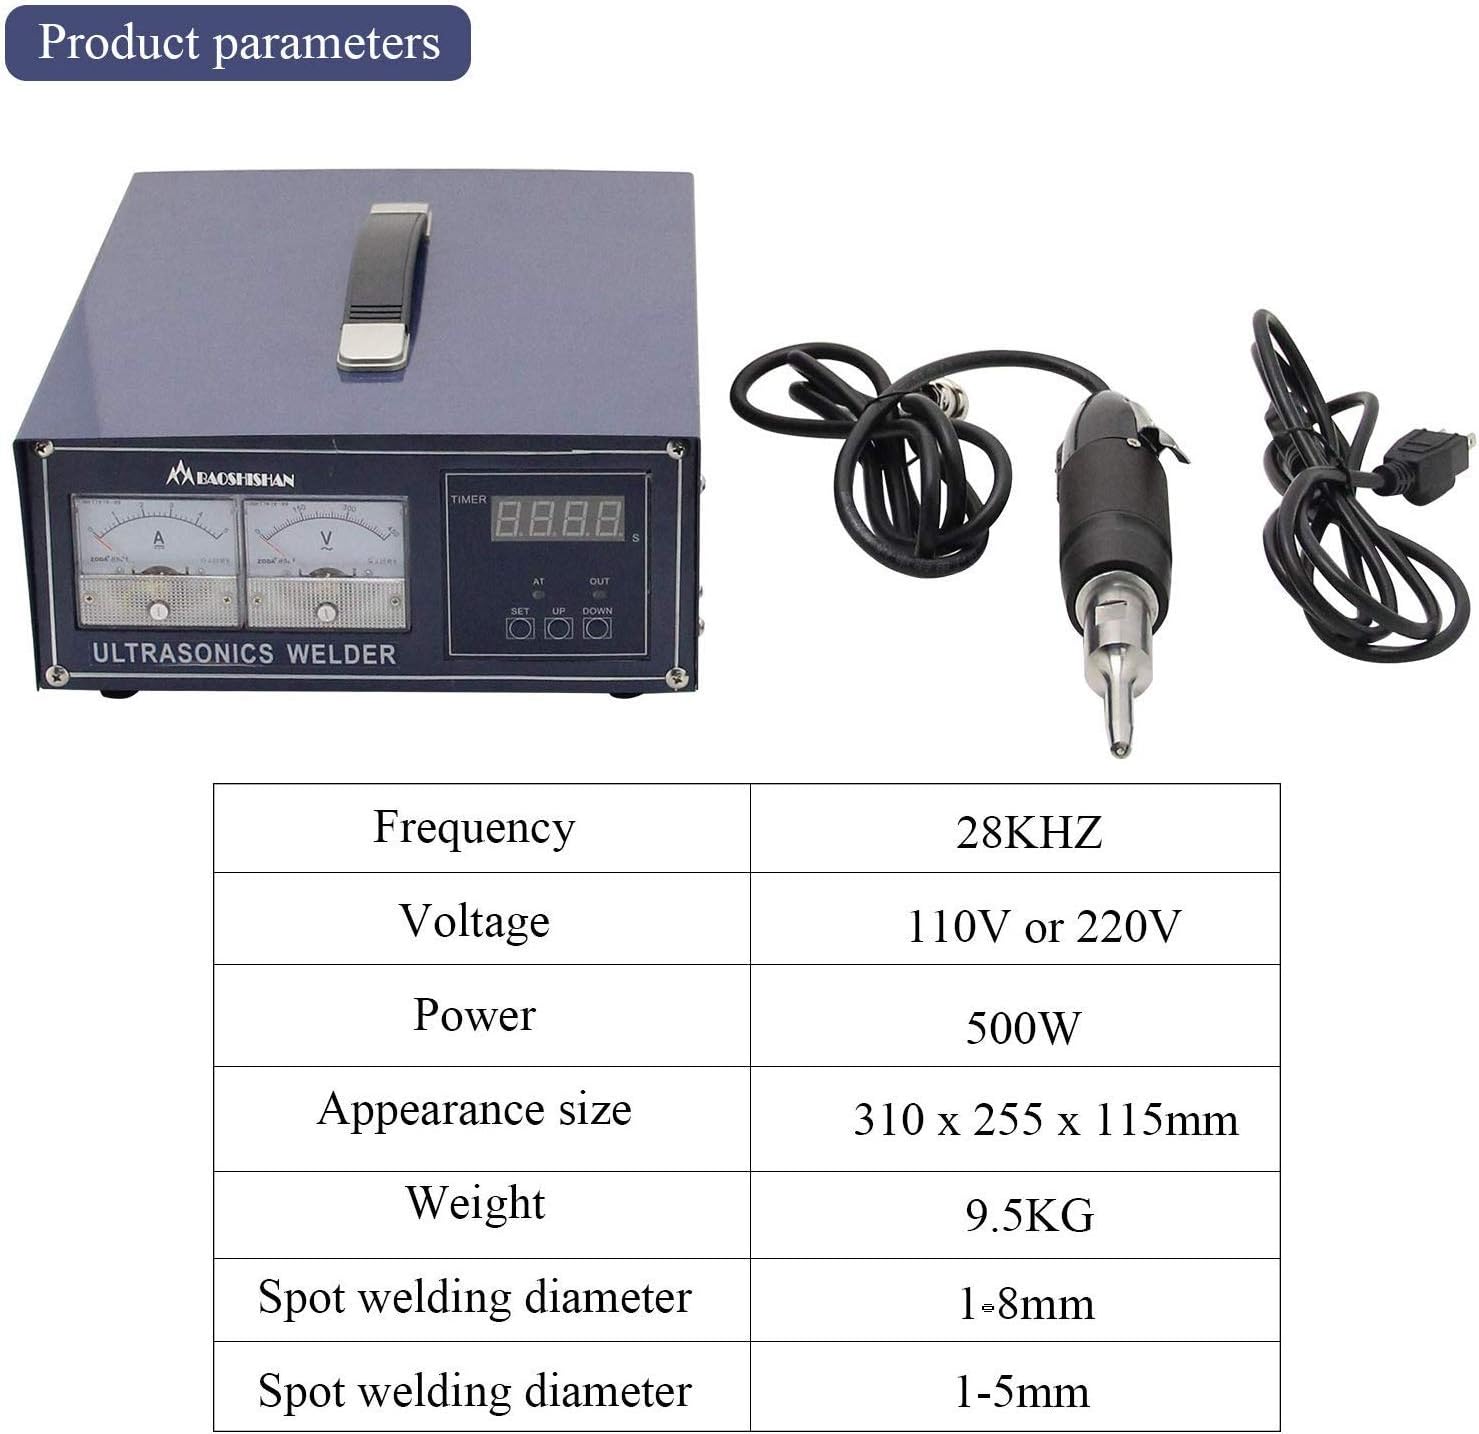
Figure 5: Demonstrating the spot welding process on plastic film.
Video 2: Operation Video - Shows the process of adjusting welding time and performing welds.
メンテナンス
1. 清掃:
- Regularly clean the exterior of the machine with a soft, dry cloth.
- Ensure the cooling fan on the rear panel is free from dust and debris to maintain optimal performance.
2. Checking Welding Tip Wear:
- After a period of use, the welding tip may wear out. This can affect welding performance.
- To check for wear, ensure the welding tip is not touching any items. Press the セット button on the front panel to observe the V-meter.
- If the pointer on the V-meter has significantly exceeded the safe value (more than one large grid mark), the welding tip may be worn and require adjustment or replacement.
3. Amplitude Adjustment (if V-meter reading is too high):
- If the V-meter pointer indicates an unsafe value (exceeding one large grid mark) when the tip is not welding, you need to adjust the ampリチュード。
- 見つける Amplitude Adjustment Knob on the rear panel (often labeled "Please do not rotate this brass knob!" in some diagrams, but it's the adjustment for amplitude)。
- Slowly rotate this knob either clockwise or counter-clockwise. While rotating, periodically press the セット button on the front panel to check the V-meter reading.
- Continue adjusting until the V-meter reading is stable and within the safe operating range (pointer turns less than 50, or within one large grid mark). Lock the fixing screw of the copper column once adjusted.
トラブルシューティング
| 問題 | 考えられる原因 | 解決 |
|---|---|---|
| Poor weld quality / Plastic melting | Welding time too long, excessive ampリチュード。 | Reduce welding time using UP/DOWN buttons. Check and adjust amplitude if necessary (see Maintenance). |
| Weak weld / No fusion | Welding time too short, insufficient amplitude, worn welding tip. | Increase welding time. Check and adjust amplitude. Inspect welding tip for wear and replace if needed. |
| マシンの電源が入らない | No power supply, power switch off, blown fuse. | Check power connection. Ensure power switch is ON. Inspect and replace fuse if blown. |
| V-meter reading too high (unloaded) | Worn welding tip, incorrect amp光度調整。 | 実行する amplitude adjustment (see Maintenance). Consider replacing the welding tip if adjustment does not resolve the issue. |
技術仕様
| パラメータ | 価値 |
|---|---|
| モデル番号 | ZQ-549B |
| 頻度 | 28KHZ |
| 巻tage | 110V/220V (as per model variant) |
| 力 | 500W |
| 外観サイズ | 310mm x 255mm x 115mm |
| 重さ | 9.5キロ |
| Spot Weld Size (diameter) | 1-8mm |
| 材料 | ステンレス鋼 |
Note: Welding head is customizable. Please specify material and desired welding head when ordering.
保証とサポート
All products are checked and packaged in good condition before shipping. For any questions or support needs, please contact BAOSHISHAN customer service. We are committed to providing a satisfactory solution.
具体的な保証条件については、購入書類を参照してください。