1. はじめに
Thank you for choosing the XTUGA BK510 Single Channel Wireless In-Ear Monitor System. This system is designed to provide professional-grade audio monitoring for musicians, performers, and presenters. It features UHF wireless technology with 100 selectable channels, ensuring clear and reliable sound transmission. This manual will guide you through the setup, operation, and maintenance of your new in-ear monitor system.
2. 安全情報
本装置を操作する前に、すべての安全に関する指示をよく読んで理解してください。このマニュアルは、今後の参考のために保管してください。
- FCC準拠: Most users do not need a license to operate this wireless microphone system. However, operation is subject to certain restrictions: the system must not cause harmful interference, must operate at a low power level (not exceeding 50 milliwatts), and has no protection from interference received from any other device.
- FCC規制: Purchasers should be aware that the FCC is currently evaluating the use of wireless microphone systems, and these rules are subject to change. For more information, contact the FCC at 1-888-CALL-FCC (TTY: 1-888-TELL-FCC) or visit the FCC's wireless microphone webサイト: fcc.gov/cgb/wirelessmicrophones.
- 電気安全: To prevent electric shock, do not open the device casing. すべての修理は資格を持った担当者に依頼してください。
- 電源: 付属の電源アダプターのみを使用してください。tageはデバイスの要件を満たしています。
- 水と湿気: デバイスを水、雨、または過度の湿気にさらさないでください。
- 熱: デバイスをラジエーター、暖房送風口、ストーブ、その他の熱を発生する器具などの熱源から遠ざけてください。
- 換気: Ensure proper ventilation around the transmitter unit. Do not block any ventilation openings.
- イヤホン音量: 聴覚障害を防ぐため、長時間大音量で聞くことは避けてください。
3. パッケージ内容
下記のすべての品目がパッケージに含まれていることをご確認ください。不足または破損している品目がある場合は、販売店までご連絡ください。
- 1x XTUGA BK510 Transmitter Unit
- 1x XTUGA BK510 Bodypack Receiver
- 1x Detachable Antenna
- 1x Power Adapter (DC 12V-18V)
- 2x Audio Cables (1/4" TS to 1/4" TS)
- 1x Pair of Earbud Headphones (White)

画像: XTUGA BK510 Single Channel Wireless In-Ear Monitor System package contents, showing the transmitter, bodypack receiver, antenna, power adapter, two audio cables, and white earbud headphones.
4.製品オーバーview
4.1送信機ユニット
画像: Front panel of the XTUGA BK510 transmitter unit, featuring a USB port, headphone output, volume control, channel selection buttons (UP/DOWN), SET button, power button, and an LCD display.
- USBポート: For connecting USB devices (e.g., for playback or recording, specific functionality may vary).
- HEADPHONE Output: 3.5mm jack for wired headphone monitoring directly from the transmitter.
- ボリュームノブ: Adjusts the output volume for the HEADPHONE output.
- 上/下ボタン: Used to navigate and select channels or frequencies.
- SETボタン: 選択を確定するか、設定メニューに入ります。
- 電源スイッチ: Turns the transmitter unit on or off.
- LCDディスプレイ: Shows current channel, frequency, and other operational information.

画像: Rear panel of the XTUGA BK510 transmitter unit, showing the DC IN power input, AF IN (L) and AF IN (R) combo XLR/TRS inputs, AF LEVEL (Left/Right) adjustment knobs, and the ANTENNA connector.
- DC入力(12V-18V): 付属の電源アダプターの電源入力。
- AF IN (L)/(R): Combo XLR/TRS inputs for connecting audio sources (e.g., mixer output).
- AF LEVEL (Left/Right): Rotary knobs to adjust the input audio level for each channel.
- ANTENNA Connector: 着脱式アンテナを取り付けます。
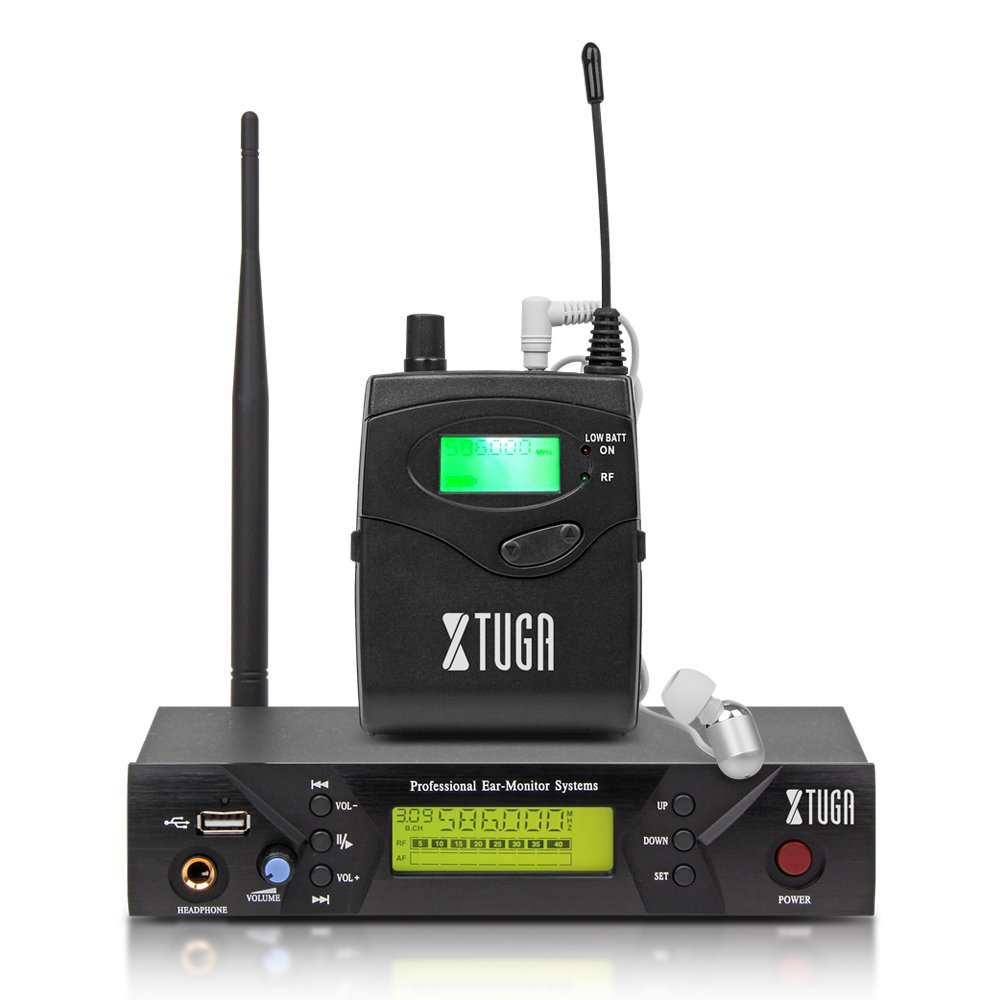
4.2 ボディパックレシーバー

画像: フロント view of the XTUGA BK510 bodypack receiver, showing the LCD display, LOW BATT indicator, RF indicator, and control buttons.
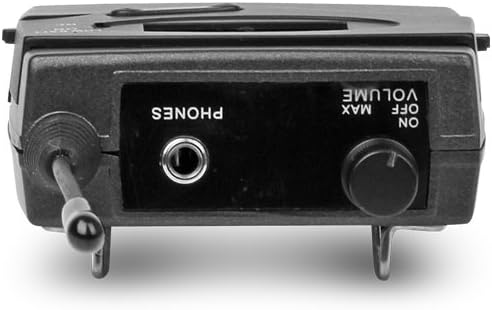
画像: トップ view of the XTUGA BK510 bodypack receiver, showing the PHONES output jack and the ON/OFF/VOLUME knob.

画像: XTUGA BK510 bodypack receiver with the battery compartment open, showing slots for two AA batteries and the belt clip on the back.
- LCDディスプレイ: 現在のチャンネル、周波数、およびバッテリーの状態を表示します。
- LOW BATTインジケーター: 電池残量が少なくなると点灯します。
- RFインジケーター: Illuminates when receiving a radio frequency signal from the transmitter.
- ON/OFF/VOLUME Knob: Turns the receiver on/off and adjusts the headphone volume.
- PHONES出力: 3.5mm jack for connecting in-ear headphones.
- バッテリーコンパートメント: 単三電池2本を収納します。
- ベルトクリップ: For attaching the bodypack to clothing or a belt.
5.セットアップガイド
- 送信機アンテナを接続します: Screw the detachable antenna onto the ANTENNA connector on the rear panel of the transmitter unit. Ensure it is securely fastened.
- 送信機の電源を入れます: Connect the provided power adapter to the DC IN (12V-18V) port on the rear of the transmitter, then plug the adapter into a suitable power outlet.
- オーディオソースを接続: Use the included 1/4" TS cables (or XLR cables, not included) to connect your audio source (e.g., mixer's auxiliary output, monitor send) to the AF IN (L) and/or AF IN (R) inputs on the transmitter's rear panel. For mono operation, typically use AF IN (L).
- 受信機の電池を取り付けます。 Open the battery compartment on the bodypack receiver and insert two AA batteries, observing correct polarity (+/-). Close the compartment securely.
- ヘッドフォンをレシーバーに接続します。 Plug your in-ear headphones into the PHONES output jack on the bodypack receiver.
6. 操作手順
- 送信機の電源オン: Press the POWER button on the transmitter's front panel. The LCD display will illuminate.
- 電源オン受信機: Rotate the ON/OFF/VOLUME knob on the bodypack receiver clockwise until it clicks and the LCD display illuminates.
- Select Channel/Frequency (Transmitter):
- Use the UP/DOWN buttons on the transmitter to browse through the available 100 UHF channels.
- Press the SET button to confirm your desired channel. The display will show the selected frequency.
- Choose a channel that is clear of interference in your operating environment.
- Sync Receiver to Transmitter: The bodypack receiver should automatically sync to the transmitter's frequency. If not, consult the receiver's specific instructions (often involves holding a SET or SYNC button on the receiver while the transmitter is broadcasting). Ensure the RF indicator on the receiver is lit, indicating a successful connection.
- Adjust Audio Input Level (Transmitter): Play audio through your connected source. Adjust the AF LEVEL (Left/Right) knobs on the rear of the transmitter until the audio level is appropriate without clipping (distortion). Monitor the audio through the transmitter's HEADPHONE output if desired.
- Adjust Monitoring Volume (Receiver): Put on your in-ear headphones. Slowly rotate the ON/OFF/VOLUME knob on the bodypack receiver to adjust the listening volume to a comfortable level. Avoid excessively high volumes to protect your hearing.
- 監視を開始: Your XTUGA BK510 system is now ready for use.
7. メンテナンス
- クリーニング: ユニットは柔らかく乾いた布で拭いてください。液体クリーナーや溶剤は使用しないでください。
- バッテリー交換: When the LOW BATT indicator on the bodypack receiver illuminates, replace both AA batteries with fresh ones. Remove batteries if the receiver will not be used for an extended period.
- ストレージ: システムは直射日光や極端な温度を避け、涼しく乾燥した場所に保管してください。
- アンテナのケア: アンテナが曲がったり壊れたりしないように注意して扱ってください。
8。 トラブルシューティング
| 問題 | 考えられる原因 | 解決 |
|---|---|---|
| 受信機から音が出ません。 |
|
|
| 干渉または雑音。 |
|
|
| Low audio quality (e.g., lack of bass). |
|
|
| LOW BATT indicator on receiver is lit. | 電池残量が少なくなっています。 | すぐに両方の単三電池を交換してください。 |
9. 仕様
| 特徴 | 詳細 |
|---|---|
| モデル | BK510 |
| ブランド | シュトゥガ |
| 接続技術 | Wired, Wireless (RF) |
| 無線通信 | UHF(100チャンネル) |
| Transmitter Material | 金属 |
| Bodypack Receiver Batteries | 単三電池2本(必須) |
| 送信機電源入力 | DC 12V-18V |
| 送信機の寸法 | 17.72 x 11.81 x 4.72インチ |
| 商品重量(約) | 3.34ポンド(パッケージ全体) |
| 特集 | Lightweight (receiver), Volume Control |
| メーカー | 中国製 |
10. 保証とサポート
保証: No specific warranty information is provided within this user manual. For details regarding warranty coverage, terms, and conditions, please refer to the product packaging, the purchase receipt, or contact the manufacturer directly.
サポート: For technical assistance, troubleshooting beyond this guide, or inquiries about your XTUGA BK510 system, please contact XTUGA customer support. You may find contact information on the official XTUGA webサイトまたは元の購入場所からご購入いただけます。
FCC情報: For regulatory questions concerning wireless microphone systems, you can contact the FCC at 1-888-CALL-FCC (TTY: 1-888-TELL-FCC) or visit fcc.gov/cgb/wirelessmicrophones.