ASUS P8H77-V
ASUS P8H77-V LGA 1155 Intel H77 ATX Motherboard User Manual
Model: P8H77-V
1. はじめに
This user manual provides comprehensive instructions for the installation, operation, and maintenance of the ASUS P8H77-V motherboard. Designed for Intel LGA 1155 processors, this ATX motherboard features the Intel H77 chipset, offering robust performance and connectivity for personal computer systems. Please read this manual thoroughly before beginning installation to ensure proper setup and to maximize the performance and longevity of your system.

Figure 1: ASUS P8H77-V Motherboard (Angled View)
This image displays the ASUS P8H77-V motherboard from an angled perspective, showcasing its various components such as the CPU socket, RAM slots, expansion slots, and heatsinks.
2.製品オーバーview
The ASUS P8H77-V motherboard is built on the Intel H77 Express chipset, supporting Intel 3rd and 2nd generation Core i7/i5/i3/Pentium/Celeron processors in the LGA 1155 package. It offers a rich set of features for a balanced and efficient computing experience.

Figure 2: ASUS P8H77-V Motherboard (Top-Down View)
この画像は明確なトップダウンの view of the ASUS P8H77-V motherboard, highlighting the layout of the CPU socket, four DDR3 DIMM slots, various PCI Express slots, SATA ports, and the chipset heatsink.
主要コンポーネント:
- CPUソケット(LGA 1155): Supports Intel 3rd/2nd Generation Core i7/i5/i3/Pentium/Celeron Processors.
- メモリスロット: Four DDR3 DIMM slots supporting up to 32GB of dual-channel DDR3 2200(O.C.)/2133(O.C.)/2000(O.C.)/1866(O.C.)/1600/1333 MHz non-ECC, unbuffered memory.
- 拡張スロット:
- 1 x PCIe 3.0 x16 slot (for discrete graphics cards)
- 1 x PCIe 2.0 x16 slot (runs at x4 mode)
- 2 x PCIe 2.0 x1 スロット
- 3 x PCI slots (for legacy expansion cards)
- Storage Ports:
- 2 x SATA 6Gb/s ports (Intel H77 chipset)
- 4 x SATA 3Gb/s ports (Intel H77 chipset)
- Supports RAID 0, 1, 5, 10
- 背面 I/O ポート: Includes USB 3.0, USB 2.0, HDMI, DVI, VGA, DisplayPort, Gigabit LAN, and 8-channel audio jacks.
3. セットアップとインストール
Proper installation is crucial for system stability and performance. Follow these steps carefully.
3.1 インストール前のチェックリスト:
- 必要なコンポーネント(CPU、CPU クーラー、RAM、電源、ストレージ デバイス、互換性のある PC ケース)がすべて揃っていることを確認します。
- Prepare a clean, static-free workspace. Use an anti-static wrist strap or frequently touch a grounded metal object.
- 具体的な取り付け手順については、PC ケースのマニュアルを参照してください。
3.2 Component Installation:
- CPUのインストール:
CPUソケットのレバーを慎重に開きます。CPUの三角形のマークをソケットのマークに合わせます。無理に押し込まず、CPUをソケットにゆっくりと差し込みます。レバーを閉じてCPUを固定します。
- CPUクーラーの取り付け:
Apply thermal paste (if not pre-applied on the cooler). Mount the CPU cooler according to its manufacturer's instructions, ensuring it is securely fastened and making good contact with the CPU. Connect the CPU fan cable to the "CPU_FAN" header on the motherboard.
- メモリ(RAM)のインストール:
Open the clips on both ends of the DIMM slots. Align the notch on the RAM module with the key in the slot. Press down firmly on both ends of the module until the clips snap into place. For dual-channel operation, install modules in matching colored slots (e.g., A2 and B2).
- マザーボードの取り付け:
Install standoffs in your PC case according to the ATX form factor. Carefully place the motherboard onto the standoffs, aligning the screw holes. Secure the motherboard with screws, ensuring it is firmly seated but not overtightened.
- 電源接続:
Connect the 24-pin ATX main power connector and the 8-pin (or 4-pin) ATX 12V CPU power connector from your power supply to the corresponding ports on the motherboard.
- ストレージデバイスの接続:
Connect SATA data cables from your storage drives (HDD/SSD/ODD) to the SATA ports on the motherboard. Connect SATA power cables from your power supply to the drives.
- フロントパネルの接続:
Connect the front panel cables (Power SW, Reset SW, HDD LED, Power LED, USB, Audio) from your PC case to the corresponding headers on the motherboard. Refer to the motherboard's silkscreen labels for correct pin alignment.
- 拡張カードの取り付け:
If installing a discrete graphics card or other expansion cards, insert them firmly into the appropriate PCIe or PCI slots until they click into place. Secure them with the case's retention mechanism or screws.
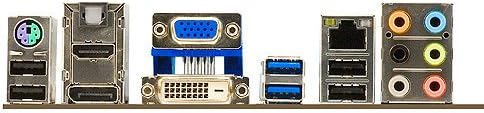
Figure 3: ASUS P8H77-V Motherboard Rear I/O Panel
This image shows a close-up of the rear input/output panel of the ASUS P8H77-V motherboard, detailing the various ports available for connecting external devices such as USB, HDMI, DVI, VGA, LAN, and audio jacks.
4. 操作手順
4.1 First Boot-Up:
- すべてのコンポーネントをインストールして接続したら、モニター、キーボード、マウスを接続します。
- Turn on the power supply and then press the power button on your PC case.
- The system should power on and display the ASUS logo or BIOS POST screen.
4.2 BIOS/UEFI セットアップ:
- During POST, repeatedly press the 削除 キー(または F2 key) to enter the BIOS/UEFI setup utility.
- In the BIOS, you can configure boot order, system time, fan speeds, and other hardware settings.
- 変更を保存して BIOS を終了し、起動を続行します。
4.3 ドライバーのインストール:
- After installing your operating system, install the necessary drivers for the motherboard's components (chipset, LAN, audio, USB 3.0, etc.).
- Drivers are typically provided on a support DVD included with the motherboard or can be downloaded from the official ASUS support webサイト。
5. メンテナンス
定期的なメンテナンスは、マザーボードとシステムの寿命を延ばし、最適なパフォーマンスを確保するのに役立ちます。
- ほこりの除去: Periodically clean dust from inside your PC case, especially from fans (CPU cooler, case fans, GPU fans) and heatsinks. Use compressed air or a soft brush. Ensure the system is powered off and unplugged before cleaning.
- BIOS アップデート: ASUSサポートを確認する website for the latest BIOS versions. BIOS updates can improve compatibility, stability, and performance. Follow the update instructions carefully to avoid system damage.
- ドライバーの更新: Keep your motherboard drivers updated. Newer drivers can offer performance improvements, bug fixes, and compatibility with new software or hardware.
- ケーブル管理 Ensure all cables are neatly routed and not obstructing airflow. Loose cables can interfere with cooling and cause connectivity issues.
6。 トラブルシューティング
このセクションでは、発生する可能性のある一般的な問題に対する解決策を示します。
一般的な問題と解決策:
- No Power / System Not Turning On:
- Check if the power supply is switched on and properly connected to the motherboard (24-pin and 8-pin/4-pin CPU power).
- フロントパネルの電源ボタン ケーブルがマザーボード ヘッダーに正しく接続されていることを確認します。
- 別のシステムまたは電源テスターを使用して電源をテストします。
- 表示なし:
- Verify that the monitor is connected to the correct video output (motherboard integrated graphics or discrete graphics card).
- グラフィック カード (該当する場合) と RAM モジュールを装着し直します。
- RAM スティック 1 個だけで起動してみます。
- CMOS をクリアします (ジャンパー/ボタンの位置についてはマザーボードのマニュアルを参照してください)。
- システムがフリーズまたはクラッシュする:
- CPUとGPUの温度を確認してください。過熱すると動作が不安定になる可能性があります。
- メモリ診断ツールを実行して、障害のある RAM がないか確認します。
- すべてのドライバーが最新であることを確認してください。
- Check for loose power or data cables to storage devices.
- Peripheral Not Detected (USB, SATA):
- デバイスが正しく接続されていることを確認してください。
- オペレーティング システムのデバイス マネージャーでドライバーの問題を確認してください。
- Try a different port or device to isolate the problem.
- Verify that the ports are enabled in BIOS/UEFI.
For more complex issues, consult the ASUS support webサイトをご覧いただくか、テクニカル サポートにお問い合わせください。
7. 仕様
Detailed technical specifications for the ASUS P8H77-V motherboard.
| 特徴 | 仕様 |
|---|---|
| ブランド | エイスース |
| モデル番号 | P8H77-V |
| CPUソケット | 1155 号線 |
| チップセット | インテル H77 エクスプレス |
| RAMメモリ技術 | DDR3 |
| メモリ速度 | 2133 MHz(OC) |
| RAMメモリ最大サイズ | 32ギガバイト |
| SATA ポート | 2x SATA 6Gb/s, 4x SATA 3Gb/s |
| USB 2.0 ポート | 4(背面)+内部ヘッダー |
| 製品寸法 | 12 x 1.7 x 8.9 インチ (ATX フォーム ファクター) |
| アイテム重量 | 2.91ポンド |
| 初回利用可能日 | 12年2012月XNUMX日 |
8. 保証情報
ASUS products typically come with a limited manufacturer's warranty. The specific terms and duration of the warranty may vary by region and product.
- Please refer to the warranty card included with your product packaging for detailed terms and conditions.
- You can also find the most up-to-date warranty information on the official ASUS support webサイト。
- 保証請求の際に必要となるため、購入証明(請求書または領収書)を保管してください。
9. サポート
さらに詳しいサポート、テクニカルサポート、ドライバーのダウンロードについては、ASUSの公式サポートをご覧ください。 webサイト:
You can also find FAQs, troubleshooting guides, and contact information for regional support centers on their webサイト。