1. הקדמה
Welcome to the user manual for the Ortur Laser Master 2 Laser Engraving Machine. This device is a versatile CNC laser cutter and engraver designed for various materials including wood, glass, and plastic. With a maximum speed of 3000mm/min, it offers precision and efficiency for your creative and professional projects. This manual provides essential information for safe operation, assembly, maintenance, and troubleshooting to ensure optimal performance and longevity of your machine.
The Ortur Laser Master 2 features a 32-bit motherboard for smoother and faster carving, and supports popular DIY engraving software like LaserGRBL and LightBurn.
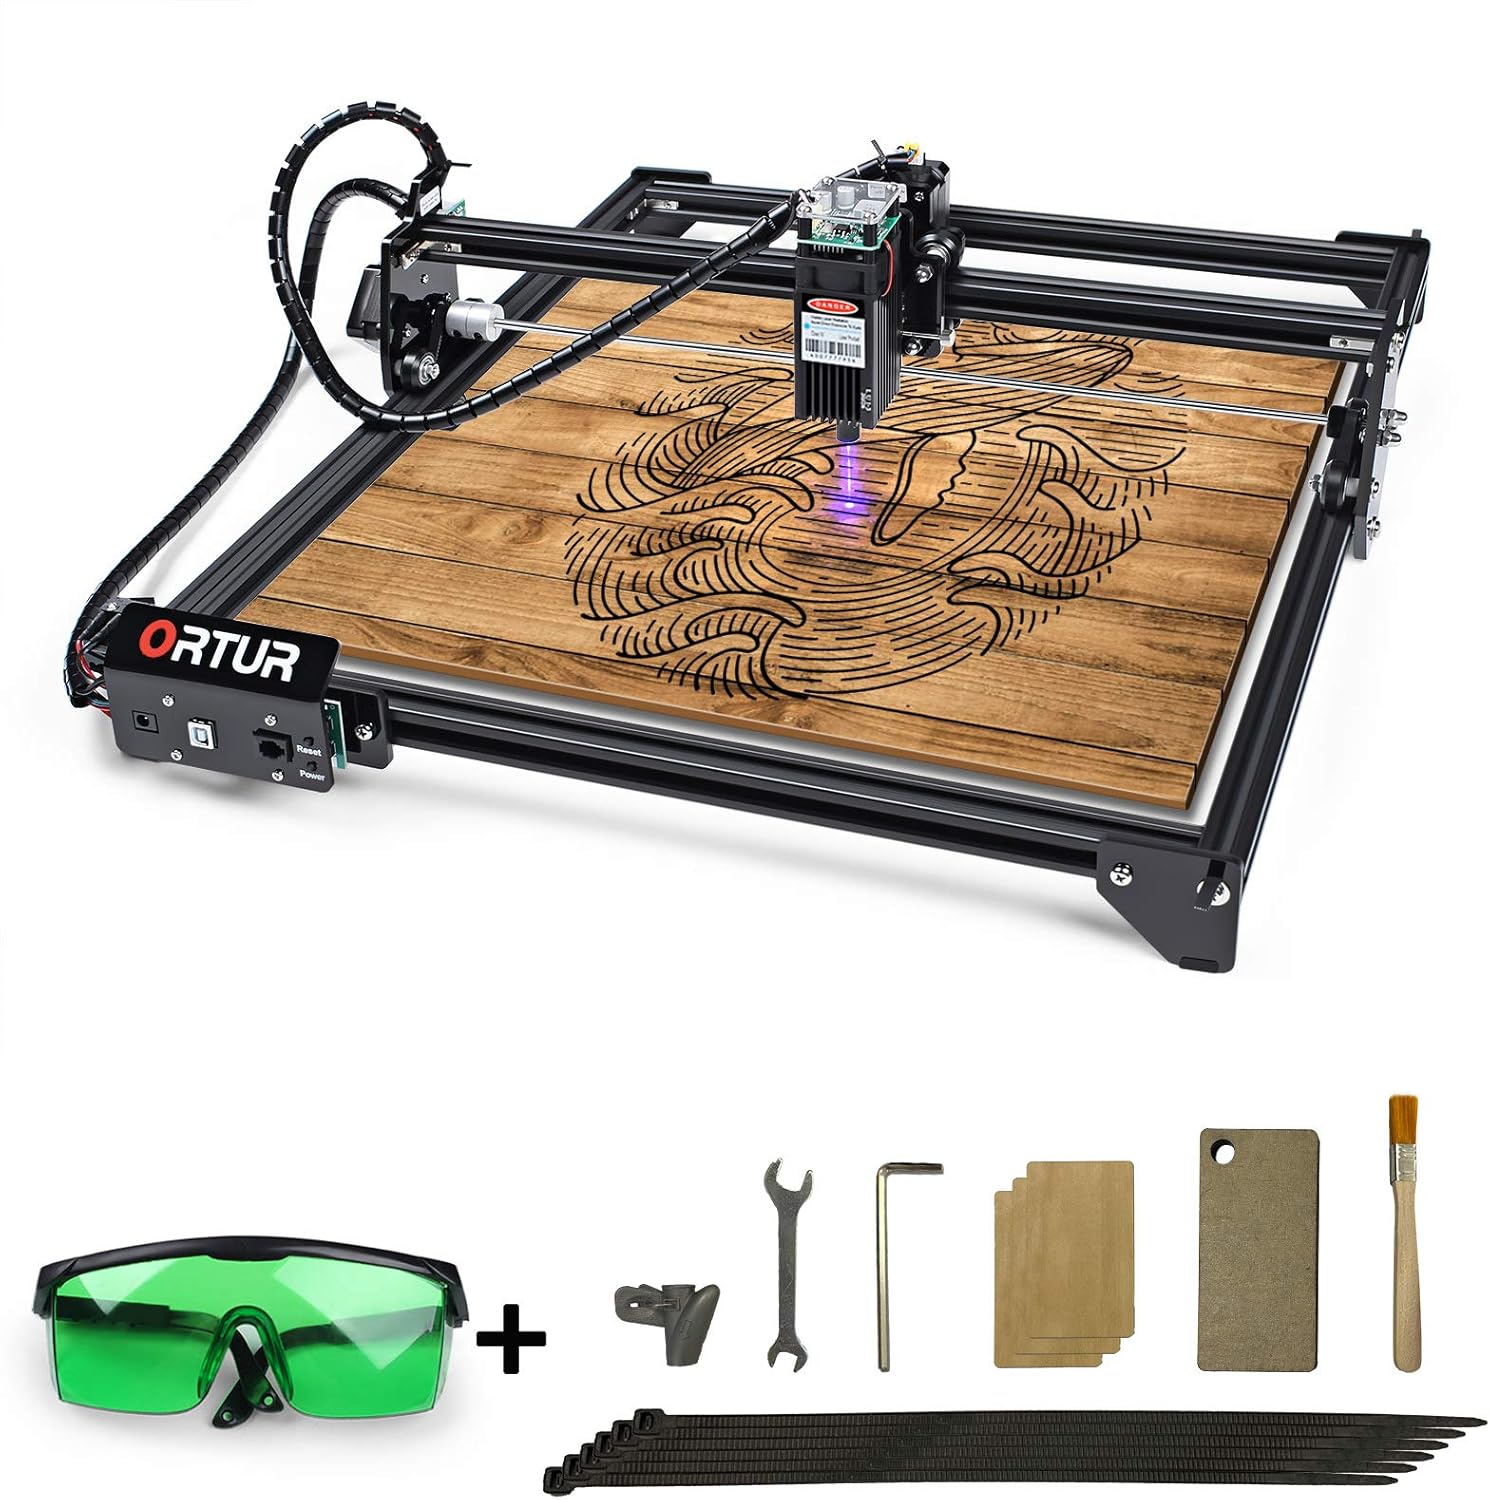
Image: The Ortur Laser Master 2 laser engraving machine, showcasing its main components and included accessories such as safety glasses, wrenches, and material samples.
2. מידע בטיחות
Operating a laser engraving machine involves potential hazards. It is crucial to read and understand all safety instructions before operating the device to prevent injury and damage. Always prioritize safety.
- הגנת עיניים: Always wear the provided laser safety glasses when the machine is in operation. Direct exposure to the laser beam can cause severe and permanent eye damage.
- הגנה על העור: Avoid direct contact with the laser beam. The laser can cause burns.
- אוורור: Operate the machine in a well-ventilated area. Laser engraving can produce smoke, fumes, and odors, which may be harmful if inhaled.
- סכנת שריפה: הלייזר עלול להצית חומרים דליקים. לעולם אל תותירו את המכונה ללא השגחה במהלך הפעולה. שמרו מטף כיבוי אש בקרבת מקום.
- תאימות חומרים: Only engrave or cut materials specified as safe. Certain plastics and other materials can produce toxic fumes when laser processed. Avoid reflective materials.
- ילדים וחיות מחמד: הרחק ילדים וחיות מחמד מאזור ההפעלה.
- עצירת חירום: Familiarize yourself with the location of the emergency stop button and how to quickly power off the machine in an emergency.
3. תכולת החבילה
לפני תחילת ההרכבה, אנא ודא שכל הרכיבים המפורטים להלן נמצאים באריזה שלך:
- Ortur Laser Master 2 Frame Components (Aluminum profiles, gantry, etc.)
- Laser Module (LU1-3, 15W)
- Control Box / Motherboard
- מתאם חשמל וכבל
- כבל USB
- משקפי בטיחות בלייזר
- Assembly Tools (Wrenches, Hex keys)
- קשרי כבלים
- Test Materials (e.g., wood samples, cardboard)
- מדריך למשתמש (מסמך זה)
4. התקנה והרכבה
The Ortur Laser Master 2 is designed for easy assembly, typically taking 10-20 minutes to get it ready for operation. Follow these steps carefully:

Image: Disassembled components of the Ortur Laser Master 2, illustrating its modular design for straightforward assembly.
- פרק רכיבים: Carefully remove all parts from the packaging and lay them out on a clean, flat surface. Refer to the package contents list to ensure everything is present.
- להרכיב מסגרת: חבר את פרו האלומיניוםfiles to form the rectangular frame. Ensure all screws are tightened securely.
- Install Gantry: Attach the gantry (the moving crossbar) to the side rails. Ensure it slides smoothly along the rails.
- Mount Laser Module: Securely attach the laser module to the gantry. Ensure it is firmly in place and properly aligned.
- חבר חיווט: Connect all necessary cables from the motors, limit switches, and laser module to the control box/motherboard. Refer to the wiring diagram in the quick start guide for precise connections.
- חיבור חשמל: Connect the power adapter to the control box and then to a suitable power outlet. Do not power on the machine yet.
- חיבור USB: חבר את המכשיר למחשב שלך באמצעות כבל ה-USB המצורף.
5. הוראות הפעלה
5.1 התקנה ושימוש בתוכנה
The Ortur Laser Master 2 supports widely used engraving software. It is recommended to use either LaserGRBL (free) or LightBurn (paid).

Image: Displays the user interfaces of LaserGRBL and LightBurn, two popular software options compatible with the Ortur Laser Master 2.
- לייזרGRBL: A free, open-source software compatible with Windows XP, 7, 8, and 10. It allows importing various image formats (NC, DXF, BMP, JPG, PNG) and can be used for basic carving and cutting.
- LightBurn: A powerful, paid software compatible with Windows, macOS, and Linux. It offers advanced features for design, layout, and control of your laser engraver.
Download and install your preferred software from the official Ortur website or the respective software developer's website. Follow the software's specific instructions for driver installation and machine connection.
5.2 Material Compatibility and Settings
The Ortur Laser Master 2 (LU1-3 module) is capable of engraving and cutting a wide range of materials. Optimal results depend on adjusting the laser speed and power based on the material type and desired effect. Always perform test engravings on scrap material before starting a final project.

Image: A detailed table providing recommended speed and power settings for engraving and cutting different materials like plywood, paper, wood, glass, and various plastics.
Common materials include wood, plywood, cardboard, paper, leather, acrylic, glass, stone, ceramic tile, and some coated metals. Note that the LU1-3 module is not suitable for cutting non-flammable materials or engraving highly reflective surfaces without proper preparation (e.g., painting the surface black).
5.3 תהליך חריטה וחיתוך
- הכן חומר: Place your material securely on the engraving bed. Ensure it is flat and stable.
- מיקוד הלייזר: The LU1-3 module has a fixed focus. Use the provided focal gauge (typically 29mm from the laser module to the material surface) to set the correct distance. Adjust the material height or use a Z-axis lifter if available.
- עיצוב עומס: Open your chosen software (LaserGRBL or LightBurn) and load your design file.
- הגדר פרמטרים: Adjust the laser power, speed, and number of passes according to your material and desired outcome. Refer to the material compatibility table.
- Position Origin: Use the software to set the starting point (origin) for your engraving or cutting job. Perform a frame test to ensure the design fits within your material.
- התחל את הפעולה: Ensure all safety precautions are in place (wearing safety glasses, proper ventilation). Initiate the engraving/cutting process from the software.
- מעקב אחר התקדמות: Do not leave the machine unattended during operation. Observe for any issues like smoke, fire, or unexpected behavior.
- סִיוּם: Once the job is complete, wait for the laser to turn off and the machine to stop moving before removing the material.

Image: A collage of various items engraved and cut by the Ortur Laser Master 2, demonstrating its versatility on materials like wood, glass, stone, and acrylic.
6. תחזוקה
Regular maintenance ensures the longevity and optimal performance of your Ortur Laser Master 2.
- עדשה נקייה: Periodically clean the laser lens with a soft, lint-free cloth and lens cleaning solution (if recommended by manufacturer) to ensure clear beam transmission.
- Clean Rails and Wheels: Keep the guide rails and wheels free from dust and debris. Use a dry cloth or compressed air. Lubricate if necessary, following manufacturer guidelines.
- בדוק חיווט: Inspect all cables and connections regularly for any signs of wear, fraying, or loose connections.
- נקה פסולת: After each use, remove any material scraps, dust, or residue from the engraving area.
- עדכוני קושחה: בדקו את אורטור הרשמי website for any available firmware updates for your machine.
7. פתרון תקלות
סעיף זה עוסק בבעיות נפוצות שאתם עשויים להיתקל בהן ומציע פתרונות אפשריים.
| בְּעָיָה | סיבה אפשרית | פִּתָרוֹן |
|---|---|---|
| לייזר לא יורה או פלט חלש | Loose connection, dirty lens, incorrect power setting, laser module failure. | Check all cable connections. Clean the laser lens. Verify power settings in software. Contact support if module is faulty. |
| המכונה לא מתחברת למחשב | בעיה בכבל USB, מנהל התקן לא מותקן, נבחרה יציאת COM שגויה. | Try a different USB port/cable. Install/reinstall drivers. Select correct COM port in software. |
| החריטה מטושטשת או לא עקבית | Incorrect focus, loose belts, material not flat, machine vibration. | Re-focus the laser. Check and tighten belts. Ensure material is flat and secured. Place machine on a stable surface. |
| Machine moves erratically or stops mid-job | Loose wiring, software error, power supply issue, motor problem. | Check all wiring. Restart software and machine. Ensure stable power supply. Contact support if motors are faulty. |
If you encounter issues not listed here, or if the suggested solutions do not resolve the problem, please contact Ortur customer support for further assistance.
8. מפרטים
Key technical specifications for the Ortur Laser Master 2 (LU1-3 model):
- דֶגֶם: אורטור לייזר מאסטר 2 LU1-3
- מודול לייזר: LU1-3 (Fixed Focus)
- עוצמת אור: Approximately 4,000-4,500mW (15W electric power)
- אֹרֶך גַל: 450 ± 5 ננומטר
- אזור חריטה: Approximately 400mm x 430mm (based on common Ortur Laser Master 2 models)
- לוח אם: 32-bit MCU chipset
- מהירות מרבית: 3000 מ"מ לדקה
- חוֹמֶר: אלומיניום, פלסטיק
- קלט כרךtage: 230 וולט (AC)
- משקל פריט: כ-3.47 קילוגרם
- תוכנה נתמכת: LaserGRBL, LightBurn
- פורמטי תמונה נתמכים: NC, DXF, BMP, JPG, PNG
- מַעֲרֶכֶת הַפעָלָה: Windows XP, 7, 8, 10; macOS; Linux

תמונה: תקריב view of the Ortur 32-bit motherboard, highlighting its advanced processing capabilities for smoother and faster carving.

Image: The Ortur LU1-3 laser module, showing its fixed focus design and key specifications such as wavelength and power output.
9. אחריות ותמיכה
Ortur provides a limited warranty for the Laser Master 2. Please refer to the official Ortur webבאתר או בכרטיס האחריות המצורף למוצר שלך לקבלת תנאים והגבלות מפורטים.
For technical support, troubleshooting assistance, or spare parts, please visit the official Ortur support page or contact their customer service team. Provide your product model and serial number when seeking support to expedite the process.
Official Ortur Webאֲתַר: www.ortur.tech