1. הקדמה
This manual provides essential instructions for the installation, operation, maintenance, and troubleshooting of the APC Smart-UPS SRT3000RMXLT 3kVA 208V Rackmount Uninterruptible Power Supply (UPS). Please read this manual thoroughly before installing or operating the equipment to ensure proper usage and safety.
2. מידע בטיחות
יש להקפיד על כל האזהרות והוראות ההפעלה במדריך זה. אי ביצוע פעולה זו עלול לגרום לפציעה או נזק לציוד.
- בטיחות חשמל: יחידה זו מכילה כרך מסוכןtages. Do not attempt to disassemble the UPS. Servicing should only be performed by qualified personnel.
- בטיחות סוללה: סוללות עלולות להוות סיכון להתחשמלות וקצר חשמלי גבוה. הסירו שעונים, טבעות או חפצי מתכת אחרים לפני הטיפול בסוללות. השתמשו בכלים עם ידיות מבודדות.
- מִשׁקָל: The UPS is heavy. Use proper lifting techniques and ensure adequate support during installation.
- סְבִיבָה: Install the UPS indoors in a controlled environment, free from excessive dust, moisture, and extreme temperatures.
3. תכולת החבילה
Carefully unpack the UPS and inspect for shipping damage. The package should contain the following items:
- APC Smart-UPS SRT3000RMXLT Unit
- Power Supply (Built-In)
- חומרה להרכבת מתלה
- תקליטור תיעוד
- כבל USB
- כבל טורי
4. התקנה
4.1 התקנה פיזית
The SRT3000RMXLT is designed for rack installation. Ensure the rack is stable and capable of supporting the UPS weight (approximately 69 pounds).
- Mount the UPS into a standard 19-inch rack using the provided rack-mounting hardware.
- ודאו זרימת אוויר מספקת סביב היחידה. אין לחסום פתחי אוורור.

איור 4.1: חזית view of the APC Smart-UPS SRT3000RMXLT. This image shows the front panel with the display and ventilation grille.
4.2 חיבור UPS
Connect the UPS to the utility power and your equipment.
- Connect the UPS input power cord to a dedicated 208V AC outlet. The UPS uses a Type B - 3 pin (North American) power plug.
- Connect your equipment to the output receptacles on the rear of the UPS. The unit provides 12 IEC 320 C13/C14 outlets.
- For communication, connect the USB cable or serial cable from the UPS to your computer or network management card.
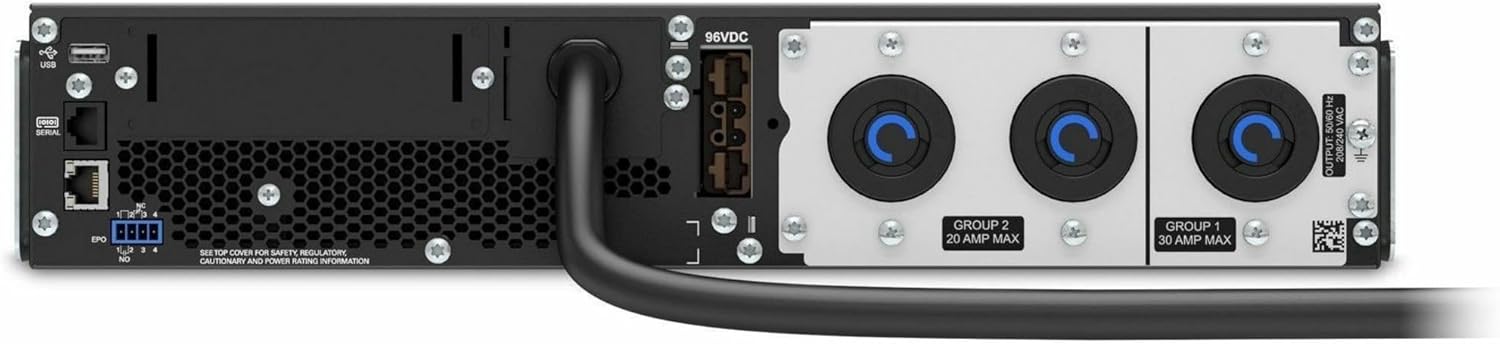
איור 4.2: אחורי view of the APC Smart-UPS SRT3000RMXLT. This image displays the various input and output ports, including USB, serial, EPO, and the 12 output receptacles, along with the main power input.
4.3 הפעלה ראשונית
After all connections are secure:
- לחץ על לחצן ההפעלה בלוח הקדמי כדי להפעיל את ה-UPS.
- The UPS will perform a self-test and the display will show the current status.
- Allow the batteries to charge for at least 6 hours before relying on them for extended backup time.
5. הפעלת ה-UPS
5.1 צג ובקרות בלוח הקדמי
The front panel features an LCD display and control buttons for monitoring and configuring the UPS.
- תצוגת LCD: Shows real-time status, load, battery charge, input/output voltage, and event logs.
- לחצן ESC: Exits the current menu or cancels an operation.
- לחצן אישור: מאשר בחירה או כניסה לתפריט.
- חצים למעלה/למטה: נווט בין אפשרויות התפריט או התאם הגדרות.
5.2 פעולה בסיסית
- הפעלה: לחץ והחזק את לחצן ההפעלה עד שהתצוגה תיאר.
- כיבוי: Press and hold the power button until the UPS powers down. Ensure all connected equipment is safely shut down first.
- מצב סוללה: במקרה של כוח outage, the UPS will automatically switch to battery power. The display will indicate 'On Battery'.
- מבחן עצמי: Initiate a manual self-test through the front panel menu to verify battery and UPS functionality.
6. תחזוקה
6.1 החלפת סוללה
The UPS uses sealed lead-acid batteries. Battery life is typically 3-5 years, depending on environmental conditions and usage. Replace batteries when the UPS indicates a 'Battery Fault' or 'Replace Battery' warning.
- Contact APC support or a certified service technician for battery replacement.
- Always use genuine APC replacement battery cartridges (RBCs) to ensure compatibility and optimal performance.
- Recycle old batteries responsibly.
6.2 ניקוי
Keep the UPS free from dust and debris to ensure proper ventilation.
- השתמש במטלית רכה ויבשה כדי לנקות את החלק החיצוני של ה-UPS.
- אין להשתמש בחומרי ניקוי נוזליים או ממסים.
- ודא שפתחי האוורור נקיים ממכשולים.
7. פתרון תקלות
סעיף זה מספק פתרונות לבעיות נפוצות. עבור בעיות מורכבות יותר, פנה לתמיכה הטכנית.
| בְּעָיָה | סיבה אפשרית | פִּתָרוֹן |
|---|---|---|
| UPS לא נדלק | No input power; Battery disconnected or discharged | Check power cord connection; Ensure utility power is present; Allow batteries to charge. |
| UPS מצפצף ברציפות | On battery power; Overload condition | Check utility power; Reduce connected load. |
| מחוון 'החלפת סוללה' | הסוללה מתקרבת לסוף חייה | Order and replace the battery cartridge. |
| UPS not providing power to outlets | Output circuit breaker tripped; UPS in fault mode | Reset circuit breaker; Check display for fault codes and consult manual. |
8. מפרטים
Key technical specifications for the APC Smart-UPS SRT3000RMXLT.
| תכונה | מִפרָט |
|---|---|
| מספר דגם | SRT3000RMXLT |
| מותג | APC |
| קיבולת הספק פלט | 3000 VA / 2700 וואט |
| פלט נומינלי כרךtage | 208V AC |
| קלט נומינלי כרךtage | 208V AC / 230V AC |
| תדר קלט | 60 הרץ |
| חיבורי פלט | 12 x IEC 320 C13/C14 |
| סוג סוללה | חומצת עופרת |
| זמן טעינה טיפוסי | 6 שעות |
| Typical Backup Time (Full Load) | דקות 4 |
| גורם צורה | דְפוּפָה |
| מידות (H x W x D) | 9 x 23 x 34 אינץ' |
| מִשׁקָל | 69 פאונד |
| טמפרטורת הפעלה | 0 - 40 מעלות צלזיוס (32 - 104 מעלות פרנהייט) |
9. אחריות ותמיכה
9.1 מידע אחריות
APC provides a standard warranty for this product. Please refer to the warranty card included with your product or visit the official APC webבאתר לקבלת תנאי אחריות מפורטים הספציפיים לאזורך.
9.2 תמיכה טכנית
For technical assistance, product information, or troubleshooting beyond the scope of this manual, please contact APC customer support. Have your model number (SRT3000RMXLT) and serial number ready when contacting support.
- Visit the official APC webאתר למשאבי תמיכה, שאלות נפוצות ופרטי יצירת קשר.
- Online resources often include updated manuals, firmware, and diagnostic tools.