
1. Introduzione
This manual provides essential information for the safe and effective operation of your VEVOR C50AMPPT DC to DC Charger with MPPT. Please read all instructions carefully before installation and use. Retain this manual for future reference.
1.1 Informazioni sulla sicurezza
- Indossare sempre adeguati dispositivi di protezione individuale (DPI) durante l'installazione e la manutenzione.
- Ensure all connections are secure and correctly polarized to prevent damage to the charger or batteries.
- Do not operate the charger in wet conditions or expose it to flammable materials.
- Disconnect power sources before making or breaking connections.
- This device is designed for 12V/24V systems. Verify your system voltage prima della connessione.
2. Prodotto finitoview
The VEVOR C50AMPPT DC to DC Charger is a high-efficiency, multi-stage battery charger designed for charging auxiliary batteries from a vehicle's alternator or solar panels. It features Maximum Power Point Tracking (MPPT) for solar input and supports bi-directional charging, including emergency reverse charging to assist a low starter battery.
2.1 Caratteristiche principali
- Prestazioni di ricarica rapida: Delivers up to 50A and 650W with up to 94% efficiency.
- Doppio ingresso: Supports charging from both solar panels and the vehicle alternator.
- Tecnologia MPPT: Optimizes solar panel output and prioritizes solar energy to reduce alternator load.
- Emergency Reverse Charging: Allows charging of the starter battery from the auxiliary battery.
- Ampia compatibilità della batteria: Compatible with LiFePO4, Lead Acid, GEL, AGM, and Calcium batteries, and over 95% of portable power stations.
- Ampio volumetageSupporto: Operates in 12V to 12V, 12V to 24V, 24V to 12V, and 24V to 24V modes.
- Reliable Charging Protection: Include sovravoltage, sottovoltage, reverse polarity, over-temperature, and short circuit protection.
- Ventola di raffreddamento integrata: Ensures stable operation under high temperatures.
2.2 Componenti del prodotto
The package includes the VEVOR C50AMPPT DC to DC Charger, two 11.8 inch (30cm) battery leads with XT60 connectors, two DIP switch keys, four wire terminals, and this user manual.

Image: The VEVOR C50AMPPT DC to DC Charger unit, showing its robust casing e terminali di collegamento.
3. Specifiche
| Specificazione | Valore |
|---|---|
| Numero di modello | C50AMPPT |
| Ingresso volumetage | 12 V/24 V |
| Volume di uscitatage | 12.6V - 29.4V (depending on battery type and mode) |
| Corrente di carica | 50A |
| Potenza massima in uscita | 650W |
| Efficienza di conversione | >94% |
| Tipi di batterie compatibili | LiFePO4, Lead Acid, GEL, AGM, Calcium |
| Dimensioni del prodotto (P x L x A) | 5.71" x 9.25" x 2.76" (145 x 235 x 70 mm) |
| Peso dell'articolo | 3.6 libbre (1.62 kg) |
| Tipo di connettore | XT60 Quick-Connect Cable |
| Certificazioni | UL, FCC |
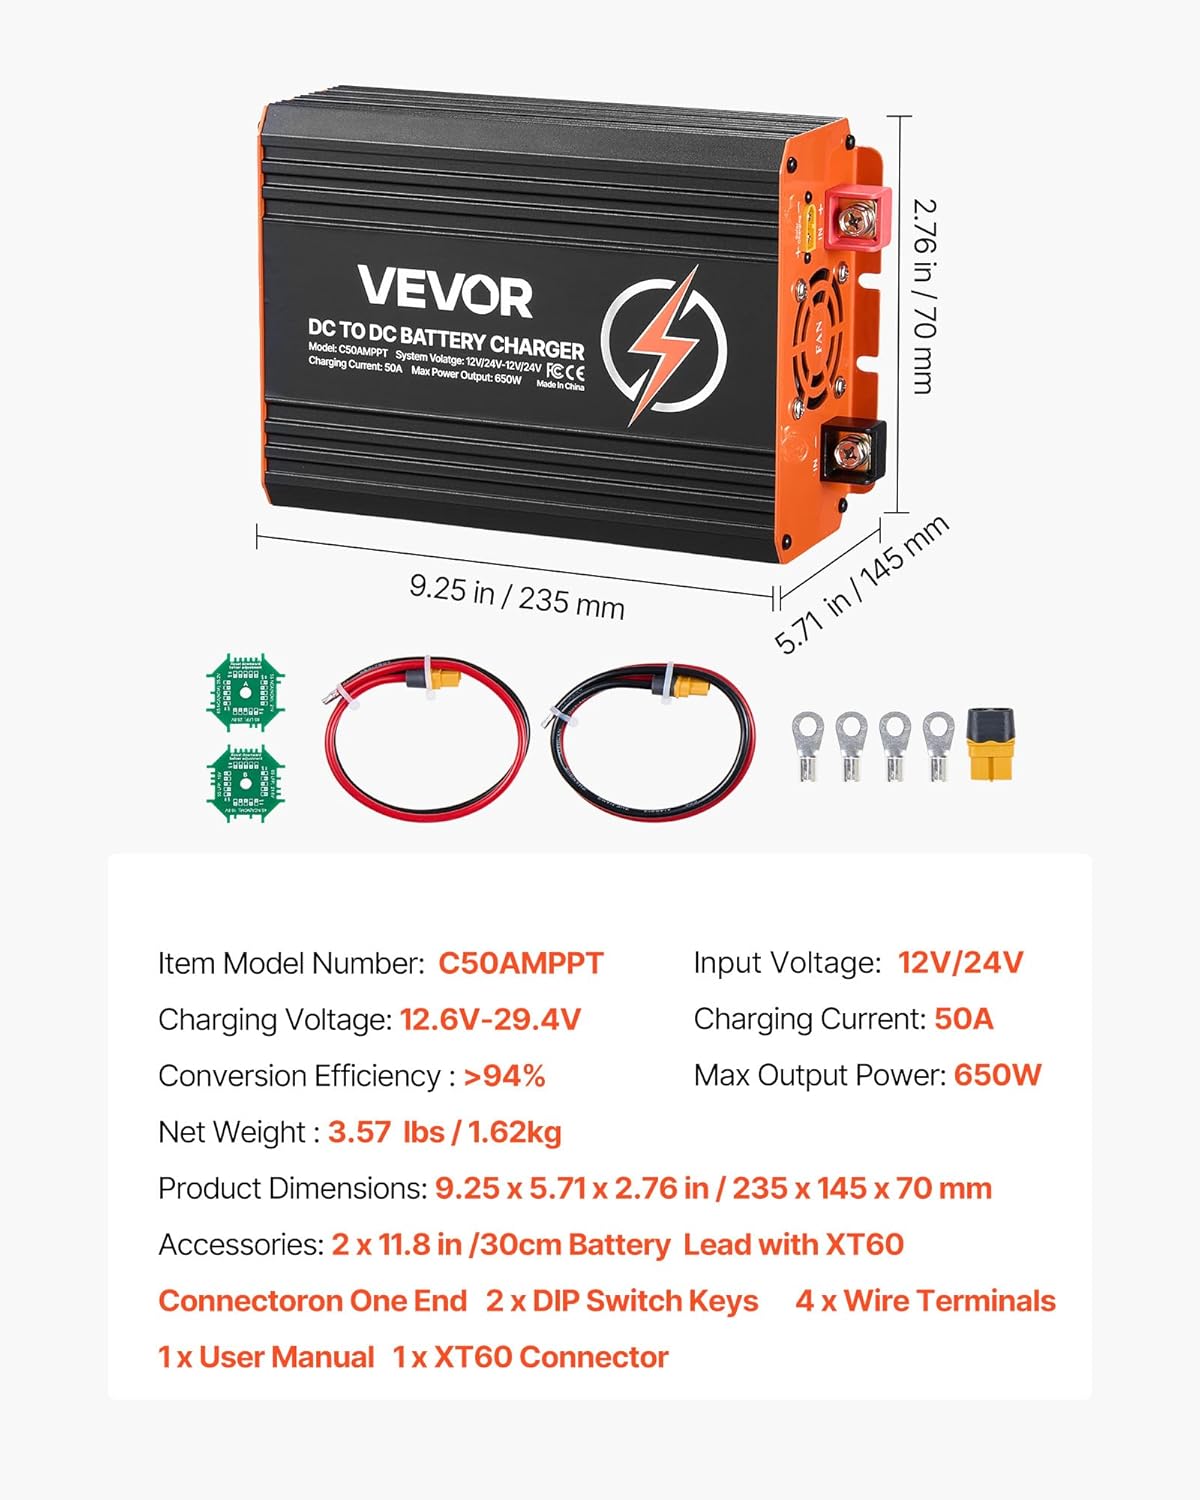
Image: Visual representation of the VEVOR C50AMPPT DC to DC Charger's dimensions and key specifications.
4. Configurazione e installazione
Proper installation is crucial for the performance and safety of your DC to DC charger. Consult a qualified professional if you are unsure about any steps.
4.1 Montaggio
- Mount the charger in a dry, well-ventilated area, away from direct sunlight and heat sources.
- Ensure sufficient clearance around the unit for proper airflow, especially for the cooling fan.
- Secure the charger firmly using appropriate fasteners.
4.2 Schema elettrico
The charger supports dual input from both the vehicle alternator (starter battery) and solar panels, charging an auxiliary (service) battery. It also allows for reverse charging of the starter battery.

Image: A detailed wiring diagram illustrating the connection of the DC to DC charger to a starter battery, service battery, and solar panels within a vehicle system.
4.3 Fasi di connessione
- Connect to Starter Battery: Connect the charger's input terminals (marked 'IN') to your vehicle's starter battery. Ensure correct polarity (positive to positive, negative to negative). Use appropriately sized cables and fuses.
- Connect to Auxiliary Battery: Connect the charger's output terminals (marked 'OUT') to your auxiliary (service) battery. Maintain correct polarity.
- Connect Solar Panels (Optional): If using solar, connect your solar panels to the dedicated solar input terminals on the charger. Ensure the solar panel voltage is within the charger's specified range.
- Selezione del tipo di batteria: Use the provided DIP switch keys to select the correct battery type for your auxiliary battery. Refer to the table below for settings.
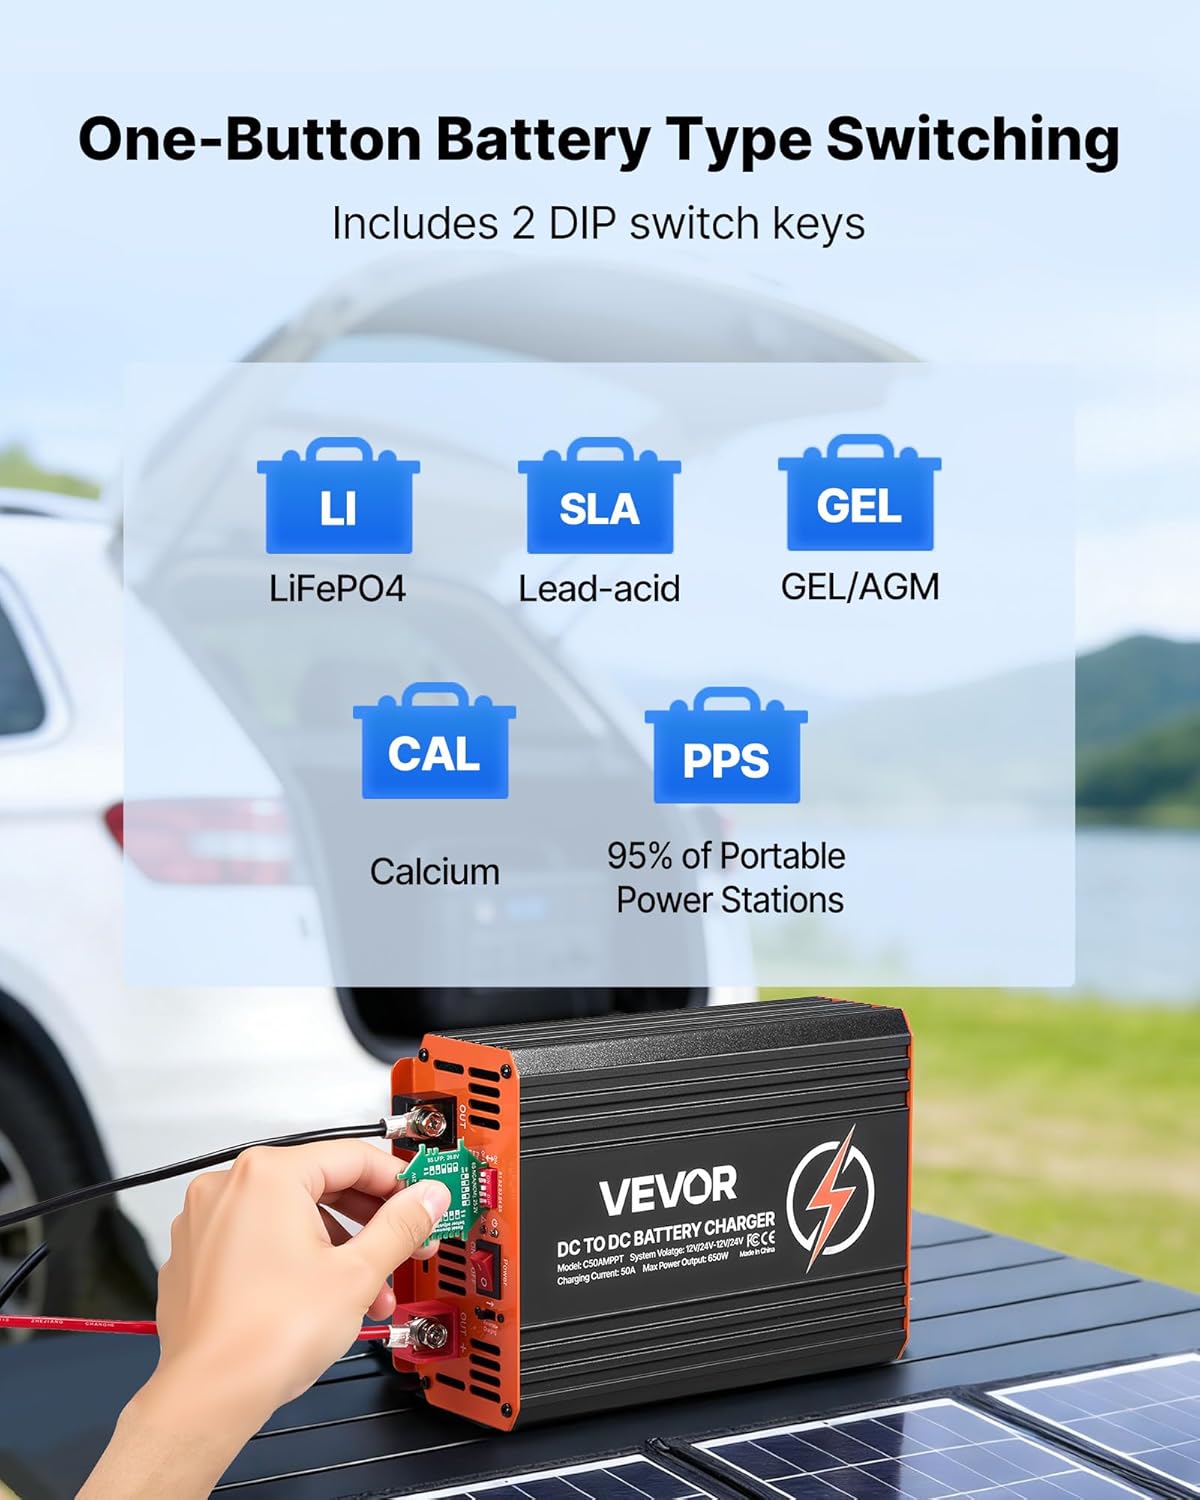
Image: The VEVOR DC to DC Charger showing the DIP switches used for selecting the auxiliary battery type.
4.4 Battery Type DIP Switch Settings
Refer to the charger's label or a separate guide for the specific DIP switch combinations for each battery chemistry (LiFePO4, Lead-Acid, GEL, AGM, Calcium).
5. Istruzioni per l'uso
Once installed and configured, the VEVOR C50AMPPT charger operates largely automatically.
5.1 modalità di ricarica
The charger automatically detects the input voltage and adjusts its operation. It supports:
- 12V to 12V Mode: For charging a 12V auxiliary battery from a 12V starter battery.
- 12V to 24V Mode: For charging a 24V auxiliary battery from a 12V starter battery.
- 24V to 12V Mode: For charging a 12V auxiliary battery from a 24V starter battery.
- 24V to 24V Mode: For charging a 24V auxiliary battery from a 24V starter battery.

Image: Illustrations of different vehicle types (RV, modified systems, trucks, marine) demonstrating the charger's wide voltage compatibilità.
5.2 Solar Charging (MPPT)
When solar panels are connected, the integrated MPPT controller optimizes power extraction from the panels. The charger prioritizes solar input to reduce the load on your vehicle's alternator, enhancing fuel efficiency and extending alternator life.
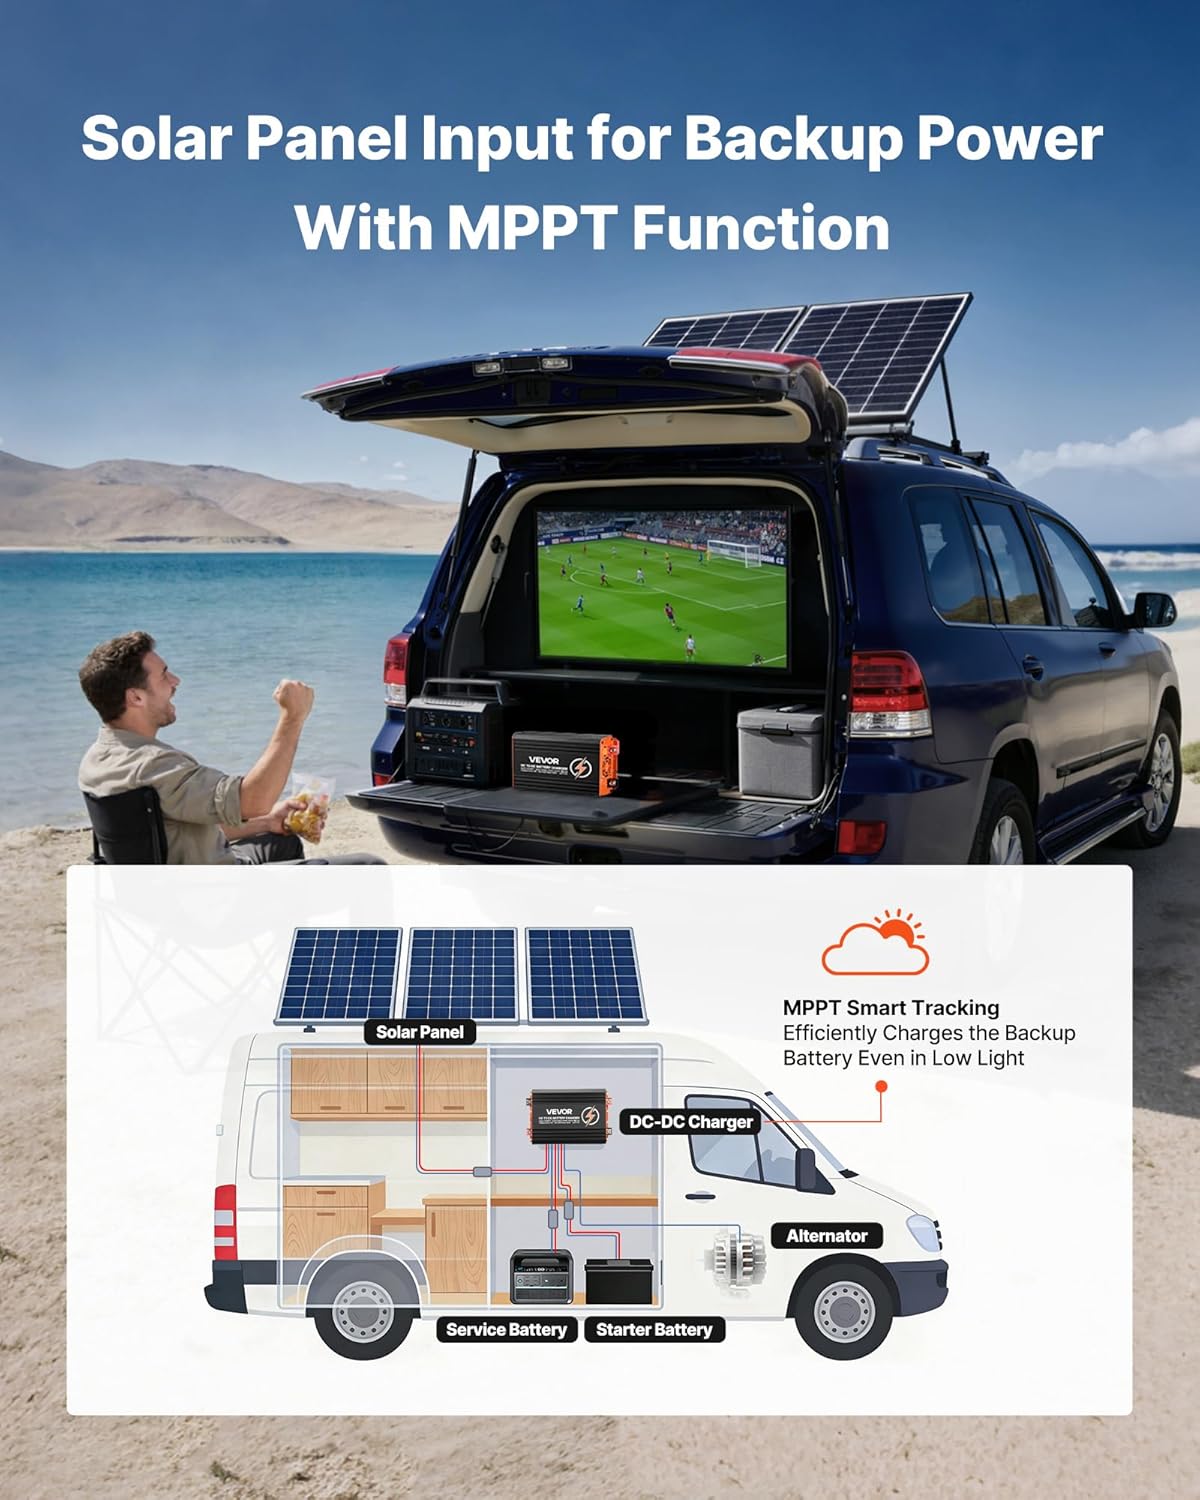
Image: A diagram showing the VEVOR DC to DC Charger connected to solar panels and an alternator, charging a service battery, highlighting the MPPT function.
5.3 Emergency Reverse Charging
In situations where your vehicle's starter battery is low, the charger can be manually activated (if applicable, refer to specific model features) or automatically engage to draw power from the auxiliary battery to provide a charge to the starter battery. This feature helps prevent being stranded due to a dead starter battery.

Image: A visual representation of the bi-directional charging capability, showing forward charging from the vehicle to the backup battery and reverse charging from the backup battery to the vehicle starter battery.
6. Manutenzione
Regular maintenance ensures the longevity and optimal performance of your VEVOR DC to DC Charger.
- Pulizia: Pulire periodicamente l'esterno del caricabatterie con un panno asciutto e morbido. Assicurarsi che le aperture di ventilazione siano libere da polvere e detriti. Non utilizzare detergenti liquidi.
- Verifica della connessione: Regularly inspect all wiring connections for tightness and corrosion. Loose connections can lead to overheating and poor performance.
- Ventilazione: Ensure the area around the charger remains clear to allow the cooling fan to operate effectively.
- Condizioni ambientali: Avoid exposing the charger to extreme temperatures or humidity beyond its operating specifications.

Image: The VEVOR DC to DC Charger depicted in both hot and cold environments, emphasizing its built-in cooling fan for temperature management.
7. Risoluzione Dei Problemi
If you encounter issues with your VEVOR DC to DC Charger, refer to the following common troubleshooting steps:
| Problema | Possibile causa | Soluzione |
|---|---|---|
| Caricabatterie non funzionante / Nessuna uscita | No input power; Incorrect wiring; Blown fuse; Battery type not selected. | Check input connections and voltage from starter battery/solar. Verify wiring polarity. Check and replace fuses if necessary. Ensure DIP switches are set for the correct battery type. |
| Bassa corrente di carica | Poor connections; Undersized wiring; Low input voltage; Overheating. | Inspect all connections for tightness and corrosion. Use appropriate gauge wiring. Ensure starter battery/alternator is providing sufficient voltage. Check for obstructions around the cooling fan. |
| Surriscaldamento | Insufficient ventilation; Excessive load; Faulty fan. | Ensure adequate airflow around the unit. Reduce load if possible. Contact support if the fan is not operating. |
| La ricarica inversa non funziona | Feature not activated; Auxiliary battery too low. | Refer to the specific model's instructions for activating reverse charging. Ensure the auxiliary battery has sufficient charge. |
Se il problema persiste dopo aver provato queste soluzioni, contattare l'assistenza clienti VEVOR.
8. Garanzia e supporto
VEVOR products are designed for reliability and performance. For warranty information, please refer to the warranty card included with your product or visit the official VEVOR websito.
8.1 Assistenza clienti
If you have any questions, require technical assistance, or need to report an issue, please contact VEVOR customer support through their official website or the contact information provided with your purchase. When contacting support, please have your model number (C50AMPPT) and purchase details readily available.