1. Introduzione
This manual provides essential information for the safe assembly, operation, maintenance, and troubleshooting of your Prostormer 10-Inch Double Bevel Sliding Compound Miter Saw, Model MS002D. Please read and understand all instructions before using the tool. Keep this manual for future reference.
2. Istruzioni generali di sicurezza
Seguire sempre le precauzioni di sicurezza di base per ridurre il rischio di incendio, scosse elettriche e lesioni personali.
- Sicurezza dell'area di lavoro: Mantenere l'area di lavoro pulita e ben illuminata. Aree disordinate o buie possono favorire incidenti. Non utilizzare utensili elettrici in atmosfere esplosive, ad esempio in presenza di liquidi, gas o polveri infiammabili.
- Sicurezza elettrica: Le spine degli elettroutensili devono essere adatte alla presa. Non modificare mai la spina in alcun modo. Evitare il contatto del corpo con superfici messe a terra o a massa come tubi, termosifoni, cucine e frigoriferi.
- Sicurezza personale: Indossare sempre protezioni per gli occhi, protezioni per l'udito e una maschera antipolvere. Vestirsi in modo appropriato; evitare abiti larghi o gioielli. Tenere capelli, indumenti e guanti lontani dalle parti in movimento.
- Uso e cura dello strumento: Non forzare l'utensile elettrico. Utilizzare l'utensile elettrico corretto per l'applicazione desiderata. Scollegare la spina dalla presa di corrente prima di effettuare qualsiasi regolazione, sostituire accessori o riporre l'utensile elettrico.
- Sicurezza specifica per la sega troncatrice: Ensure the blade guard is always in place and functioning correctly. Never reach into the blade area when the saw is connected to power. Secure the workpiece firmly with the clamp prima di tagliare.
3. Contenuto della confezione
Verificare che tutti gli articoli siano presenti al momento del disimballaggio:
- Prostormer 10-Inch Double Bevel Sliding Compound Miter Saw
- 1 x 100T TCT Blade (pre-installed)
- 2 x Side Support Bars
- 1 chiave a brugola
- 1 x Pezzo da lavorare Clamp
- 1 x sacchetto antipolvere
- 1 x Manuale utente (questo documento)
4. Componenti del prodotto
Familiarize yourself with the parts of your miter saw:
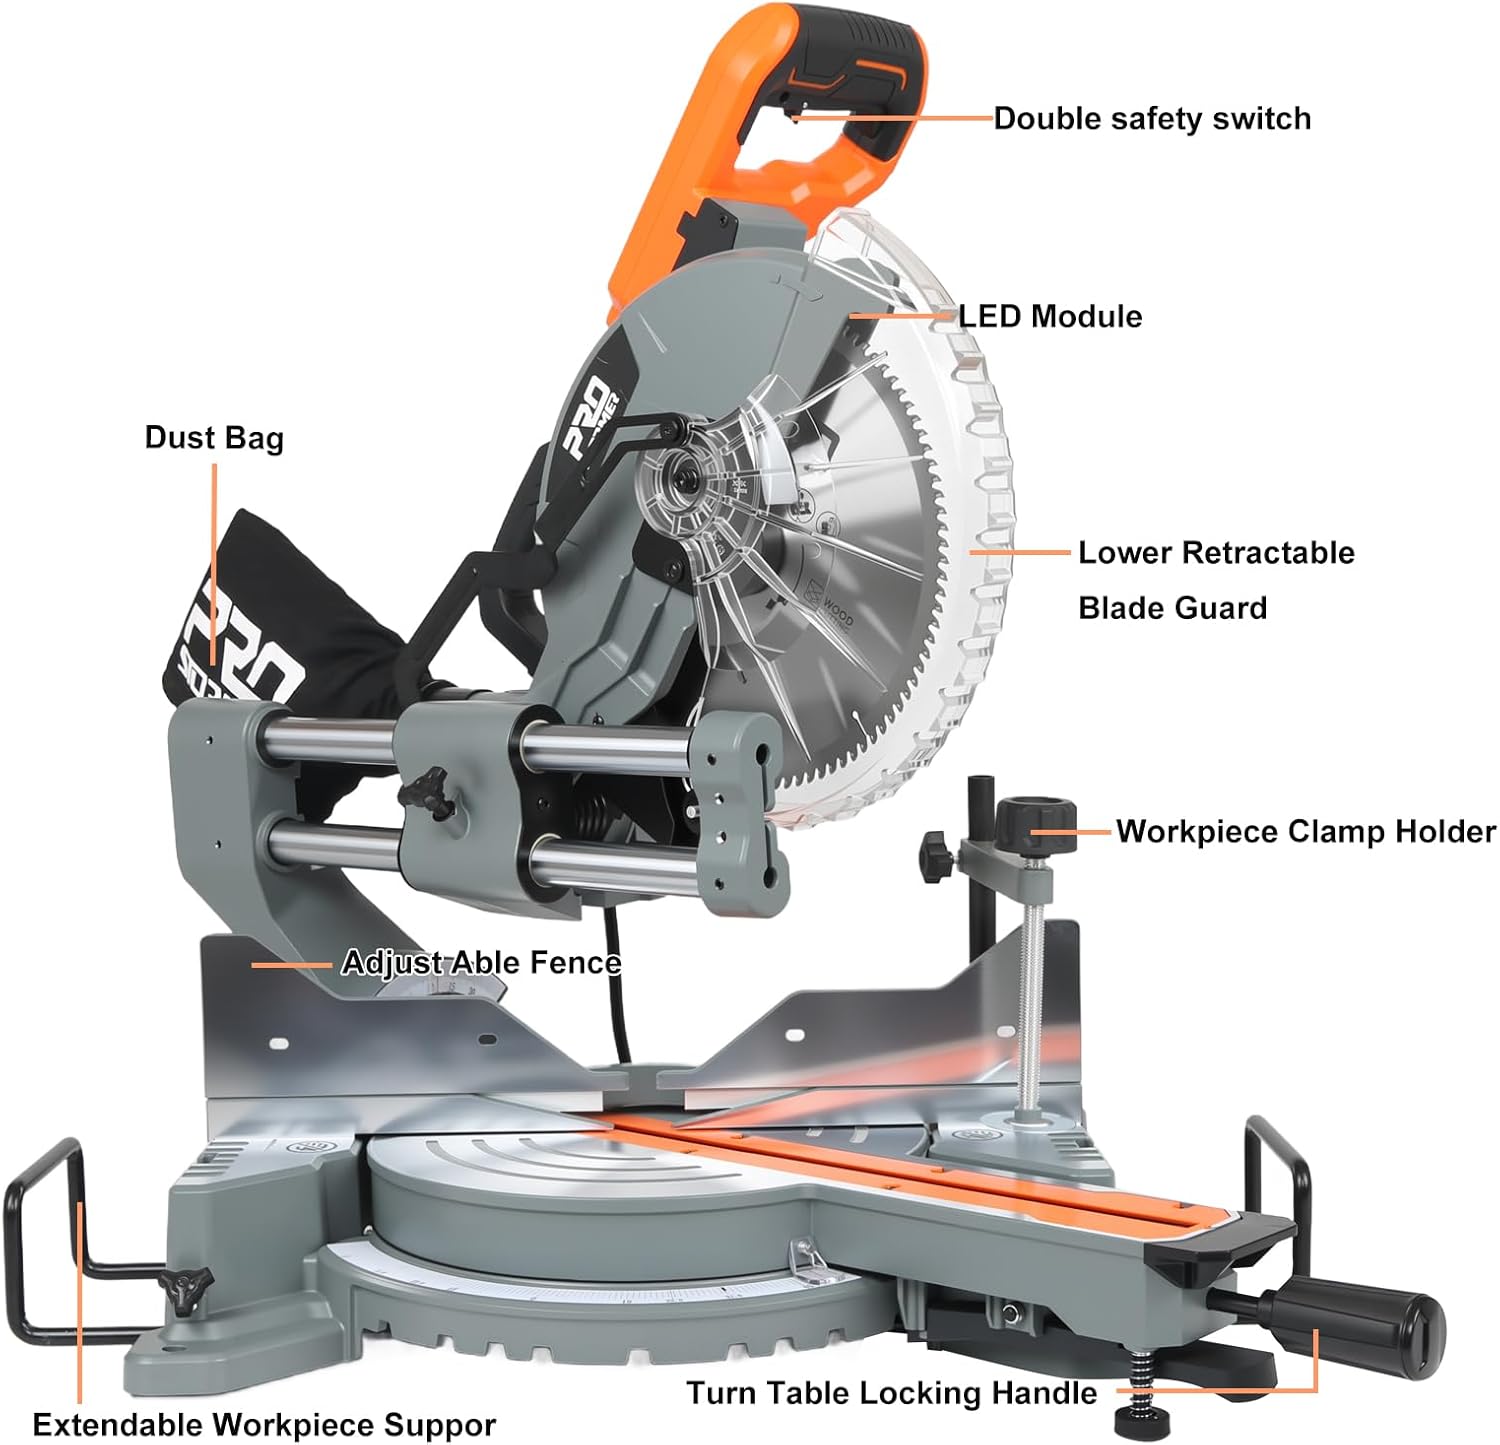
Immagine 1: Sopraview of the Prostormer 10-Inch Miter Saw with key components labeled, including the Double Safety Switch, LED Module, Lower Retractable Blade Guard, Workpiece Clamp Holder, Adjustable Fence, Extendable Workpiece Support, Dust Bag, and Turntable Locking Handle.
- Doppio interruttore di sicurezza: Ensures accidental startup is prevented.
- Modulo LED: Illuminates the cutting line for improved accuracy.
- Lower Retractable Blade Guard: Automatically covers the blade when not in use, retracting during a cut.
- Pezzo Clamp Titolare: Secures material to prevent movement during cutting.
- Recinzione regolabile: Provides support for the workpiece and guides the cut.
- Extendable Workpiece Support: Offers additional support for longer materials.
- Sacchetto antipolvere: Collects sawdust and debris for a cleaner workspace.
- Turntable Locking Handle: Secures the miter table at desired angles.
5. Specifiche
Technical details of the Prostormer 10-Inch Double Bevel Sliding Compound Miter Saw:

Immagine 2: Visual representation of the miter saw's dimensions and a table summarizing its key electrical and operational specifications.
| Specificazione | Valore |
|---|---|
| Numero di modello | MS002D |
| Fonte di alimentazione | Elettrico con cavo |
| Voltage | 120V~, 60Hz |
| Attuale | 15 Amp |
| Velocità a vuoto | 5000 giri al minuto |
| Diametro lama | 10 pollici (255 mm) |
| Numero di denti | 100T (TCT blade) |
| Angoli mitra | 0°-45° Left/Right |
| Angoli smussati | 0°-45° Left/Right (Double Bevel) |
| Dimensioni del prodotto (L x P x A) | 30.3" x 20.9" x 27.6" |
| Peso dell'articolo | 40 libbre |
| Materiale | Acciaio, Alluminio, Plastica |
| Caratteristica speciale | Double Bevel, LED Alignment, Axial Sliding |
6. Impostazione
6.1 Disimballaggio e ispezione
- Rimuovere con attenzione tutti i componenti dalla confezione.
- Ispezionare la sega per verificare eventuali danni subiti durante il trasporto. Non utilizzarla se danneggiata.
- Assicurarsi che tutto il contenuto della confezione elencato sia presente.
6.2 Mounting the Miter Saw
- For stability and safety, permanently mount the miter saw to a workbench or a miter saw stand using appropriate bolts and nuts (not included).
- Ensure the mounting surface is level and capable of supporting the saw's weight and cutting forces.
6.3 Collegamento degli accessori
- Sacchetto antipolvere: Slide the dust bag onto the dust port located at the rear of the blade guard assembly. Ensure it is securely attached to collect debris.
- Side Support Bars: Insert the two side support bars into the designated slots on either side of the saw base. Tighten the locking knobs to secure them. These provide additional support for longer workpieces.
- Pezzo Clamp: Inserire il pezzo clamp into the hole on the saw base. Adjust its position and tighten it to firmly hold the material during cuts.
7. Istruzioni per l'uso
7.1 Accensione/Spegnimento
- To start the saw, depress the double safety switch and then squeeze the trigger switch.
- To stop the saw, release the trigger switch. The blade will coast to a stop. Always wait for the blade to stop completely before moving the workpiece or making adjustments.
7.2 Regolazione degli angoli di taglio obliquo
The miter saw allows for angle adjustments from 0° to 45° left or right.

Immagine 3: Demonstrates the precise angle adjustment capabilities of the miter saw, highlighting the locking handle for securing desired cutting positions.
- Loosen the turntable locking handle.
- Rotate the miter table to the desired angle, indicated on the miter scale.
- Tighten the turntable locking handle firmly to secure the angle before cutting.
7.3 Adjusting Bevel Angles (Double Bevel)
This saw features a double bevel function, allowing cuts from 0° to 45° on both the left and right sides.

Immagine 4: Illustrates the dual-bevel cutting capability, showing the saw head tilting 45 degrees to both the left and right for versatile angled cuts.
- Locate the bevel lock lever/knob (refer to Image 1 for general location).
- Allentare il blocco dello smusso.
- Tilt the saw head to the desired left or right bevel angle, as indicated on the bevel scale.
- Securely tighten the bevel lock before making a cut.
7.4 Using the Axial Sliding System
The axial sliding system allows for wider crosscuts and easy alignment.

Immagine 5: Depicts the axial sliding mechanism, allowing the saw head to move forward and backward for extended cutting capacity, indicated by a 13-inch slide.
- For wider materials, pull the saw head forward along the sliding rails before starting the cut.
- Engage the motor and slowly push the saw head through the workpiece.
- Ensure the sliding mechanism is clean and free of debris for smooth operation.
7.5 Operazione di taglio

Immagine 6: Shows the miter saw actively cutting a wooden board, demonstrating proper workpiece placement and clampdurante il funzionamento.
- Posizionare saldamente il pezzo da lavorare contro la guida e sul tavolo della sega.
- Utilizzare il pezzo da lavorare clamp to secure the material.
- Lower the blade slowly until it just touches the workpiece. The LED light will help align the cut.
- Engage the double safety switch and trigger. Allow the blade to reach full speed before cutting.
- Slowly and steadily lower the blade through the workpiece. Do not force the cut.
- Once the cut is complete, release the trigger and allow the blade to stop completely before raising the saw head and removing the workpiece.
7.6 Compatibilità dei materiali
The included 100T TCT blade is suitable for cutting various materials.

Immagine 7: Illustrates the versatility of the miter saw, capable of cutting plastic, soft metals (like aluminum), and timber with the appropriate blade.
- Legna: All types of wood and wood composites.
- Plastica: Various plastic materials.
- Soft Metals: Such as aluminum. Ensure to use appropriate cutting techniques and safety measures for metal.
8. Manutenzione
Una manutenzione regolare garantisce prestazioni ottimali e prolunga la durata del tuo utensile.
- Pulizia: After each use, disconnect the saw from power and clean off sawdust and debris. Empty the dust bag regularly. Use compressed air to clear dust from vents and moving parts.
- Ispezione della lama: Controllare regolarmente la lama per verificare che non sia affilata, non presenti crepe o denti mancanti. Sostituire immediatamente le lame smussate o danneggiate.
- Sostituzione lama: When replacing the blade, ensure the saw is unplugged. Use the provided Allen key to loosen the blade retaining bolt. Follow the instructions in the saw's manual for specific blade change procedures. Always use a 10-inch blade with a 5/8-inch arbor hole.
- Parti mobili: Keep all moving parts, especially the sliding rails, clean and lightly lubricated if necessary.
- Elementi di fissaggio: Controllare periodicamente il serraggio di tutti i dadi, bulloni e viti. Serrare eventuali elementi di fissaggio allentati.
9. Risoluzione Dei Problemi
Per i problemi più comuni e le relative soluzioni, fare riferimento a questa tabella:
| Problema | Possibile causa | Soluzione |
|---|---|---|
| Saw non si avvia | No power, safety switch not engaged, faulty switch | Check power connection, ensure double safety switch is pressed, inspect power cord and switch. |
| La lama non taglia in modo fluido o brucia il legno | Dull blade, incorrect blade for material, forcing the cut | Replace blade, ensure correct blade type, reduce feed rate. |
| Tagli imprecisi | Miter/bevel angle not locked, fence not square, loose blade | Ensure all locks are tightened, check fence alignment, inspect blade for wobble. |
| Vibrazione eccessiva | Loose blade, damaged blade, loose mounting bolts | Check blade for damage and tightness, ensure saw is securely mounted. |
| Il sacchetto antipolvere non raccoglie efficacemente | Dust bag full, dust port clogged, dust bag not properly attached | Empty dust bag, clear dust port, reattach dust bag securely. |
10. Garanzia e supporto
Prostormer products are manufactured to high-quality standards. For warranty information, technical support, or service inquiries, please refer to the warranty card included with your purchase or contact Prostormer customer service directly. Keep your purchase receipt as proof of purchase.
For further assistance, please visit the official Prostormer websito o contattare i loro canali di assistenza clienti.