1. Importanti istruzioni di sicurezza
Please read all instructions before using this sewing machine. This machine is intended for household use only.
DANGER - To reduce the risk of electric shock:
- Un elettrodomestico non deve mai essere lasciato incustodito quando è collegato alla corrente.
- Scollegare sempre questo apparecchio dalla presa elettrica subito dopo l'uso e prima della pulizia.
- Scollegare sempre prima di ri-lamping. Sostituire la lampadina con una dello stesso tipo da 15 watt (area 110-120 V) o 15 watt (area 220-240 V).
WARNING - To reduce the risk of burns, fire, electric shock, or injury to persons:
- Non permettere di essere usato come un giocattolo. È necessaria molta attenzione quando questo apparecchio è utilizzato da o vicino a bambini.
- Utilizzare questo apparecchio solo per l'uso previsto, come descritto in questo manuale. Utilizzare solo gli accessori consigliati dal produttore come indicato in questo manuale.
- Non utilizzare mai questo apparecchio se ha un cavo o una spina danneggiati, se non funziona correttamente, se è caduto o è stato danneggiato o è caduto nell'acqua. Restituire l'apparecchio al più vicino rivenditore autorizzato o centro di assistenza per l'esame, la riparazione, la regolazione elettrica o meccanica.
- Non utilizzare mai l'apparecchio con le prese d'aria ostruite. Tenere le aperture di ventilazione della macchina per cucire e del pedale reostato libere da accumuli di lanugine, polvere e panni sciolti.
- Tenere le dita lontane da tutte le parti in movimento. È necessaria una cura speciale intorno all'ago della macchina per cucire.
- Utilizzare sempre la piastra ago corretta. Una piastra sbagliata può causare la rottura dell'ago.
- Non utilizzare aghi piegati.
- Non tirare o spingere il tessuto mentre si cuce. Potrebbe deviare l'ago e romperlo.
- Always unplug sewing machine off ("O") when making any adjustments in the needle area, such as threading needle, changing needle, threading bobbin, or changing presser foot, and the like.
- Scollegare sempre la macchina per cucire dalla presa elettrica quando si rimuovono i coperchi, si lubrifica o quando si effettuano altre regolazioni di manutenzione da parte dell'utente menzionate nel manuale di istruzioni.
- Non far cadere o inserire mai alcun oggetto in nessuna apertura.
- Non utilizzare all'aperto.
- Non azionare dove vengono utilizzati prodotti spray aerosol o dove viene somministrato ossigeno.
- Per scollegare, portare tutti i comandi in posizione di spegnimento ("O"), quindi rimuovere la spina dalla presa.
- Non staccare la spina tirando il cavo. Per staccare la spina, afferrare la spina, non il cavo.
- Il livello di pressione sonora in condizioni operative normali è di 75 dB(A).
- Always turn off the machine or unplug when the machine is not operating properly.
- Non appoggiare mai nulla sul pedale reostato.
- If the supply cord to the foot controller is damaged, it must be replaced by the manufacturer or its service agent or a similar qualified person in order to avoid a hazard.
- Questo apparecchio non è destinato all'uso da parte di persone (bambini compresi) con ridotte capacità fisiche, sensoriali o mentali, o prive di esperienza e conoscenza, a meno che non siano supervisionate o abbiano ricevuto istruzioni riguardanti l'uso dell'apparecchio da una persona responsabile della loro sicurezza.
- I bambini devono essere sorvegliati per assicurarsi che non giochino con l'apparecchio.
SALVA QUESTE ISTRUZIONI
Image: Important Safety Instructions page from the Singer 2250 manual, detailing electrical and general safety warnings.
2. Impostazione
2.1 Accessori
The Singer 2250 sewing machine comes with a set of standard accessories and supports various optional accessories for different sewing tasks.
- Accessori standard: All purpose foot, Button sewing foot, Zipper foot, Screwdriver, Seam ripper/brush, Pack of needles, Bobbin (3), Darning plate, Spool holder.
- Optional Accessories (not supplied with machine, available from SINGER® retailers): Edge/quilting guide, Zipper foot, Straight stitch foot, Overcasting foot, Hemmer foot, Blind hem foot, Satin stitch foot, Cording/embroidery foot, Second spool pin, Spool pin felt.
2.2 Avvolgimento della bobina
- Place thread and corresponding spool holder onto the spool pin.
- Snap the thread into the thread guide.
- Wind the thread counterclockwise around the bobbin winder tension disc.
- Thread the bobbin as illustrated and place it on the spindle.
- Push the bobbin spindle to the right.
- Hold the thread end.
- Step on the foot control pedal to begin winding.
- Cut the thread once the bobbin is full.
- Push the bobbin spindle to the left and remove the wound bobbin.
Notare che: When the bobbin winder spindle is in the "bobbin winding" position, the machine will not sew and the hand wheel will not turn. To start sewing, push the bobbin winder spindle to the left (sewing position).

Image: Manual page illustrating standard and optional accessories, and a step-by-step guide for winding the bobbin.
2.3 Connecting to Power Source
Ensure the machine's power switch is in the "O" (off) position. Insert the machine plug into the electrical outlet. Always use a grounded outlet.
2.4 Raising the Presser Foot Lifter
The presser foot lifter is located at the back of the needle bar area. Lift it to raise the presser foot for placing fabric, and lower it to hold the fabric in place for sewing.
3. Funzionamento
3.1 Choosing Your Pattern
The Singer 2250 features a Pattern Selector Dial to choose various stitch patterns.
- Stitches indicated in black on the diagram correspond to the Pattern Selector Dial.
- For patterns indicated with the "S" color, turn the Pattern Selector Dial to "S", then use the Stitch Length Dial to adjust the desired stitch length.
- The Pattern Selector Dial can be turned in either direction.
3.2 Stitch Length Dial
The Stitch Length Dial controls the length of straight stitches and the density of zig-zag stitches.
- For Straight Stitching: Turn the Pattern Selector Dial to the straight stitch symbol. The stitch length increases as the dial approaches "4". Use longer stitches for heavier fabrics and thicker needles, shorter stitches for lighter fabrics and finer needles.
- For Zig-Zag Stitching: Turn the Pattern Selector Dial to "~~~ ". The density of zig-zag stitches increases as the setting of the stitch length dial approaches "0". Dense zig-zag stitches are known as satin stitches.

Image: Manual page detailing how to choose stitch patterns and adjust stitch length for various sewing applications.
3.3 Infilatura della macchina
Proper threading is crucial for smooth sewing. Follow these general steps:
- Posizionare il rocchetto di filo sul perno portarocchetto.
- Far passare il filo attraverso i guidafilo superiori.
- Passare il filo attraverso i dischi di tensione.
- Far passare il filo attraverso la leva di avvolgimento.
- Guide the thread down through the needle bar thread guide.
- Infilare l'ago da davanti a dietro.
- Raise the bobbin thread by turning the handwheel towards you, catching the bobbin thread with the needle thread.
- Pull both threads under the presser foot and towards the back.
3.4 Sewing on Buttons
To sew buttons using your Singer 2250:
- Installa la piastra per rammendo.
- Change the all-purpose foot to the button sewing tool.
- Position the fabric and button under the foot.
- Lower the button to the desired position and lower the foot.
- Set the Pattern Selector Dial on "---" and sew a few securing stitches.
- Select one of the two narrow zig-zag patterns (between 0.5 and 1.5) and sew through both holes of the button. Turn the handwheel to check needle clearance.
- Slowly sew the button with about 10 stitches.
- Select pattern "---" again and sew a few securing stitches.
- If a shank is required, place a darning needle on top of the button and sew.
- For buttons with 4 holes, sew through the front two holes first, then sew backwards and then sew through the back two holes.
3.5 Installing the Removable Extension Table
The removable extension table provides a larger work surface and also serves as an accessory box.
- Per installare: Hold the removable extension table horizontally and push it in the direction of the arrow until it clicks into place.
- Per rimuovere: Pull the extension table towards the left.
- The inside of the removable extension table can be used as an accessory box. To open, flip the cover down.
4. Manutenzione
4.1 Darning Plate
The darning plate is used for specific tasks like darning or free-hand embroidery.
- Installazione: Install the darning plate as illustrated in the manual.
- Rimozione: Per la cucitura normale, rimuovere la piastra per rammendo.
- For free-motion sewing, a darning/embroidery foot (optional accessory) is recommended.
4.2 Inserting & Changing Needles
Regularly change your needle, especially if sewing problems occur. Use SINGER® Brand Needles for best results.
- Turn the power switch to off ("O").
- Allentare l'ago clamp vite.
- Insert the new needle with the flat side of the shaft facing the back, pushing it up as far as it will go.
- Stringere l'ago clamp vite.
Attenzione: Needles must be in perfect condition. Problems can occur with bent needles, damaged points, or blunt needles.
4.3 Changing the Bulb
To change the light bulb, ensure the machine is unplugged. Replace the bulb with the same type rated 15 watts (110-120V area) or 15 watts (220-240V area).
4.4 Pulizia
Regularly clean the lint and dust from the bobbin case area and feed dogs using the provided brush. Ensure the machine is unplugged before cleaning.
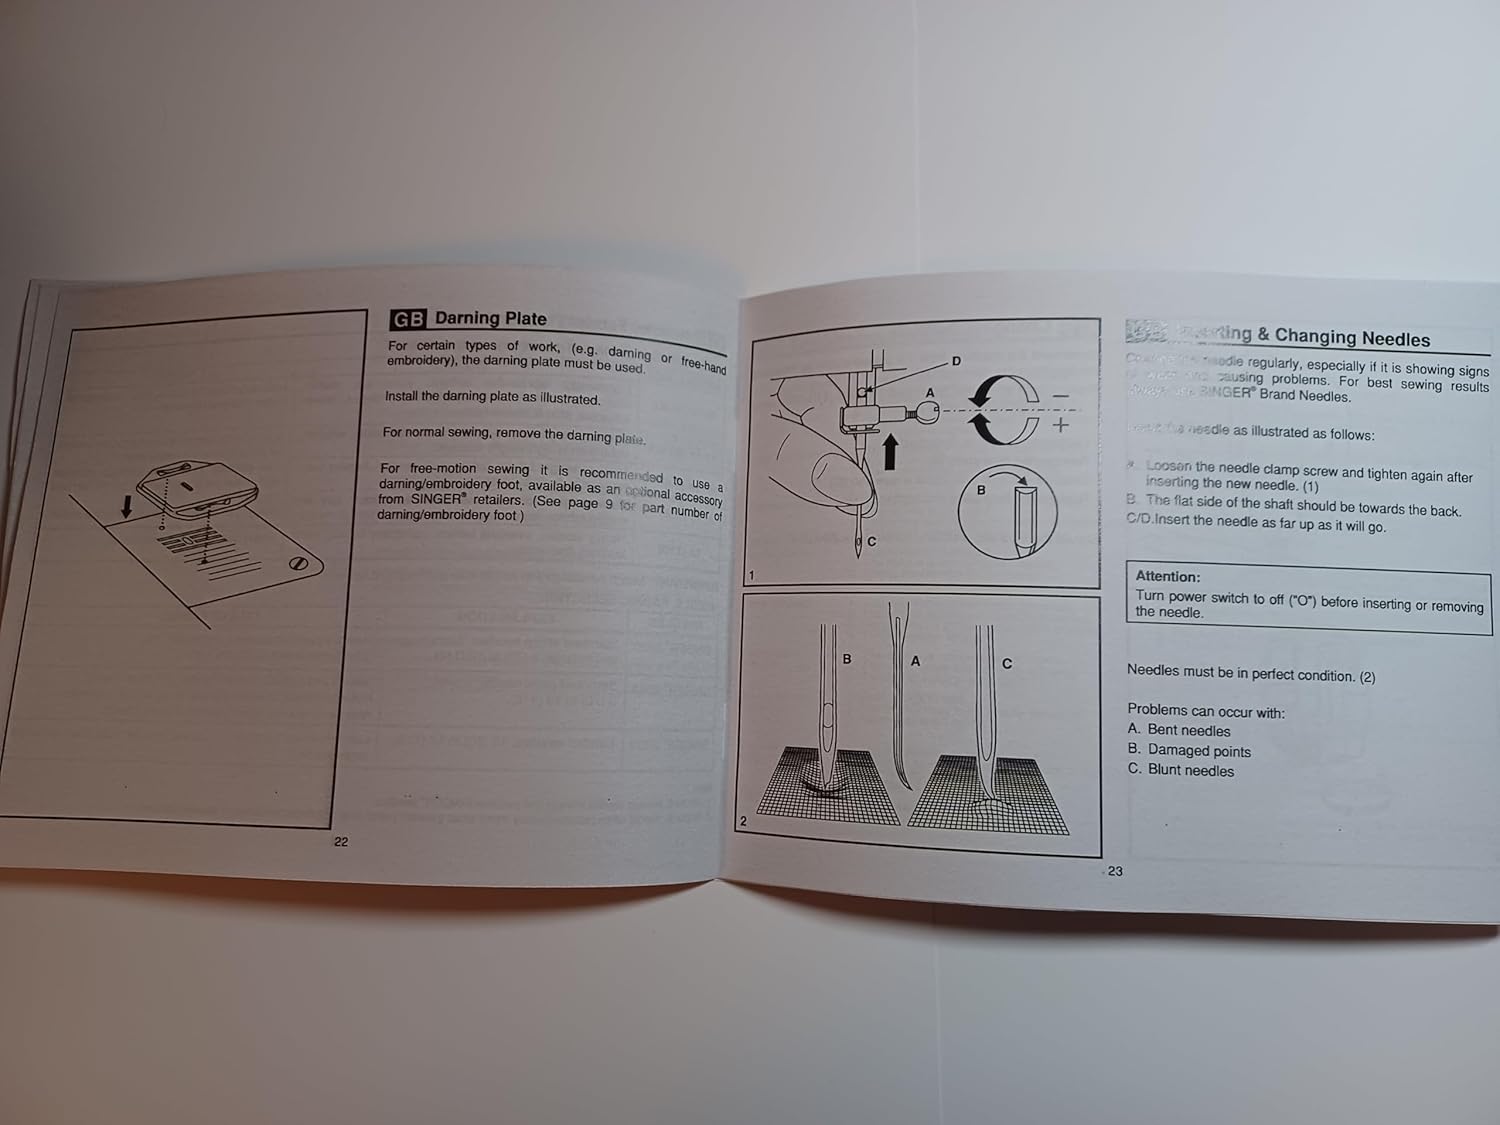
Image: Manual page illustrating procedures for sewing on buttons, installing the extension table, using the darning plate, and changing needles.
5. Risoluzione Dei Problemi
If you encounter issues with your Singer 2250, refer to the following common problems and solutions:
- Punti saltati: Ensure the needle is inserted correctly, not bent, and is the appropriate size for the fabric and thread. Re-thread the machine.
- Rottura del filo: Check for correct threading, proper tension, a bent or blunt needle, or burrs on the needle plate or bobbin case.
- Arricciature del tessuto: Adjust tension settings, use the correct needle size, or ensure the presser foot pressure is appropriate for the fabric.
- Machine Not Feeding Fabric: Check if the feed dogs are raised. Ensure the presser foot is lowered.
- Funzionamento rumoroso: Clean and lubricate the machine as per maintenance instructions. Check for loose parts or a bent needle.
For persistent problems, contact an authorized Singer service center.
6. Specifiche
| Dimensioni del prodotto | 8.5 x 5.5 x 0.1 pollici |
| Peso dell'articolo | 3 once |
| Numero di modello | SINGER 2250 Manual |
| Produttore | TabSynth Design (for reproduction manual) |
| ASIN | B0G19M5M63 |
7. Garanzia e supporto
This instruction manual is a reproduction for the Singer 2250 Sewing Machine. For warranty information regarding your Singer 2250 sewing machine, please refer to the original documentation provided with your machine or contact Singer customer support directly.
For support related to the operation or maintenance of your Singer 2250, please consult this manual. If further assistance is needed, contact an authorized Singer service center or your local Singer dealer.