1. Introduzione
This manual provides essential instructions for the safe assembly, operation, and maintenance of your Generic 1200LBS Multi-Function Power Rack. Please read this manual thoroughly before assembly and use to ensure proper function and user safety. Retain this manual for future reference.
Informazioni importanti sulla sicurezza
- Prima di iniziare un nuovo programma di esercizi, consultare sempre un medico.
- Prima di ogni utilizzo, assicurarsi che tutti i bulloni e i dadi siano ben serrati.
- Do not exceed the maximum weight capacities specified for the rack and its components.
- Use spotters when lifting heavy weights, especially during squats and bench presses.
- Tenere i bambini e gli animali domestici lontani dall'apparecchiatura durante l'uso.
- Inspect the power rack for any signs of wear or damage before each workout. Do not use if damaged.
- Place the power rack on a flat, stable surface.
2. Prodotto finitoview e componenti
The Generic 1200LBS Multi-Function Power Rack is designed for a comprehensive home gym experience, supporting various strength training exercises. It features a robust alloy steel frame and adjustable components for versatile use.

Figura 2.1: Labeled diagram of the Power Rack components, including the wide & narrow pull-up bar, barbell rack, 1.8mm steel tube, safety bar, and non-slip base.
Caratteristiche principali:
- Qualità di livello commerciale: Constructed from 1.8mm high-density alloy steel tubing with a 2"x2" square frame.
- Capacità di peso elevato: Supports up to 1200 lbs for the main frame and 800 lbs for J-hooks.
- Versatile Adaptability: Features 14 clearly marked adjustable holes for J-hooks and safety bars.
- Garanzia di sicurezza: Equipped with large non-slip bases, scratch-resistant J-hooks, and quick-positioning barbell supports.
- Design salvaspazio: Compact footprint of 14.0 square feet.
- Integrated Pull-Up Bar: Wide and narrow grip options for varied exercises.

Figura 2.2: Image highlighting the commercial-grade construction, 1200 lbs weight capacity, 800 lbs J-hook capacity, and 1.88mm thick steel pipe.

Figura 2.3: Dettagliato view of the wide & narrow pull-up bar, high-quality J-hook, barbell protection frame, 14 adjustable holes, and non-slip base.
3. Installazione e assemblaggio
Carefully unpack all components and verify against the parts list (not provided in this manual, refer to packaging). Assembly typically requires two people. Ensure you have adequate space and the necessary tools (e.g., wrenches) before beginning.

Figura 3.1: Visual guide for the four main installation steps of the power rack.
Fasi di assemblaggio:
- Passaggio 1: assemblaggio del telaio di base
Connect the two base frames using the horizontal support bars. Ensure all connections are finger-tightened initially. - Fase 2: Installazione del palo verticale
Attach the four vertical upright posts to the assembled base frames. Ensure the posts are oriented correctly with the adjustment holes facing inwards. - Step 3: Top Frame and Pull-Up Bar Attachment
Secure the top frame to the upright posts. Install the wide and narrow pull-up bar onto the top frame. - Step 4: Final Tightening and Accessory Installation
Once the main structure is assembled, fully tighten all bolts and nuts. Install the J-hooks and safety bars into the desired positions.
After assembly, gently shake the rack to ensure stability. If any movement is detected, re-check all connections and tighten as necessary.
4. Istruzioni per l'uso
The Power Rack is designed to facilitate a variety of exercises. Always ensure proper form and safety precautions during your workouts.
Adjusting J-Hooks and Safety Bars:
The power rack features 14 adjustable holes, allowing for precise positioning of J-hooks and safety bars. The barbell safety collars can be manually adjusted without tools.
- To adjust, simply lift the J-hook or safety bar, align it with the desired hole, and insert the pin securely.
- Ensure both J-hooks or safety bars are set at the same height to prevent uneven loading.
- For squats, position the J-hooks at a height that allows you to unrack the barbell comfortably. Set the safety bars just below your lowest squat depth.
- For bench press, position the J-hooks at a height that allows you to unrack the barbell with a slight elbow bend. Set the safety bars just above your chest at the bottom of the movement.

Figura 4.1: Illustration of the 14-speed adjustable holes for the barbell protection frame, allowing for flexible height adjustments.

Figura 4.2: Demonstrates the use of J-hooks for easy barbell placement and barbell protection racks for safety during squats.
Supported Exercises:
The power rack supports a variety of exercises, including but not limited to:
- Squat: Utilize the J-hooks and safety bars for barbell squats.
- Panca piana: Combine with a weight bench (not included) and use J-hooks and safety bars.
- Trazioni alla sbarra: Use the integrated wide and narrow grip pull-up bar.
- Stampa ambientale: Perform standing overhead presses within the rack.
- Rack Pulls: Adjust safety bars to desired height for partial deadlifts.

Figura 4.3: Espressione visivaamples of exercises that can be performed with the power cage, including bench press, deep squats, and pull-ups.
5. Manutenzione
Una manutenzione regolare garantisce la longevità e il funzionamento sicuro del tuo power rack.
- Quotidiano: Pulisci il telaio con un panno pulito, damp panno dopo ogni utilizzo per rimuovere sudore e polvere.
- Settimanale: Inspect all bolts, nuts, and connection points. Tighten any that appear loose.
- Mensile: Perform a thorough inspection of the entire frame for any signs of rust, cracks, or structural damage. Pay close attention to welding points and areas of high stress.
- Pulizia: Per la pulizia utilizzare acqua e sapone neutro. Evitare detergenti abrasivi o solventi che potrebbero danneggiare la finitura.
- Magazzinaggio: Se si conserva per un periodo prolungato, assicurarsi che il rack sia pulito e asciutto. Conservare in un ambiente climatizzato per prevenire la ruggine.
6. Risoluzione Dei Problemi
| Problema | Possibile causa | Soluzione |
|---|---|---|
| Il rack sembra instabile o traballante. | Bulloni allentati o superficie del pavimento irregolare. | Assicurarsi che tutti i bulloni di montaggio siano ben serrati. Spostare il rack su una superficie piana e livellata. |
| Difficulty adjusting J-hooks/safety bars. | Pin not fully aligned or obstruction in the hole. | Ensure the pin is perfectly aligned with the hole. Check for any debris inside the adjustment holes. |
| Cigolii durante l'uso. | Collegamenti allentati o attrito metallo su metallo. | Tighten all bolts. Apply a small amount of silicone lubricant to contact points if necessary (avoiding areas that contact skin or clothing). |
7. Specifiche
| Caratteristica | Dettaglio |
|---|---|
| Modello | 1200LBS Multi-Function Power Rack |
| Marca | Generico |
| Materiale | Alloy Steel (1.8mm thick, 2"x2" square frame) |
| Peso dell'articolo | 105 libbre |
| Max Weight Capacity (Rack) | 1200 libbre |
| Capacità di peso massima (ganci a J) | 800 libbre |
| Adjustable Holes | 14 velocità regolabili |
| Orma | Circa 14.0 piedi quadrati |
| Colore | Nero |
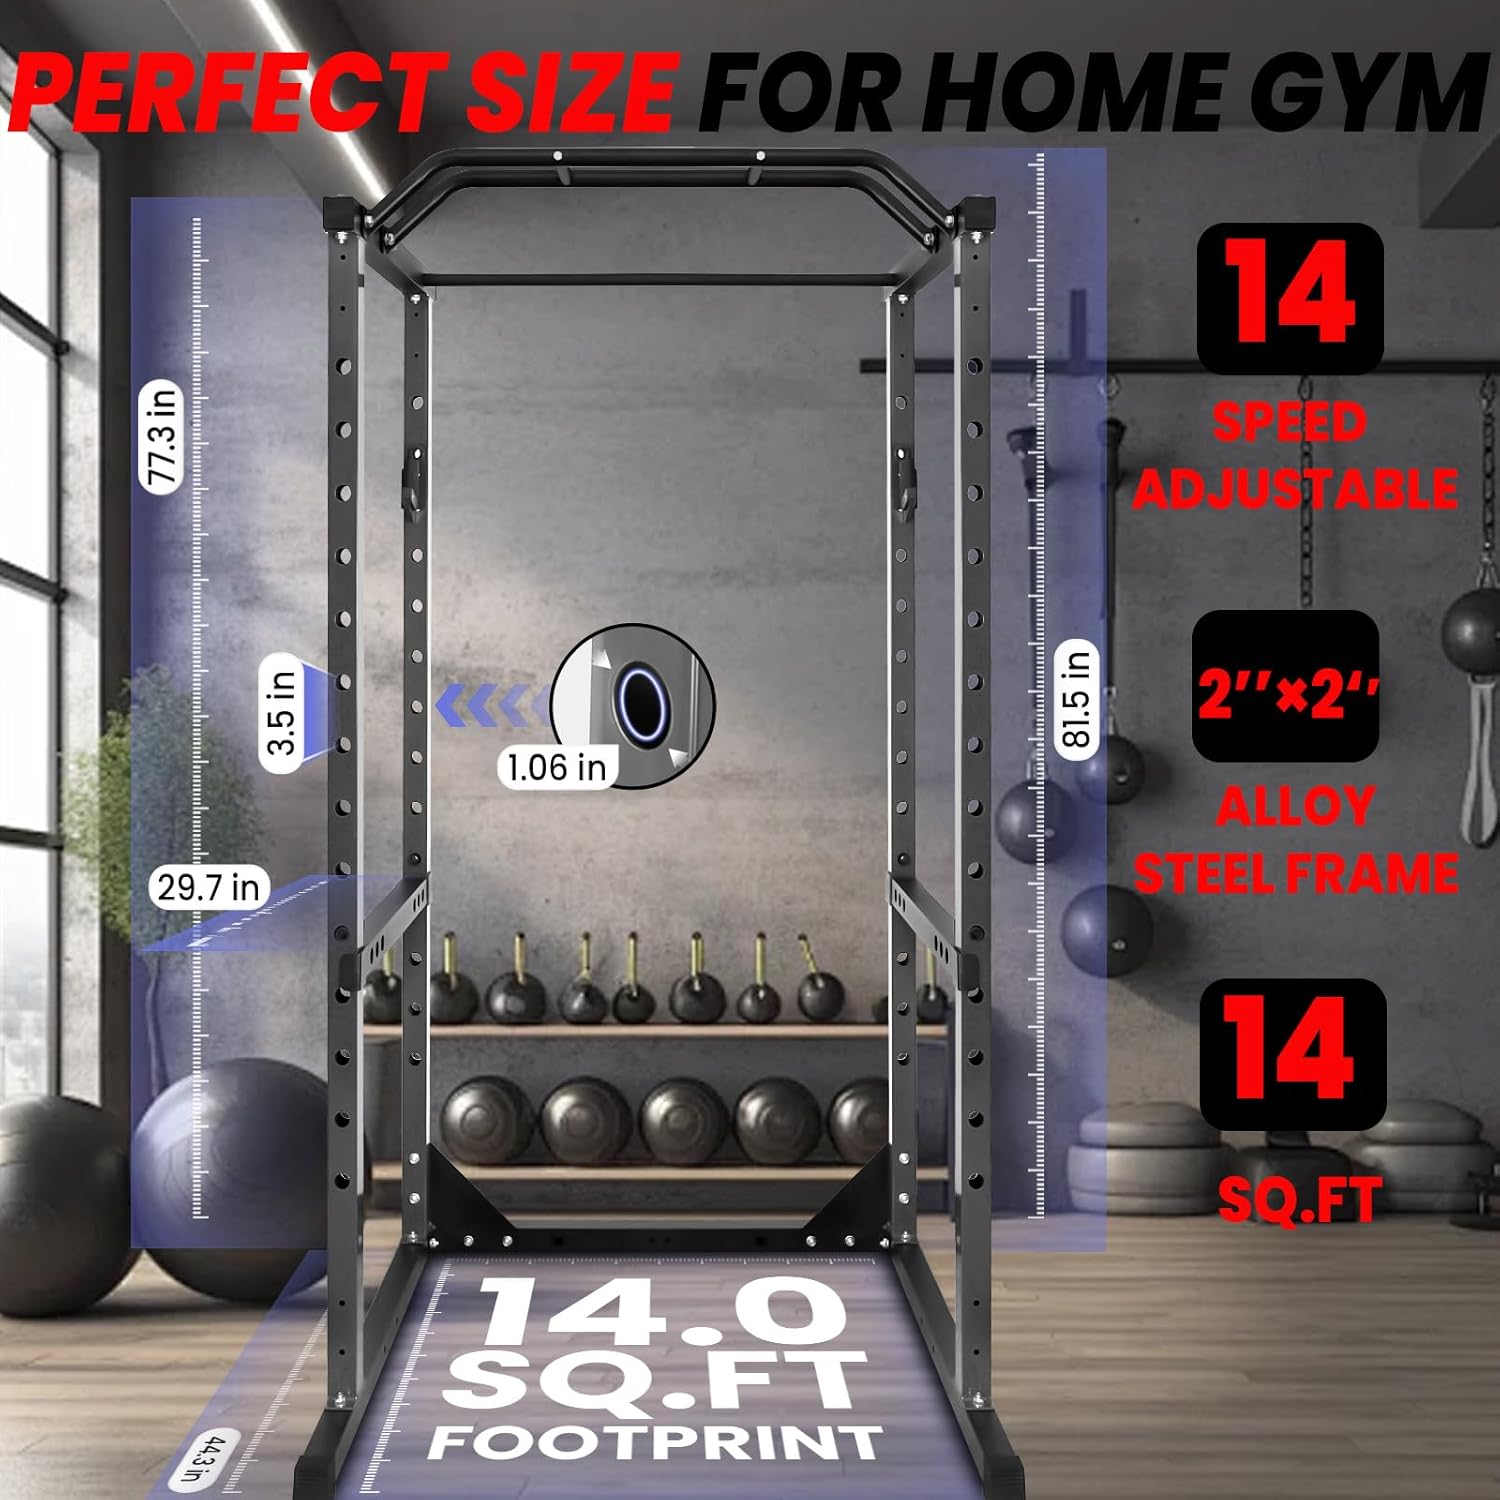
Figura 7.1: Diagram illustrating the dimensions and 14.0 sq. ft. footprint of the power rack, along with the 14-speed adjustability and 2"x2" alloy steel frame.
8. Garanzia e supporto
Garanzia: The manufacturer states that there is no warranty for this product. Please refer to your purchase documentation for any return or refund policies from the retailer.
Assistenza clienti: For any questions regarding assembly, operation, or missing parts, please contact the seller directly through the platform where the product was purchased. The manufacturer is HHJU.