Introduzione
This manual provides comprehensive instructions for assembling and operating your iCubeSmart 3D8S-MULTI-DIY-KIT LED Cube Kit. This kit is designed as a DIY electronics project, suitable for learning soldering and understanding 3D LED display technology. The mainboard comes pre-installed with the program, and the package includes paper installation instructions to guide you through the process.
Informazioni sulla sicurezza
Warning: Soldering is required for assembly. This product is not suitable for children under 14 years of age due to the use of soldering equipment and small electronic components.
Contenuto della confezione
The iCubeSmart 3D8S-MULTI-DIY-KIT includes the following components:
- Circuit board (mainboard, pre-soldered and pre-programmed)
- LEDs (Red, Green, Blue)
- Fili
- Cavo USB-CC
- Test LED Tool
- Strumento di download
- Electronic Wire (tinned)
- Tool for Bending LEDs
- Paper installation instructions
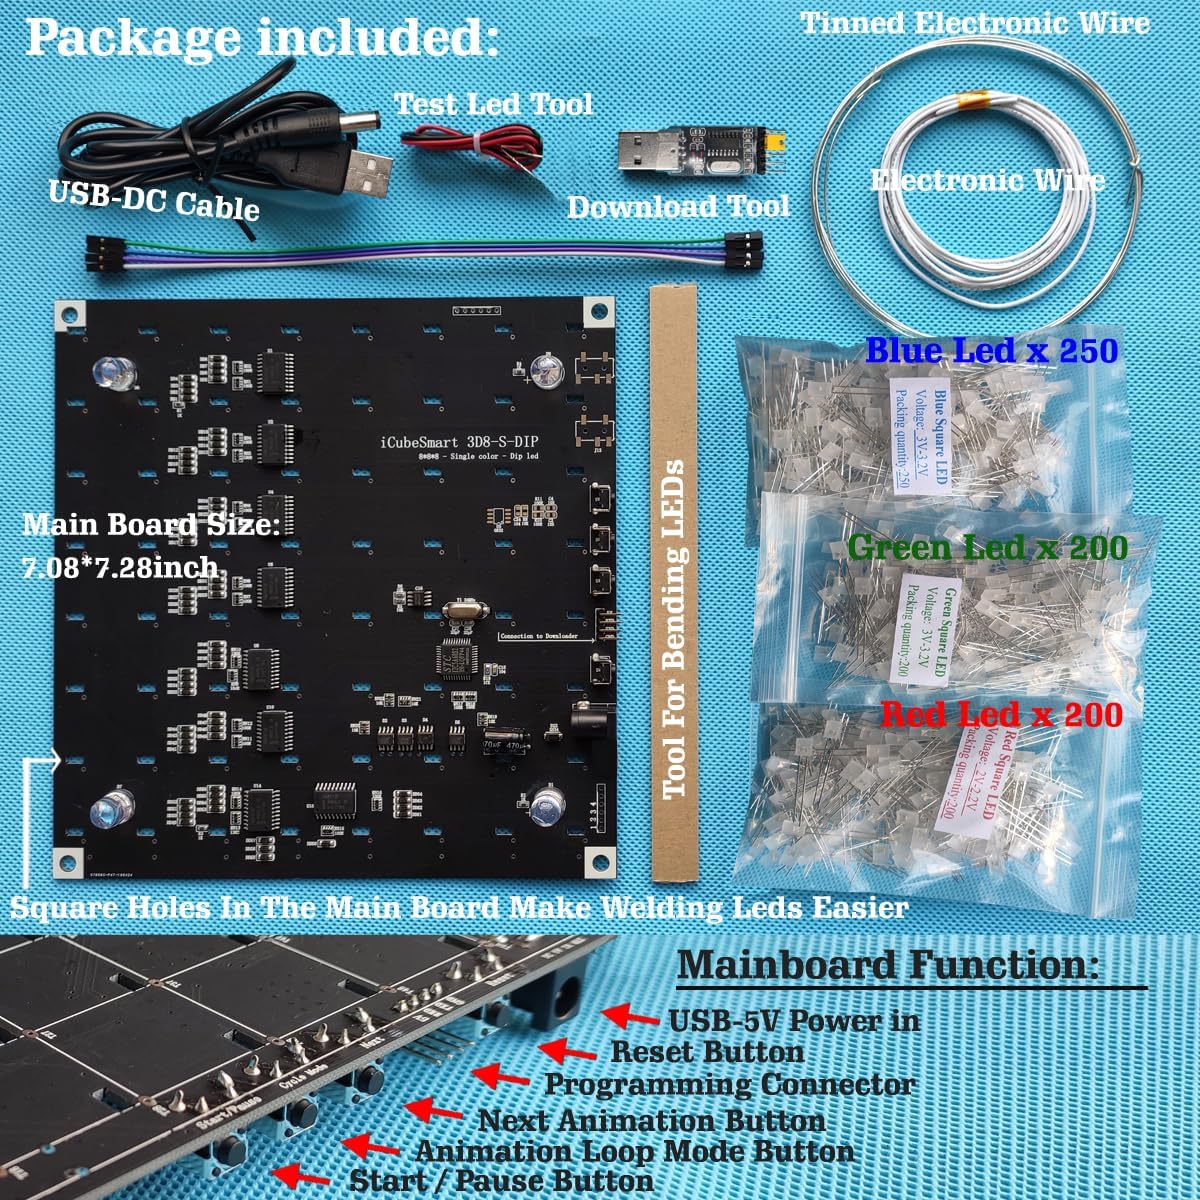
Immagine: Oltreview of the kit's components, including the mainboard, various LEDs, USB cable, and specialized tools for assembly.
Istruzioni per l'installazione e il montaggio
This kit requires soldering. The mainboard is pre-soldered and pre-programmed. Your primary task will be soldering the LEDs to form the 3D cube structure. Refer to the included paper instructions for detailed diagrams and steps.
Step 1: Prepare LEDs
Carefully bend the leads of the LEDs using the provided bending tool. Ensure consistent bending for proper alignment within the cube structure.
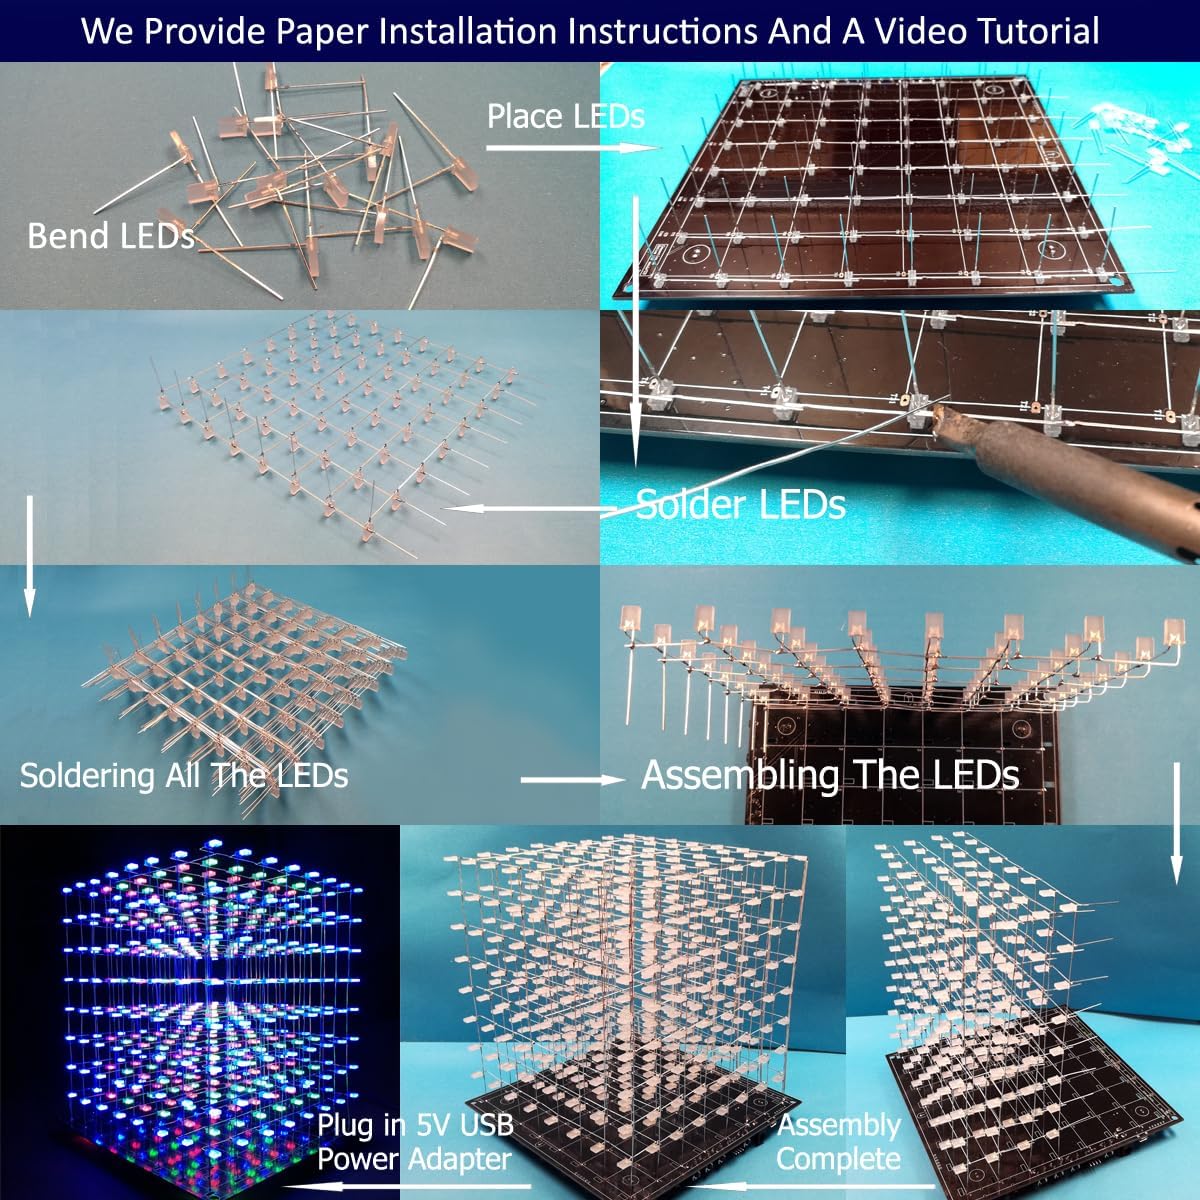
Image: A visual guide demonstrating the process of bending LED leads, placing them onto the board, and soldering them.
Step 2: Place and Solder LEDs
Insert the bent LEDs into the designated holes on the circuit board. Pay close attention to the polarity of each LED (anode and cathode) as indicated in the paper instructions. Solder each LED securely to the circuit board, ensuring good solder joints to prevent connectivity issues.
Step 3: Assemble LED Layers
Once individual LEDs are soldered, assemble them into layers as per the paper instructions. Connect these layers to form the complete 3D cube structure.
Fase 4: Assemblaggio finale
Mount the completed LED cube structure onto the mainboard. Ensure all electrical connections are secure and properly aligned.
Mainboard Functions Overview
The mainboard features several buttons for controlling the LED cube:
- USB-5V Power In: Connect the USB-DC cable here for power.
- Pulsante di reset: Resets the cube to its initial state.
- Connettore di programmazione: For advanced users to upload custom animations.
- Next Animation Button: Cycles through the built-in animation programs.
- Animation Loop Mode Button: Changes the animation loop behavior.
- Pulsante Avvio/Pausa: Starts or pauses the current animation.
Immagine: dettagliata view of the mainboard, highlighting the USB-5V power input, reset button, programming connector, and animation control buttons.
Operating Your LED Cube
Accensione
Connect the USB-DC cable to the "USB-5V Power In" port on the mainboard and plug it into a 5V USB power adapter. The cube will automatically start displaying one of the built-in animation effects.
Image: The assembled LED cube powered on, demonstrating the connection to a 5V USB power adapter.
Changing Animations
Press the "Next Animation Button" on the mainboard to cycle through the 30 vibrant animation programs.
Animation Loop Mode
Use the "Animation Loop Mode Button" to adjust how animations loop or transition.
Avvio/Pausa
Press the "Start/Pause Button" to pause or resume the current animation.
Customizing Animations (Advanced Users)
The mainboard supports custom 3D animation effects. You can modify existing effects or create new ones using downloadable software available on the iCubeSmart website. Instructions for using the software and uploading custom animations are available on our websito.

Image: A screenshot of the dedicated software, illustrating its interface for simulating LED positions and programming custom 3D animation effects.
Manutenzione
The iCubeSmart LED Cube Kit requires minimal maintenance.
- Keep the cube clean and free from dust. Use a soft, dry cloth for cleaning.
- Avoid exposing the cube to moisture or extreme temperatures.
- Ensure all soldered connections remain secure. If an LED stops working, inspect its solder joints for any issues.
Risoluzione dei problemi
Se si verificano problemi durante il montaggio o il funzionamento, fare riferimento ai seguenti problemi comuni e alle relative soluzioni:
- I LED non si accendono:
- Controllare tutti i giunti di saldatura per individuare eventuali giunzioni fredde o ponti.
- Verify LED polarity during installation.
- Ensure the power supply is correctly connected and providing 5V.
- Le animazioni non cambiano:
- Ensure the "Next Animation Button" is functioning correctly.
- Verify the mainboard program is intact (it comes pre-programmed).
- Problemi generali:
If you have any questions or problems not covered here, please contact iCubeSmart technical support via email. Our professional engineers are available to assist you.
Specifiche del prodotto
| Dimensioni del prodotto: | 8 x 8.2 x 8 pollici |
| Peso dell'articolo: | 15.2 once |
| Produttore: | iCube Smart |
| Età consigliata: | 14 years and older (for assembly requiring soldering) |

Image: The fully assembled 3D LED cube, showcasing its illuminated display and indicating its approximate dimensions.
Garanzia e supporto tecnico
iCubeSmart provides life-long technical support for all DIY products. If you have any questions or require assistance with assembly, operation, or troubleshooting, please contact us via email. Our team of professional engineers will provide prompt support.
For contact information, please refer to the product packaging or the official iCubeSmart websito.