Introduzione
This manual provides comprehensive instructions for the installation, operation, maintenance, and troubleshooting of the ASUS Prime H810M-E-CSM Intel H810 mATX Commercial CSM Motherboard. This motherboard is engineered for Intel Core Ultra (Series 2) processors, offering robust performance and essential features for commercial and AI PC applications.
Informazioni sulla sicurezza
Durante l'installazione e il funzionamento, osservare sempre le seguenti precauzioni di sicurezza:
- Scollegare il cavo di alimentazione dalla presa a muro prima di toccare qualsiasi componente.
- Indossare un braccialetto antistatico per evitare danni ai componenti causati dalle scariche elettrostatiche (ESD).
- Maneggiare i componenti tenendoli per i bordi per evitare di toccare parti sensibili.
- Assicurare una corretta ventilazione all'interno del case del PC per evitare il surriscaldamento.
- Refer to the specific component manuals for additional safety guidelines.
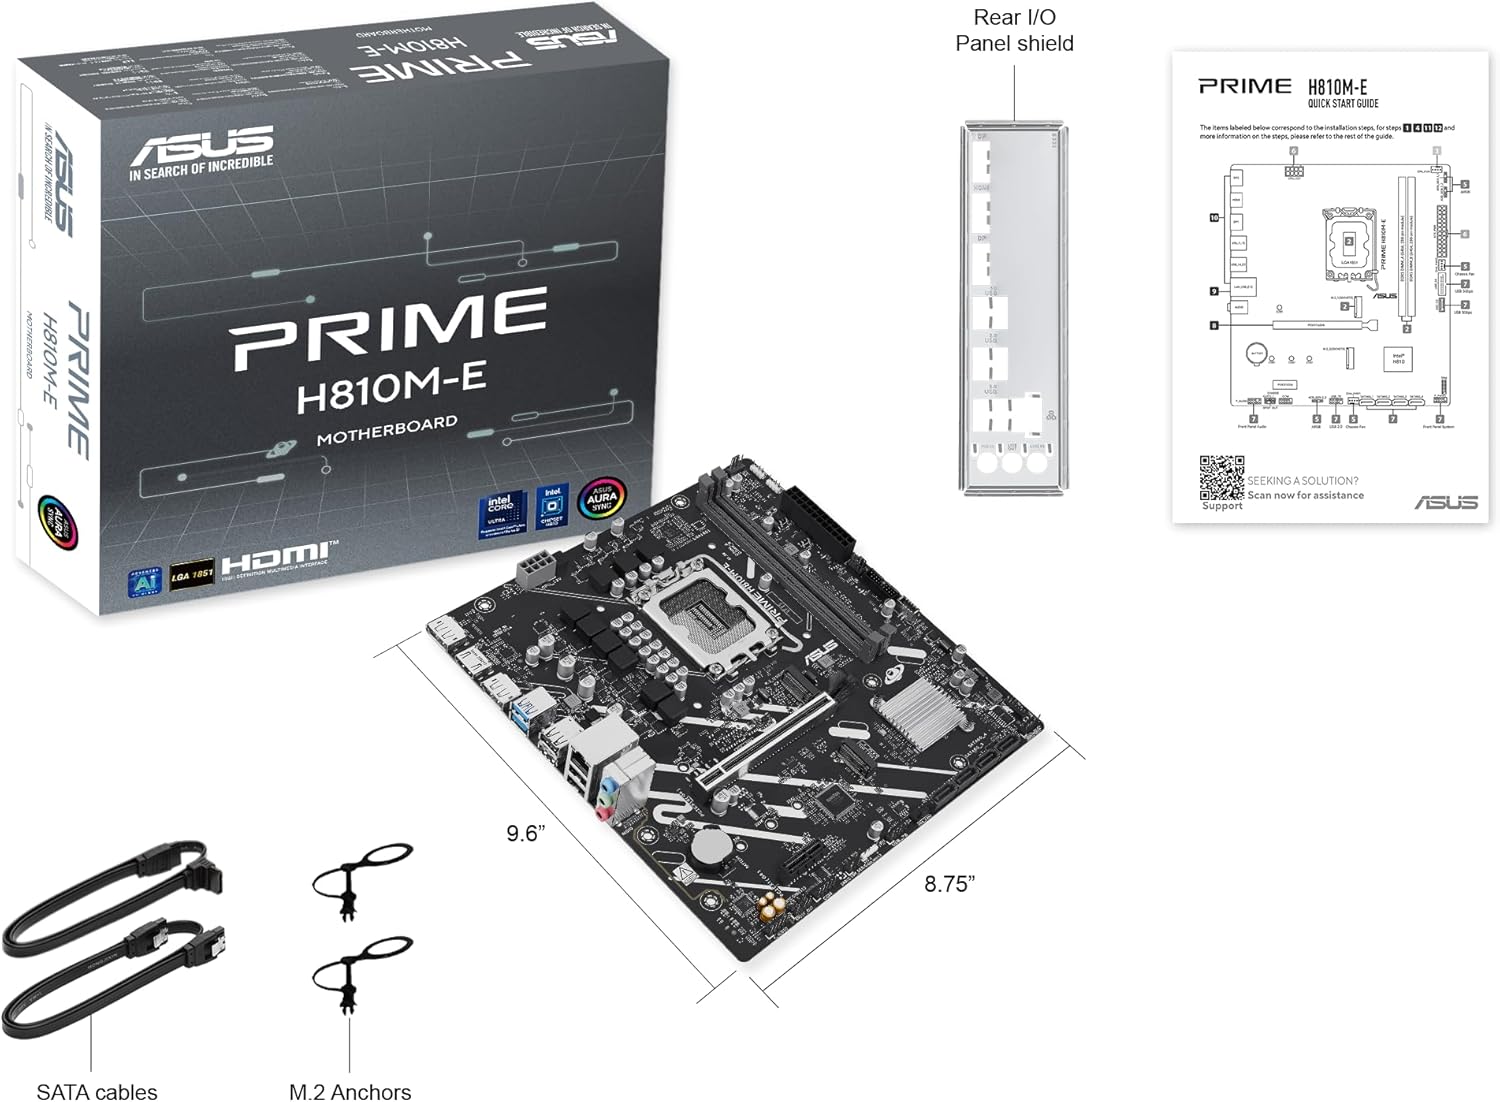
Contenuto della confezione
Verificare che tutti gli elementi siano presenti nella confezione della scheda madre:
- ASUS Prime H810M-E-CSM Motherboard
- SATA 6Gb/s Data Cables (2x)
- M.2 SSD Anchors (2x)
- Rear I/O Shield
- Manuale dell'utente / Guida rapida
Layout della scheda madre
Familiarize yourself with the key components and connectors on the motherboard.


Impostare
1 Installazione della CPU
This motherboard supports Intel Core Ultra (Series 2) processors with an LGA 1851 socket.
- Aprire la leva del socket della CPU e rimuovere il cappuccio protettivo.
- Carefully align the CPU with the socket, ensuring the notches on the CPU match the keys on the socket.
- Inserire delicatamente la CPU nel socket senza esercitare forza.
- Chiudere la leva del socket per fissare la CPU.
- Installare il dissipatore della CPU seguendo le istruzioni del produttore.
2. Installazione della memoria (RAM)
The motherboard features two DDR5 DIMM slots, supporting up to 128GB of RAM.
- Aprire le clip su entrambe le estremità dello slot DIMM.
- Allineare il modulo di memoria allo slot, assicurandosi che la tacca sul modulo corrisponda alla chiave nello slot.
- Premere con decisione su entrambe le estremità del modulo di memoria finché le clip non scattano in posizione.
3. Installazione di archiviazione
The motherboard supports M.2 SSDs and SATA drives.
Installazione SSD M.2:
- Individuare lo slot M.2 sulla scheda madre.
- Inserire l'SSD M.2 nello slot con un'angolazione di 30 gradi.
- Gently push down the SSD and secure it with the provided M.2 anchor or screw.

Installazione dell'unità SATA:
- Collegare un'estremità di un cavo dati SATA a una porta SATA sulla scheda madre.
- Connect the other end of the SATA data cable to your storage drive (HDD/SSD).
- Connect a SATA power cable from your power supply unit (PSU) to the storage drive.
4. Installazione della scheda PCIe
Install graphics cards or other expansion cards into the PCIe 4.0 slots.
- Open the retention clip at the end of the PCIe slot.
- Align the expansion card with the slot and press down firmly until it is seated and the clip snaps shut.
- Fissare la scheda al case del PC con una vite.

5. Collegamenti di alimentazione
Collegare i cavi dell'alimentatore (PSU) alla scheda madre.
- Connettore di alimentazione ATX a 24 pin: Connect the main 24-pin power cable from your PSU to the corresponding connector on the motherboard.
- 8-pin CPU Power Connector (EATX12V): Connect the 8-pin CPU power cable from your PSU to the connector located near the CPU socket.
6. Collegamenti del pannello frontale
Connect your PC case's front panel cables (power button, reset button, USB ports, audio jacks, LED indicators) to the corresponding headers on the motherboard. Refer to the motherboard diagram for exact locations.
Operativo
Primo avvio e configurazione BIOS/UEFI
Dopo aver assemblato il sistema, collega un monitor, una tastiera e un mouse. Accendere il sistema.
- Premere il tasto Eliminare tasto durante l'avvio per accedere all'utilità di configurazione BIOS/UEFI.
- Configura l'ordine di avvio, l'ora di sistema e altre impostazioni essenziali.
- Salva le modifiche ed esci dal BIOS.

Driver and Operating System Installation
Install your preferred operating system (e.g., Windows 10/11) from a bootable USB drive or DVD. After OS installation, install the latest drivers for the motherboard chipset, LAN, audio, and any other integrated components from the ASUS support websito per garantire prestazioni e stabilità ottimali.
Manutenzione
Pulizia
Regularly clean your PC to prevent dust buildup, which can lead to overheating and component failure. Use compressed air to remove dust from heatsinks, fans, and other components. Ensure the system is powered off and unplugged before cleaning.
Aggiornamenti del BIOS
Controllare periodicamente il supporto ASUS website for BIOS updates. BIOS updates can improve system stability, compatibility, and performance. Follow the instructions provided by ASUS carefully when performing a BIOS update to avoid system damage.
Risoluzione dei problemi
Questa sezione affronta i problemi più comuni che potresti incontrare.
- No Display / No Post:
- Assicurarsi che tutti i cavi di alimentazione (ATX a 24 pin, CPU a 8 pin) siano collegati saldamente.
- Reinstallare i moduli RAM. Provare ad avviare il sistema con un solo modulo RAM.
- Verificare che la CPU sia posizionata correttamente e che il dissipatore della CPU sia installato correttamente.
- Check that the graphics card is fully seated in its PCIe slot and has adequate power.
- If using integrated graphics, ensure your monitor is connected to the motherboard's video output (HDMI).
- Instabilità del sistema/arresti anomali:
- Assicurarsi che tutti i driver siano aggiornati.
- Controllare le temperature della CPU e della GPU utilizzando un software di monitoraggio.
- Eseguire strumenti di diagnostica della memoria per verificare la presenza di RAM difettosa.
- Verificare l'alimentazione elettricatage è sufficiente per tutti i componenti.
- Periferica non rilevata:
- Prova a collegare la periferica a una porta diversa.
- Install or update drivers for the peripheral.
- Controllare le impostazioni del BIOS per assicurarsi che la porta sia abilitata.
Specifiche
| Caratteristica | Specificazione |
|---|---|
| Marca | Asus |
| Nome del modello | PRIME H810M-E-CSM |
| Presa CPU | LGA1851 |
| Processori compatibili | Processori Intel Core Ultra (serie 2) |
| Tipo di chipset | Intel H810 |
| Tecnologia della memoria RAM | DDR5 |
| Slot di memoria disponibili | 2 |
| Ram Memory Maximum Size | 128 GB |
| Interfaccia della scheda grafica | PCI Express 4.0 |
| Total PCIe Ports | 2 |
| Total SATA Ports | 4 |
| Total M.2 Slots | 1 |
| Porte USB totali | 11 (vari tipi) |
| Numero totale di porte HDMI | 1 |
| Numero di porte Ethernet | 1 (1Gb LAN) |
| Tipo di connettore di alimentazione principale | 24 pin |
| Piattaforma | Finestre 10, Windows 11 |
| Dimensioni dell'articolo L x P x A | 9.6 cm L x 8.7 cm P x 1.5 cm A |
| Peso dell'articolo | 1.1 libbre |
Informazioni sulla garanzia
The ASUS Prime H810M-E-CSM Motherboard comes with a Garanzia del produttore di 3 anni. For detailed terms and conditions, please refer to the warranty card included in your package or visit the official ASUS support websito.
Supporto
For further assistance, technical support, driver downloads, or BIOS updates, please visit the official ASUS support websito:
You can also find additional resources and FAQs on the ASUS product page for the Prime H810M-E-CSM.