1. Introduzione
This manual provides detailed instructions for the installation, operation, and maintenance of your darkFlash DS900 Air ATX Mid-Tower PC Gaming Case. Please read this manual thoroughly before beginning assembly to ensure proper setup and safe usage. The DS900 Air is designed to offer a clear view of your components with its 270° full-view tempered glass and provides excellent cooling capabilities for high-performance systems.

Figure 1.1: darkFlash DS900 Air ATX Mid-Tower PC Gaming Case with internal components and RGB lighting.
2. Informazioni sulla sicurezza
Durante l'installazione e il funzionamento, osservare sempre le seguenti precauzioni di sicurezza:
- Scollegare l'alimentatore dalla presa a muro prima di installare o rimuovere qualsiasi componente.
- Indossare un braccialetto antistatico per evitare danni causati dalle scariche elettrostatiche (ESD) ai componenti sensibili.
- Handle tempered glass panels with care. Avoid impacts or dropping them, as they can shatter.
- Tenere le parti di piccole dimensioni e le viti lontano dalla portata dei bambini.
- Assicurare una corretta ventilazione attorno al case per evitare il surriscaldamento.
- Non tentare di modificare la struttura della custodia, poiché ciò potrebbe invalidare la garanzia e comportare rischi per la sicurezza.
3. Specifiche
| Caratteristica | Specificazione |
|---|---|
| Nome del modello | DS900 Air |
| Tipo di caso | ATX Mid-Tower |
| Supporto per la scheda madre | ATX, Micro ATX, Mini ITX |
| Spazio libero sulla lunghezza della GPU | Fino a 425 mm |
| Altezza libera del dissipatore della CPU | Fino a 170 mm |
| Tipo di PSU | ATX (Bottom-mounted) |
| Alloggiamenti unità | 2x 3.5" HDD or 2x 2.5" SSD, 2x 2.5" SSD |
| Slot di espansione | 7 slot PCIe |
| Porte I/O | 1x USB-C, 1x USB 3.0, Audio (HD Audio) |
| Supporto per i fan | Bottom: 3x 120mm; Top: 3x 120mm or 2x 140mm; Rear: 1x 120mm; Right Side: 2x 120mm |
| Supporto radiatore | Top: Up to 360mm; Side: Up to 240mm |
| Materiali | Acciaio, vetro temperato |
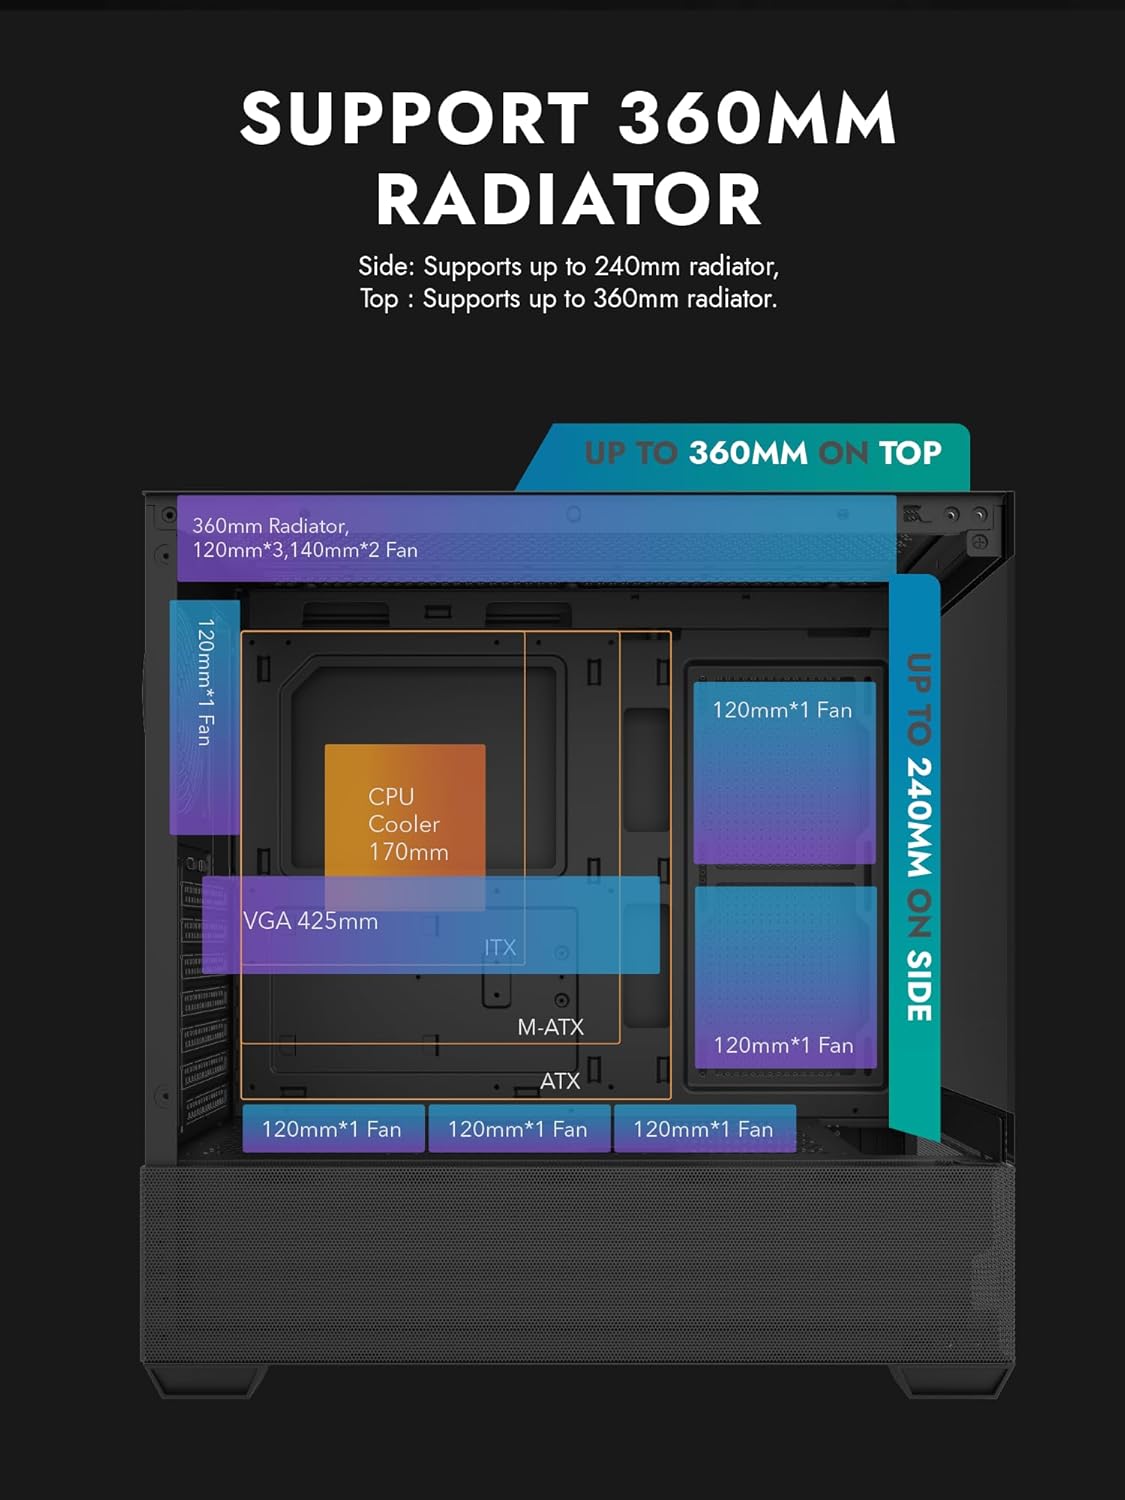
Figure 3.1: Radiator and fan support diagram for the DS900 Air case, illustrating maximum component dimensions.
4. Configurazione e installazione
Follow these steps to assemble your PC components within the darkFlash DS900 Air case.
4.1. Preparazione del caso
- Rimuovere i pannelli laterali: The DS900 Air features a tool-free clamshell side panel. Gently pull the top edge of the tempered glass side panel to unlatch it, then lift it off. Repeat for the other side panel if necessary.
- Scatola degli accessori: Individuare la scatola degli accessori all'interno della custodia, che contiene viti, fascette e altri accessori di montaggio.
4.2. Installazione della scheda madre
- Installare la schermatura I/O nell'apertura posteriore del case.
- Align your ATX, Micro-ATX, or Mini-ITX motherboard with the standoffs inside the case. Ensure the I/O ports align with the I/O shield.
- Fissare la scheda madre utilizzando le viti fornite.
4.3. Installazione dell'unità di alimentazione (PSU)
- The DS900 Air has a dedicated bottom PSU chamber. Slide your ATX power supply into the chamber from the rear of the case.
- Fissare l'alimentatore con le viti dalla parte posteriore del case.
- Route necessary power cables through the cutouts into the main compartment.
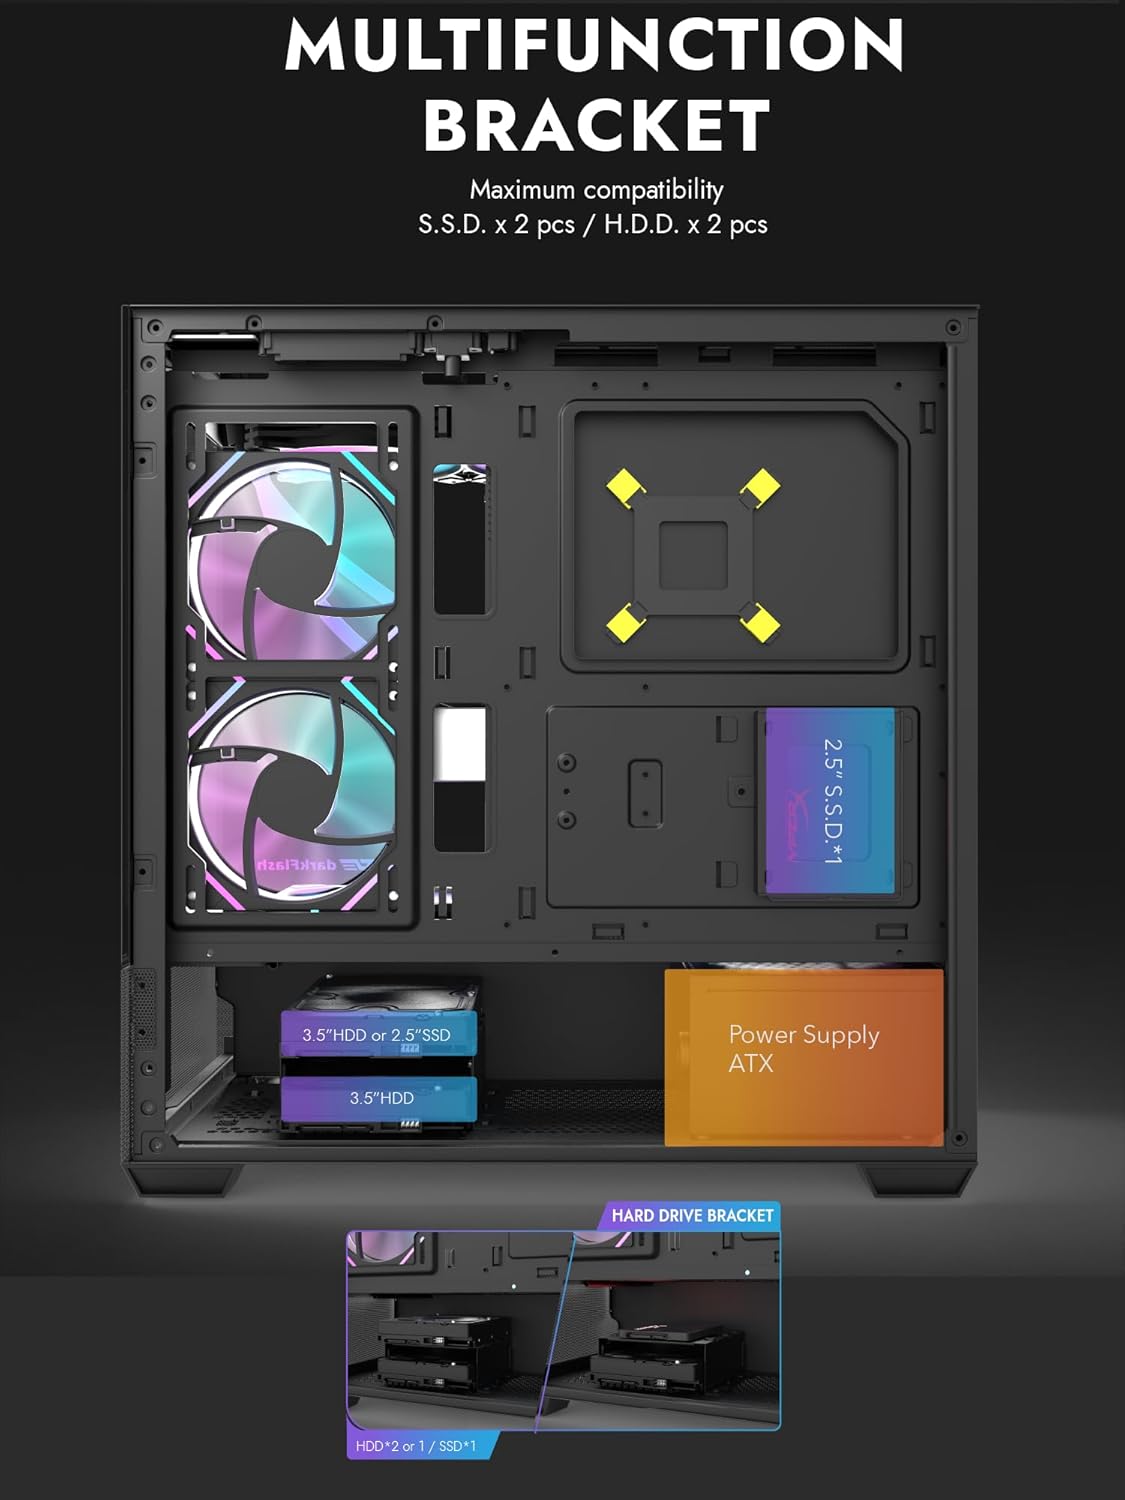
Figure 4.1: Internal layout showing the multifunction drive bracket and the bottom-mounted PSU chamber.
4.4. Installazione del dispositivo di archiviazione
The case supports up to two 3.5" HDDs or 2.5" SSDs in the hard drive bracket, and two additional 2.5" SSDs on the multifunction bracket.
- HDD da 3.5" / SSD da 2.5": Install drives into the removable hard drive bracket located in the PSU chamber. Secure with screws.
- SSD da 2.5": Mount 2.5" SSDs onto the multifunction bracket located on the motherboard tray. Secure with screws.
4.5. Installazione della scheda grafica (GPU)
- Rimuovere le coperture degli slot PCIe necessari dalla parte posteriore del case.
- Inserire la scheda grafica nello slot PCIe appropriato sulla scheda madre.
- Fissare la scheda grafica con le viti. Il case supporta GPU fino a 425 mm di lunghezza.
4.6. Cooling System Installation (Fans/Radiators)
The DS900 Air offers extensive cooling options:
- Superiore: Supports up to 3x 120mm fans or 2x 140mm fans, or a 360mm radiator.
- Metter il fondo a: Supports up to 3x 120mm fans.
- Posteriore: Supports 1x 120mm fan.
- Lato destro: Supports 2x 120mm fans or a 240mm radiator.
Install fans and radiators using the appropriate screws and mounting points. Ensure correct airflow direction for optimal cooling.

Figure 4.2: Fan support locations and quantities within the DS900 Air chassis.

Figure 4.3: Airflow diagram demonstrating optimal cooling paths through the case.
4.7. Collegamento dei cavi I/O anteriori
Connect the front panel cables (USB-C, USB 3.0, HD Audio, Power, Reset, LED) to their corresponding headers on your motherboard. Refer to your motherboard manual for exact header locations.

Figure 4.4: Top-right I/O panel featuring USB-C and USB 3.0 ports.
4.8. Gestione dei cavi
Utilizzate i fori per il passaggio dei cavi e i punti di fissaggio dietro il vassoio della scheda madre per gestire i cavi. Questo migliora il flusso d'aria e l'estetica.
5. Utilizzo del PC
Once all components are installed and cables are connected, replace the side panels. Connect your monitor, keyboard, mouse, and power cable. Press the power button on the case to start your system. Ensure all fans are spinning and components are receiving power.
6. Manutenzione
Una manutenzione regolare aiuta a garantire prestazioni ottimali e longevità dei componenti del PC.
- Pulizia della polvere: Periodically clean dust filters and internal components using compressed air. The DS900 Air features mesh panels that help filter dust.
- Flusso d'aria: Ensure no obstructions block the intake or exhaust vents of the case.
- Gestione dei cavi: Re-evaluate cable routing periodically to ensure no cables are interfering with fan blades or airflow.
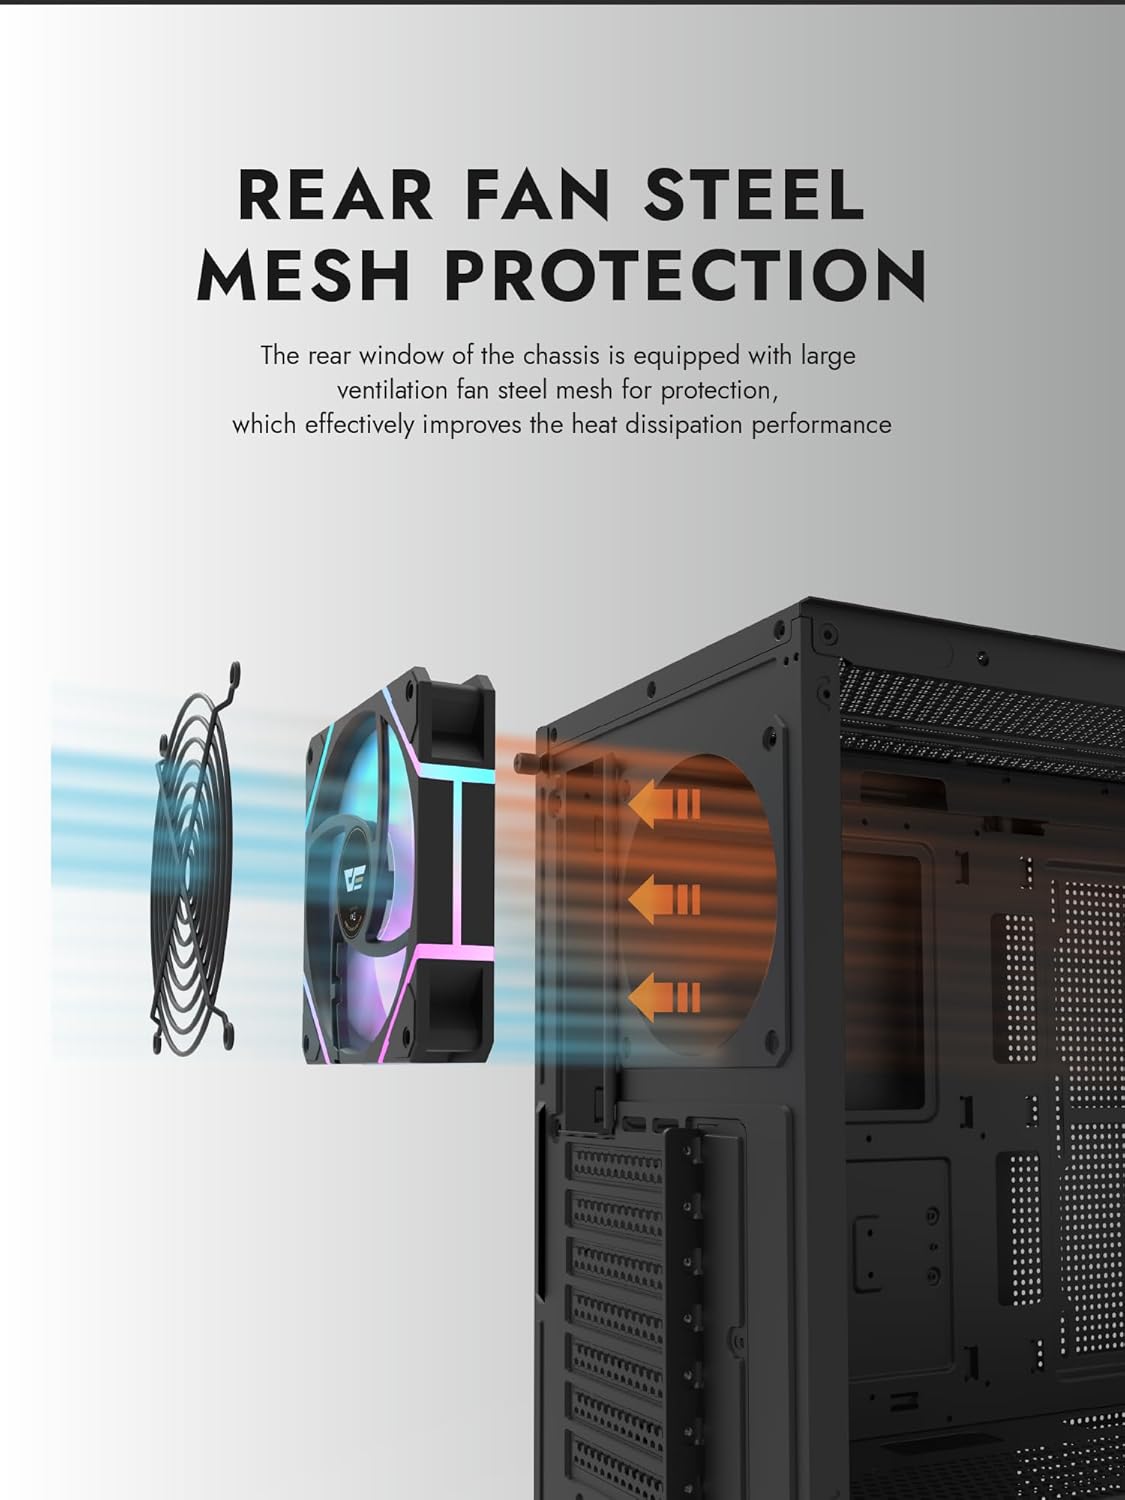
Figure 6.1: Rear fan steel mesh protection, designed to improve heat dissipation.
7. Risoluzione Dei Problemi
Se riscontri problemi con la configurazione del tuo PC, prendi in considerazione i seguenti passaggi comuni per la risoluzione dei problemi:
- Nessun potere: Check all power connections, including the PSU to the wall, PSU to motherboard, and front panel power switch cable to the motherboard.
- Nessuna visualizzazione: Ensure your monitor is connected to the graphics card (not the motherboard I/O unless using integrated graphics). Reseat the graphics card and RAM.
- Surriscaldamento: Verify all fans are spinning correctly and are oriented for proper airflow. Check CPU cooler installation.
- Componente non rilevato: Reseat the component (e.g., RAM, GPU, storage drive) and check its power and data connections.
8. Garanzia e supporto
darkFlash products are manufactured to high-quality standards. For warranty information or technical support, please refer to the official darkFlash webo contattare il rivenditore. Conservare la prova d'acquisto per eventuali reclami in garanzia.