1. Introduzione
This manual provides detailed instructions for the assembly, operation, and maintenance of your darkFlash DY460 ATX Full-Tower PC Gaming Case. Designed for high airflow and extensive hardware compatibility, this case features a 330° full-view tempered glass design and comes with four pre-installed ARGB PWM fans. Please read this manual thoroughly before beginning your PC build to ensure a smooth and successful experience.
2. Caratteristiche del prodotto
2.1. 330° Full-View Pannelli in vetro temperato
The darkFlash DY460 features triple tempered-glass panels on the front, top, and side, providing a panoramic view of your internal components. Its full-tower design offers generous internal space, accommodating large hardware such as GPUs up to 400mm in length.

Immagine: Panoramica view of the darkFlash DY460 case.
2.2. Pre-installed 4× darkFlash INF34 ARGB PWM Fans
The case includes four 120mm ARGB PWM fans (darkFlash INF34) that provide both vibrant lighting and precise speed control (0-1800 RPM) for balanced cooling and low noise. These fans are strategically placed to optimize airflow within the full-tower layout.

Immagine: Interno view highlighting pre-installed ARGB fans.
2.3. High-Airflow Layout & 360mm Radiator Support
Optimized for superior cooling, the DY460 supports a 360mm radiator at the top and a 240mm radiator at the front. Additionally, three 120mm fan slots are available at the bottom. A 34mm rear cable routing space ensures a tidy build, preventing airflow obstruction. The spacious design is compatible with AIO liquid cooling systems and large air coolers.

Image: Airflow diagram illustrating cooling paths.

Image: Fan and radiator support specifications.
2.4. Full-Tower GPU & CPU Cooler Support
This case accommodates GPUs up to 400mm horizontally, making it compatible with high-end cards like the RTX 5090. CPU coolers up to 185mm in height are also supported. Vertical GPU mounting is possible with a separately sold bracket. Always confirm your hardware dimensions before purchase.
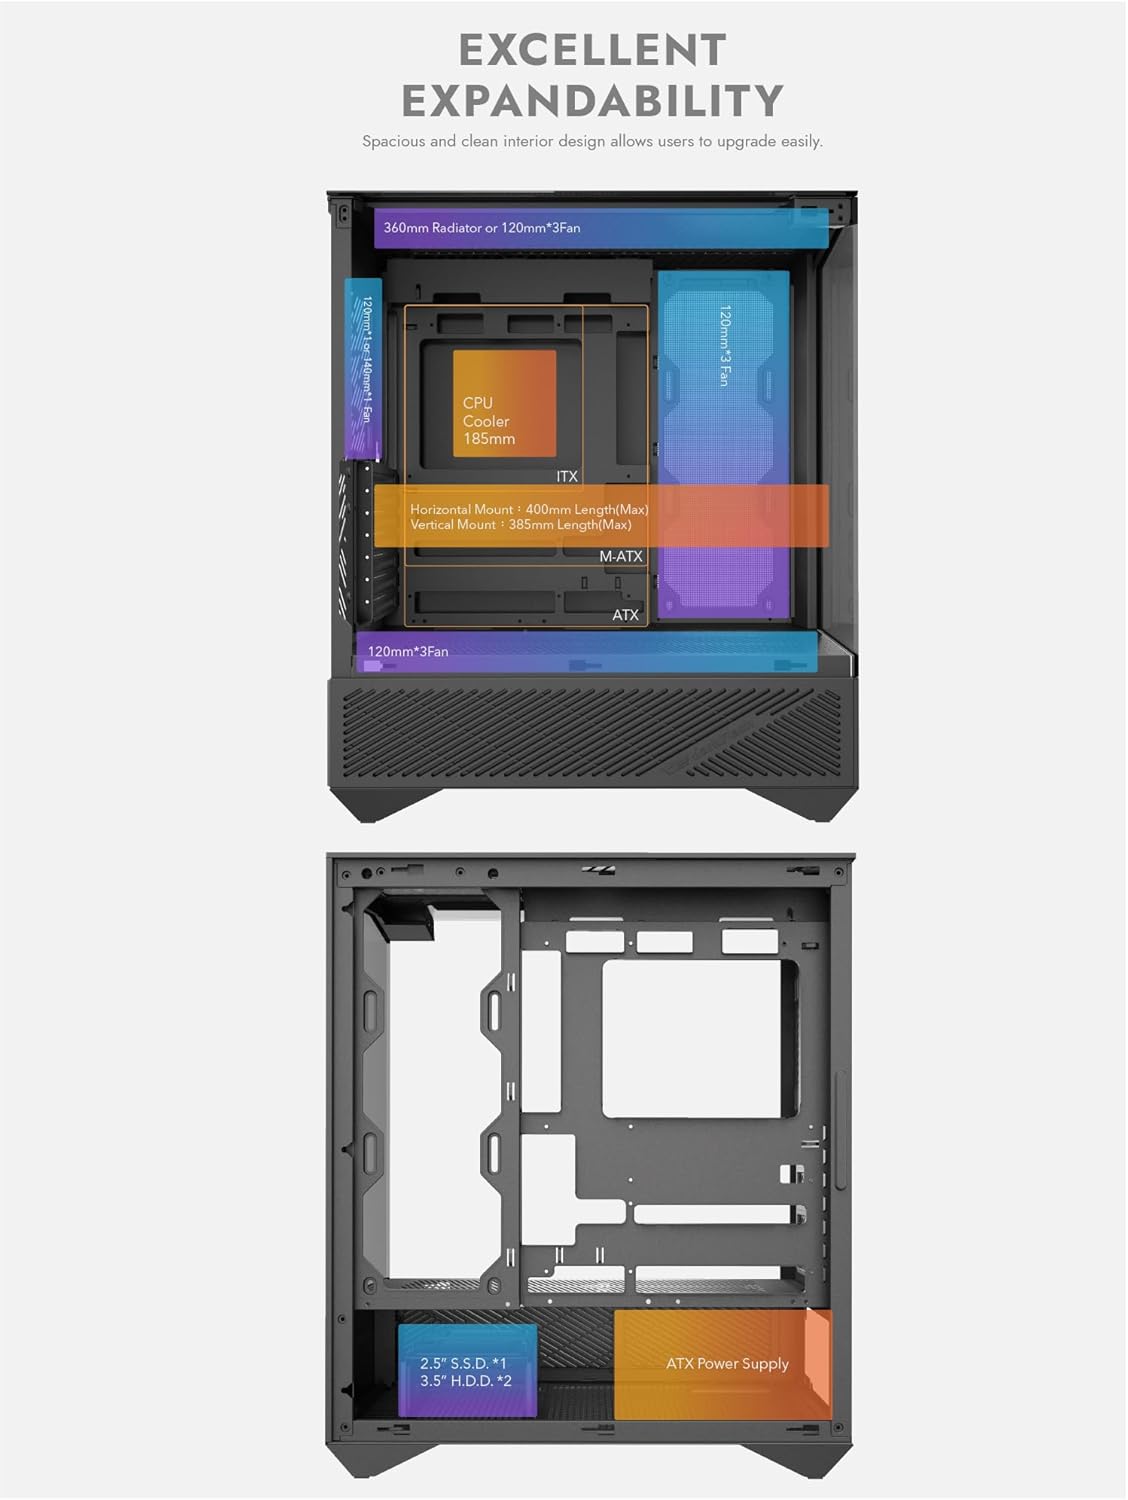
Image: Internal dimensions for GPU and CPU cooler clearance.

Image: Optional vertical GPU mount kit.
2.5. Separate PSU Chamber & Top USB-C I/O
A dedicated power supply unit (PSU) chamber at the bottom isolates cables, improving internal airflow and aesthetics. The top I/O panel includes a high-speed USB-C (10Gbps) port and a USB 3.0 port for convenient connectivity. The 34mm cable routing depth facilitates easy cable management, even for complex builds with multiple storage drives.

Image: Top I/O panel with USB-C and USB 3.0 ports.

Image: Multifunction bracket for storage drives.
2.6. Back-Connect Motherboard Support
The DY460 supports ATX and M-ATX back-connect motherboards, allowing most cables to be routed behind the motherboard tray. This design contributes to a visually clean and organized interior.

Image: Back-connect motherboard compatibility.
2.7. Magnetic Dust Filters
For easy maintenance and to keep the interior clean, the case includes removable magnetic dust filters.

Image: Case features including magnetic dust filters.
3. Specifiche
| Caratteristica | Specificazione |
|---|---|
| Marca | Flash scuro |
| Numero di modello | Numero di modello: DY460 |
| Serie | DF-DY460-BK-4F |
| Tipo di caso | Torre completa |
| Compatibilità della scheda madre | ATX |
| Dimensioni del prodotto (LxWxH) | 9.37 x 17.8 x 19.88 pollici (23.8 x 45.2 x 50.5 cm) |
| Peso dell'articolo | 23.4 libbre (10.6 kg) |
| Colore | Nero |
| Materiale | Metallo, plastica, vetro temperato |
| Numero di porte USB 3.0 | 1 (più 1 USB-C) |
| Tipo di montaggio dell'alimentatore | Montaggio inferiore |
| Metodo di raffreddamento | Aria, Acqua |
| Usi consigliati | Gioco d'azzardo |

Image: Detailed hardware compatibility chart.
4. Guida all'installazione
Follow these general steps to assemble your PC within the darkFlash DY460 case. For a visual guide, please refer to the embedded video below.
- Disimballaggio e ispezione: Carefully remove the case from its packaging and inspect for any damage.
- Rimozione del pannello: Gently remove the tempered glass side panels and the top panel to access the interior.
- Installazione della scheda madre: Install your CPU and RAM onto the motherboard. Then, secure the motherboard into the case using the provided standoffs and screws.
- Installazione dell'alimentatore: Mount your power supply unit (PSU) in the dedicated bottom chamber.
- Installazione dell'unità di archiviazione: Install your SSDs and HDDs using the multifunction brackets.
- Installazione della GPU: Install your graphics card into the appropriate PCIe slot. Ensure it is securely fastened.
- Fan/Radiator Installation: If installing additional fans or radiators, mount them in the designated positions (top, front, bottom, rear).
- Gestione dei cavi: Route all necessary cables through the cutouts and utilize the 34mm space behind the motherboard tray for a clean build.
- Chiusura del caso: Reattach all panels securely.
Video: Official darkFlash DY460 Full-Tower PC Gaming Case build guide. This video demonstrates the assembly process, including component installation and cable management.
5. Istruzioni per l'uso
- Accensione: Locate the power button on the top I/O panel. Press it once to power on your system.
- Porte I/O: Utilize the conveniently located USB-C (10Gbps), USB 3.0, and audio ports on the top panel for connecting peripherals and external devices.
- Controllo della ventola: The pre-installed PWM fans can be controlled via your motherboard's fan headers and accompanying software. Adjust fan speeds to achieve your desired balance of cooling performance and noise levels.
- Illuminazione ARGB: The ARGB fans can be synchronized with compatible motherboard software (e.g., ASUS Aura Sync, MSI Mystic Light, Gigabyte RGB Fusion) or a dedicated ARGB controller (if included or purchased separately) to customize lighting effects and colors.
6. Manutenzione
- Filtri antipolvere: Regularly remove and clean the magnetic dust filters located on the case to maintain optimal airflow and prevent dust buildup inside your system. Clean with water and mild soap, or simply brush off accumulated dust. Ensure they are completely dry before reattaching.
- Pulizia interna: Periodically clean the interior of the case and components with compressed air to remove dust. Ensure the system is powered off and unplugged before cleaning.
- Pannelli in vetro temperato: Clean glass panels with a soft, lint-free cloth and a non-abrasive glass cleaner. Avoid harsh chemicals that may damage the glass or coatings.
7. Risoluzione Dei Problemi
- Problemi di adattamento dei componenti: If a component (e.g., GPU, CPU cooler) does not fit, double-check its dimensions against the case specifications (GPU length max 400mm, CPU cooler height max 185mm). Ensure all cables are routed efficiently to avoid obstruction.
- Airflow Concerns: Verify that all installed fans are correctly oriented for optimal intake and exhaust. Refer to the airflow diagrams in the 'Product Features' section. Ensure no cables or components are blocking airflow paths.
- Loose Glass Panels: When removing tempered glass panels, exercise extreme caution. Support the panel firmly with one hand as you loosen fasteners to prevent accidental drops, as they may not be secured by channels or hooks.
- Cable Management Difficulties: Utilize the generous 34mm rear cable routing space. Organize cables with zip ties or Velcro straps to prevent them from interfering with components or airflow.
8. Garanzia e supporto
The darkFlash DY460 PC Gaming Case comes with a manufacturer's warranty. For specific warranty terms, technical support, or replacement parts, please refer to the official darkFlash webo contattare direttamente il servizio clienti. Conservare la prova d'acquisto per eventuali reclami in garanzia.
DarkFlash ufficiale Websito: www.darkflash.com