Introduzione
This manual provides detailed instructions for the assembly, operation, and maintenance of your Greesum 10x10FT Outdoor Storage Shed. Please read all instructions carefully before beginning assembly to ensure safe and correct installation. This heavy-duty steel storage shed is designed to provide secure, spacious storage for your tools, lawn mower, and outdoor equipment, offering superior strength and long-lasting weather resistance.
Informazioni sulla sicurezza
- Indossare guanti: Always wear protective gloves during installation to prevent cuts from sharp edges of metal components.
- Superficie stabile: Install the shed on a flat, solid surface. A wooden platform is recommended for stability and moisture protection.
- Normative locali: Prima dell'acquistoasing and installing, check with your local Homeowners' Association (HOA) for any specific rules or approvals regarding shed installation.
- Assemblea di due persone: Il montaggio è notevolmente più semplice e sicuro se eseguito da due persone.
- Elementi di fissaggio sicuri: Ensure all screws and fasteners are tightened securely to maintain structural integrity.
Elenco delle parti
Before beginning assembly, verify that all parts are present and undamaged. Refer to the included parts guide for detailed identification. Components are typically numbered for ease of assembly.
Common Fasteners
- F1: Screws (various quantities)
- F2: Screws with nuts (various quantities)
- F3: Screws for hinges (various quantities)
- F5: Screws for corner caps (various quantities)
- V1: Rubber nuts (80 pieces) - for preventing injuries from sharp screw ends.
- V2: Washers (various quantities)
Frame and Panel Components
- B1, B2, BL, BR: Base frame components
- W1A, W2A, W3A: Wall panels
- L1, L2, L3: Upper frame connectors for walls
- UP1, ULA, URA: Upper frame components for door area
- P1, P2, P3: Roof panels
- S2, S3, S4: Roof support brackets
- M3, M4: Roof trim pieces
- GC: Roof corner caps
- DL1, DR1: Door panels
- DX1: Door braces
- DF: Door frame bracket
- DG: Door latch mechanism
- DH: Door hinges
Istruzioni di montaggio
Fase 1: assemblare il telaio di base
Connect the base frame components (B1, B2, BL, BR) using screws (F1) as indicated in the diagram. Ensure all corners are securely fastened.
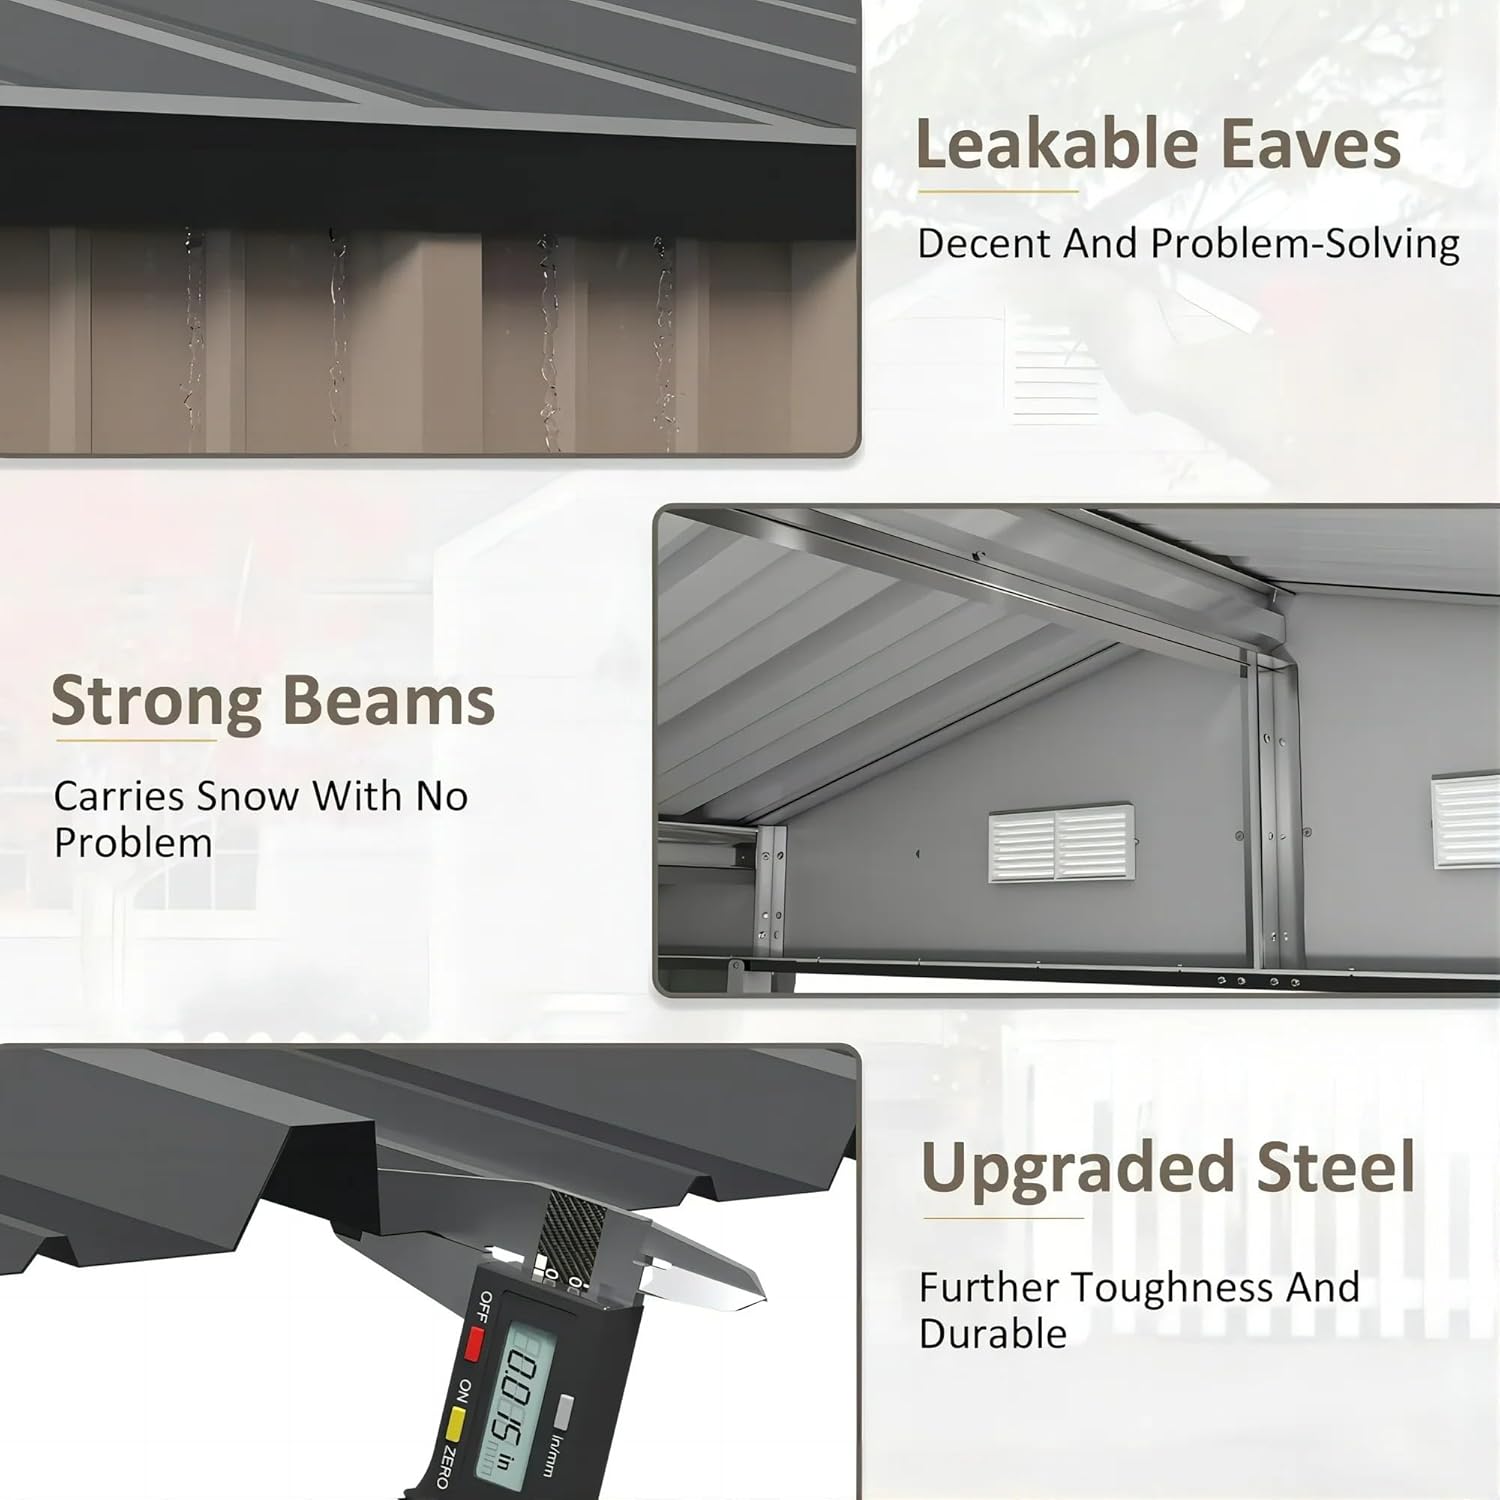
Immagine: dettagliata view of the base frame assembly, showing components B1, B2, BL, BR and screw placement (F1).
Fase 2: Installare i pannelli a parete
Attach the wall panels (W1A, W2A, W3A) to the base frame using screws (F1) and washers (V2). Secure the upper frame connectors (L1, L2, L3) between the wall panels. Pay attention to the orientation of L1, L2, and L3; portions with holes should face inward.

Immagine: Lato view of the shed during wall panel installation, showing the connection points to the base frame.
Video: Wall Part Instruction
Video: This video demonstrates the step-by-step process of assembling the wall panels and connecting them to the base frame, including proper screw and washer usage. Note: This video may feature a slightly different shed size (10x12) but the assembly principles are similar.
Fase 3: assemblare il tetto
Attach the roof support brackets (S2, S3, S4) to the top of the wall structure. Then, place the roof panels (P1, P2, P3) onto the brackets and secure them with screws (F1) and washers (V2). Ensure the two P1 parts are aligned correctly. Install roof trim pieces (M3, M4) and corner caps (GC).

Image: The fully assembled Greesum storage shed, showcasing the completed roof structure.
Passaggio 4: installare le porte
Assemble the door panels (DL1, DR1) with their braces (DX1). Attach the hinges (DH) to the door panels using screws (F3). Mount the assembled doors to the shed frame. Install the door latch mechanism (DG) and door frame bracket (DF).

Immagine: Frontale view of the Greesum storage shed, highlighting the double doors and their hardware.
Step 5: Final Touches and Safety
Install the rubber nuts (V1) onto the exposed screw ends inside the shed. This prevents injuries from sharp edges and provides a cleaner finish.
Video: Assembly & Honest Opinion of Greesum 10 x10FT Metal Outdoor Storage Shed
Video: Questo video fornisce una panoramica completaview of the shed assembly process and offers an honest opinion on the product's features and build quality.
Istruzioni per l'uso
- Apertura delle porte: Slide the door latch (DG) to unlock and pull the door handles to open. For wider access, the second door can also be opened by disengaging internal latches (if applicable).
- Chiusura delle porte: Push the doors shut until they meet. Engage the door latch (DG) to secure the doors.
- Blocco: The door features pre-drilled holes for a padlock (not included) to provide additional security for your stored items.
Manutenzione
- Pulizia regolare: Clean the shed exterior periodically with mild soap and water to remove dirt and debris. Avoid abrasive cleaners that could damage the galvanized steel finish.
- Controllare i dispositivi di fissaggio: Periodically inspect all screws and bolts to ensure they remain tight. Tighten any loose fasteners to maintain structural integrity.
- Ventilazione: Ensure the air vents remain clear of obstructions to promote proper air circulation and prevent moisture buildup inside the shed.
- Prevenzione della ruggine: Sebbene sia realizzato in acciaio zincato, ispezionatelo per individuare eventuali segni di ruggine, soprattutto nelle zone in cui il rivestimento potrebbe essere graffiato. Ritoccate con vernice antiruggine se necessario.
- Rimozione della neve: In areas with heavy snowfall, regularly clear snow from the roof to prevent excessive weight buildup, which could potentially damage the structure. The shed has a 6-inch snow-bearing capacity.
Risoluzione dei problemi
- Difficoltà nell'allineamento dei pannelli: Ensure the base frame is perfectly level and square before attaching wall panels. Loosen screws slightly, adjust alignment, and then re-tighten.
- Perdita: Check all roof panel overlaps and screw points for proper sealing. Apply silicone sealant if necessary to any gaps. Ensure roof trim pieces are correctly installed.
- Malfunzionamento della porta: Verify that hinges are securely attached and not bent. Check that the door frame is square and not warped. Adjust the door latch for smooth operation.
- Instabilità: Ensure the shed is anchored to the ground using appropriate methods for your chosen base (e.g., ground stakes for soil, concrete anchors for concrete slabs).
Specifiche
- Marca: Greesum
- Numero modello: GS-406GY-820
- Colore: Grigio
- Materiale: Acciaio legato
- Dimensioni del prodotto: 122"P x 125.5"L x 76.4"A
- Peso dell'articolo: 120 libbre
- Stile della porta: Single Hinged Door
- Livello di resistenza all'acqua: Resistente all'acqua
- Snow-Bearing Capacity: 6 pollici
- Resistenza al vento: 24-30 MIGLIA ORARIE
Garanzia e supporto
For any questions, missing parts, or assistance with assembly, please contact Greesum customer service. Refer to your purchase documentation for specific warranty details and contact information.