1. Introduzione
This manual provides detailed instructions for the setup, operation, maintenance, and troubleshooting of your ATTACK SHARK G3PRO Wireless Gaming Mouse. Please read this manual thoroughly to ensure proper use and to maximize your gaming experience.

Immagine: Un overview of the ATTACK SHARK G3PRO mouse and its features, including magnetic fast charging, PAW3311 sensor, web cloud drive, RGB rapid charging dock, and lightweight design.
2. Contenuto della confezione
Verifica che tutti gli articoli siano presenti nel tuo pacco:
- ATTACK SHARK G3PRO Wireless Gaming Mouse
- Dock di ricarica magnetico RGB
- Ricevitore USB 2.4G
- Cavo di ricarica/dati da USB-C a USB-A
- Manuale d'uso
3. Impostazione
3.1 Carica iniziale
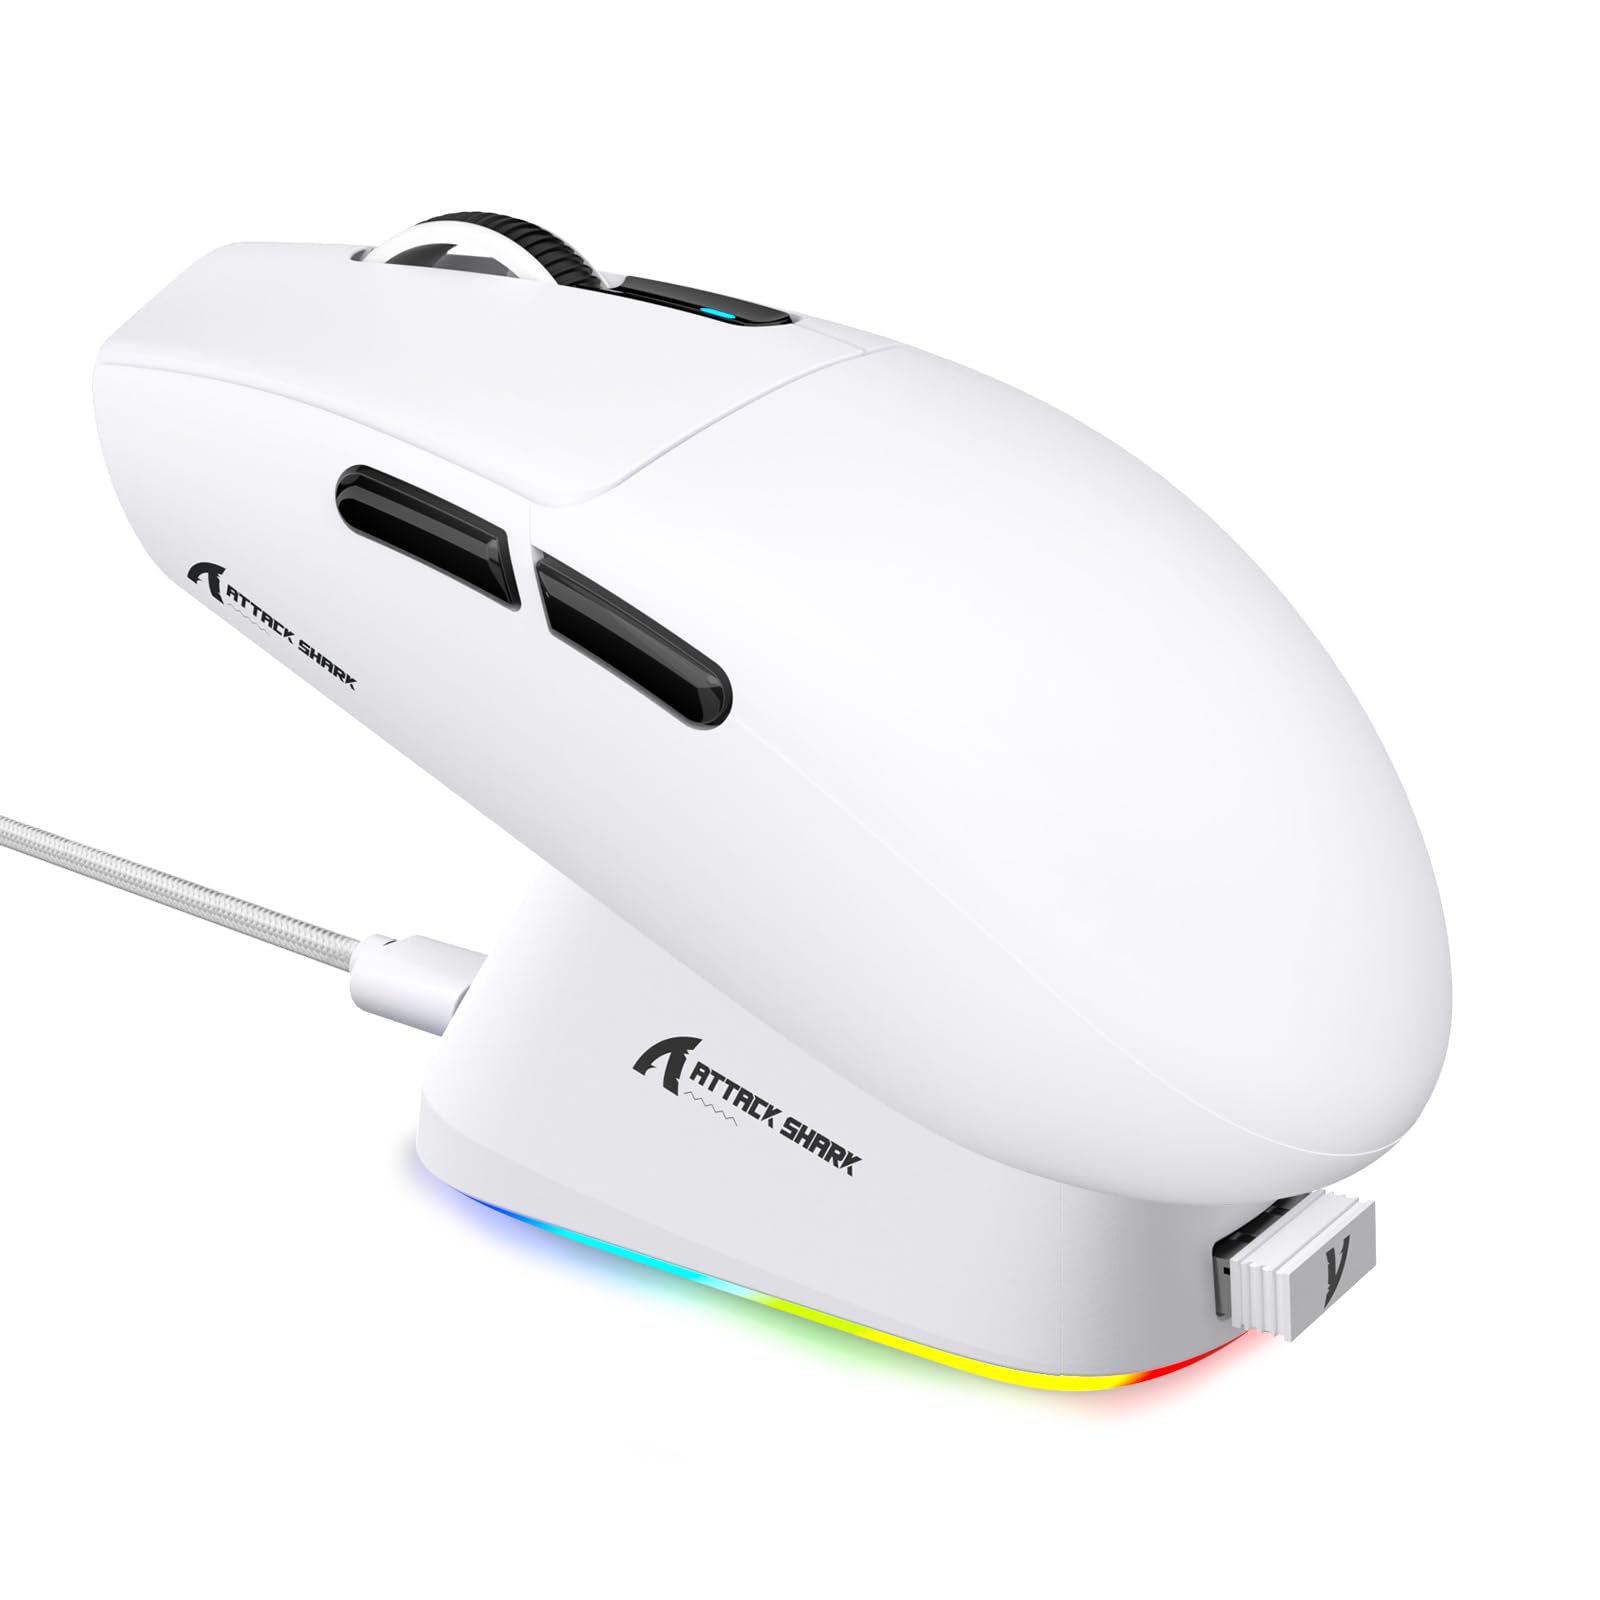
Before first use, it is recommended to fully charge the mouse. Connect the USB-C cable to the charging dock and a power source. Place the mouse onto the magnetic charging dock. The RGB lighting on the dock will indicate charging status.
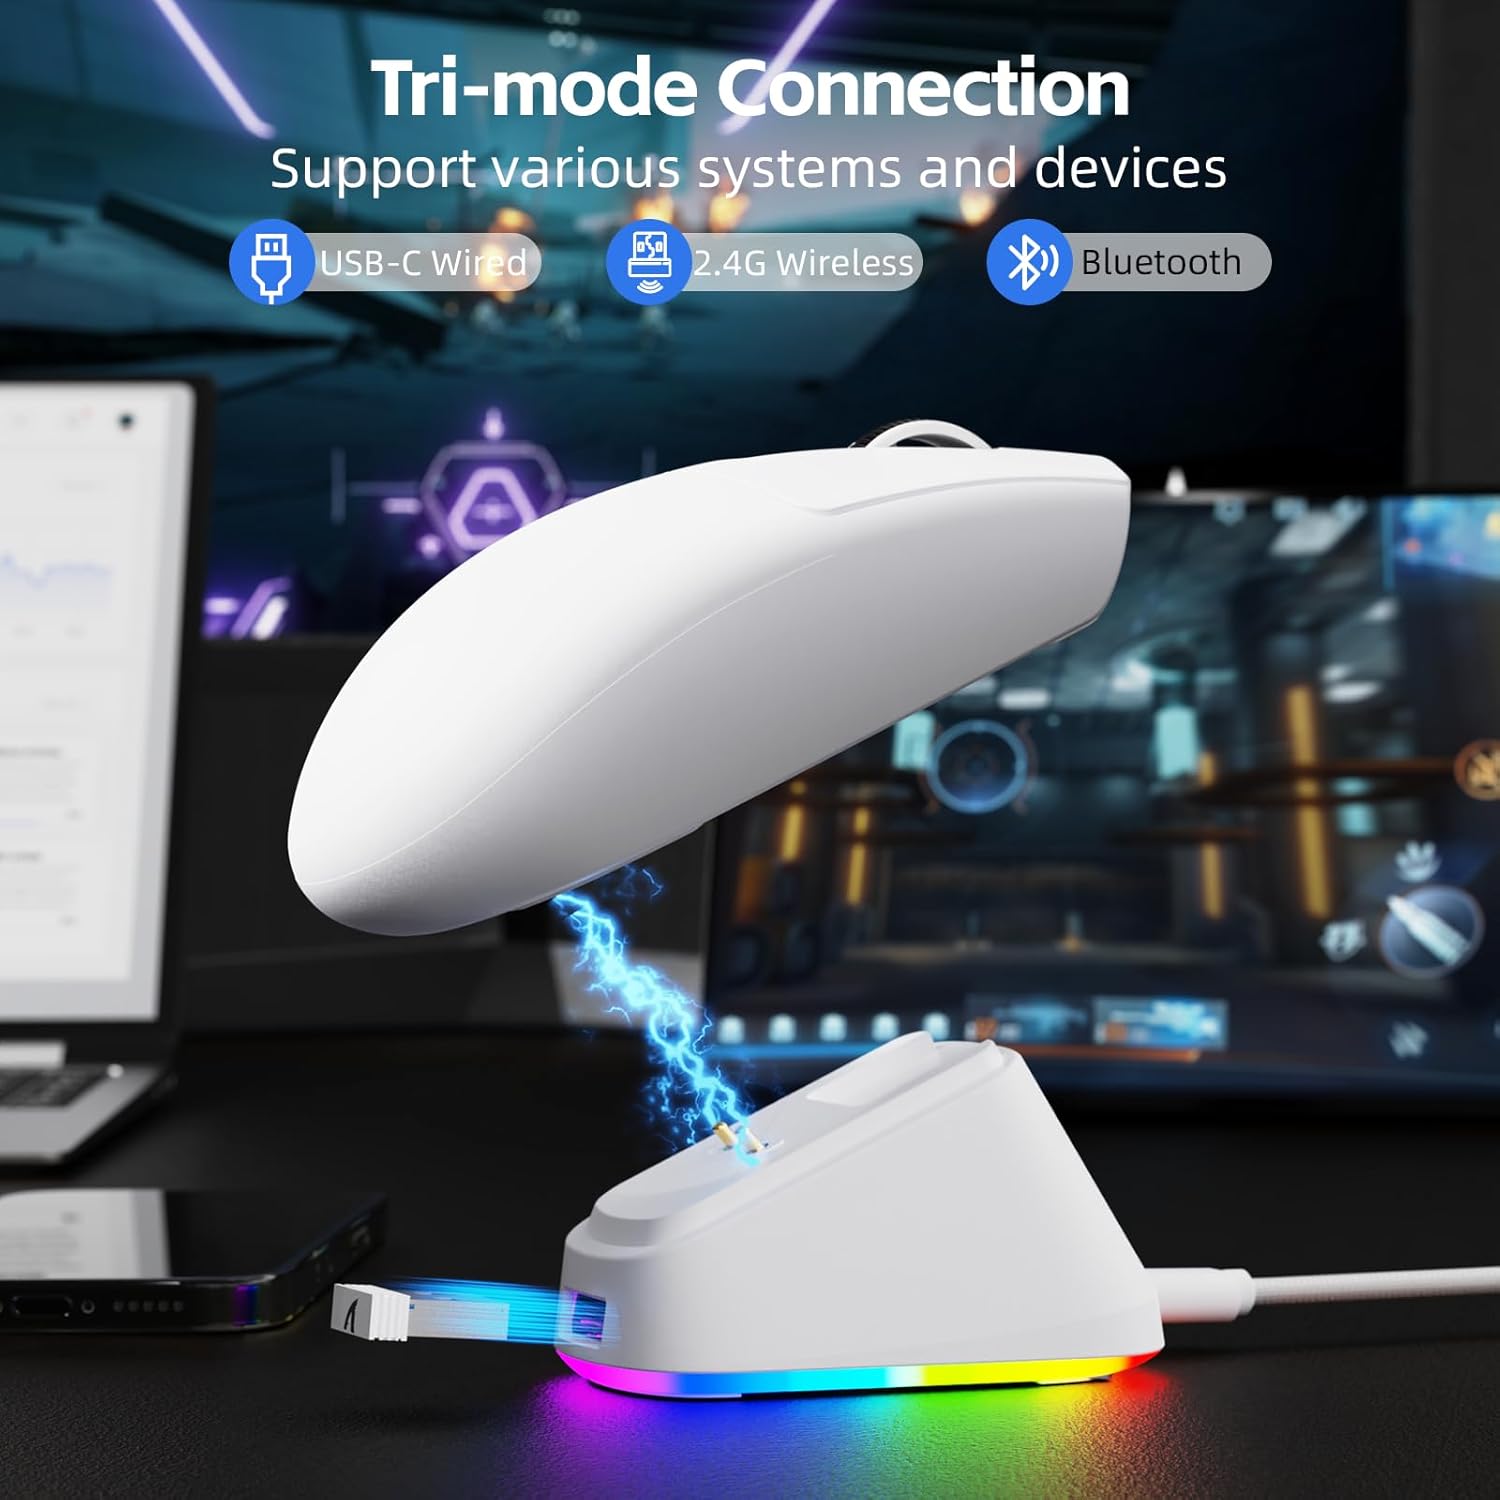
Image: The ATTACK SHARK G3PRO mouse magnetically attached to its RGB charging dock, showing the charging thimbles and USB-C port.
For a visual guide on charging, please watch the following video:
Video: This video demonstrates the magnetic charging dock and its features for the ATTACK SHARK G3PRO Wireless Gaming Mouse.
3.2 Collegamento del mouse
The G3PRO supports three connection modes: 2.4GHz Wireless, Bluetooth, and USB-C Wired. A switch on the bottom of the mouse allows you to select the desired mode.

Image: The ATTACK SHARK G3PRO mouse with visual indicators for Wired, 2.4G, and Bluetooth connectivity modes.
Modalità wireless a 2.4 GHz:
- Locate the 2.4G USB receiver, typically stored within the charging dock or the mouse itself.
- Collega il ricevitore USB a una porta USB disponibile sul tuo computer.
- Set the switch on the bottom of the mouse to "2.4G".
- Il mouse dovrebbe connettersi automaticamente.
Modalità Bluetooth:
- Set the switch on the bottom of the mouse to "BT".
- Sul tuo computer o dispositivo, vai alle impostazioni Bluetooth e abilita il Bluetooth.
- Cercare new devices and select "ATTACK SHARK G3PRO" to pair.
Modalità cablata USB-C:
- Connect the USB-C cable directly from the mouse to your computer.
- Il mouse funzionerà come un mouse cablato e si caricherà contemporaneamente.
For a visual guide on product features and connectivity, please watch the following video:
Video: This video demonstrates the various color options and the magnetic charging feature of the ATTACK SHARK G3PRO Wireless Gaming Mouse, showcasinil suo design e la sua funzionalità.
4. Utilizzo del mouse
4.1 Funzioni dei pulsanti
The ATTACK SHARK G3PRO features 5 programmable buttons:
- Clic sinistro: Azione primaria.
- Clic destro: Menu contestuale/azione secondaria.
- Clic centrale/rotellina di scorrimento: Scroll up/down, middle click for universal scroll or other functions.
- Pulsante Avanti: Default for navigating forward in web browser/cartelle.
- Pulsante indietro: Default for navigating backward in web browser/cartelle.
- Interruttore DPI: Scorre i livelli DPI preimpostati.

Image: A detailed diagram illustrating the location and default functions of the multi-functional buttons on the ATTACK SHARK G3PRO mouse.

Immagine: Un esploso view and labeled diagram of the G3PRO mouse components, including buttons, switches, charging points, and the 2.4G/OFF/BT mode switch.
4.2 Regolazione DPI
The mouse features a dedicated DPI switch to cycle through various sensitivity levels, ranging from 800 to 25,000 DPI. The current DPI setting is indicated by an LED light.

Image: A visual representation of the 25,000 DPI optical sensor's precision and how mouse movement trajectory sensitivity scales with DPI settings.
4.3 Frequenza di polling
The G3PRO supports a 1000Hz polling rate in both wired and 2.4GHz wireless modes, ensuring rapid response times for competitive gaming.

Image: A diagram illustrating the 1000Hz polling rate capability in both wired and wireless modes, highlighting millisecond response times.
5. Software e personalizzazione
Customize your G3PRO mouse settings using the intuitive web driver or downloadable software from ATTACK SHARK. This allows for personalization of DPI, polling rate, macros, and more.
- Web Autista: Accedi al web-based configuration tool for quick adjustments without installation.
- Downloadable Software: For advanced customization and profile management, download the dedicated software.

Image: A screenshot of the ATTACK SHARK Hub software interface, showing options for mouse settings, DPI settings, parameter settings, macro editing, and personal center.

Image: The cloud-driven programming interface for the G3PRO mouse, displaying options for button settings, DPI adjustments, polling rate settings, and power management.
6. Manutenzione
6.1 Pulizia
Per mantenere prestazioni ottimali, pulire regolarmente il mouse. Utilizzare un panno morbido e asciutto per pulire la superficie. Per lo sporco ostinato, utilizzare un panno leggermenteamp È possibile utilizzare un panno, assicurandosi che non penetri umidità nei componenti interni. Evitare prodotti chimici aggressivi o materiali abrasivi.
6.2 Conservazione
When not in use for extended periods, store the mouse and charging dock in a cool, dry place. Ensure the USB receiver is securely stored, ideally within the charging dock's designated slot, to prevent loss.
7. Risoluzione Dei Problemi
| Problema | Possibile causa | Soluzione |
|---|---|---|
| Il mouse non risponde (2.4G) | Low battery; Receiver not plugged in; Incorrect mode selected; Driver issue. | Charge the mouse; Ensure receiver is firmly plugged in; Set mouse to "2.4G" mode; Reinstall mouse drivers. |
| Il mouse non risponde (Bluetooth) | Low battery; Bluetooth not enabled on device; Not paired; Incorrect mode selected. | Charge the mouse; Enable Bluetooth on your device; Re-pair the mouse in Bluetooth settings; Set mouse to "BT" mode. |
| Charging dock RGB not lighting up | Cable not connected; Power source issue. | Ensure USB-C cable is securely connected to dock and power source; Try a different USB port or power adapter. |
| Inconsistent tracking | Dirty sensor; Uneven surface; Interference (wireless). | Clean the optical sensor; Use a clean, even mouse pad; Reduce wireless interference by moving other devices or using wired mode. |
| I pulsanti non rispondono | Conflitto software; Danni fisici. | Check software settings for button remapping; Test on another computer; Contact support if physical damage is suspected. |
8. Specifiche
| Caratteristica | Dettaglio |
|---|---|
| Marca | ATTACCO SQUALO |
| Modello | G3 PRO |
| Colore | Bianco |
| Tecnologia di connettività | Wireless a 2.4 GHz, Bluetooth, USB-C cablato |
| Tecnologia di rilevamento del movimento | Ottico (sensore PAW3311) |
| DPI massimo | 25,000 DPI |
| Tasso di sondaggio | 1000 Hz |
| Accelerazione | 40G |
| Velocità di tracciamento | 400 IPS |
| Interruttori | Mechanical (100 Million Clicks) |
| Capacità della batteria | 500mAh |
| Durata della batteria | Fino a 200 ore |
| Peso | 59 g ± 3 g |
| Pulsanti | 5 |
| Orientamento della mano | Ambidestro |
| Dispositivi compatibili | Computer portatile, computer personale, smartphone, tablet |
| Sistema operativo | Windows, macOS |
For a comparison of G3 and G3PRO models, refer to the image below:

Image: A table comparing the specifications of the ATTACK SHARK G3 and G3PRO models, highlighting differences in components and features.
9. Informazioni sulla sicurezza
- Non esporre il dispositivo a temperature o umidità estreme.
- Evitare di far cadere o sottoporre il dispositivo a forti impatti.
- Tenere fuori dalla portata dei bambini.
- Non tentare di smontare o modificare il dispositivo, poiché ciò invaliderebbe la garanzia e potrebbe causare danni.
- Utilizzare solo il cavo di ricarica e la base forniti.
10. Garanzia e supporto
The ATTACK SHARK G3PRO Wireless Gaming Mouse comes with a standard manufacturer's warranty. For detailed warranty information, please refer to the warranty card included in your package or visit the official ATTACK SHARK websito.
For technical support, troubleshooting assistance, or to inquire about replacement parts, please contact ATTACK SHARK customer service through their official websito o le informazioni di contatto fornite nella confezione del prodotto.
Ufficiale Websito: Negozio ATTACK SHARK su Amazon