Introduzione
This manual provides comprehensive instructions for the assembly, operation, and maintenance of your Dowinx Vanity Desk. Please read all instructions carefully before beginning assembly or use to ensure safe and proper functionality.
Informazioni importanti sulla sicurezza
Si prega di osservare le seguenti linee guida di sicurezza:
- Always unplug the vanity before assembly or disassembly.
- Tenere i componenti elettrici lontani dall'acqua.
- Do not use the vanity if the power cord is damaged.
- Seguire sempre attentamente le istruzioni di montaggio per evitare lesioni.
- Non appoggiare sul mobile lavabo oggetti pesanti che potrebbero causarne il ribaltamento.
Contenuto della confezione
Verify all components are present before beginning assembly. Refer to the parts list in your included assembly guide for a complete inventory.
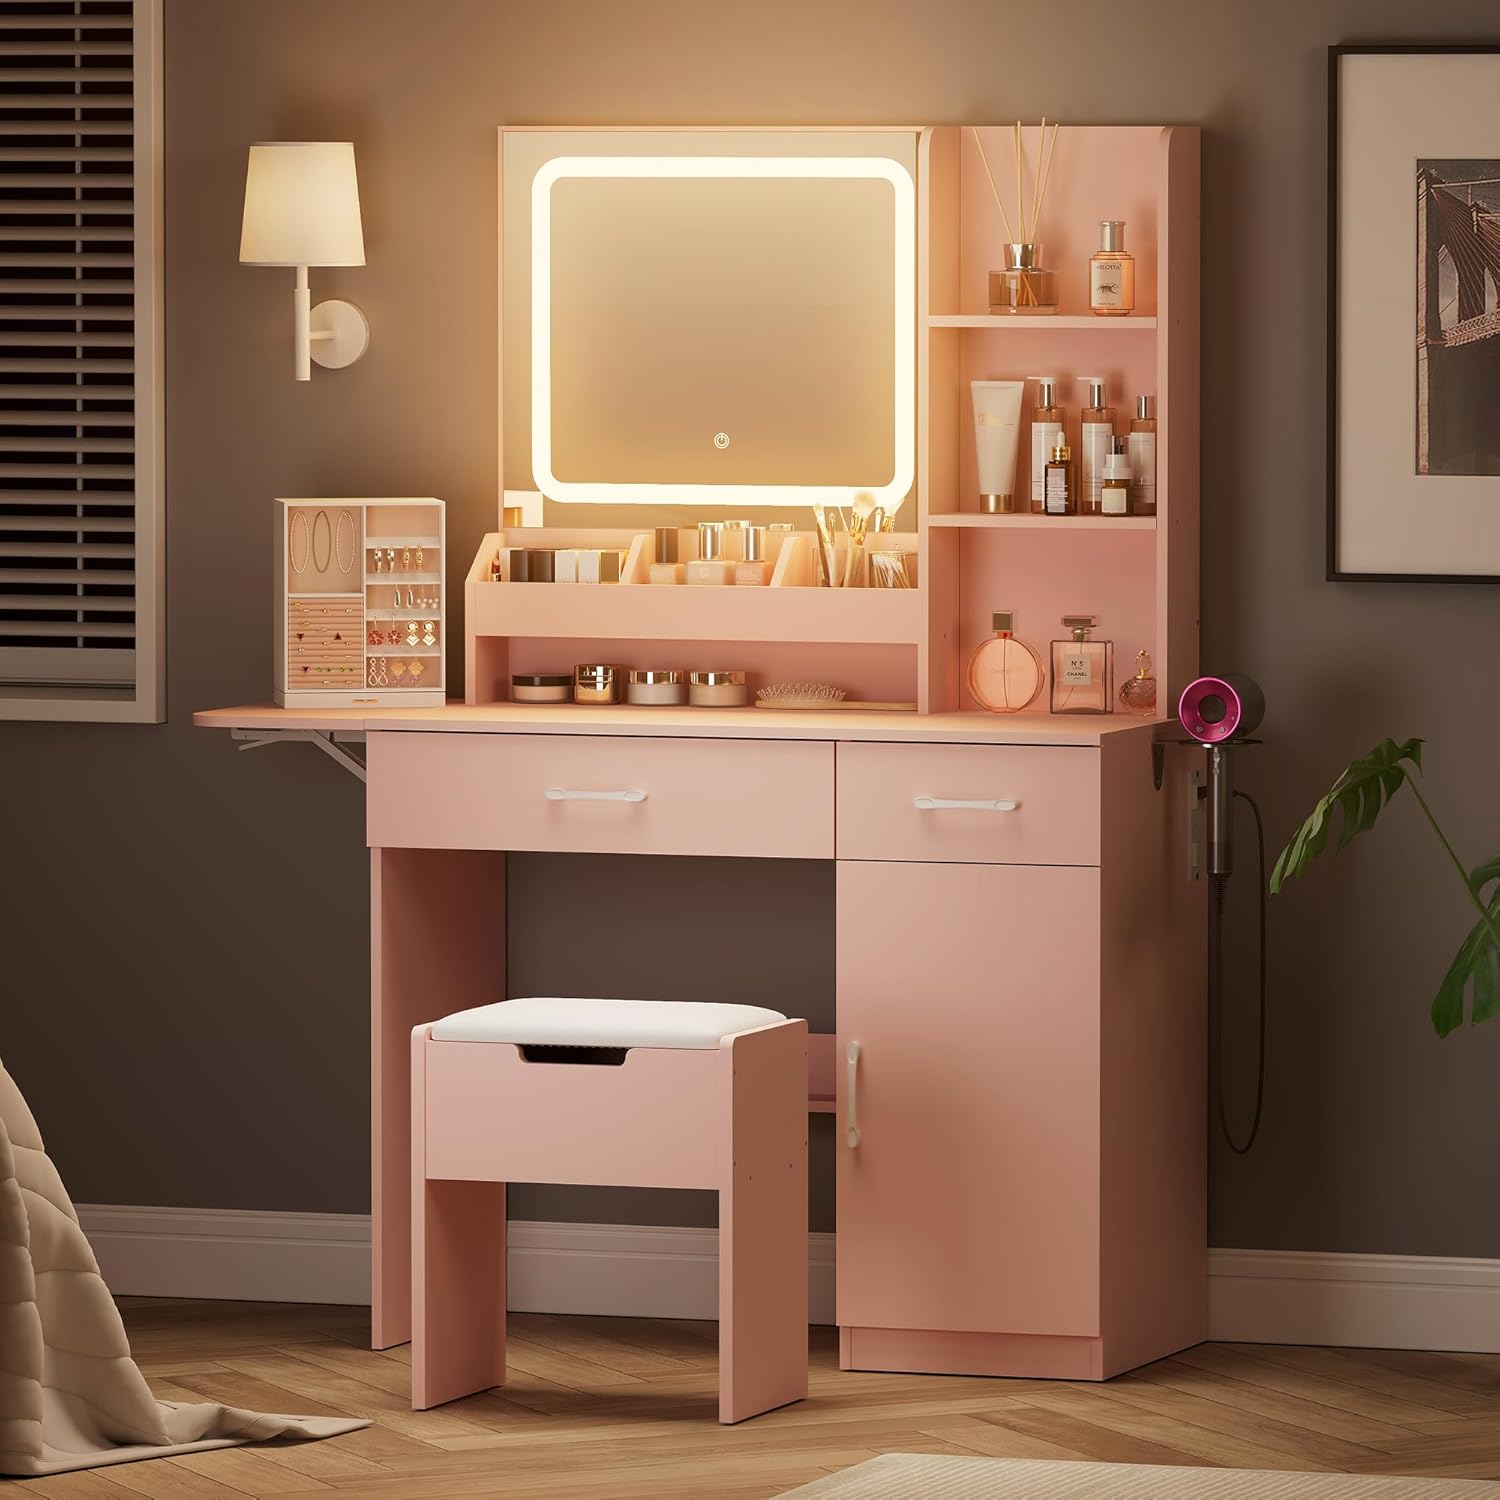
Image: All components of the Dowinx Vanity Desk are neatly organized and laid out on a carpeted floor, ready for assembly. The instruction manual and hardware box are visible.
Istruzioni di montaggio
The Dowinx Vanity Desk is designed for straightforward assembly. It is recommended to have two people for certain steps, especially when handling larger sections.
Passaggio 1: disimballaggio e preparazione
Carefully unpack all components from the box. Lay out all numbered and lettered parts on a clean, flat surface to ensure easy identification. Locate the hardware kit and assembly manual.
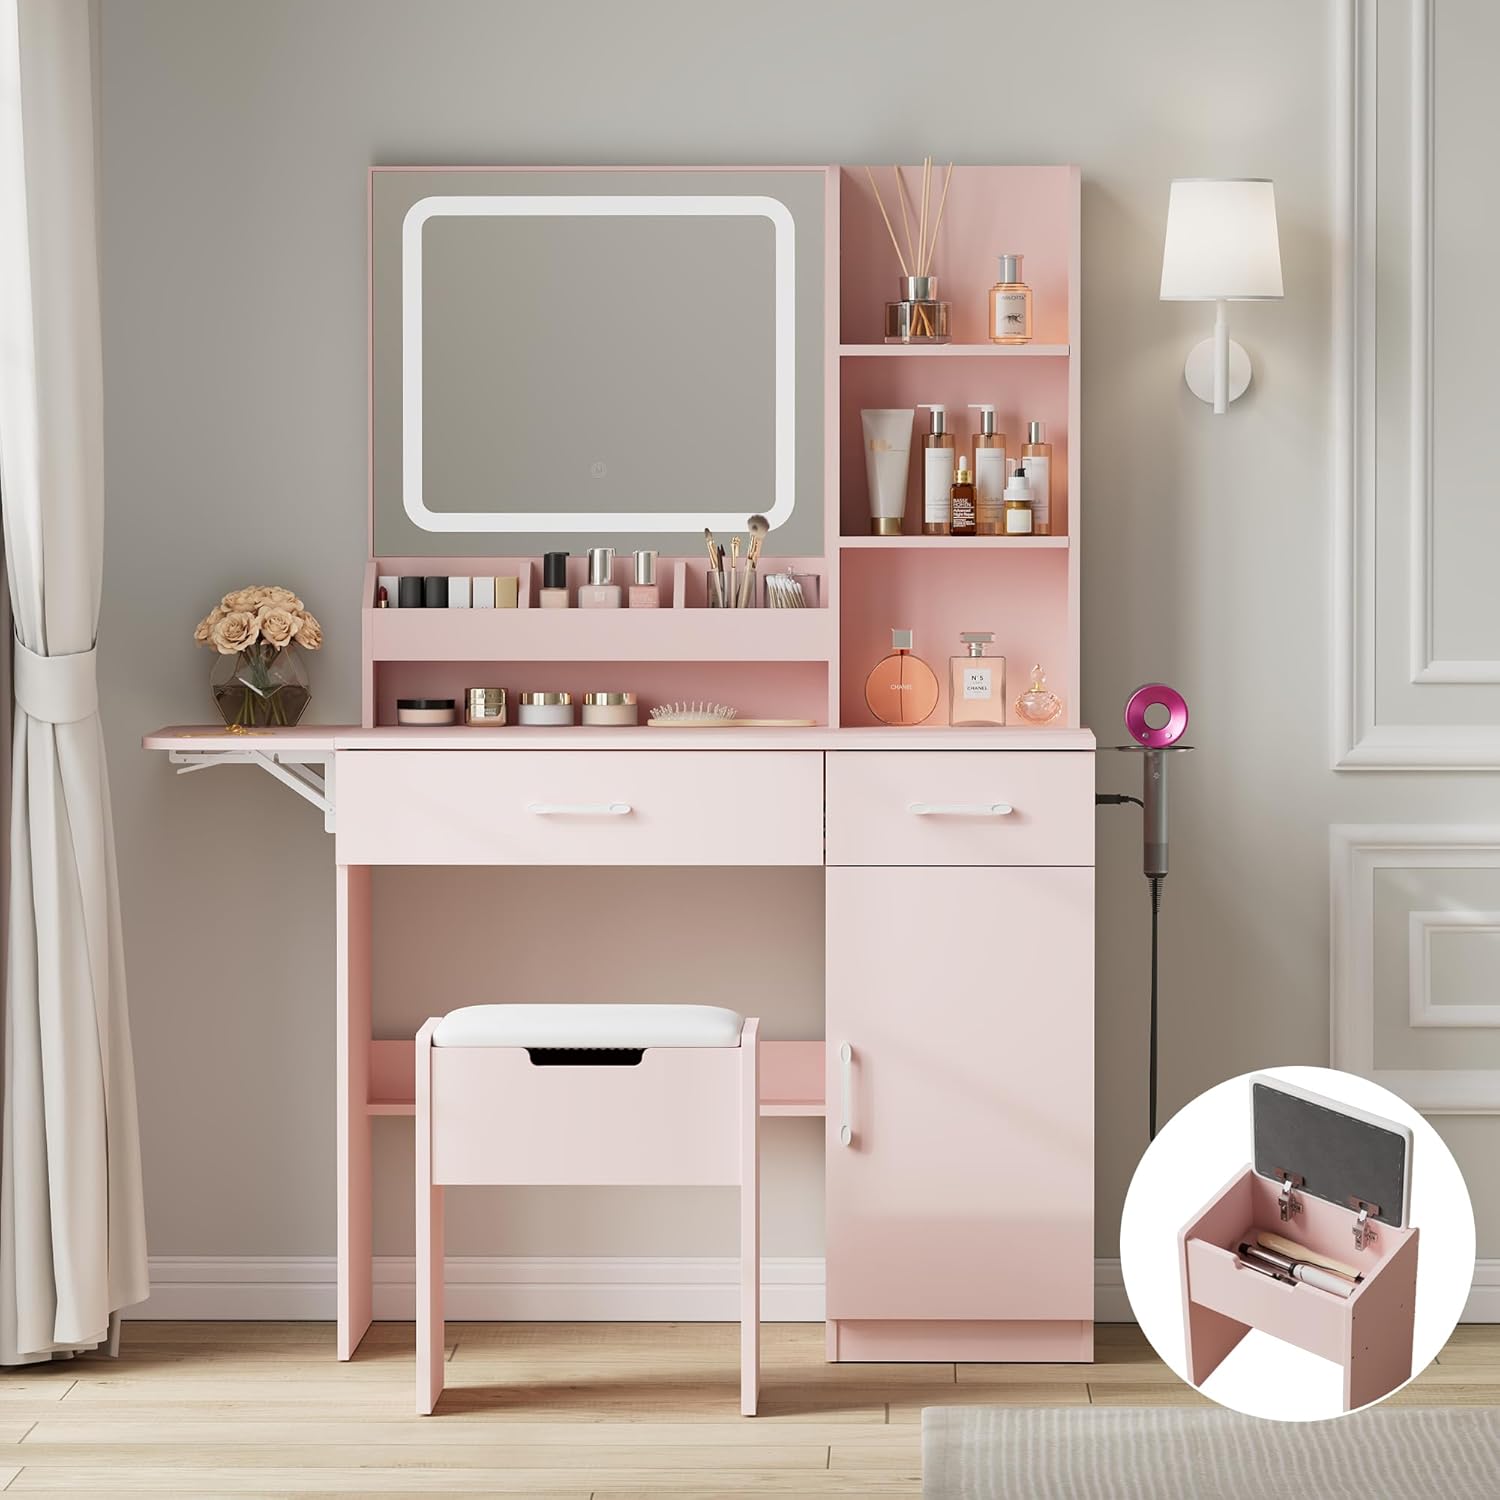
Immagine: un primo piano view of the unpacked Dowinx Vanity Desk components, including the instruction manual, power cables, and a box containing screws and tools.
Passaggio 2: assemblaggio della base
Follow the step-by-step diagrams in your included assembly manual to construct the base of the vanity desk. Ensure all screws are tightened securely but do not overtighten.

Image: A person is shown assembling a section of the vanity desk, carefully inserting screws into pre-drilled holes.
Step 3: Attaching the Top Section
This step may require assistance due to the weight and size of the mirror and upper shelving unit. Carefully align the top section with the pegs on the base and gently lower it into place, ensuring a snug fit.

Image: A person carefully lowers the upper section of the vanity, which includes the mirror and shelves, onto the assembled base.
Fase 4: Installazione di cassetti e ante
Install the drawer slides into the designated slots, then insert the drawers. Attach the cabinet door using the provided hinges, ensuring smooth and quiet operation. Adjust hinges if necessary for proper alignment.

Image: A person slides a drawer into its designated slot within the vanity desk, demonstrating the smooth operation of the drawer slides.
Fase 5: Ritocchi finali
Attach the drop-leaf countertop and the hairdryer holder to their respective positions. Connect the power outlet and mirror lights to a suitable power source. Place the storage stool in front of the vanity.
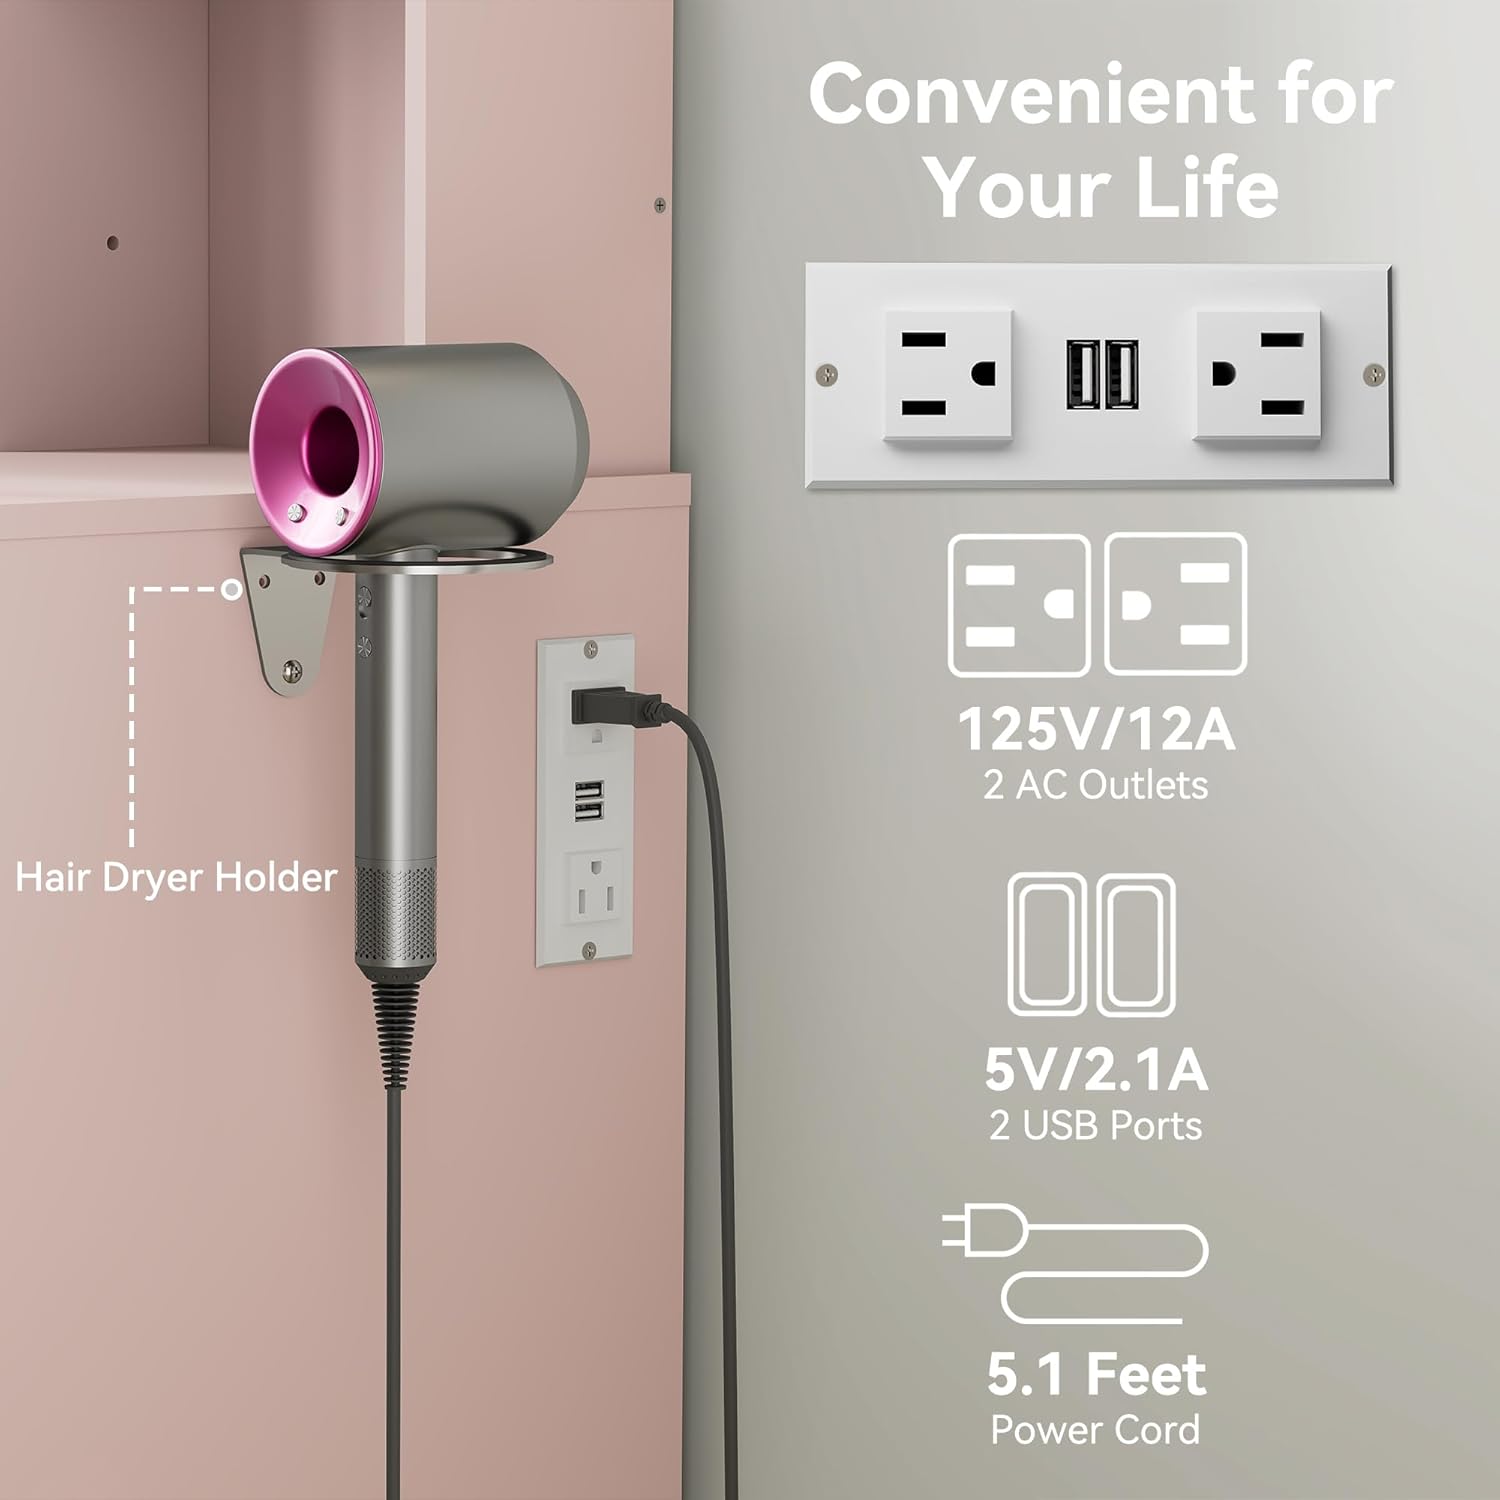
Image: The fully assembled Dowinx Vanity Desk, complete with its mirror, shelves, drawers, and matching stool, is shown in a bedroom setting.
Istruzioni per l'uso
Specchio illuminato a LED
The mirror features integrated LED lighting with three color modes and adjustable brightness for optimal illumination during use.
- Per accendere/spegnere: Short press the power button icon located on the mirror surface.
- To change color mode (Warm Yellow, Warm White, Cold White): Short press the power button icon while the light is on.
- Per regolare la luminosità: Long press the power button icon while the light is on. The brightness will gradually cycle through its range; release when desired brightness is reached.

Image: A close-up of the vanity mirror showing the touch-sensitive power button icon and the illuminated LED strip around the mirror.
Presa di corrente e porte USB
The vanity desk includes a built-in power strip with 2 standard AC outlets (125V/12A) and 2 USB ports (5V/2.1A). These are designed for convenient charging of mobile devices and powering beauty tools such as hairdryers or curlferri da stiro.

Immagine: Un dettaglio view of the integrated power strip on the side of the vanity desk, featuring two AC outlets and two USB ports, with a hairdryer holder nearby.
Drop-Leaf Countertop
The side drop-leaf countertop can be extended for additional workspace or folded down to save space when not in use.
- Per estendere: Lift the leaf until the support brackets underneath lock into place.
- Per ripiegare: Press the release mechanism on the brackets and gently lower the leaf.

Image: A visual demonstration of the drop-leaf countertop, showing it both extended for extra space and folded down for compact storage.
Sgabello contenitore
The included stool features a padded seat that lifts to reveal hidden storage space, ideal for keeping small items organized and out of sight.

Image: A pink storage stool with a padded top, shown with the top lifted to reveal internal storage space.
Manutenzione
- Pulizia delle superfici: Pulisci tutte le superfici con un panno morbido eamp panno. Evitare l'uso di detergenti abrasivi, prodotti chimici aggressivi o solventi che potrebbero danneggiare la finitura.
- Cura dello specchio: Use a glass cleaner specifically designed for mirrors. Apply the cleaner to a soft cloth first, then wipe the mirror. Do not spray cleaner directly onto the mirror surface.
- Componenti elettrici: Always ensure the vanity is unplugged from the power source before cleaning any electrical parts or the area around the power outlet.
- Hardware: Periodically check and tighten any loose screws, bolts, or fittings to maintain the stability and structural integrity of the vanity desk.
Risoluzione dei problemi
Luci dello specchio non funzionanti
- Verificare che il cavo di alimentazione sia collegato saldamente a una presa elettrica funzionante.
- Ensure the power button on the mirror is pressed correctly.
- Verify there is power to the outlet by testing it with another device.
Drawers or Doors Sticking
- Controllare che non vi siano ostruzioni nelle guide dei cassetti o nelle cerniere delle porte.
- Ensure all assembly screws are properly tightened and not overtightened, which can cause misalignment.
Vanity Instability
- Verify all connections and screws are securely fastened.
- Assicurarsi che il mobiletto sia posizionato su una superficie piana e livellata.
Specifiche
| Caratteristica | Dettaglio |
|---|---|
| Marca | Dowinx |
| Numero di modello | LS-QL-66BS-03 |
| Dimensioni del prodotto | 24.3"P x 38.6"L x 7.5"A |
| Peso dell'articolo | 38.7 libbre |
| Materiale del telaio | Legno ingegnerizzato |
| Colore | Rosa |
| Illuminazione a specchio | LED with 3 Color Modes (Warm Yellow, Warm White, Cold White) & Adjustable Brightness |
| Presa elettrica | 2 prese CA (125 V/12 A), 2 porte USB (5 V/2.1 A) |
| Magazzinaggio | 2 Drawers, 6 Open Shelves, 1 Cabinet with Adjustable Shelf, 1 Storage Stool |
| Assemblaggio richiesto | SÌ |

Image: The Dowinx Vanity Desk in pink, showcasing its overall design and features including the lighted mirror, multiple storage compartments, and the accompanying stool.
Garanzia e supporto
For any issues or inquiries regarding your Dowinx Vanity Desk, please contact Dowinx customer support. Refer to the contact information provided in your product packaging or visit the official Dowinx websito per assistenza.
Prodotto finitoview

Image: An infographic highlighting the key features of the Dowinx Vanity Desk, including the sliding lighted HD mirror, trapezoidal makeup trays, extra storage area, drop-leaf countertop, storage stool, sliding drawers, open shelves, charging station, and hairdryer holder.

Image: A visual guide demonstrating the three lighting modes (Cool White, Warm White, Warm Yellow) and the adjustable brightness feature of the vanity mirror.

Immagine: Un'illustrazione mostraasing the seven open shelves on the vanity desk, ideal for organizing skincare, cosmetics, and other items.

Image: A close-up of the vanity's cabinet, showing an adjustable shelf with three possible height settings for flexible storage.

Image: A comparison graphic highlighting the space-saving design of the Dowinx hairdryer holder and integrated power outlets compared to other vanity designs.