1. Introduzione
Thank you for choosing the AULA F99 Pro Wireless Mechanical Keyboard. This manual provides essential information for setting up, operating, and maintaining your keyboard. Please read it thoroughly to ensure optimal performance and longevity of your device.

Image: The AULA F99 Pro Wireless Mechanical Keyboard, showcasinil suo layout completo e la vivace retroilluminazione RGB.
2. Contenuto della confezione
Verifica che tutti gli articoli siano presenti nel tuo pacco:
- Tastiera meccanica wireless AULA F99 Pro
- Estrattore per tasti/interruttori x1
- Cavo USB (tipo C)
- Copertura antipolvere x1
- Extra Replacement Switches x 2
- Manuale dell'utente (questo documento)
3. Caratteristiche principali
The AULA F99 Pro keyboard is designed with advanced features for enhanced user experience:

Image: A visual summary of the AULA F99 Pro's main features.
3.1 Connettività multi-dispositivo
Supports three connection modes: Bluetooth 5.0, 2.4GHz wireless, and USB Type-C wired. Easily switch between up to five connected devices (PC, laptop, tablet, gaming console, mobile phone) using FN + key combinations and the side button.
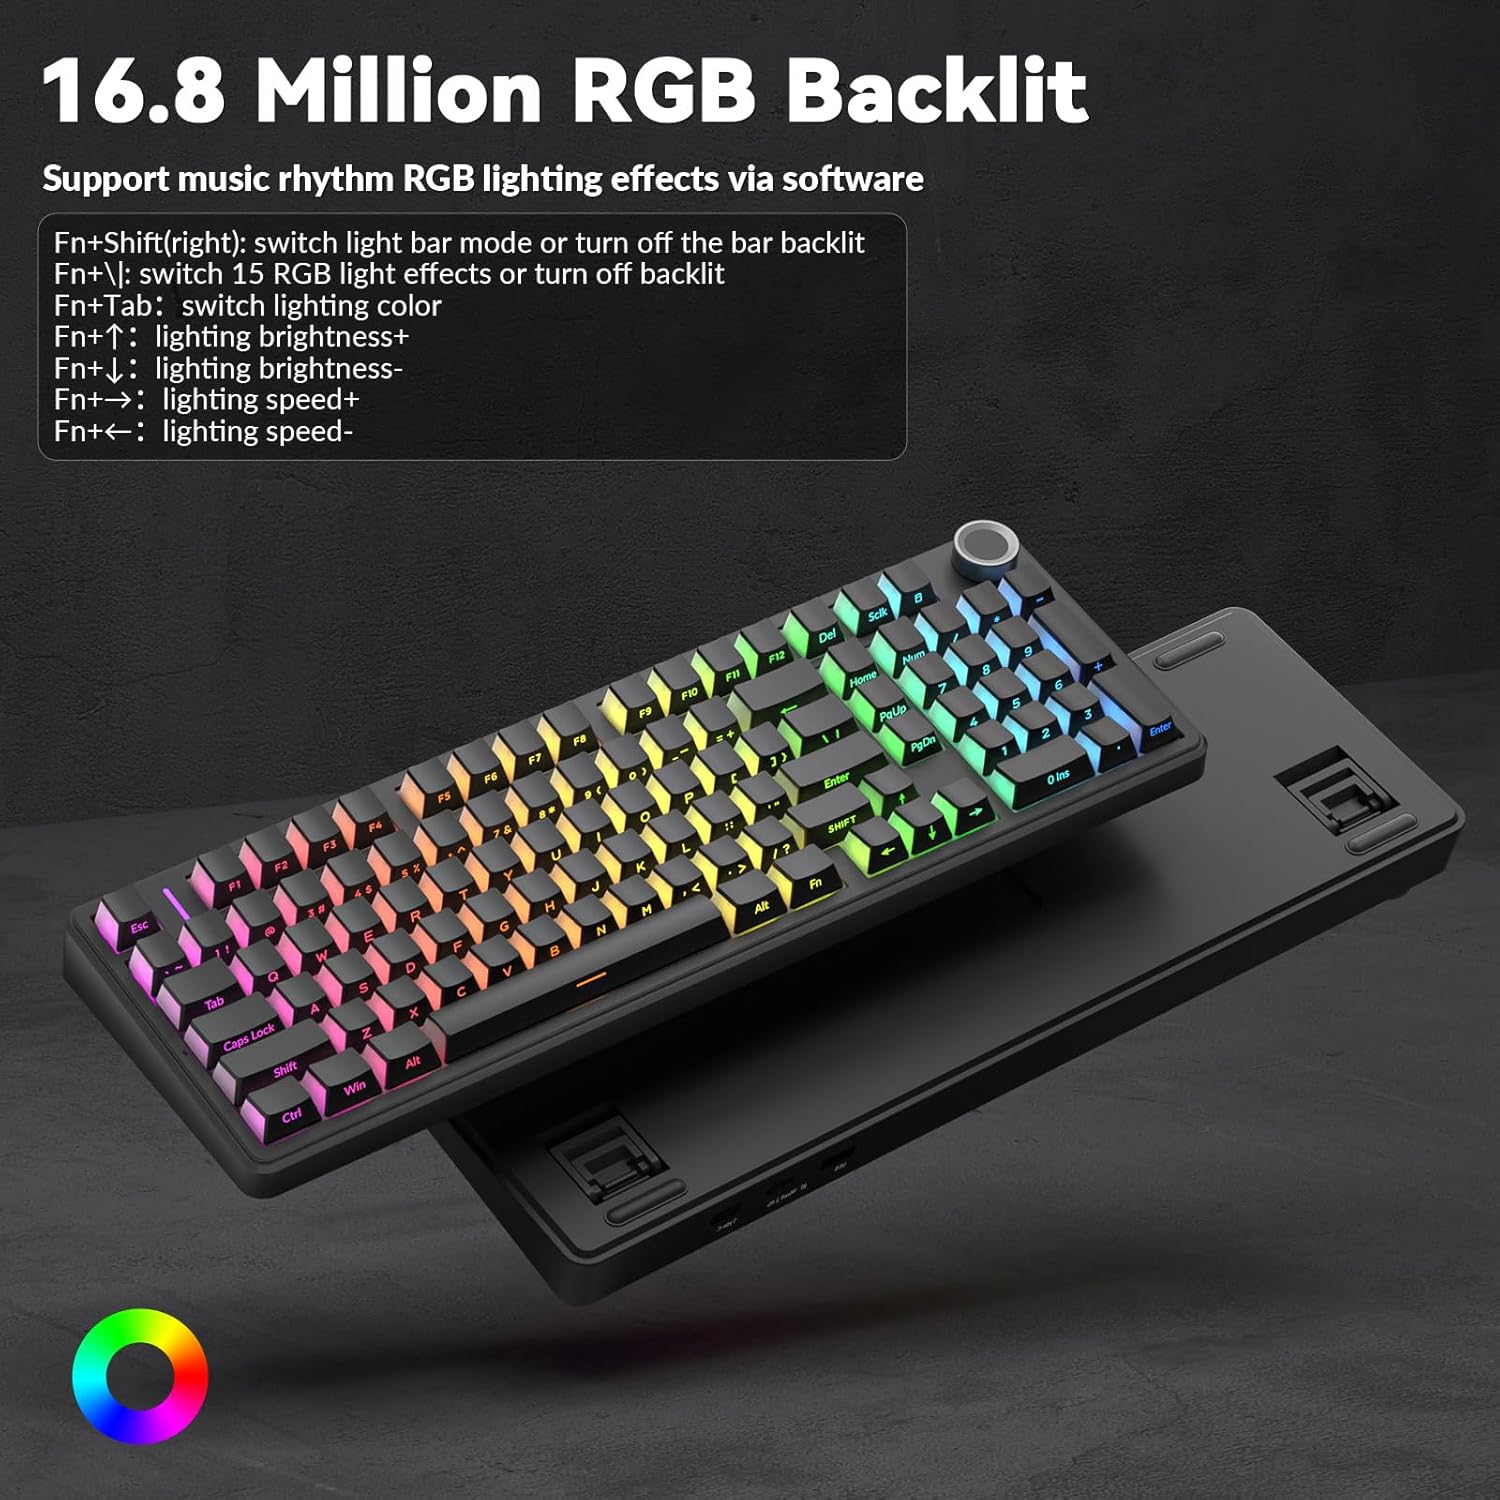
Image: Illustration of the keyboard's versatile triple-mode connectivity.
3.2 Design sostituibile a caldo
The PCB supports 3-pin and 5-pin switches, allowing for easy replacement of switches without soldering. Keycaps are also replaceable. This feature enables customization of typing feel and sound.

Image: Close-up of the hot-swappable sockets, silent switches, and PBT keycaps.
3.3 Gasket Structure & Silent Operation
Features an advanced gasket-mounted design with an integrated silicone pad and PCB single key slotting. This structure, combined with five layers of sound-dampening materials (PORON cotton, IXPE shaft underpad, PET voice actor pad, PORON base cotton, silicone base pad), optimizes resilience, stability, and reduces cavity noise for a soft, elastic, and quiet typing experience.
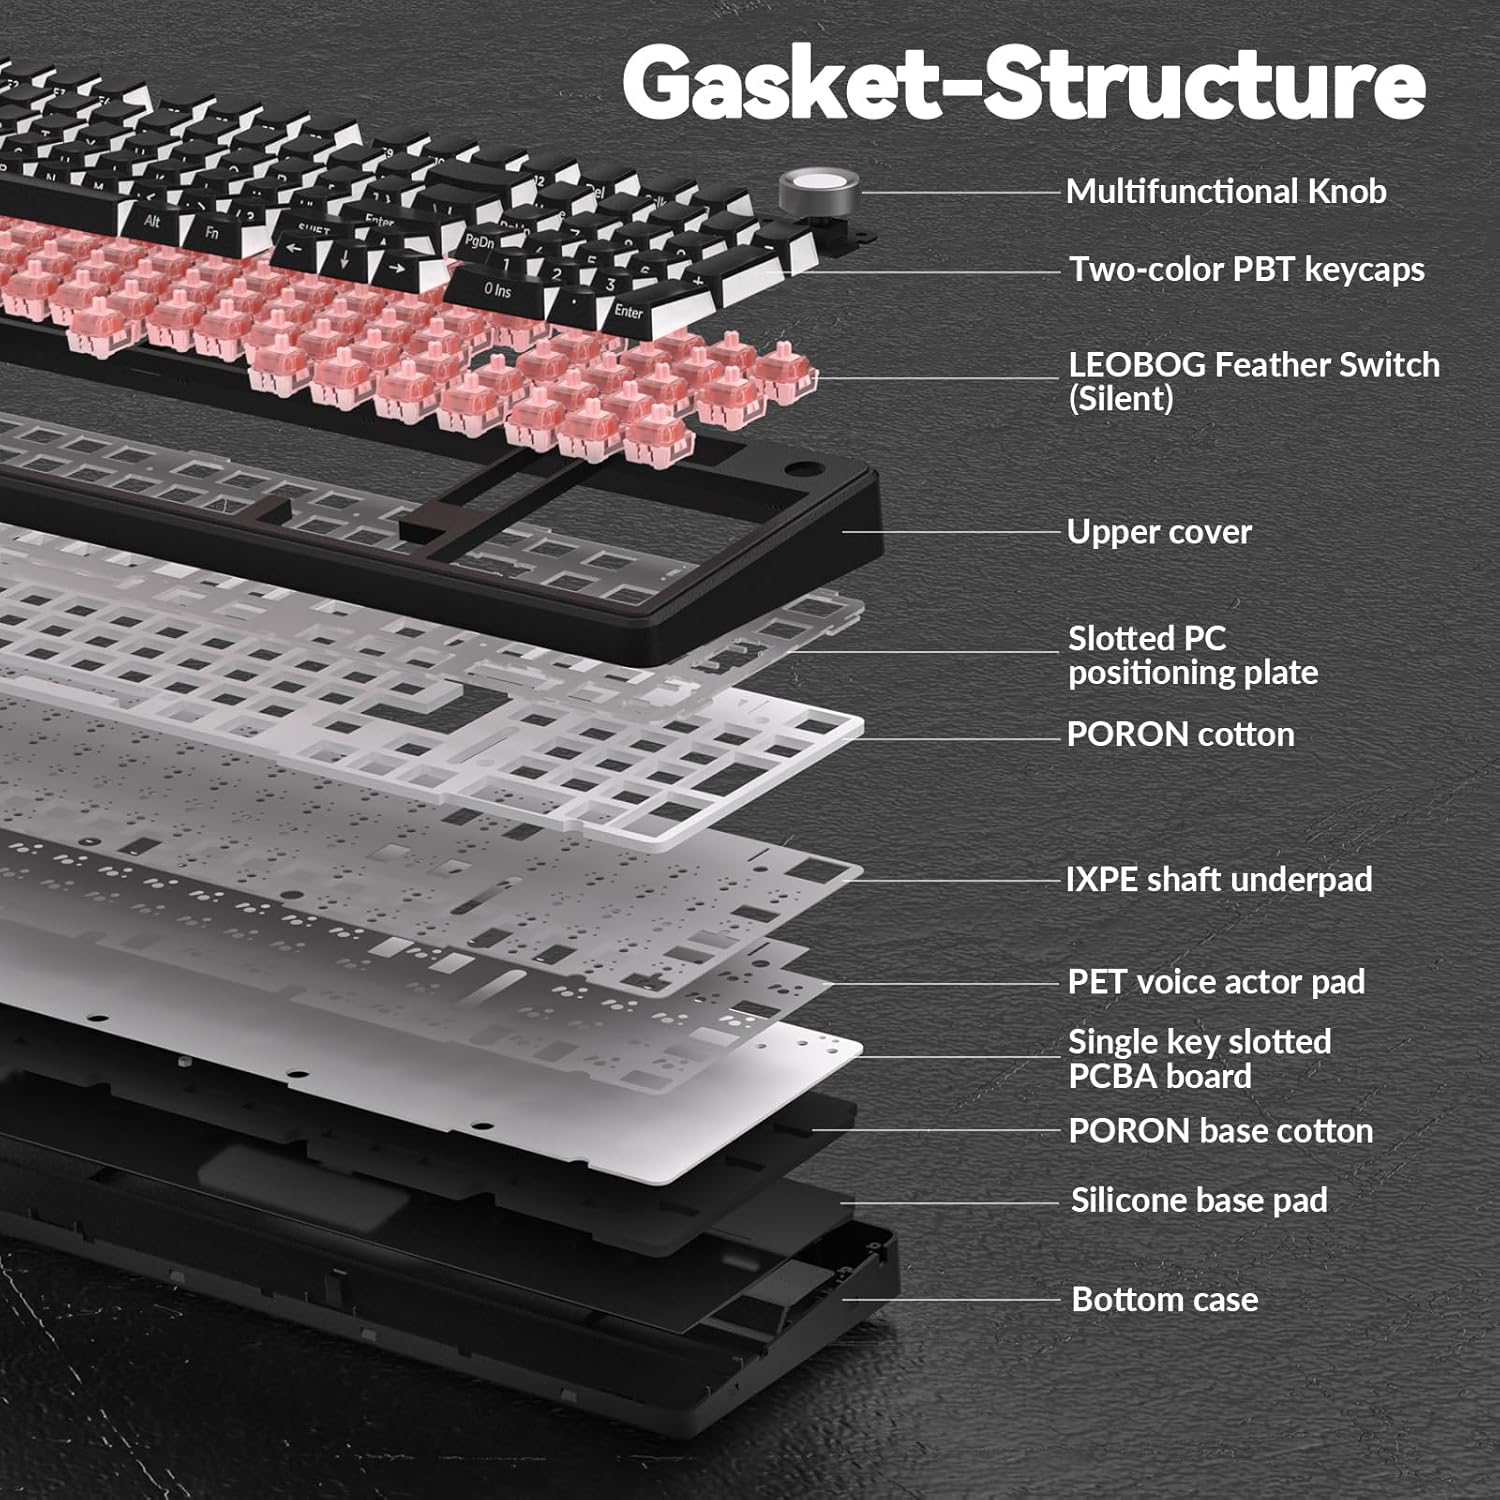
Image: Exploded diagram showing the internal gasket structure and sound-dampstrati crescenti.
3.4 RGB Backlighting & Customization
Offers 16 RGB lighting effects and supports 16.8 million colors. Lighting effects can be customized via driver software, which also allows for macro recording, editing, and custom shortcut keys. Features cool music rhythm lighting effects.

Image: Keyboard with RGB backlighting and key combinations for lighting control.
3.5 Multi-Function Control Knob
A dedicated knob allows switching between backlit mode and multimedia mode. In backlit mode, rotate to adjust brightness and click to switch lighting effects. In multimedia mode, rotate to adjust volume and click to play/pause. Long press the knob for approximately 5 seconds to switch modes.

Image: Detailed explanation of the control knob's functions.
3.6 High-Capacity Battery
Equipped with an 8000mAh battery for extended wireless use. Battery life is approximately 53 hours with backlighting on and up to 400 hours with backlighting off.

Image: Visual representation of the keyboard's 8000mAh battery capacity.
4. Impostazione
4.1 Ricarica della tastiera
Before first use, fully charge the keyboard using the provided USB Type-C cable. Connect the cable to the keyboard's Type-C port and a power source (e.g., computer USB port, USB wall adapter). The charging indicator will show status.
4.2 Modalità di connessione
The AULA F99 Pro supports three connection methods:
- Modalità cablata USB: Connect the keyboard directly to your device using the USB Type-C cable. The keyboard will be recognized automatically.
- Modalità wireless a 2.4 GHz:
- Individuare il ricevitore USB da 2.4 GHz (solitamente conservato in uno scomparto sulla tastiera).
- Collega il ricevitore a una porta USB disponibile sul tuo computer.
- Switch the keyboard to 2.4GHz mode (refer to keyboard's physical switch or FN key combination). The keyboard should connect automatically.
- Modalità Bluetooth 5.0:
- Switch the keyboard to Bluetooth mode (refer to keyboard's physical switch or FN key combination).
- Sul tuo dispositivo (PC, tablet, telefono), attiva il Bluetooth e cerca nuovi dispositivi.
- Select "AULA F99 Pro" from the list of available devices to pair.
- La tastiera può memorizzare fino a tre dispositivi Bluetooth professionalifiles. Use FN + 1/2/3 to switch between paired Bluetooth devices.
5. Funzionamento
5.1 Multi-Function Knob Usage
The knob has two primary modes:
- Lighting Control Mode:
- Rotate the knob to adjust backlight brightness.
- Click the knob to cycle through different lighting effects.
- Modalità multimediale:
- Ruotare la manopola per regolare il volume del sistema.
- Fare clic sulla manopola per riprodurre o mettere in pausa il contenuto multimediale.
To switch between Lighting Control Mode and Multimedia Mode, press and hold the knob for approximately 5 seconds.
5.2 RGB Backlight Control (FN Key Combinations)
In addition to the knob, use the following FN key combinations for lighting control:
- FN + Maiusc destro: Switch light bar mode or turn off the light bar backlight.
- FN + \: Switch between 15 RGB light effects or turn off the main backlight.
- FN + Tab: Switch lighting color.
- FN + Freccia su: Aumentare la luminosità dell'illuminazione.
- FN + Freccia giù: Ridurre la luminosità dell'illuminazione.
- FN + Freccia destra: Aumenta la velocità di illuminazione.
- FN + Freccia sinistra: Diminuire la velocità di illuminazione.
5.3 Macro Customization & Driver Software
For advanced customization, including macro recording, editing, custom key functions, and 16.8 million light colors, download the official AULA driver software. The driver is available at bit.ly/m/AULA. Please note that the driver currently supports Windows systems and functions only in wired mode.

Image: Driver software interface for macro and RGB customization.
6. Manutenzione
6.1 Pulizia della tastiera
Per pulire la tastiera, scollegarla prima da tutte le fonti di alimentazione. Utilizzare un panno morbido e privo di lanugine leggermenteampened with water or a mild cleaning solution. For dust and debris between keycaps, use compressed air or a small brush. Avoid harsh chemicals or abrasive materials.
6.2 Sostituzione dei tasti e degli interruttori
The AULA F99 Pro is hot-swappable, allowing for easy replacement of keycaps and switches. Use the included keycap/switch puller tool:
- Rimozione dei tasti: Gently attach the keycap puller to the sides of the keycap and pull upwards evenly.
- Rimozione interruttore: Use the switch puller to grip the top and bottom clips of the switch. Apply gentle pressure and pull the switch straight up.
- Installazione: Align the new switch's pins with the PCB sockets and press down firmly until it clicks into place. Ensure pins are not bent. Place the new keycap onto the switch stem and press down.
7. Specifiche
| Caratteristica | Dettaglio |
|---|---|
| Numero di modello | F99 Pro |
| Tecnologia di connettività | 2.4GHz Wireless, BT5.0, USB Wired (Type-C) |
| Descrizione della tastiera | Meccanico |
| Caratteristiche speciali | Backlit, Hot-Swappable, Programmable Keys, Rechargeable, Silent |
| Retroilluminazione | RGB (16.8 milioni di colori) |
| Capacità della batteria | 8000mAh |
| Durata stimata della batteria | ~53 hours (backlight ON), ~400 hours (backlight OFF) |
| Materiale del copritastiera | PBT (Side-printed) |
| Tipo di interruttore | Pre-lubed Linear Switches (LEOBOG Feather Switch) |
| Dispositivi compatibili | Console di gioco, laptop, PC, smartphone, tablet |
| Peso dell'articolo | 3.39 libbre |
| Dimensioni del pacco | 17.04 x 6.77 x 2.05 pollici |
8. Risoluzione Dei Problemi
8.1 La tastiera non risponde
- Ensure the keyboard is charged. Connect it via USB-C cable to check if it powers on.
- Verify the connection mode switch (wired, 2.4GHz, Bluetooth) is set correctly.
- For 2.4GHz, ensure the USB receiver is securely plugged in and the keyboard is in 2.4GHz mode.
- Per quanto riguarda il Bluetooth, assicurati che il Bluetooth sia abilitato sul tuo dispositivo e che la tastiera sia associata. Prova a ripetere l'associazione se necessario.
- Try connecting the keyboard to a different USB port or computer to rule out port/device issues.
8.2 Retroilluminazione RGB non funzionante/errata
- Check brightness settings using the control knob or FN + Up/Down Arrow keys.
- Cycle through lighting effects using the control knob or FN + \ key.
- Ensure the keyboard is sufficiently charged, as low battery can affect lighting.
- If using driver software, ensure it is running and settings are applied correctly.
8.3 Problemi di connettività (ritardi/disconnessioni)
- Ensure the keyboard is within range of the receiver/Bluetooth device.
- Ridurre al minimo le interferenze provenienti da altri dispositivi wireless (ad esempio, router Wi-Fi, altri dispositivi a 2.4 GHz).
- Assicurarsi che la batteria della tastiera non sia scarica.
- For 2.4GHz, try plugging the receiver into a different USB port, preferably a USB 2.0 port if available.
- For Bluetooth, try removing and re-pairing the device.
9. Garanzia e supporto
AULA products are manufactured to high quality standards. For specific warranty information, please refer to the warranty card included with your product or contact AULA customer support. Keep your purchase receipt as proof of purchase.
For technical assistance or further inquiries, please visit the official AULA websito o contattare i loro canali di assistenza clienti.