1. Introduzione
This manual provides essential instructions for the installation, operation, and maintenance of your POWLAND 12000W Solar Hybrid Inverter. This device integrates a solar charge controller, inverter, and battery charger into one unit, offering uninterruptible power support. Please read this manual thoroughly before installation and operation to ensure optimal performance and safety.

Immagine 1.1: anteriore view of the POWLAND 12000W Solar Hybrid Inverter, showing the LCD display and indicator lights.
2. Istruzioni di sicurezza
WARNING: Before proceeding with installation or operation, carefully read and understand all safety warnings and instructions in this manual. Failure to follow these instructions may result in electric shock, fire, severe injury, or death.
- L'installazione deve essere eseguita da personale qualificato.
- Assicurarsi che tutti i cavi siano correttamente dimensionati e isolati.
- Scollegare tutte le fonti di alimentazione (CA, CC e FV) prima di eseguire qualsiasi operazione di manutenzione o cablaggio.
- Non smontare l'inverter. All'interno non ci sono parti riparabili dall'utente.
- Evitare l'esposizione a pioggia, neve o liquidi.
- Assicurare un'adeguata ventilazione attorno all'inverter per evitare il surriscaldamento.
- Questo inverter è progettato per l'uso in ambienti interni controllati.
- Quando si lavora con impianti elettrici, utilizzare sempre dispositivi di protezione individuale (DPI) adeguati.

Image 2.1: Visual representation of the inverter's comprehensive protection features, including safeguards against overload, short-circuit, reverse polarity, overvoltage, e sottovoltage.
3. Prodotto finitoview
3.1 Caratteristiche principali
- 12000W Pure Sine Wave Output (120V±5%) for sensitive electronics.
- Regolatore di carica solare MPPT integrato da 200 A con efficienza del 99.9%.
- Supports extreme solar input (90-500VDC).
- Compatible with 48V LiFePO4 and Lead-Acid battery systems.
- Battery-free operation mode available.
- Scalable system with up to 6 units stacking (72,000W total) for single-phase output.
- Multiple charging modes: Solar-Only, Grid-Priority, Solar-Priority, Dual-Input Mode.
- Comprehensive protection: Overload, Short-Circuit, Reverse Polarity, Auto-voltage taglio.
- Grado di protezione IP65 casing for environmental durability.
- Display LCD e indicatori LED a tre colori per il monitoraggio in tempo reale.
3.2 Display LCD e indicatori
The inverter features an LCD HD display for viewing real-time data and setting various parameters. Tri-color LED indicators provide quick status updates.
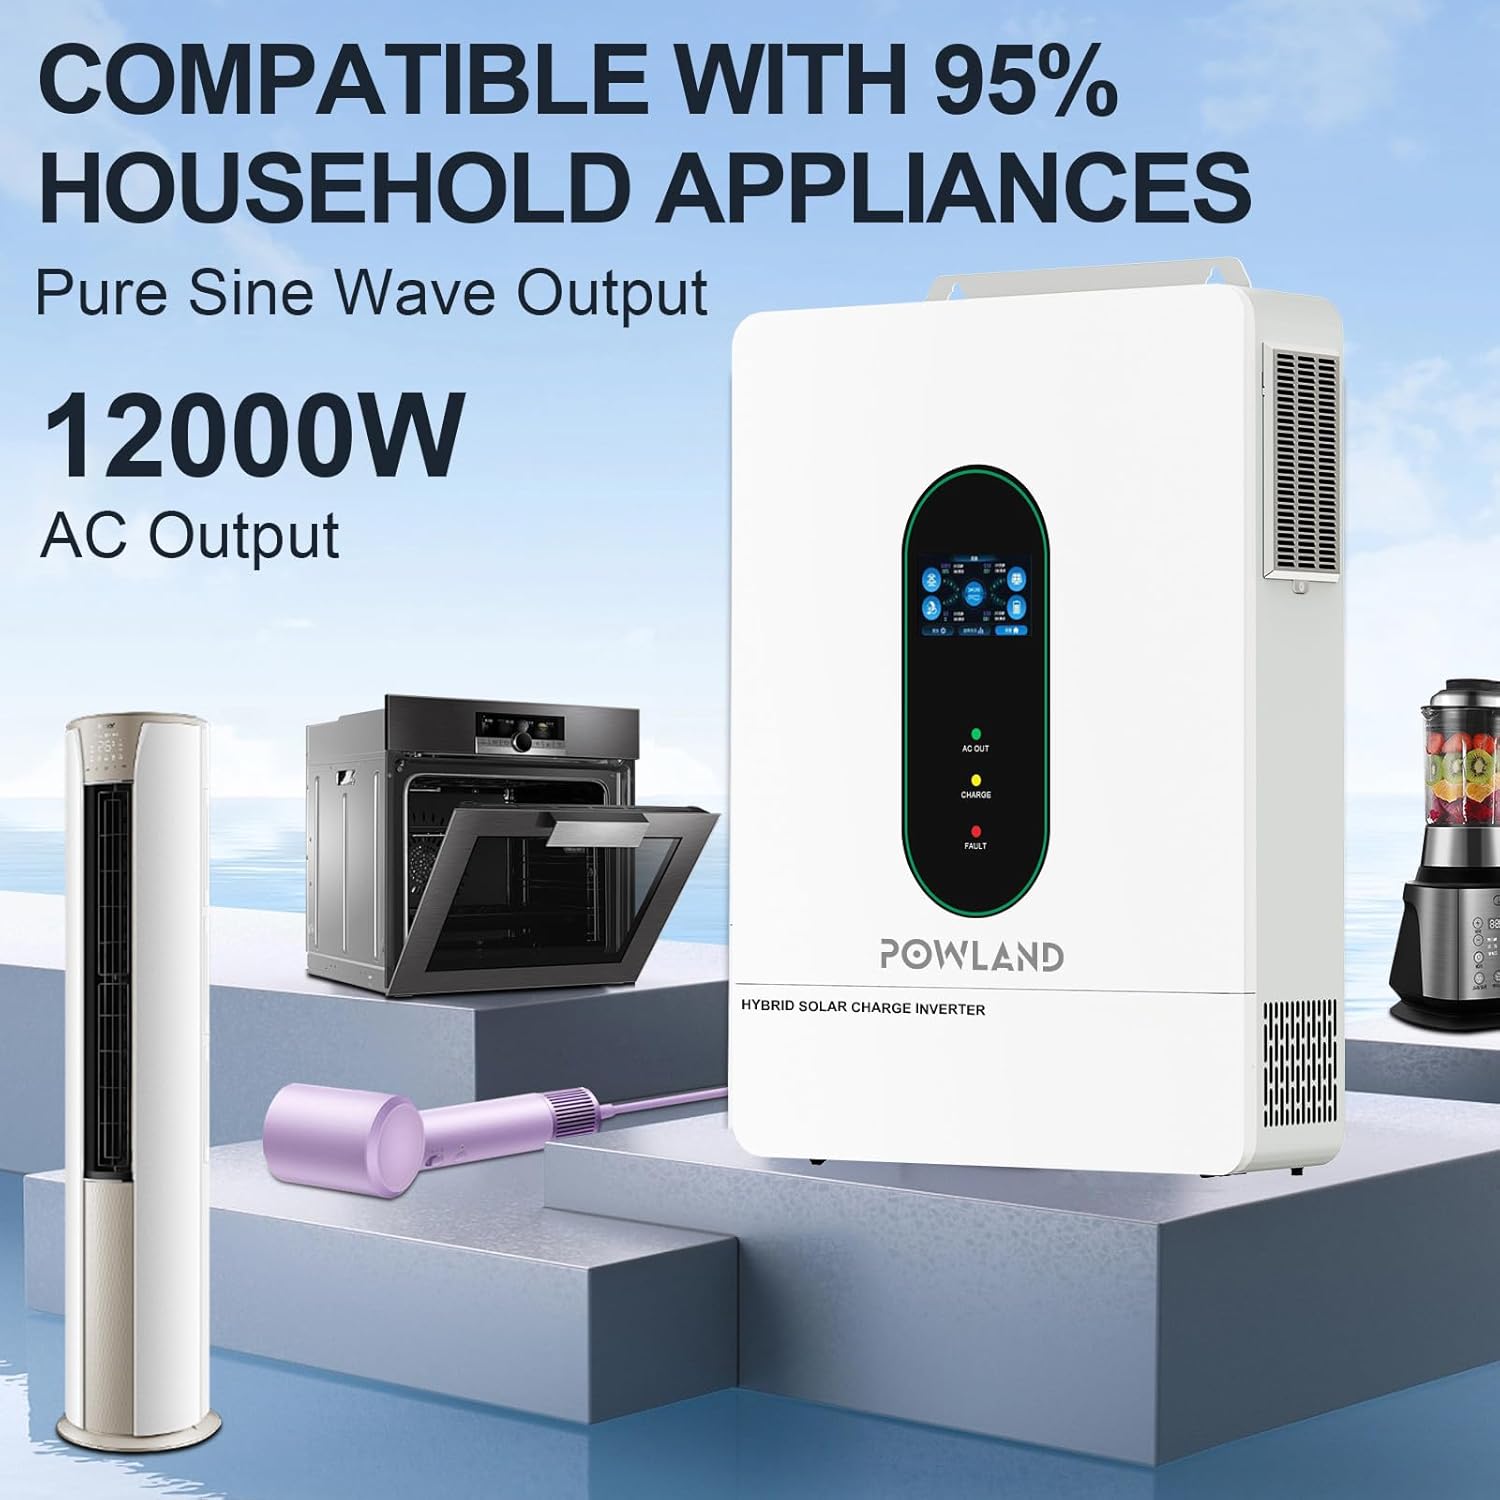
Immagine 3.1: Dettagliata view of the LCD HD Display, illustrating the interface for monitoring and setting operational parameters.
- AC OUT LED (Green): Indica lo stato dell'uscita CA.
- CHARGE LED (Yellow): Indica lo stato di carica della batteria.
- FAULT LED (Red): Indicates system fault or error.
4. Configurazione e installazione
4.1 Disimballaggio e ispezione
Upon receiving the inverter, carefully unpack it and inspect for any damage. Report any damage to your dealer immediately. Ensure all accessories are present.
4.2 Luogo di installazione
Scegliere un luogo adatto per l'installazione:
- Montare verticalmente su una parete.
- Ensure adequate clearance (at least 20 cm) around the unit for proper heat dissipation.
- Evitare la luce solare diretta, le alte temperature e l'elevata umidità.
- Installare in un luogo pulito, asciutto e ben ventilato.
4.3 Collegamenti di cablaggio
Refer to the connection diagram for proper wiring. All connections must be secure and correctly polarized.

Image 4.1: Detailed connection diagram showing inputs for Mains Power, Generator, Solar Panels, and Battery, along with AC output to Home Load.
- Collegamento della batteria: Connect the 48V battery bank to the inverter's battery terminals. Ensure correct polarity (positive to positive, negative to negative). The inverter supports various battery types including SLD, FLD, AGM, GEL, LI (Lithium), and SUER.
- Collegamento di ingresso FV: Connect your solar panel array to the PV input terminals. Observe maximum PV input voltage (500VDC) and current (22A x 2).
- Connessione ingresso CA: Collegare la rete elettrica CA o un generatore ai terminali di ingresso CA.
- Collegamento di uscita CA: Connect your home loads to the AC output terminals. The inverter provides 120V-240V AC split-phase output.

Image 4.2: Illustration of the inverter's compatibility with various 48V battery types, including Lithium and Lead-Acid, and its battery activation function.
4.4 Funzionamento parallelo (facoltativo)
The inverter supports parallel operation of up to 6 units for increased power output, reaching up to 72,000W in single-phase configuration. Refer to the specific parallel kit manual for detailed instructions.

Image 4.3: Diagrams illustrating how to connect multiple inverters (2, 3, or 6 units) in parallel for increased power output in a single-phase system.
5. Istruzioni per l'uso
5.1 Accensione iniziale
- Assicurarsi che tutti i collegamenti elettrici siano corretti e sicuri.
- Accendere l'interruttore della batteria.
- Accendere l'interruttore del pannello fotovoltaico.
- Accendere l'interruttore di ingresso CA (se collegato alla rete/generatore).
- Accendere l'interruttore di alimentazione dell'inverter.
- Per il normale funzionamento, osservare il display LCD e gli indicatori LED.
5.2 LCD Display Navigation and Settings
Use the buttons below the LCD display to navigate menus and adjust settings. Key settings include:
- Volume di uscitatage/Frequenza: Configure AC output parameters.
- Tipo di batteria: Select the correct battery type (LiFePO4, Lead-Acid, etc.) for accurate charging.
- Corrente di carica: Adjust the maximum charging current from AC or solar.
- Priorità della fonte di ricarica: Set the preferred charging source.
- Priorità della sorgente di output: Define the priority for AC output (e.g., Solar First, Utility First).
5.3 modalità di ricarica
The inverter offers intelligent hybrid charging modes to adapt to various scenarios:
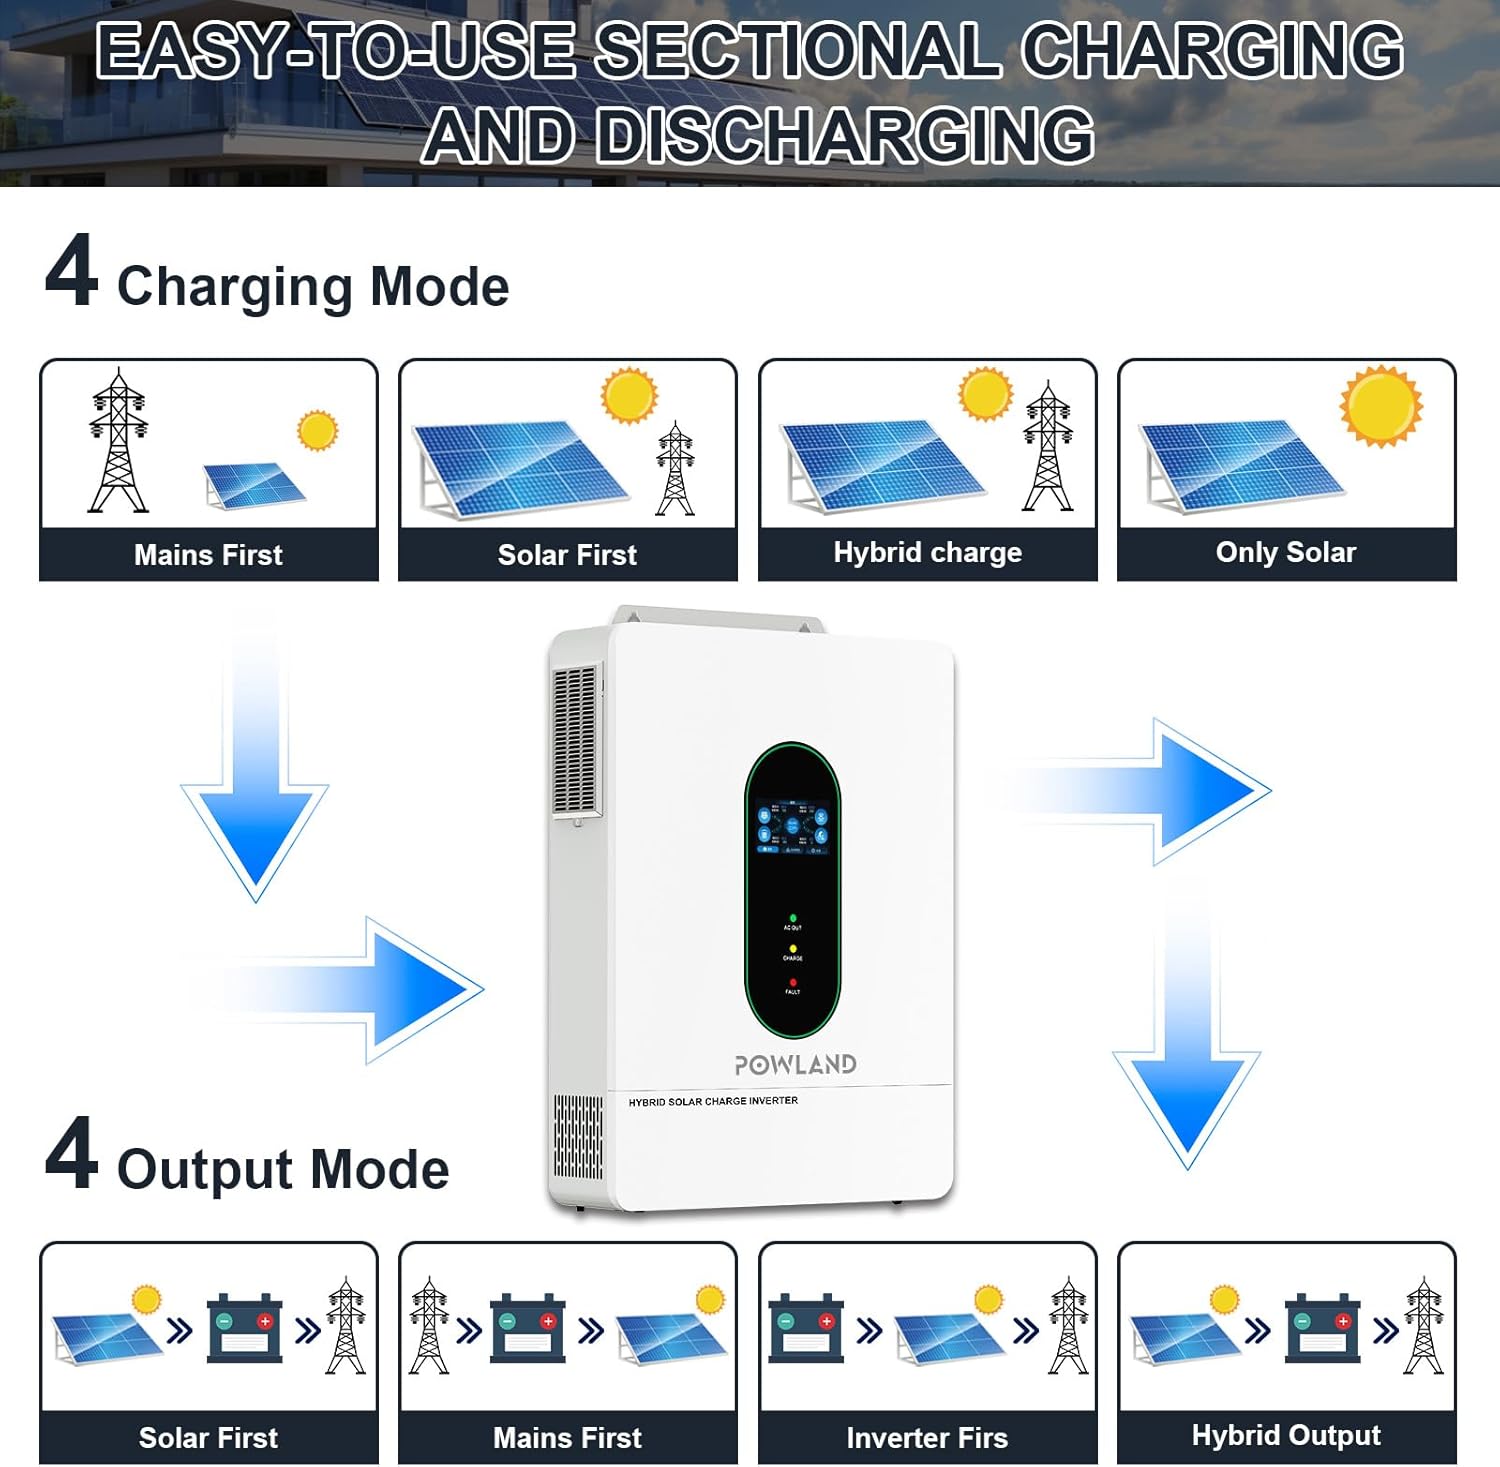
Image 5.1: Visual representation of the four available charging modes (Mains First, Solar First, Hybrid Charge, Only Solar) and four output modes (Solar First, Mains First, Inverter First, Hybrid Output).
- Prima la rete elettrica: Prioritizes utility power for charging and load supply.
- Solar First: Prioritizes solar power for charging and load supply.
- Carica ibrida: Utilizza sia l'energia solare che quella di rete per la ricarica.
- Solo solare: Carica le batterie esclusivamente tramite energia solare.
5.4 modalità di uscita
The inverter also provides flexible output modes:
- Solar First: Dà priorità all'energia solare per i carichi, poi alla batteria e infine all'utilità.
- Prima la rete elettrica: Prioritizes utility power for loads, then battery, then solar.
- Inverter prima: Prioritizes battery power for loads, then utility.
- Uscita ibrida: Passa dinamicamente da una sorgente all'altra in base alla disponibilità e al carico.

Image 5.2: The inverter demonstrating compatibility with a wide range of household appliances, including high-power devices.
6. Manutenzione
Una manutenzione regolare garantisce la longevità e le prestazioni ottimali del vostro inverter.
- Pulizia: Pulire periodicamente l'esterno dell'inverter e le aperture di ventilazione per evitare l'accumulo di polvere. Utilizzare un panno asciutto e morbido. Non utilizzare detergenti liquidi.
- Controllo delle connessioni: Controllare annualmente tutti i collegamenti elettrici per verificarne la tenuta e la corrosione. Collegamenti allentati possono causare surriscaldamento e danni.
- Ispezione della batteria: For lead-acid batteries, check electrolyte levels and terminal corrosion. For all battery types, monitor voltage salute come raccomandato dal produttore della batteria.
- Ambiente: Assicurarsi che l'ambiente di installazione rimanga entro gli intervalli di temperatura e umidità specificati.
7. Risoluzione Dei Problemi
Questa sezione fornisce soluzioni ai problemi più comuni. Se il problema persiste, contattare l'assistenza tecnica.
| Problema | Possibile causa | Soluzione |
|---|---|---|
| L'inverter non si accende | Nessuna connessione alla batteria; Vol. batteriatage too low; Power switch off; Blown fuse/breaker. | Check battery connections; Charge battery; Turn on power switch; Check and reset breakers. |
| Nessuna uscita CA | Overload; Output breaker tripped; Inverter in fault mode; Incorrect output settings. | Reduce load; Reset output breaker; Check fault codes on LCD; Verify output settings. |
| Batteria non in carica | PV input too low/high; AC input not present; Incorrect charging settings; Battery fault. | Controllare il volume PVtage/current; Verify AC input; Adjust charging mode/current; Inspect battery. |
| Avviso di sovraccarico | Il carico collegato supera la capacità dell'inverter. | Ridurre il carico totale collegato all'inverter. |
| Avviso di temperatura elevata | Ventilazione insufficiente; Temperatura ambiente troppo alta; Malfunzionamento della ventola. | Ensure clear airflow around the inverter; Relocate to a cooler area; Contact support if fan is faulty. |
8. Specifiche
The following table details the technical specifications of the POWLAND 12000W Solar Hybrid Inverter (Model 12KW-48V).
| Caratteristica | Specificazione |
|---|---|
| Potenza di uscita | 12000 Watt |
| Ingresso volumetage (CC) | 48 Volt |
| Volume di uscita CAtage | 120V-240V AC (Split Phase) |
| Corrente del regolatore di carica MPPT | 200A |
| Max ingresso PV Voltage | 500 V CC |
| Corrente di ingresso FV massima | 22 A x 2 |
| Corrente di carica CA massima | 0-63A |
| Compatibilità della batteria | 48V LiFePO4, Lead-Acid (SLD, FLD, AGM, GEL, SUER) |
| Capacità parallela | Up to 6 units (72000W total) |
| Peso dell'articolo | 60.5 libbre |
| Dimensioni del pacco | 24 x 17 x 5.2 pollici |
9. Garanzia e supporto
For warranty information, please refer to the warranty card included with your product or contact your point of purchase. POWLAND is committed to providing reliable products and customer support.
If you encounter any issues or have questions not covered in this manual, please contact POWLAND customer service through the official channels provided at the time of purchase. When contacting support, please have your product model (12KW-48V) and serial number ready.