1. Introduzione
This manual provides detailed instructions for the installation, operation, and maintenance of your Japard KS-SF22R Wireless Anti-Theft Bike Alarm System. This device is designed to enhance the security of your bicycle, motorcycle, e-bike, scooter, or other vehicles by detecting vibrations and emitting a loud alarm. It features a wireless remote control, adjustable sensitivity, and an IP55 waterproof rating for reliable outdoor use.

Image 1.1: The Japard KS-SF22R Bike Alarm System, including multiple alarm units and remote controls.
2. Contenuto della confezione
Si prega di verificare che tutti gli articoli elencati di seguito siano presenti nel pacco:
- Japard KS-SF22R Alarm Unit(s)
- Wireless Remote Control(s)
- AAA Batteries (3 per alarm unit, pre-installed or included)
- 12V/27A Alkaline Battery (1 per remote control, pre-installed or included)
- Nastro biadesivo
- Fascette per cavi
- Piccolo cacciavite (per il vano batteria)
- Manuale dell'utente (questo documento)

Image 2.1: Visual representation of the alarm unit, remote control, and included installation accessories with dimensions.
3. Specifiche
| Caratteristica | Specificazione |
|---|---|
| Volume dell'allarme | Fino a 113 dB (3 livelli regolabili) |
| Grado di impermeabilità | Grado di protezione IP55 |
| Livelli di sensibilità | 7 livelli regolabili |
| Gamma di controllo remoto | Up to 66 ft (20 m) (varies by environment) |
| Batteria dell'unità di allarme | 3 x AAA batteries (included), up to 6 months standby |
| Batteria del telecomando | 1 x 12V/27A alkaline battery (included), up to 1 year standby |
| Peso dell'articolo | 4.8 once |
| Dimensioni del pacco | 4.4 x 3.8 x 1.2 pollici |
4. Configurazione e installazione
The Japard KS-SF22R alarm offers two primary installation methods:
- Utilizzo del nastro biadesivo:
- Pulire la superficie su cui verrà montato l'allarme per assicurarsi che sia priva di polvere e grasso.
- Peel off one side of the protective film from the adhesive tape and firmly attach it to the back of the alarm unit.
- Peel off the remaining protective film and press the alarm unit firmly onto the desired location on your vehicle (e.g., under the seat, on the frame). Hold for a few seconds to ensure a strong bond.
- Utilizzo delle fascette stringicavo:
- Thread the provided cable ties through the designated holes on the alarm unit.
- Securely fasten the alarm unit to a suitable part of your vehicle's frame using the cable ties. Ensure it is tight and stable.
Ensure the alarm is mounted in a location where it is not easily accessible to potential thieves but can still be heard clearly.

Image 4.1: Illustration of the alarm unit installed on a bicycle, highlighting its waterproof design and installation options.
5. Istruzioni per l'uso
The alarm system is controlled by the wireless remote. Familiarize yourself with the remote's buttons:
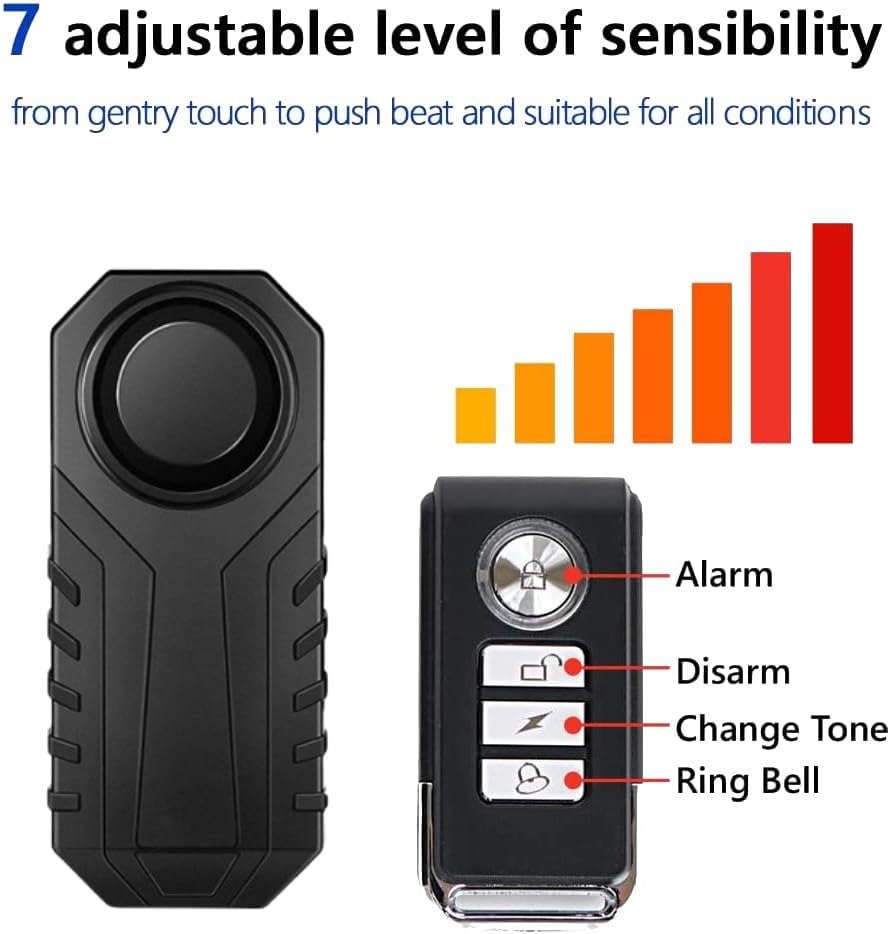
Image 5.1: Remote control button layout and functions.
- Braccio (icona del lucchetto): Press this button to activate the alarm. The alarm unit will beep once, and after 5 seconds, it will be armed. Any significant vibration will trigger the alarm.
- Disarmare (icona di sblocco): Press this button to deactivate the alarm. The alarm unit will beep twice, indicating it is disarmed.
- Cambia tono (icona del fulmine): In disarmed condition, press this button to cycle through 6 different alarm tones.
- Ring Bell (Bell Icon): Press this button to activate the bell function, which emits a short ringtone. This is useful for locating your vehicle in a crowded area.
The remote control operates effectively up to 66 feet (20 meters) in open environments. Actual range may vary depending on obstacles and signal interference.

Image 5.2: Demonstrates the remote control's effective range for operating the alarm.
6. Regolazione delle impostazioni
6.1. Regolazione del volume della sveglia
The alarm features 3 adjustable volume levels: High, Medium, and Low. To change the volume:
- Ensure the alarm is in the disarmato stato.
- Premere e tenere premuto il tasto Disarmare button on the remote control. The LED on the remote will light up.
- While holding the Disarm button, press the Allarme button to cycle through the volume levels. Each press will produce a different volume sound.
- Release the Disarm button when you have selected your desired volume level.

Image 6.1: Visual representation of the alarm's 113dB output and adjustable volume settings.
6.2. Regolazione della sensibilità
The alarm has 7 adjustable sensitivity levels, ranging from a gentle touch to a strong impact. To change the sensitivity:
- Ensure the alarm is in the disarmato stato.
- Premere e tenere premuto il tasto Disarmare button on the remote control. The LED on the remote will light up.
- While holding the Disarm button, press the Cambia tono button to cycle through the 7 sensitivity levels. Each press will produce a prompt sound (Do, Le, Mi, Fa, So, La, Si) corresponding to a different sensitivity level.
- Release the Disarm button when you have selected your desired sensitivity level.

Image 6.2: Diagram showing the alarm unit and remote, illustrating the 7 adjustable sensitivity levels.
7. Funzioni speciali
7.1. Funzione SOS
The alarm system includes an SOS function that can automatically emit an emergency call for help if your vehicle falls at a 45-degree angle due to an accident. This function must be enabled before use.
- To enable/disable the SOS function, ensure the alarm is in the disarmato stato.
- Premere e tenere premuto il tasto Suona il campanello button for approximately 3 seconds. The alarm will emit a confirmation sound (e.g., a long beep for enabled, two short beeps for disabled).
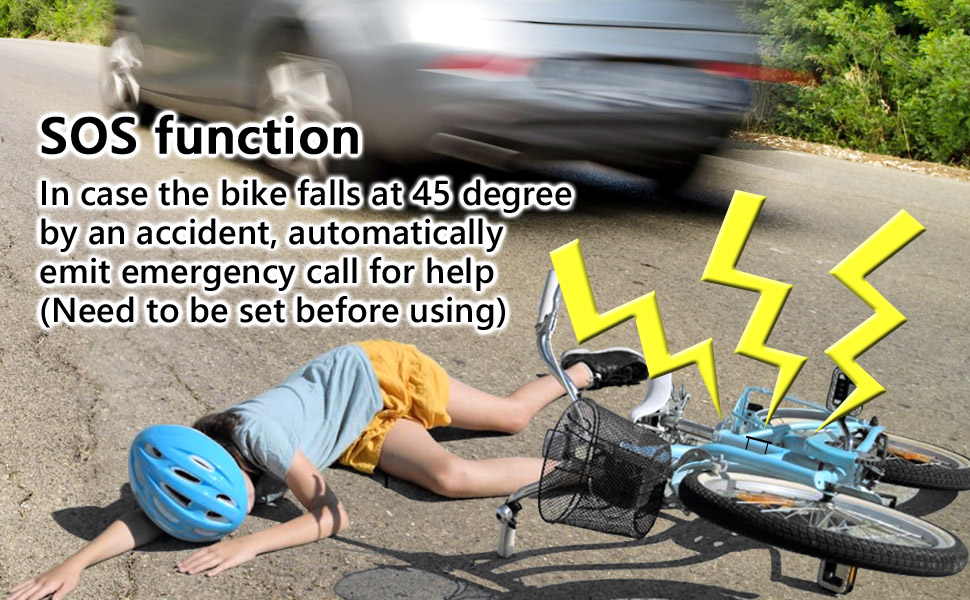
Image 7.1: Depiction of the SOS function activating when a bicycle falls.
8. Manutenzione
8.1. Sostituzione della batteria
Alarm Unit Batteries: The alarm unit uses 3 AAA batteries. When the alarm sound becomes weak or the unit fails to respond, it's time to replace the batteries. Use a small screwdriver to open the battery compartment, replace the old batteries with new ones, ensuring correct polarity, and securely close the compartment.
Batteria del telecomando: The remote control uses one 12V/27A alkaline battery. If the remote's range decreases significantly or it stops functioning, replace its battery. Use a small screwdriver to open the remote's casing, replace the battery, and reassemble.
8.2. Pulizia
Wipe the alarm unit and remote control with a soft, dry cloth. Avoid using harsh chemicals or abrasive cleaners, as these can damage the device's finish or internal components. The IP55 rating protects against water splashes and dust, but avoid submerging the unit in water.
9. Risoluzione Dei Problemi
- L'allarme non risponde al telecomando:
- Controllare la batteria del telecomando. Sostituirla se necessario.
- Ensure the alarm unit batteries are not depleted. Replace if necessary.
- Verify you are within the effective range of the remote control.
- Verificare la presenza di eventuali ostruzioni o forti interferenze tra il telecomando e l'unità di allarme.
- L'allarme è troppo sensibile o non abbastanza sensibile:
- Adjust the sensitivity level as described in Section 6.2.
- Alarm sound is weak:
- Replace the AAA batteries in the alarm unit.
- Adjust the volume level as described in Section 6.1.
- SOS function not activating:
- Ensure the SOS function is enabled (refer to Section 7.1).
- Verify the alarm unit is securely mounted and can detect a 45-degree tilt.
10. Garanzia e supporto
Japard products are designed for reliability and performance. For specific warranty information, please refer to the product packaging or contact Japard customer support directly. If you encounter any issues not covered in this manual, or require further assistance, please reach out to our support team through the official Japard website or your retailer's customer service portal.
Manufacturer: Japard