GREATEN AP 300 Pro
Manuale d'uso dello strumento a fiato elettronico GREATEN AP 300 Pro
Model: AP 300 Pro
1. Introduzione
The GREATEN AP 300 Pro is an advanced electronic wind instrument designed for musicians seeking versatility and high-quality sound. It features a built-in LCD display, OTG recording capabilities, 108 global tones, and dual-mode Bluetooth connectivity for both audio and MIDI. Its intuitive design and multiple fingering options make it accessible for players with varying levels of experience.

Figure 1.1: The GREATEN AP 300 Pro Electronic Wind Instrument in use, showcasingrazie al suo design compatto e alle sue funzionalità integrate.
This manual provides comprehensive instructions for setting up, operating, maintaining, and troubleshooting your AP 300 Pro to ensure optimal performance and longevity.
2. Cosa c'è nella scatola
Upon unboxing your AP 300 Pro, please verify that all the following components are present:
- AP 300 Pro EWI Instrument
- Cavo USB
- Tappo per bocchino
- Boccaglio di ricambio
- Custodia per il trasporto
- Cinghia da collo
- Cacciavite
- Manuale dell'utente (questo documento)
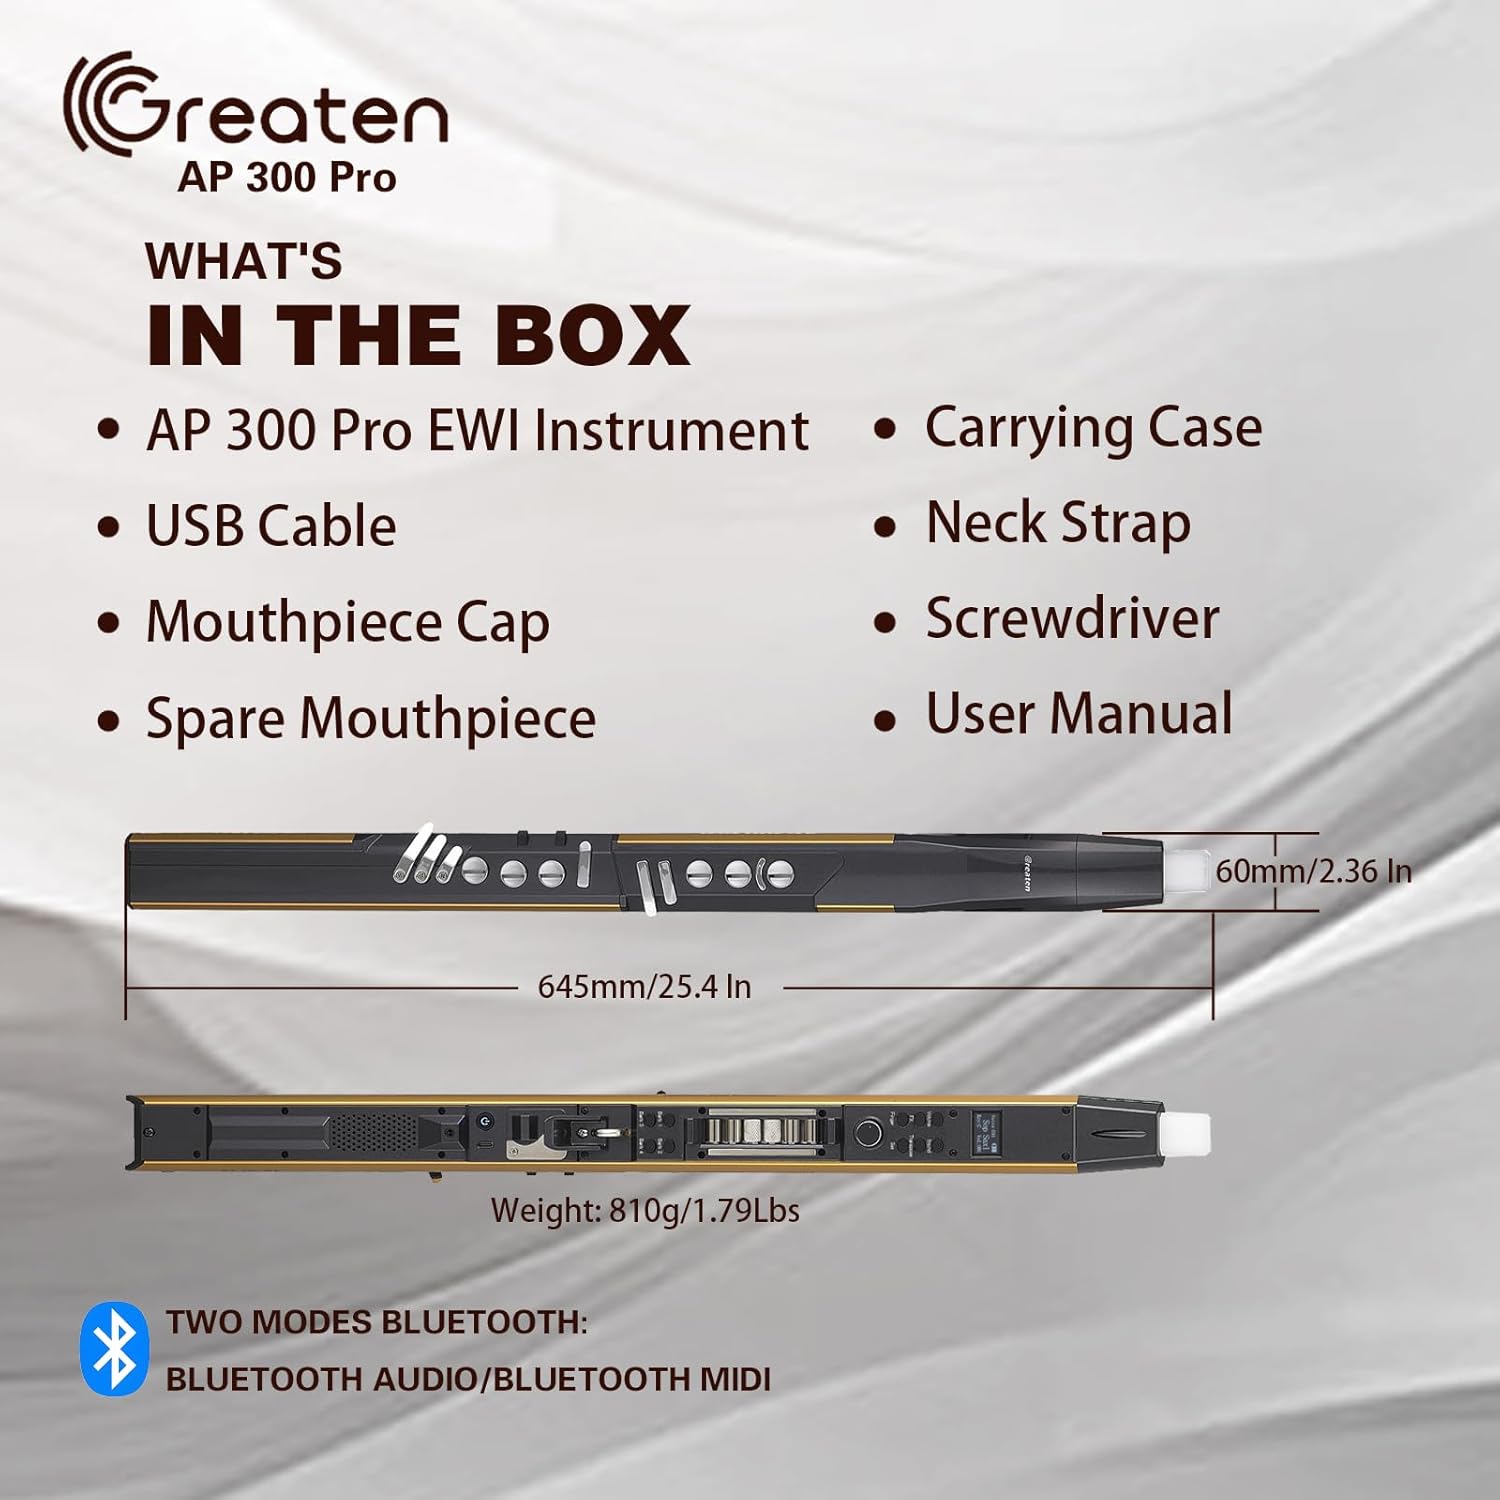
Figure 2.1: Illustration of the items included with your AP 300 Pro Electronic Wind Instrument.
3. Impostazione
3.1 Carica iniziale
Before first use, fully charge the AP 300 Pro. Connect the provided USB cable to the instrument's USB port and the other end to a compatible USB power adapter (not included) or a computer's USB port. The LCD display will indicate charging status. A full charge provides up to 6 hours of use.
3.2 Fissaggio del cinturino al collo
Attach the neck strap to the thumb hook on the back of the instrument for comfortable and secure playing. Ensure the strap is adjusted to a comfortable length.
3.3 Adjusting Thumb Hook and Key Positions
The AP 300 Pro features adjustable components for ergonomic comfort:
- Thumb Hook: The thumb hook can be moved up or down to suit your hand size and playing style. Use the provided screwdriver for adjustment.
- Reversible Thumb Controller: The thumb controller can be reversed for left-handed or right-handed players.
- Adjustable Key Positions: Certain key positions can be adjusted to optimize comfort and playability. Refer to the detailed diagram in Section 4.1 for specific adjustable keys.

Figure 3.1: Customizing the AP 300 Pro for a comfortable playing experience.
4. Istruzioni per l'uso
4.1 Panel Descriptions and Controls
Familiarize yourself with the various controls and ports on your AP 300 Pro:
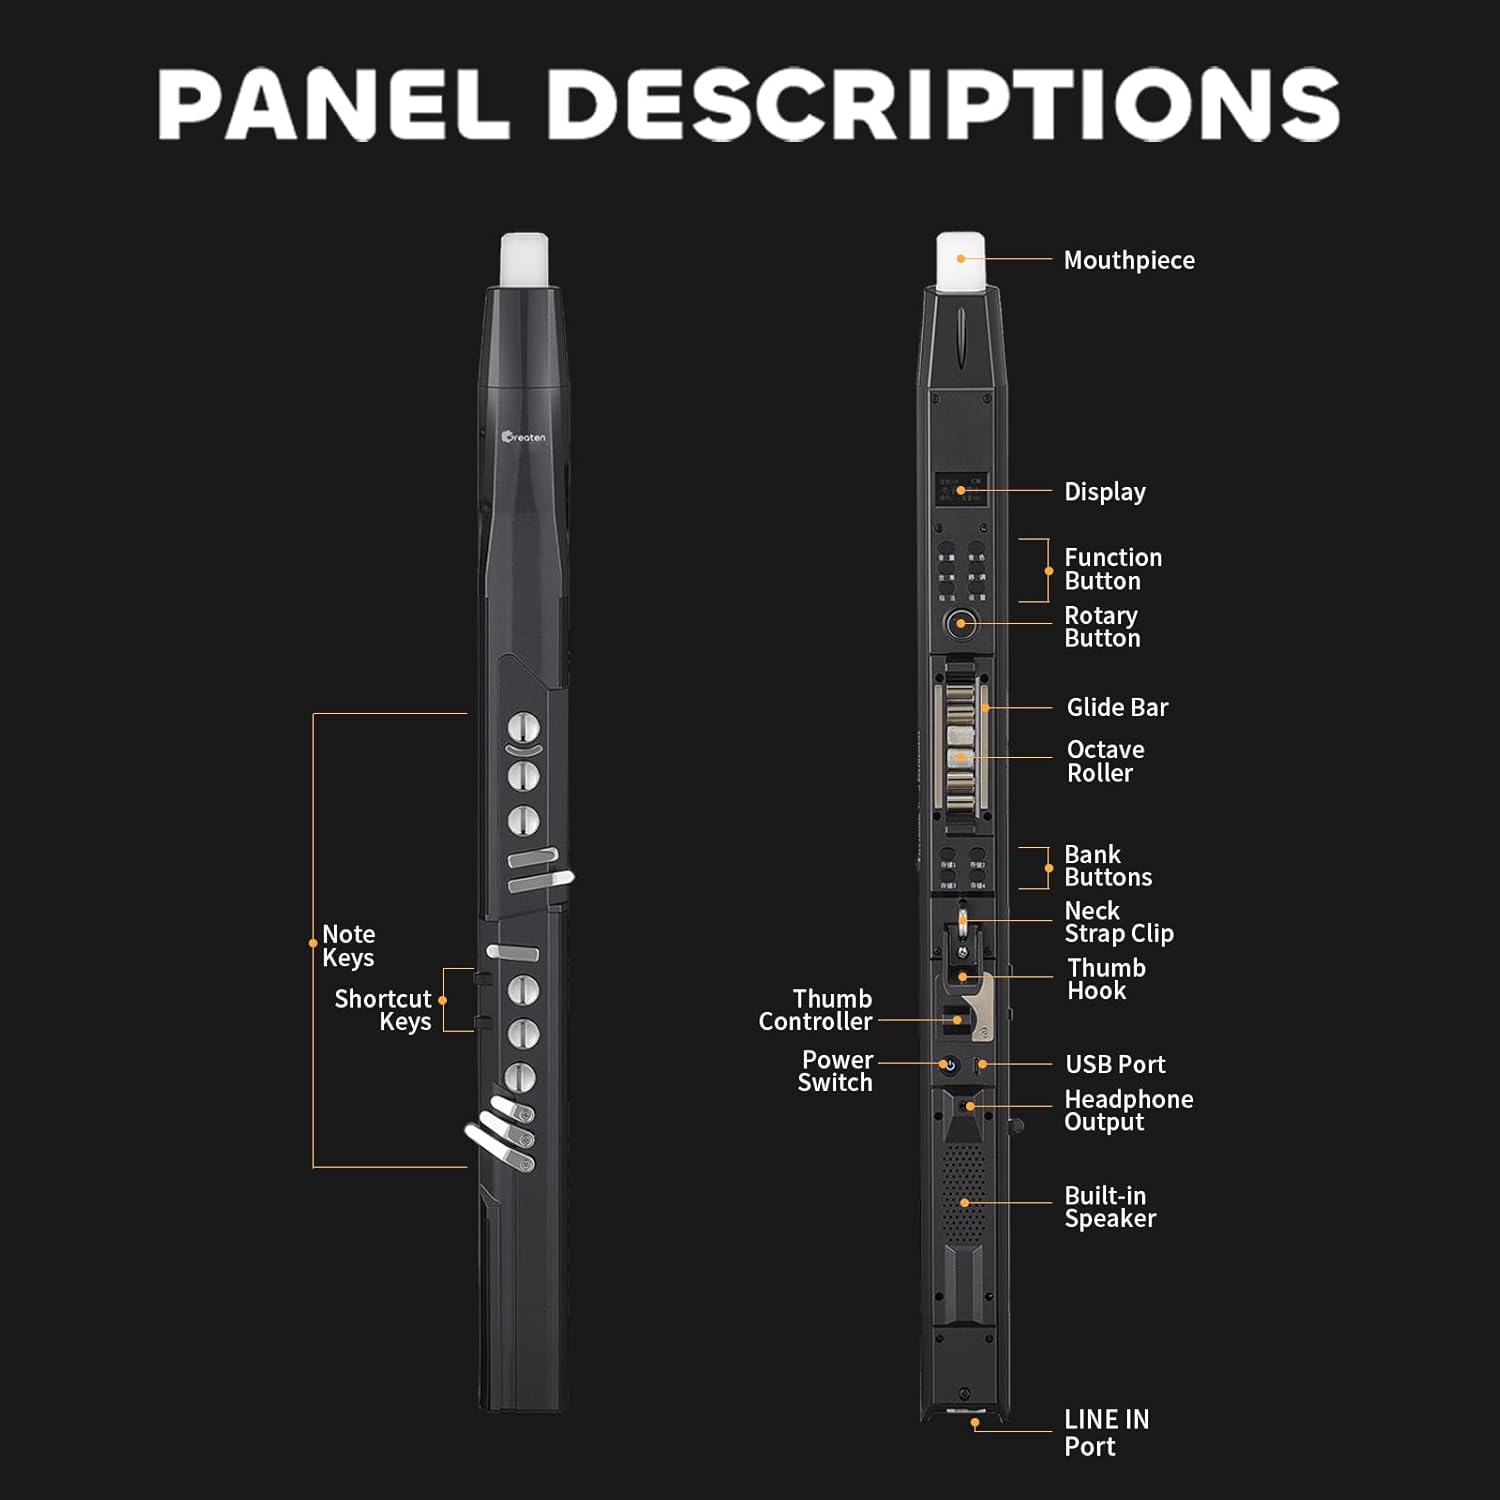
Figura 4.1: Frontale e laterale views of the AP 300 Pro with all controls and ports labeled.
- Boccaglio: Food-grade silicone mouthpiece with a built-in sensor.
- Display: LCD screen showing selected parameters, tones, volume, and key settings.
- Pulsante funzione: Used to access menus and settings.
- Pulsante rotante: Per navigare nei menu e regolare i valori.
- Barra di scorrimento: Allows for portamento effects by sliding your finger.
- Rullo di ottava: Easily switch between octaves.
- Bank Buttons (1-4): Store and recall up to four independent tone libraries/settings.
- Controller del pollice: Used for pitch bends and other expressive controls.
- Interruttore di alimentazione: Accende/spegne lo strumento.
- Porta USB: For charging and OTG recording.
- Uscita cuffie: Per la pratica silenziosa.
- Altoparlante incorporato: Per l'uscita audio diretta.
- LINEA IN Porto: Per collegare sorgenti audio esterne.
- Note Keys & Shortcut Keys: Touch-sensitive keys for playing notes and accessing quick functions.
4.2 Accensione/Spegnimento
To power on the instrument, slide the Power Switch to the "ON" position. To power off, slide it to the "OFF" position.
4.3 Suonare lo strumento
The AP 300 Pro features touch-sensitive keys and a built-in mouthpiece sensor. Simply blow into the mouthpiece and press the note keys to produce sound. The sensitivity of the mouthpiece sensor is adjustable via the settings menu.
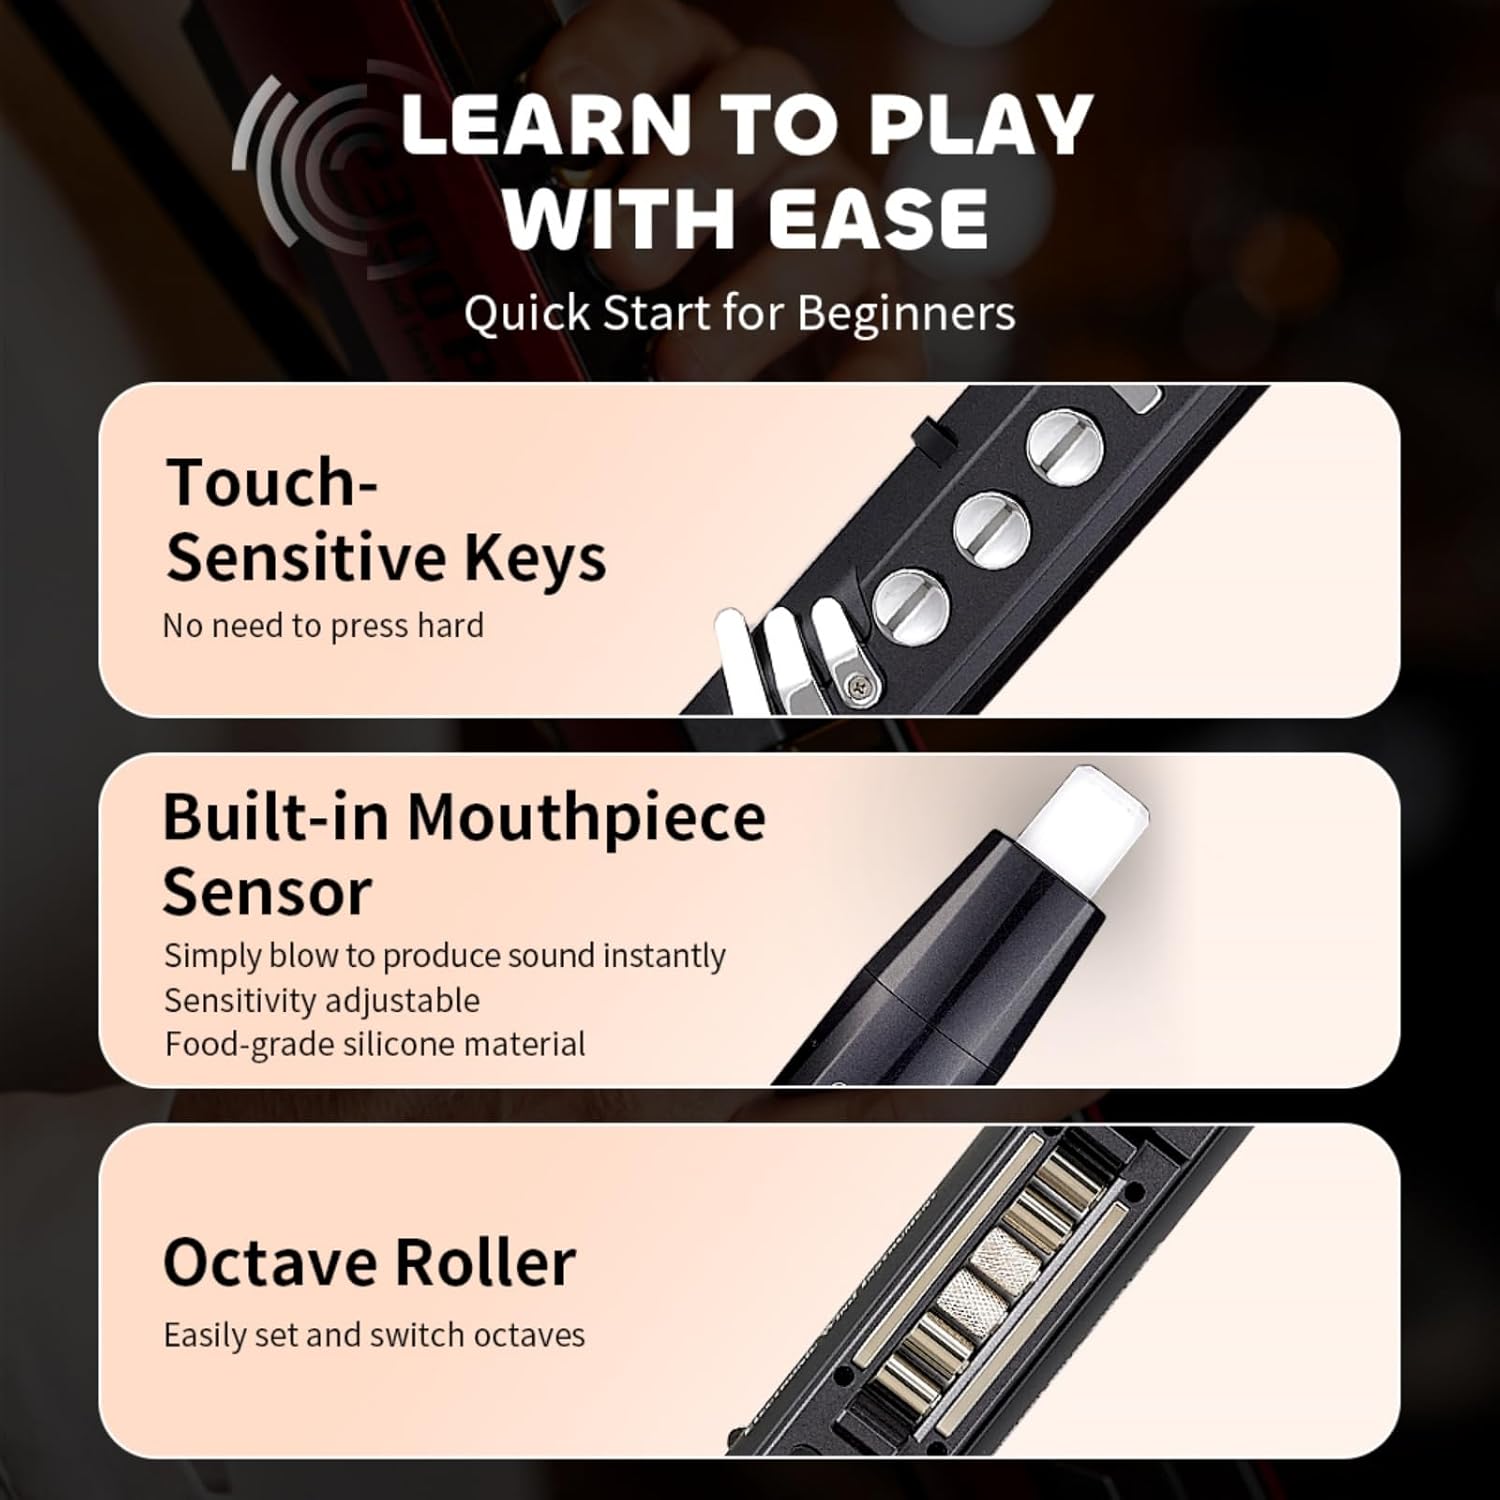
Figure 4.2: Key features for ease of play: touch-sensitive keys, mouthpiece sensor, and octave roller.
4.3.1 Fingering Options
The instrument supports 8 different fingering options, allowing users familiar with various wind instruments (e.g., standard, saxophone, flute, oboe, trumpet) to adapt quickly without extensive relearning.

Figure 4.3: The AP 300 Pro offers multiple fingering options to accommodate various playing styles.
4.3.2 Octave Control
Use the Octave Roller to easily shift the instrument's pitch up or down by octaves.
4.3.3 Expressive Techniques
- Portamento: Slide your finger along the Glide Bar to achieve smooth pitch transitions between notes.

Figure 4.4: Using the Glide Bar for Portamento.
- Pitch Bends: Utilize the Thumb Controller to bend notes up or down, adding expressive nuances to your playing.

Figure 4.5: Using the Thumb Controller for Pitch Bends.
- Vibrato: Choose from three vibrato modes with adjustable sensitivity. This can be achieved through semi-auto (blow and hold a bite), full-auto (just blow), or by repeatedly biting the mouthpiece.

Figure 4.6: Vibrato techniques.
4.4 Sound and Settings Management
4.4.1 Navigazione del display LCD
The LCD display provides a clear view of selected parameters such as chosen tones, remaining volume, and key settings. Use the Function and Rotary buttons to navigate through menus and adjust settings.

Figure 4.7: The LCD display and bank buttons for quick access to settings.
4.4.2 Selezione del tono
The AP 300 Pro offers 108 global tones. Navigate through the tone library using the Rotary button and select your desired instrument sound.
4.4.3 Saving Custom Settings (Bank Buttons)
The instrument allows for four independent tone libraries. Use the Bank Buttons (1-4) to store and quickly recall your preferred settings, including tones, fingerings, and effects.

Figure 4.8: Saving and recalling customized settings using the Bank Buttons.
4.5 Connettività
4.5.1 Connettività Bluetooth
The AP 300 Pro supports dual-mode Bluetooth for both audio and MIDI:
- Audio Bluetooth: Connect your phone or tablet to play backing tracks and perform along with seamless, zero-latency audio.
- MIDI Bluetooth: Allows wireless MIDI connections for expanded creative possibilities, such as controlling software instruments or recording MIDI data.

Figure 4.9: Dual-mode Bluetooth for versatile connectivity.
4.5.2 Registrazione OTG
The built-in OTG recording function allows for high-quality recording directly to a connected device (e.g., smartphone, tablet) via the USB port. This prevents external noise interference, ensuring clear captured sound.

Figure 4.10: Effortless recording with built-in OTG functionality.
4.5.3 Headphone and Ampconnessione lifier
For silent practice, connect headphones to the headphone output jack. To amplify your sound, connect the instrument to an external amplifier via the LINE IN port.
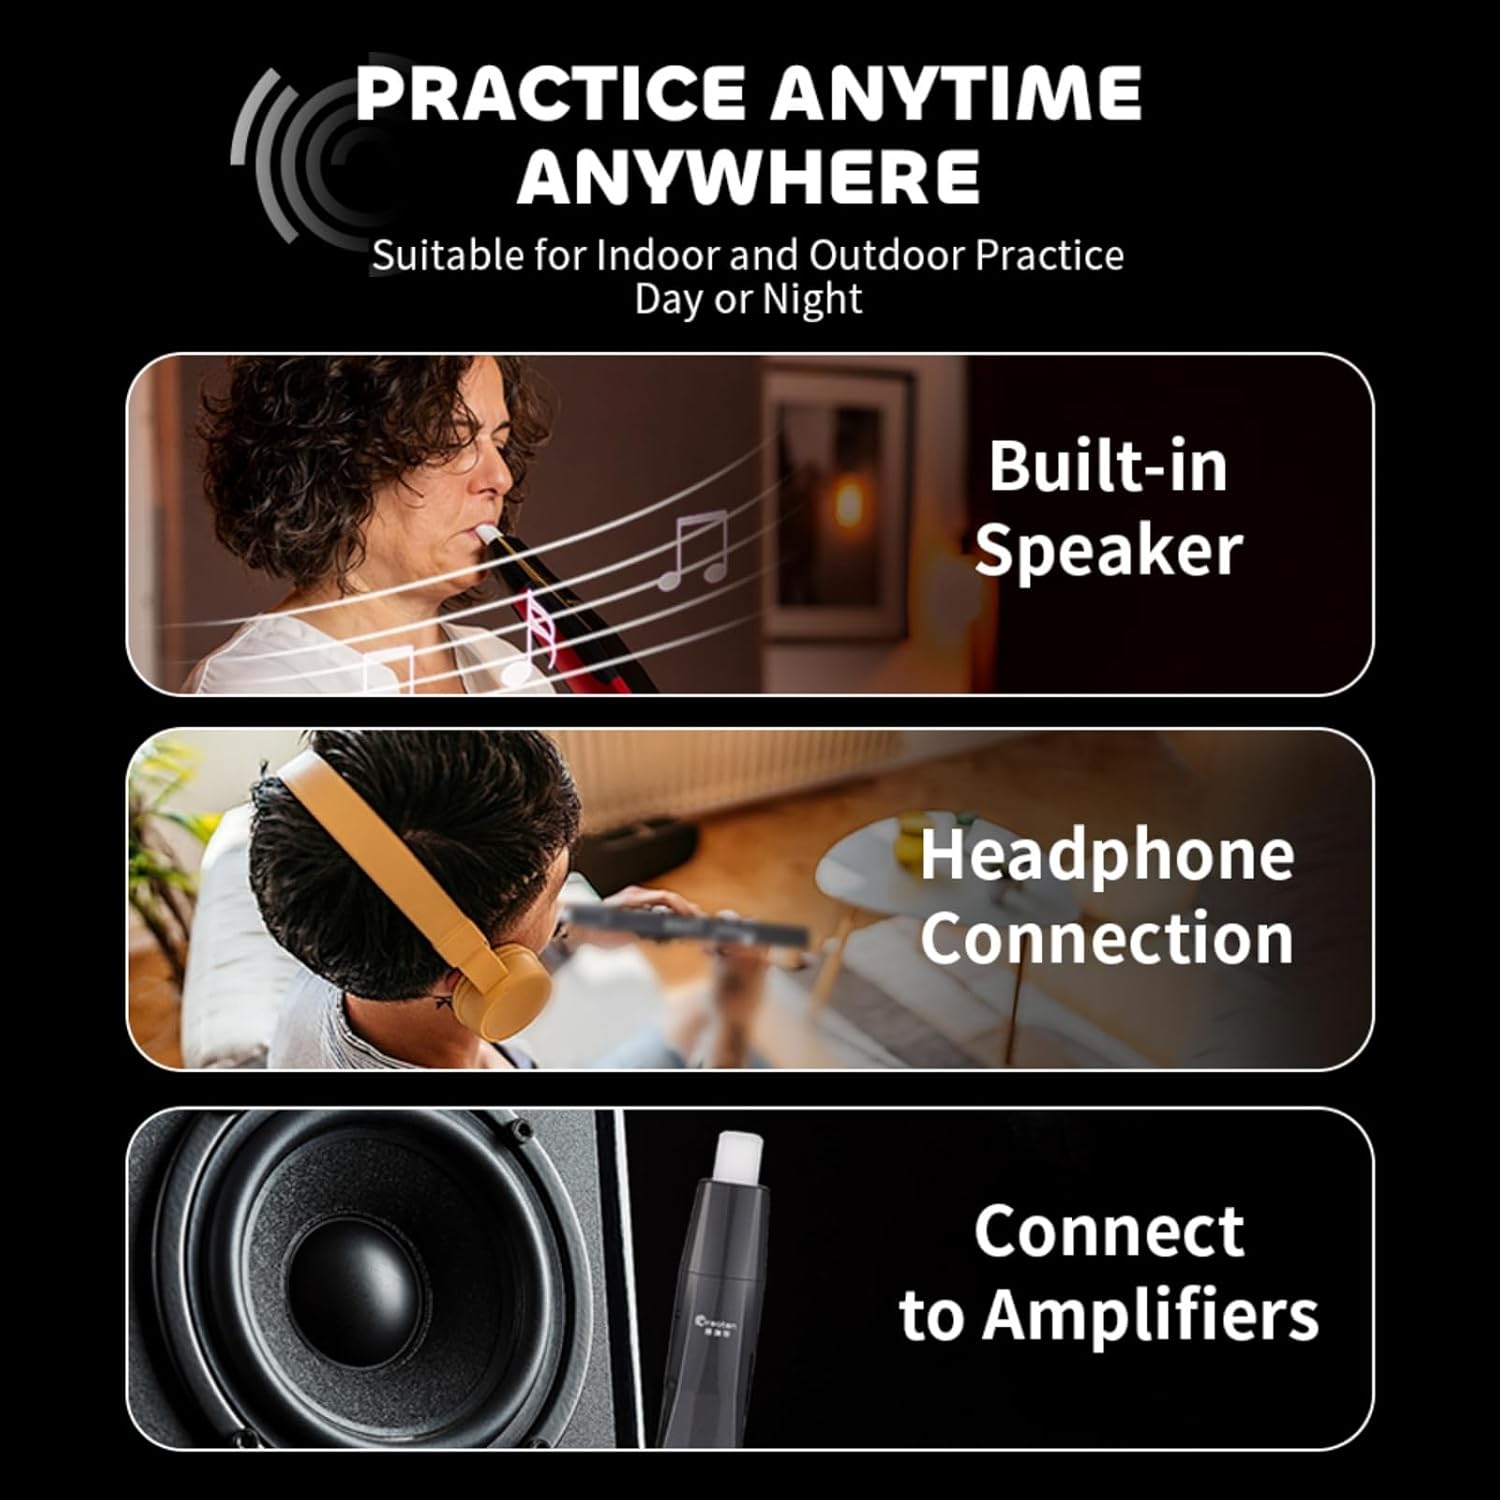
Figure 4.11: Practice options: built-in speaker, headphone connection, and amplifier connectivity.
5. Manutenzione
5.1 Pulizia
- Boccaglio: The mouthpiece can be removed for cleaning. Wash with mild soap and water, rinse thoroughly, and allow to air dry completely before reattaching.
- Corpo dello strumento: Wipe the instrument's body with a soft, dry cloth. Avoid using abrasive cleaners or solvents, which may damage the finish.
5.2 Conservazione
When not in use, store the AP 300 Pro in its provided carrying case to protect it from dust, moisture, and physical damage. Store in a cool, dry place away from direct sunlight and extreme temperatures.
5.3 Cura della batteria
To prolong battery life, avoid fully discharging the battery frequently. If storing the instrument for an extended period, charge it to approximately 50% every few months.
6. Risoluzione Dei Problemi
This section addresses common issues you might encounter with your AP 300 Pro. If the problem persists, please contact GREATEN customer support.
| Problema | Possibile causa | Soluzione |
|---|---|---|
| Lo strumento non si accende. | Batteria scarica; interruttore di alimentazione in posizione OFF. | Charge the instrument fully. Ensure the power switch is set to ON. |
| Nessuna uscita audio. | Volume too low; Incorrect tone selected; Headphone connected; Speaker muted. | Increase volume. Select a valid tone. Disconnect headphones if using speaker. Check speaker settings. |
| Problemi di connessione Bluetooth. | Instrument not in pairing mode; Device out of range; Interference. | Ensure instrument is in Bluetooth pairing mode. Move device closer. Reduce interference from other wireless devices. |
| OTG recording has noise. | External noise interference. | Ensure recording environment is quiet. Verify USB connection is secure. |
| Difficulty with staccato notes. | Breath sensor sensitivity; Playing technique. | Adjust breath sensor sensitivity in settings. Practice tonguing techniques. Ensure proper mouthpiece embouchure. |
7. Specifiche
| Caratteristica | Dettaglio |
|---|---|
| Numero di modello | AP 300 Pro |
| Dimensioni | 25.4 x 2.36 x 2.36 pollici (645 mm x 60 mm x 60 mm) |
| Peso | 1.79 libbre (810 g) |
| Materiale del corpo | Alluminio, plastica, rame |
| Colore | Golden (as per current model) |
| Toni | 108 Global Tones |
| Capacità della batteria | 6000mAh |
| Durata della batteria | Fino a 6 ore |
| Connettività | Dual-Mode Bluetooth (Audio & MIDI), USB (OTG Recording) |
| Display | Schermo LCD |
| Fingering Options | 8 different fingerings (Standard, Saxophone, Flute, Oboe, Trumpet, etc.) |
8. Garanzia e supporto
For warranty information, technical support, or any inquiries regarding your GREATEN AP 300 Pro, please contact GREATEN customer service. Refer to the contact information provided with your purchase or visit the official GREATEN websito.
GREATEN is committed to providing high-quality products and excellent customer service. If you experience any issues not covered in this manual, our support team is available to assist you.
È inoltre possibile trovare risorse aggiuntive e FAQ su GREATEN Store on Amazon.