1. Introduzione
Grazie per l'acquistoasing the Eonon 11.6-inch Headrest DVD Player Monitor. This manual provides detailed instructions for installation, operation, and maintenance to ensure optimal performance and longevity of your device. Please read this manual thoroughly before use and keep it for future reference.
2. Prodotto finitoview
Caratteristiche principali
- Display IPS da 11.6 pollici: Enjoy vibrant and clear visuals from any viewing angle with a 1366x768 high-resolution screen.
- Lettore DVD integrato: Convenient slot-in DVD player supports various disc formats including DVD, DVD+R/-R, DVD+RW/-RW, MP3, CD, CD+R/-R, CD+RW/-RW.
- CPRM Playback & Region-Free: Supports CPRM discs and is region-free, allowing playback of DVDs from various regions.
- Ingresso HDMI: Connect smartphones, Amazon Fire TV Stick, and other HDMI-compatible devices for high-quality audio and video. (Note: HDMI output devices only. HDMI conversion cable not included.)
- Supporto per schede USB/SD: Play movies, music, and photos from USB drives and SD cards up to 32GB. Supports various formats including MPEG, RMVB, MKV, MPG, MP4, ASF, VOB, AV, WMV, FLV, MOV.
- Resume Playback Function: The device can resume playback from where it was stopped for DVD, USB, and SD card content. (Note: CPRM discs do not support resume function. Dubbed DVDs may not support resume function.)
- Altoparlanti anteriori: Speakers are positioned at the front to minimize interference with the driver, promoting safer driving.
- Wired/IR Headphone Support: Connect wired or IR headphones for private listening without disturbing others. (Headphones not included.)
- Home Use Capability: Can be used at home with the separately sold EONON POA025 power cable.
- Illuminazione d'atmosfera: Integrated lights at the bottom of the monitor add ambiance to your car interior.
- 12V/24V Compatible: Suitable for use in both cars and trucks.
Contenuto della confezione
Si prega di verificare che tutti gli articoli siano inclusi nel pacco:
- Unità monitor (x1)
- Manuale di istruzioni (x1)
- Telecomando (x1)
- Cigarette Lighter Power Cable (2.4m) (x1)
- Rear Mount Bracket (x1)
- Center Mount Bracket (x1)
- Cacciavite (x1)
- Spare Fuse (x1)
- Shaft Adapters (x12)
- Monitor Cleaning Cloth (x1)

Image: All included accessories for the Eonon L0328J monitor.
3. Installazione
The Eonon L0328J monitor offers two primary installation methods: Center Bracket and Rear Bracket. Please choose the method that best suits your vehicle and preferences.
3.1 Center Bracket Installation
This method allows a single monitor to be centrally positioned in the rear, enabling passengers on both sides to comfortably view lo schermo contemporaneamente.
- Turn the switch to ON to extend the arm.
- Rotate the lock lever to adjust the direction of the arm.
- Loosen the 4 screws on the bracket.
- Remove the headrest. Position the center bracket and secure it under the original bracket using the two slots.
- Insert the two main poles into the car seat and tighten the screws.
- Slide the monitor onto the guide rail while holding the switch, then attach the center bracket.
- Adjust the tightness of the monitor and bracket connection, then lock it clockwise.
- After adjusting the extension rod, turn the switch to OFF to secure it.

Image: Diagram illustrating the steps for installing the monitor using the center bracket.
3.2 Rear Bracket Installation
This method allows the monitor to be attached directly behind a single headrest.
- Turn the 'Connection' switch to ON and the 'Fixed Clip' switch to OFF.
- Pull down to remove the connection bracket.
- Unfold the connection bracket and remove the fixed clip (screw side up).
- This is the state after removal.
- Lift the headrest. Point the headrest opening towards yourself.
- Push the left and right connection brackets into the car seat and lock them.
- When attaching the monitor and connection bracket, insert the fixed clip (bracket side up).
- Adjust the tightness of the nut and connection bracket.
- Attach the bracket and tighten the screws.
- Push the inserted part all the way in.

Image: Diagram illustrating the steps for installing the monitor using the rear bracket.
3.3 Collegamento di alimentazione
Connect the cigarette lighter power cable (2.4m length) to the monitor's DC 12V input port and then to your vehicle's cigarette lighter socket. Ensure a secure connection.

Image: Close-up of the monitor's side ports, including DC 12V input, USB, SD, HDMI, and headphone jack.
4. Funzionamento
4.1 Riproduzione DVD
The monitor features a convenient slot-in DVD player. Simply insert a compatible DVD disc into the slot. The monitor will automatically detect and begin playback. Supported formats include DVD, DVD+R/-R, DVD+RW/-RW, MP3, CD, CD+R/-R, CD+RW/-RW. The device is region-free and supports CPRM discs.

Image: Demonstrates the slot-in DVD feature and highlights CPRM compatibility.
4.2 Riproduzione da scheda USB/SD
Insert a USB drive or SD card (up to 32GB) into the designated ports on the monitor. Use the remote control or on-screen menu to navigate and select media files (movies, music, photos) for playback. Supported video formats include MPEG, RMVB, MKV, MPG, MP4, ASF, VOB, AV, WMV, FLV, MOV.
4.3 Ingresso HDMI
Connect an HDMI-compatible device (e.g., smartphone, Amazon Fire TV Stick) to the HDMI input port on the monitor. Switch the input source on the monitor to HDMI to display content from the connected device. Ensure your device has HDMI output capability. An HDMI conversion cable is not included.

Image: Shows the monitor connected via HDMI to a smartphone, displaying content.
4.4 Riprendi la riproduzione
The monitor supports a resume playback function for DVD, USB, and SD card content. If playback is stopped, the device will resume from the last stopped position when restarted. Please note that CPRM discs and some dubbed DVDs may not support this feature.
4.5 Audio Options
- Altoparlanti anteriori: The monitor has built-in front-facing speakers for audio output.
- Wired/IR Headphones: For private listening, connect wired headphones to the 3.5mm audio jack or use IR wireless headphones (not included).

Image: Icons indicating support for both wired and infrared (IR) headphones.
5. Manutenzione
5.1 Pulizia del monitor
Use the provided monitor cleaning cloth to gently wipe the screen and exterior of the device. Do not use abrasive cleaners or solvents, as they may damage the surface.
5.2 Cura del disco
Maneggiare i dischi tenendoli per i bordi per evitare impronte digitali e graffi. Conservare i dischi nelle loro custodie quando non vengono utilizzati. Pulire i dischi sporchi con un panno morbido e privo di lanugine, procedendo dal centro verso l'esterno.
5.3 Conservazione
When not in use for extended periods, disconnect the monitor from the power source and store it in a cool, dry place away from direct sunlight and extreme temperatures.
6. Risoluzione Dei Problemi
| Problema | Possibile causa | Soluzione |
|---|---|---|
| Nessun potere | Power cable not connected properly; Blown fuse in cigarette lighter plug. | Check power cable connection; Replace fuse in cigarette lighter plug. |
| No image/sound from DVD | Disco inserito in modo errato; Disco sporco o graffiato; Formato disco incompatibile. | Reinsert disc correctly; Clean or replace disc; Ensure disc format is supported. |
| No image/sound from HDMI | HDMI cable not connected properly; Incorrect input source selected; External device not outputting signal. | Check HDMI cable connection; Select correct input source; Verify external device's HDMI output. |
| Nessun suono dagli altoparlanti/cuffie | Volume too low or muted; Headphones not connected properly. | Increase volume or unmute; Check headphone connection. |
| Il telecomando non funziona | Batteries depleted; Obstruction between remote and monitor's IR receiver. | Sostituire le batterie; rimuovere eventuali ostruzioni. |
7. Specifiche
- Dimensioni dello schermo: 11.6 pollici
- Tipo di visualizzazione: Schermo LCD IPS
- Risoluzione nativa: 1366x768 pixel
- Colore: Nero
- Media Type Support: CD-R, DVD RW, SD, USB
- Connettività: HDMI, USB
- Compatibilità energetica: 12V/24V (DC 9V-40V)
- Dimensioni (L x P x A): 29 cm x 5.2 cm x 18.7 cm (circa)
- Origine: Cina
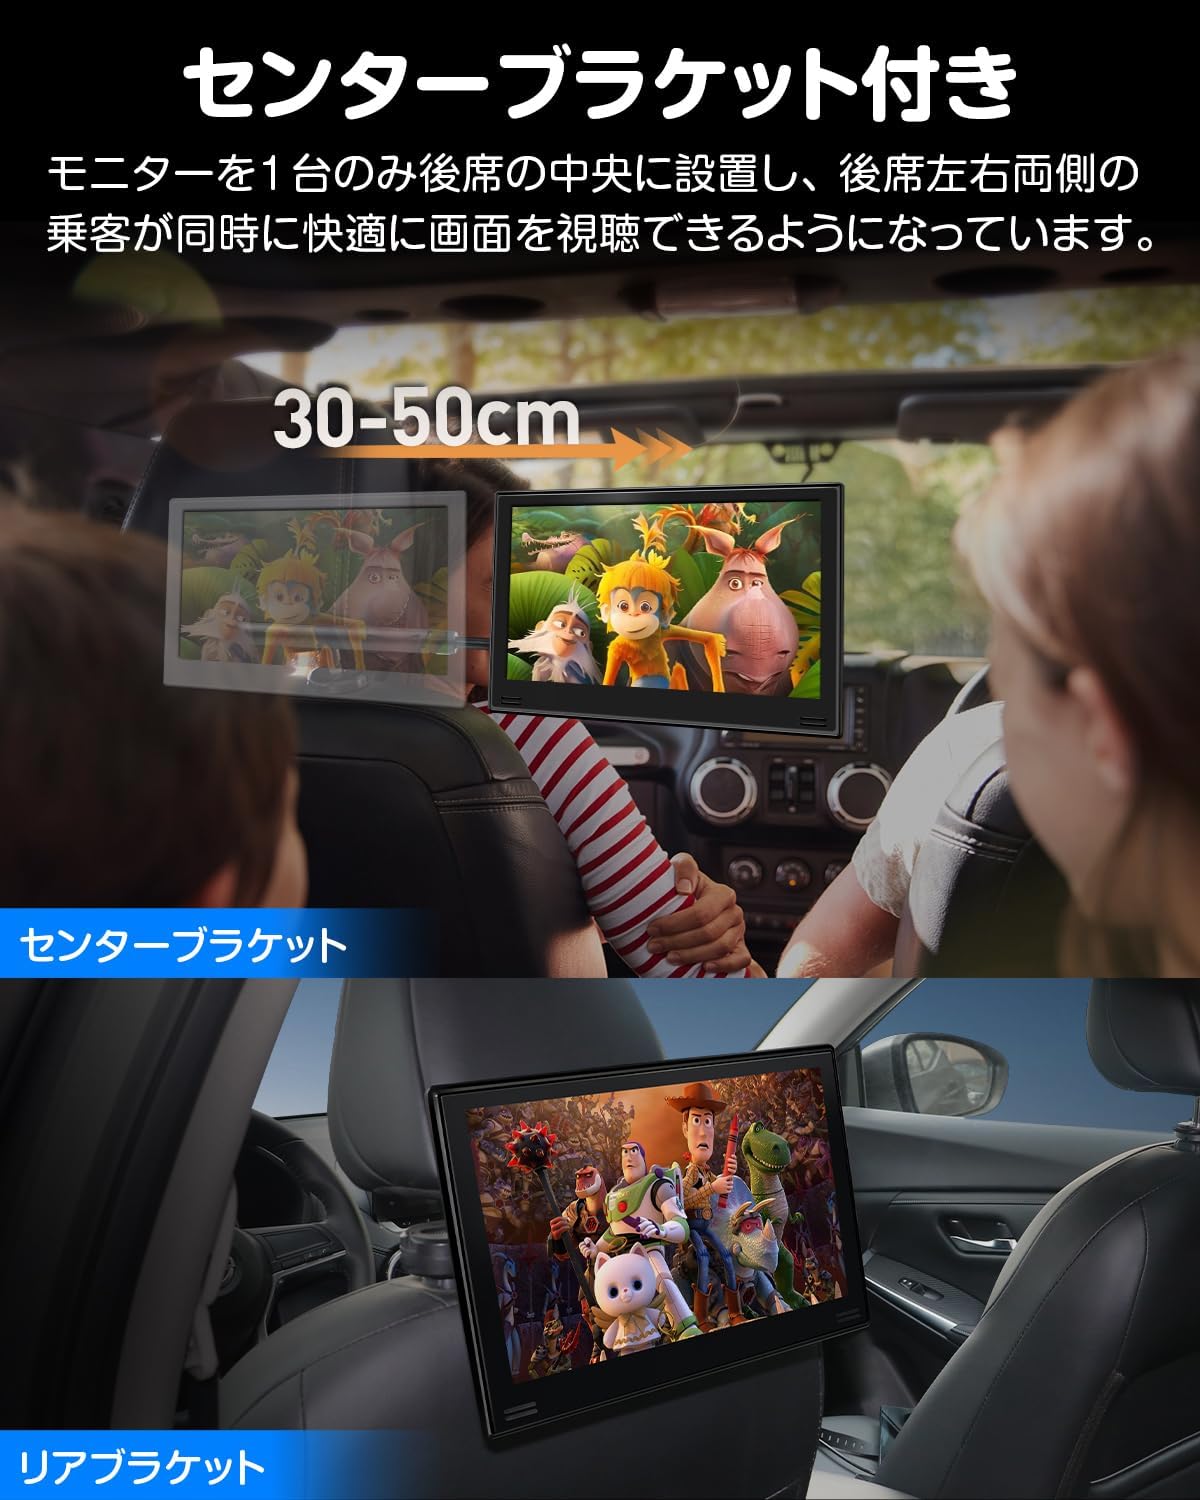
Image: Diagram showing the dimensions of the Eonon L0328J monitor and its brackets.
8. Garanzia e supporto
8.1 Informazioni sulla garanzia
Effective January 9, 2026, the warranty period for the Eonon L0328J product has been extended to due anni for customers who purchase on or after this date.
For customers who purchased between October 1, 2025, and January 8, 2026, your warranty period will also be extended to two years as a special exception, demonstrating our commitment to product reliability.
For detailed information regarding your warranty, please contact our customer support.
8.2 Assistenza clienti
For any inquiries, technical assistance, or warranty claims, please contact Eonon customer support through the official channels provided at the time of purchase or on the Eonon brand website. Please have your model number (L0328J) and purchase details ready when contacting support.