1. Introduzione
Thank you for choosing the Dowinx LS-665TE0D Gaming Chair. This manual provides detailed instructions for assembly, operation, and maintenance to ensure optimal performance and longevity of your chair. Please read this manual thoroughly before assembly and use.
2. Informazioni sulla sicurezza
- Assicurarsi che tutti i componenti siano presenti e integri prima del montaggio. Non utilizzare se alcuni componenti risultano mancanti o rotti.
- Follow assembly instructions carefully. Improper assembly may lead to instability or injury.
- Non salire sulla sedia e non usarla come sgabello.
- Non superare la capacità di peso massima di 300 libbre.
- Tenere bambini e animali domestici lontani dall'area di montaggio. Le parti di piccole dimensioni possono rappresentare un rischio di soffocamento.
- When using the heated massage lumbar pillow, ensure it is connected to a suitable power source and do not exceed the rated voltage. The massage function automatically shuts off after 5 minutes to prevent overuse.
- Evitare di esporre la sedia alla luce solare diretta o a temperature estreme per evitare il degrado del materiale.
3. Contenuto della confezione
Verificare che tutti i componenti elencati di seguito siano inclusi nel pacchetto:
- Schienale
- Cuscino del sedile
- Braccioli (2)
- Base a stella
- Rotelle (5)
- Cilindro di sollevamento a gas
- Coperchio per ascensore a gas
- Piastra del meccanismo
- Assemblaggio poggiapiedi
- Heated Massage Lumbar Pillow
- Cuscino poggiatesta
- Kit hardware (bulloni, rondelle, chiave a brugola)

Image: All components of the Dowinx LS-665TE0D Gaming Chair laid out before assembly.
4. Istruzioni di montaggio
Assembly is required. It is recommended to have two people for certain steps. Please refer to the included hardware kit for specific bolt types (e.g., H-bolts, D-bolts, A-screws, C-screws).
4.1. Assemble the Chair Base
- Inserire le cinque rotelle nei fori all'estremità di ciascuna gamba della base a stella. Spingere con decisione fino a sentire uno scatto.
- Inserire il cilindro di sollevamento a gas nel foro centrale della base a stella.
- Place the gas lift cover over the gas lift cylinder.
4.2. Attach Armrests to Seat Cushion
- Identify the left and right armrests. Ensure the 'FRONT' marking on the armrest brackets faces forward.
- Align the armrest brackets with the pre-drilled holes on the underside of the seat cushion.
- Secure each armrest using the appropriate bolts (H-bolts) from the hardware kit and the provided Allen wrench. Tighten securely but do not overtighten.
4.3. Attach Mechanism Plate to Seat Cushion
- Align the mechanism plate with the pre-drilled holes on the underside of the seat cushion, ensuring the front of the mechanism faces the front of the seat.
- Secure the mechanism plate using the appropriate bolts (D-bolts) from the hardware kit. Tighten all four bolts evenly.
4.4. Attach Backrest to Seat Cushion
- Align the backrest with the metal brackets on the seat cushion.
- Secure the backrest to the brackets using the appropriate bolts (C-screws) from the hardware kit. Lift the fabric flap on the backrest to access the screw holes.
4.5. Attach Footrest
- Slide the footrest assembly into the designated slots on the underside of the seat mechanism.
- Secure the footrest using the A-screw to prevent it from sliding out completely.
4.6. Assemblaggio finale
- Posizionare con cura il sedile e lo schienale assemblati sul cilindro di sollevamento a gas. Premere con decisione per fissarli.
- Attach the headrest pillow and the heated massage lumbar pillow using their integrated straps. The lumbar pillow can be adjusted vertically for optimal support.

Image: The Dowinx LS-665TE0D Gaming Chair with key dimensions highlighted.
5. Istruzioni per l'uso
5.1. Regolazione dell'altezza della sedia
To adjust the chair height, pull the lever located on the right side of the seat mechanism upwards while applying or releasing di peso corporeo. Rilasciare la leva all'altezza desiderata.
5.2. Adjusting Recline
To recline the backrest, pull the lever on the right side of the chair (separate from the height adjustment lever) upwards and lean back. Release the lever at your desired angle (up to 135 degrees). To return to an upright position, pull the lever and lean forward.
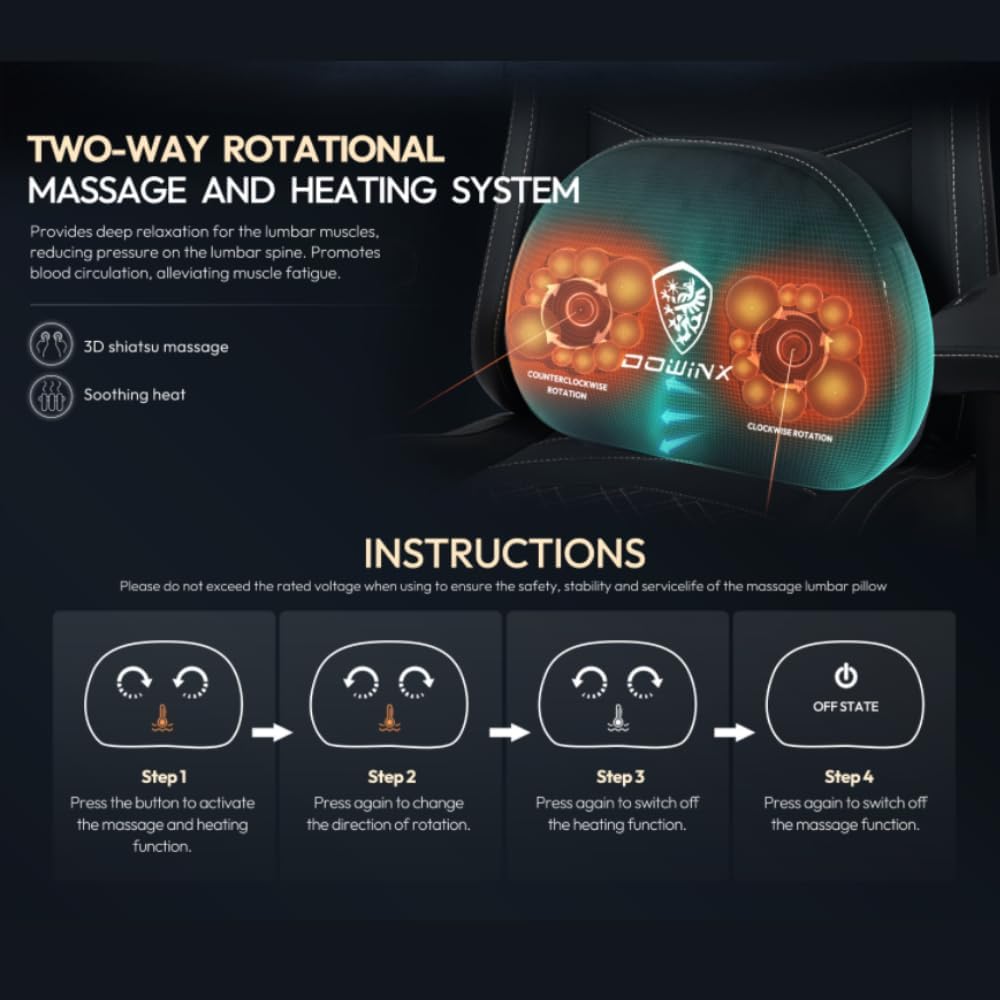
Image: The chair demonstrating various recline positions, from 90° (gaming) to 135° (relax).
5.3. Adjusting Armrests
The padded armrests are height-adjustable. Locate the button or lever on the side of each armrest post. Press it and move the armrest up or down to your preferred height. Release the button/lever to lock it in place.
5.4. Using the Footrest
To extend the footrest, pull it out from underneath the seat cushion. To retract, push it back in until it is fully stored.
5.5. Heated Massage Lumbar Pillow Operation
The lumbar pillow features Shiatsu massage technology and a slow heating function. Connect the USB cable from the pillow to a suitable power source (e.g., a USB port on your computer or a power bank).
- Fase 1: Premere il pulsante sul cuscino per attivare la funzione massaggio e riscaldamento.
- Fase 2: Press again to change the direction of rotation for the massage.
- Fase 3: Press again to switch off the heating function.
- Fase 4: Press again to switch off the massage function.
The massage function will automatically shut off after 5 minutes to ensure safety and prevent overuse.

Image: Visual guide for operating the heated massage lumbar pillow, showing button presses for different functions.
6. Manutenzione
6.1. Pulizia
- Per la pulizia generale, pulire la sedia con un panno morbido eamp stoffa.
- Per le macchie ostinate, utilizzare una soluzione di sapone delicato e pulire immediatamente con un panno pulito e asciutto.amp stoffa.
- Avoid using harsh chemicals, abrasive cleaners, or solvents, as these can damage the chair's materials.
- Regularly vacuum fabric parts to remove dust and debris.
6.2. Assistenza generale
- Controllare periodicamente tutti i bulloni e le viti per assicurarsi che siano ben serrati. Serrare nuovamente se necessario.
- Avoid placing heavy objects on the armrests or backrest.
- Keep the chair away from direct heat sources and prolonged sunlight exposure.
7. Risoluzione Dei Problemi
- La sedia non si regola in altezza: Check if the gas lift cylinder is correctly installed and the lever is fully engaged. Ensure no obstructions are preventing movement.
- La sedia è traballante: Verify that all assembly bolts are securely tightened. Check if the casters are fully inserted into the star base.
- La funzione massaggio non funziona: Ensure the USB cable is properly connected to a working power source. Check for any kinks or damage to the cable.
- Footrest is difficult to extend/retract: Ensure the footrest rails are clean and free of obstructions. Apply a small amount of silicone lubricant if needed.
8. Specifiche
| Caratteristica | Dettaglio |
|---|---|
| Marca | Dowinx |
| Nome del modello | LS-665TE0D |
| Dimensioni del prodotto | 18.5"P x 21.3"L x 47.8"A |
| Peso dell'articolo | 48.5 libbre |
| Materiale | Metal (Frame), Foam (Fill) |
| Usi consigliati | Gioco d'azzardo |
| Descrizione della fascia d'età | Adulto |
| Caratteristiche aggiuntive | Ergonomic, Heated Massage Lumbar Support, Pocket Spring Cushion, Adjustable Padded Armrests, Footrest |
| Conteggio della posizione reclinata | 2 (fino a 135 gradi) |
| Assemblaggio richiesto | SÌ |
9. Garanzia e supporto
Dowinx provides a manufacturer's warranty for this product. Please refer to the warranty card included in your package for specific terms and conditions. For technical support, missing parts, or any inquiries, please contact Dowinx customer service through the contact information provided on the warranty card or the official Dowinx websito.