1. Introduzione
Thank you for choosing the eSynic Type-C Rechargeable Magnifying Glasses Headset. This device is designed to provide enhanced visual clarity and hands-free operation for detailed tasks. It features multiple interchangeable lenses, adjustable LED lighting, and a comfortable, adjustable headband. Please read this manual thoroughly before use to ensure proper operation and maintenance.
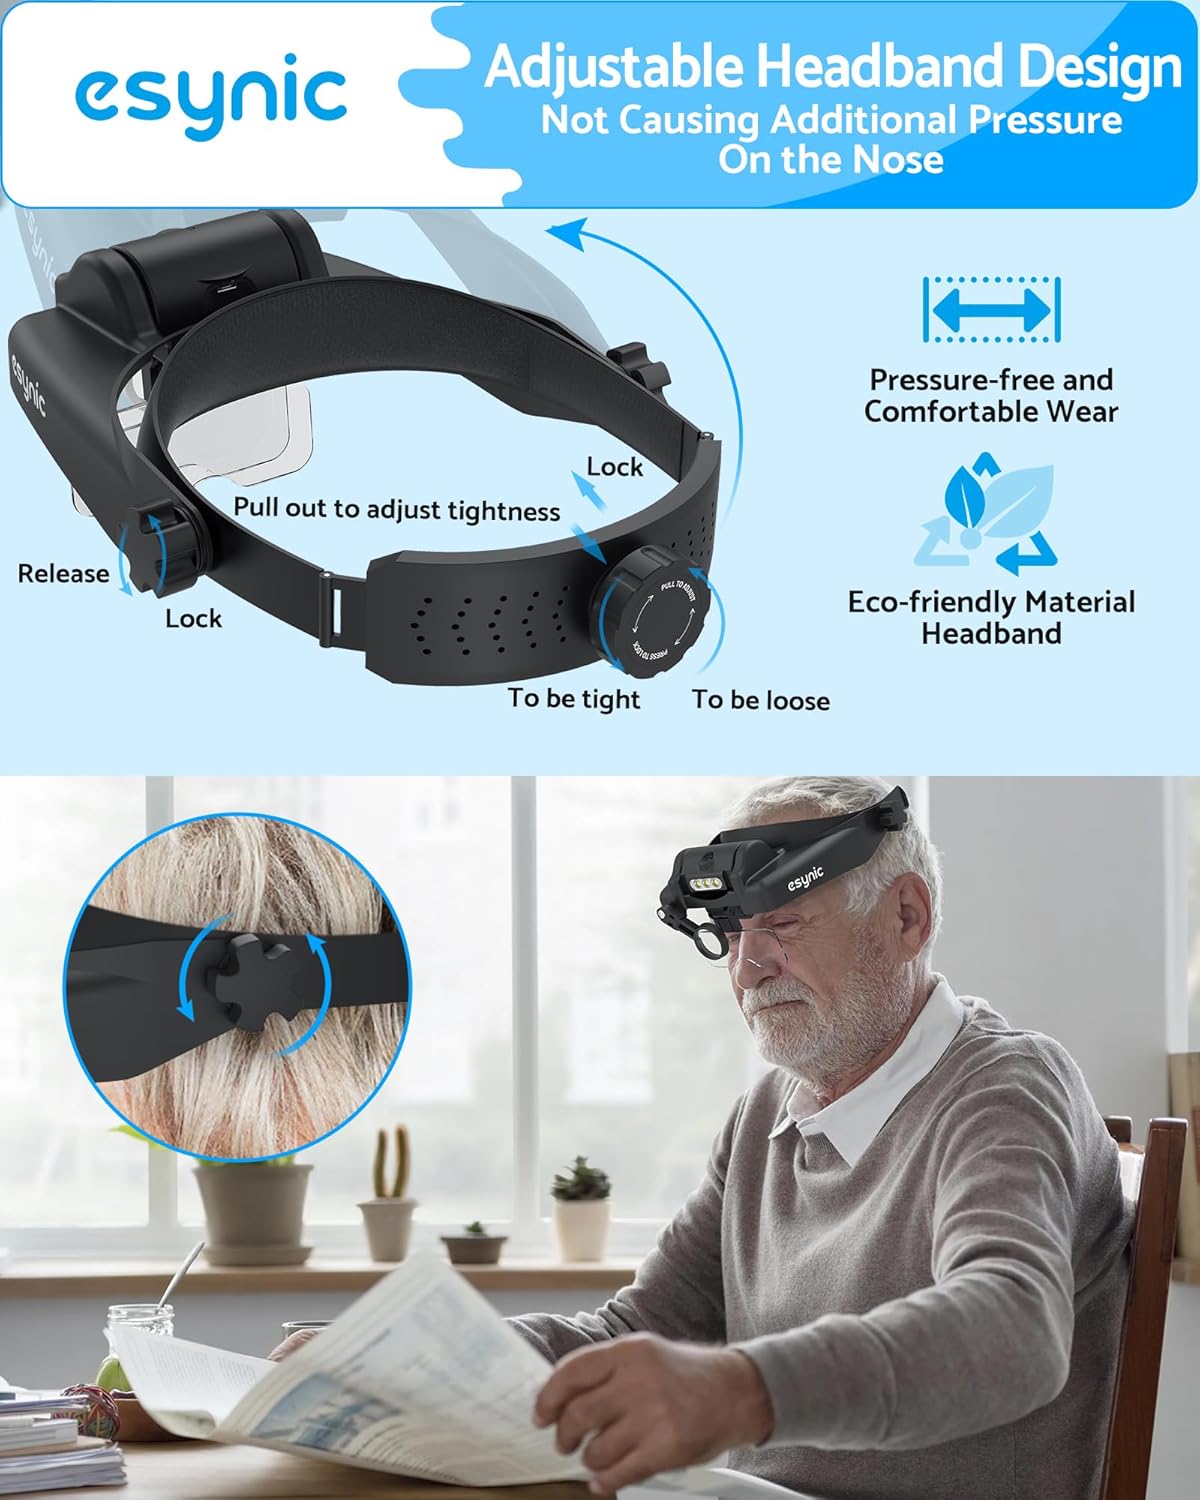
Figura 1: Oltreview of the eSynic Headset Magnifier.
2. Contenuto della confezione
Verifica che tutti gli articoli elencati di seguito siano presenti nel tuo pacco:
- 1 x eSynic Headband Magnifier
- 5 x Detachable Acrylic Lenses (1.0X, 1.5X, 2.0X, 2.5X, 3.5X)
- 1 x 8X Auxiliary Lens
- 1 x Cavo di ricarica tipo-C USB
- 1 x panno per la pulizia
- 1 x Hard-shell Storage Case for Lenses
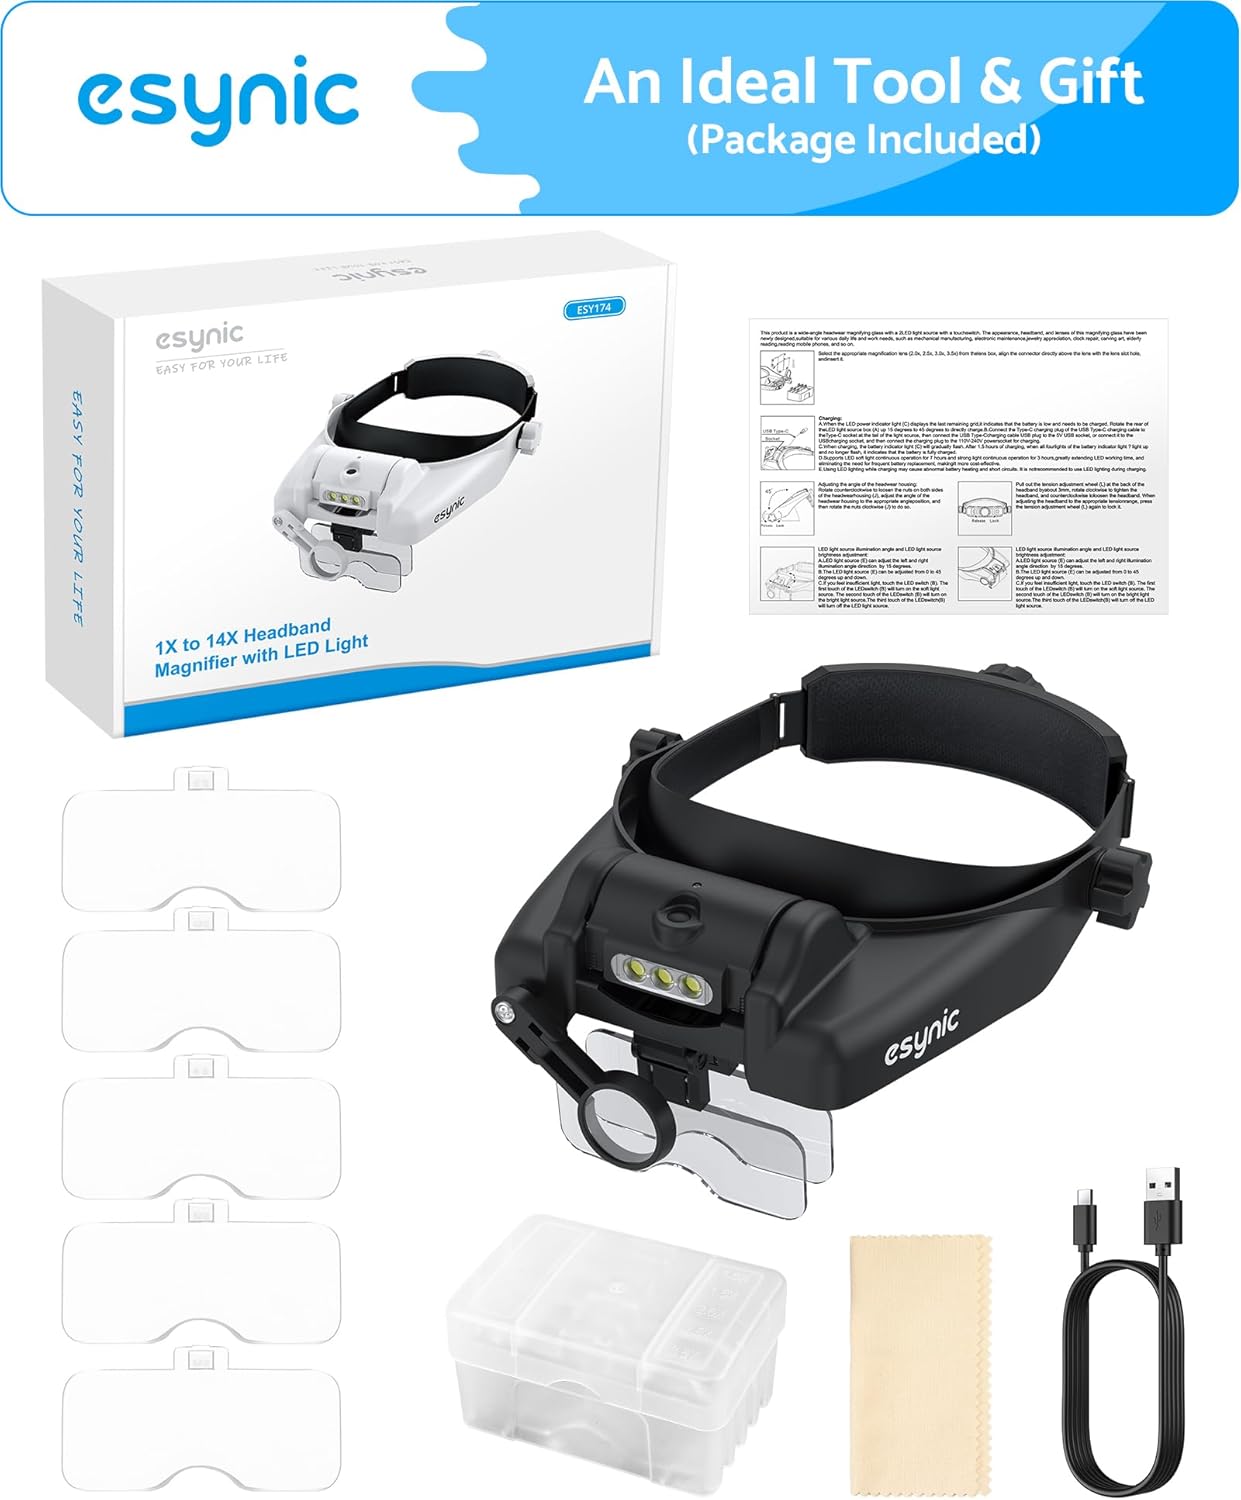
Figura 2: Tutti i componenti inclusi nella confezione.
3. Impostazione
3.1 Montaggio delle lenti
- Select the desired magnification lens(es) from the storage case.
- Align the lens with the slots on the headset's visor.
- Gently slide the lens into place until it clicks securely.
- For the 8X auxiliary lens, pivot it down into position as needed.

Figure 3: Illustration of inserting the interchangeable lenses and positioning the auxiliary lens.
3.2 Regolazione dell'archetto
- To adjust the headband tightness, pull out the knob located at the back of the headband.
- Rotate the knob to either tighten or loosen the band.
- Once the desired fit is achieved, push the knob back in to lock the adjustment.
- The side knobs allow for vertical adjustment of the visor for optimal viewangolo di ing.

Figura 4: dettagliata view of the headband adjustment mechanism.
3.3 Caricamento della batteria
The headset is powered by a rechargeable 400mAh battery. The battery compartment is detachable for convenient charging.
- To remove the battery compartment, turn it to a vertical position and pull it out from the headset.
- Connect the provided USB Type-C cable to the charging port on the battery compartment and to a power source (e.g., USB wall adapter, computer USB port).
- La spia di carica sarà rosso durante la ricarica e girare verde quando completamente carica.
- A full charge typically takes about 2 hours and provides 6-8 hours of use on low brightness.
- Once charged, reinsert the battery compartment into the headset until it clicks into place.

Figure 5: Step-by-step guide for detaching and charging the battery.
4. Istruzioni per l'uso
4.1 Indossare l'auricolare
Place the headset on your head and adjust the headband for a comfortable and secure fit. The design allows for wearing over most prescription eyeglasses.
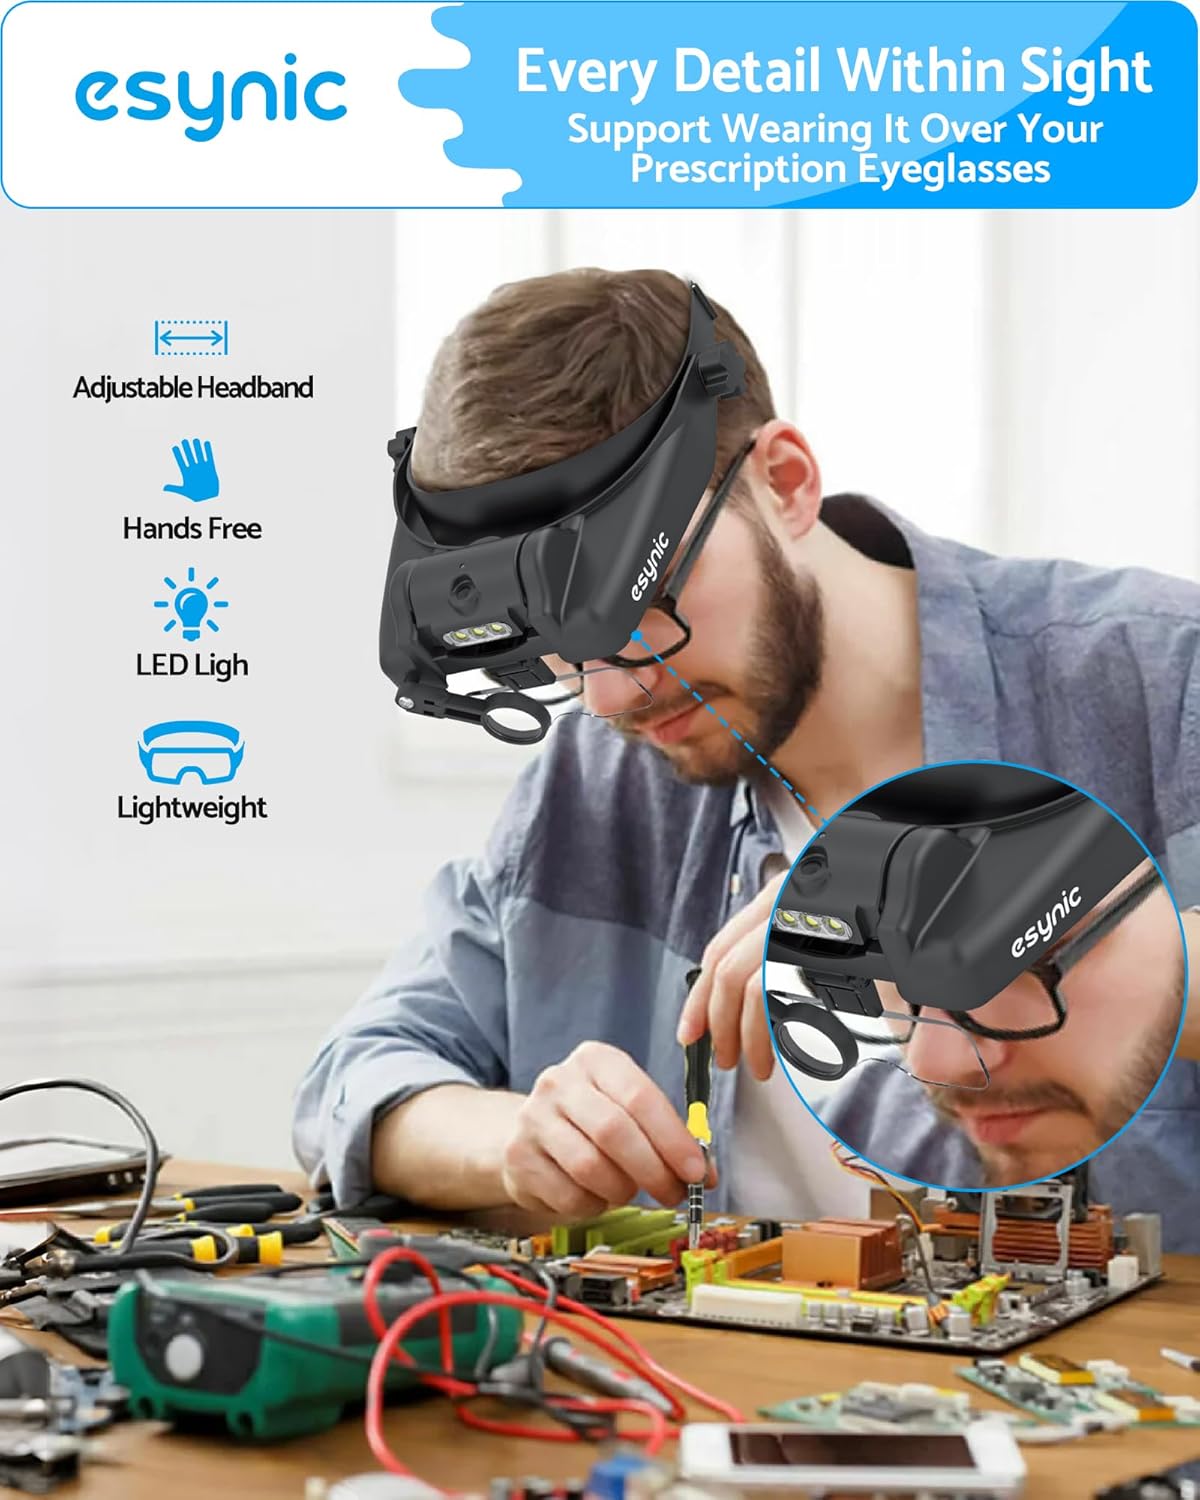
Figure 6: The headset can be comfortably worn over prescription eyeglasses.
4.2 Regolazione dell'ingrandimento
The headset comes with five primary lenses (1.0X, 1.5X, 2.0X, 2.5X, 3.5X) and an 8X auxiliary lens. You can use a single lens or combine two primary lenses for increased magnification. For example, combining a 3.5X lens with the 8X auxiliary lens can achieve up to 14X magnification. Experiment with different combinations to find the optimal magnification for your task.
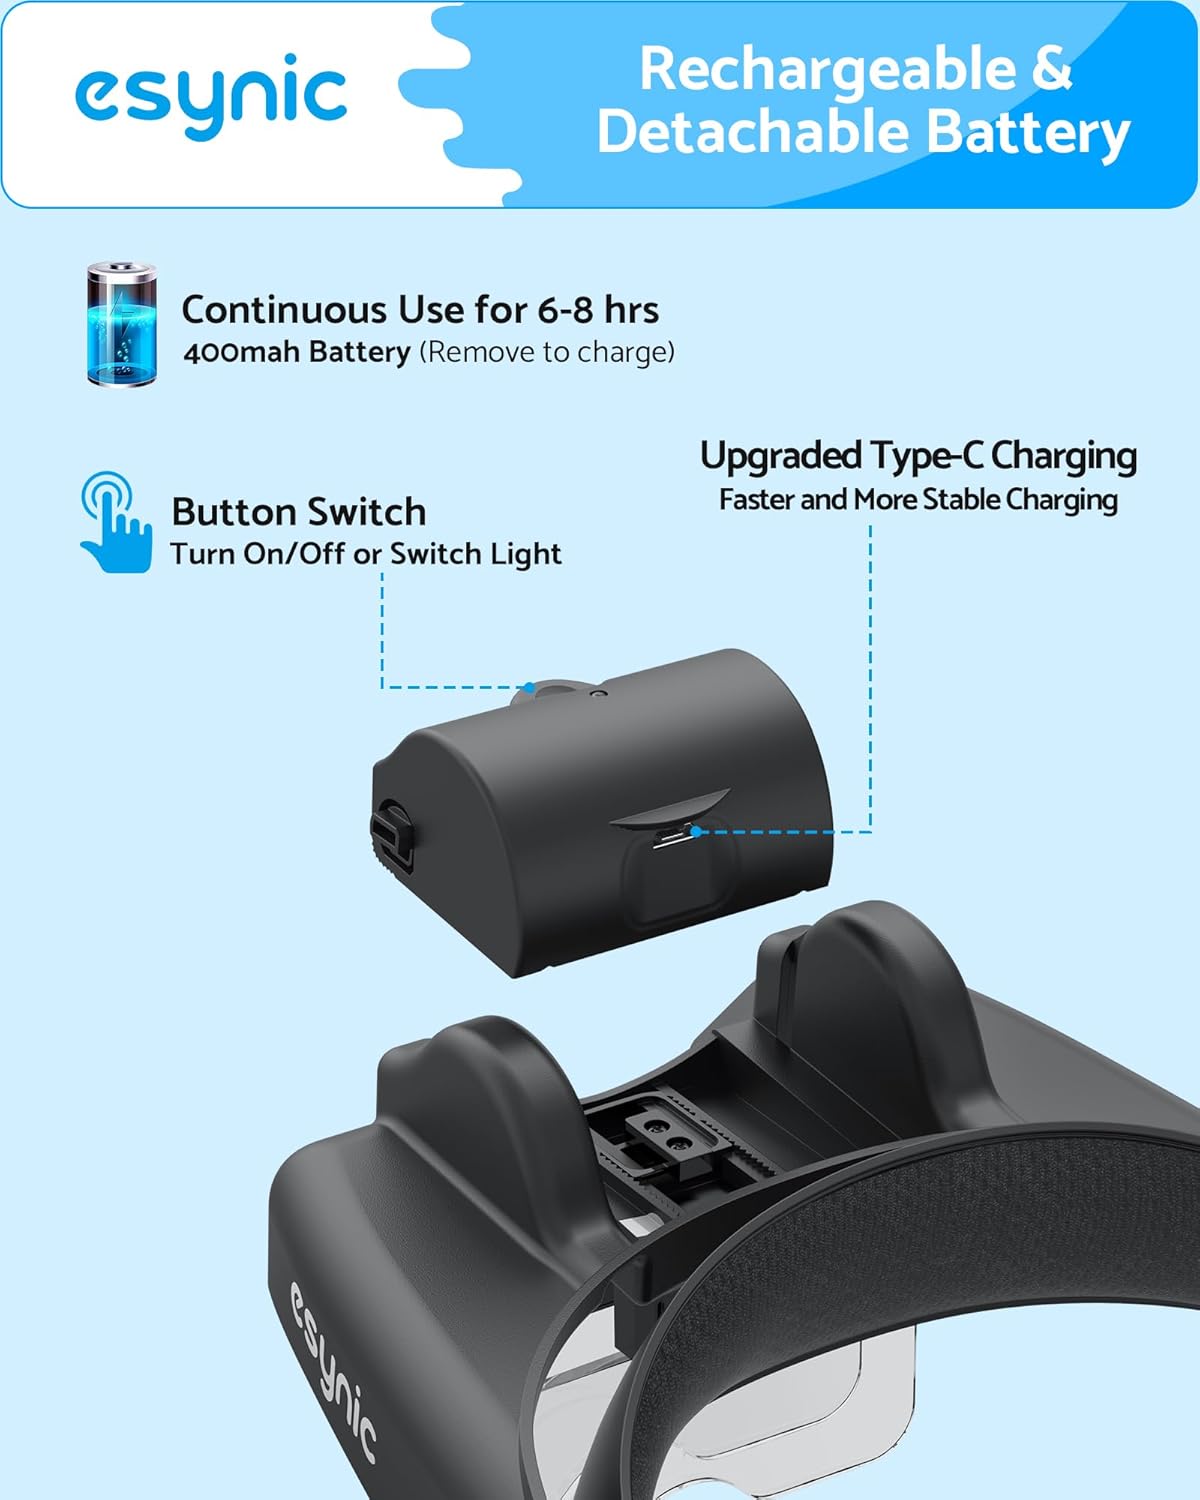
Figure 7: The five interchangeable lenses and the 8X auxiliary lens.
4.3 Utilizzo di luci LED
The headset is equipped with 3 LED lights to illuminate your workspace. These lights have two adjustable brightness levels.
- Press the power button on the top of the headset to turn the lights on.
- Press the button again to cycle through the two brightness levels.
- Press a third time to turn the lights off.
- The LED light module can be tilted to direct illumination precisely where needed.

Figure 8: Demonstrating the adjustable LED lights and brightness levels.
Video 1: Official eSynic demonstration of the Professional Headband Magnifier with Light, showcasinle sue caratteristiche e il suo utilizzo.
5. Manutenzione
5.1 Pulizia delle lenti
To maintain clear vision, regularly clean the lenses. Use the provided soft cleaning cloth. Do not use abrasive cleaners, alcohol, or harsh chemicals, as these can damage the acrylic lenses.
5.2 Cura della batteria
To prolong battery life, avoid fully discharging the battery frequently. Charge the battery when the LED lights dim or before extended periods of non-use.
5.3 Conservazione
When not in use, store the interchangeable lenses in their hard-shell case to protect them from scratches and dust. Store the headset in a clean, dry place away from direct sunlight and extreme temperatures.
6. Risoluzione Dei Problemi
- Luci LED non funzionanti: Ensure the battery is fully charged and correctly inserted into the compartment. Press the power button firmly.
- Unclear Vision: Check if the lenses are clean and free of smudges. Ensure the chosen lens(es) are securely seated. Adjust the distance between your eyes and the object being viewed.
- Headset Slipping or Uncomfortable: Re-adjust the headband tightness using the rear knob and the visor height using the side knobs until a secure and comfortable fit is achieved.
7. Specifiche
| Caratteristica | Dettaglio |
|---|---|
| Marca | eSynic |
| Modello | B0DQ8CDMPR |
| Forza di ingrandimento | Up to 14X (1.0X, 1.5X, 2.0X, 2.5X, 3.5X main lenses + 8X auxiliary lens) |
| Materiale della lente | Acrilico |
| Luci LED | 3 LEDs, 2 adjustable brightness levels |
| Batteria | 400mAh rechargeable (Type-C) |
| Durata della batteria | 6-8 hours (low brightness) |
| Peso dell'articolo | 0.62 chilogrammi |
| Colore | Nero |
8. Garanzia e supporto
For warranty information and customer support, please refer to the documentation provided with your purchase or contact eSynic directly through their official websito o rivenditore presso cui è stato acquistato il prodotto.