KOSUMOSU ACD-330
KOSUMOSU Digital Alarm Clock User Manual
Model: ACD-330
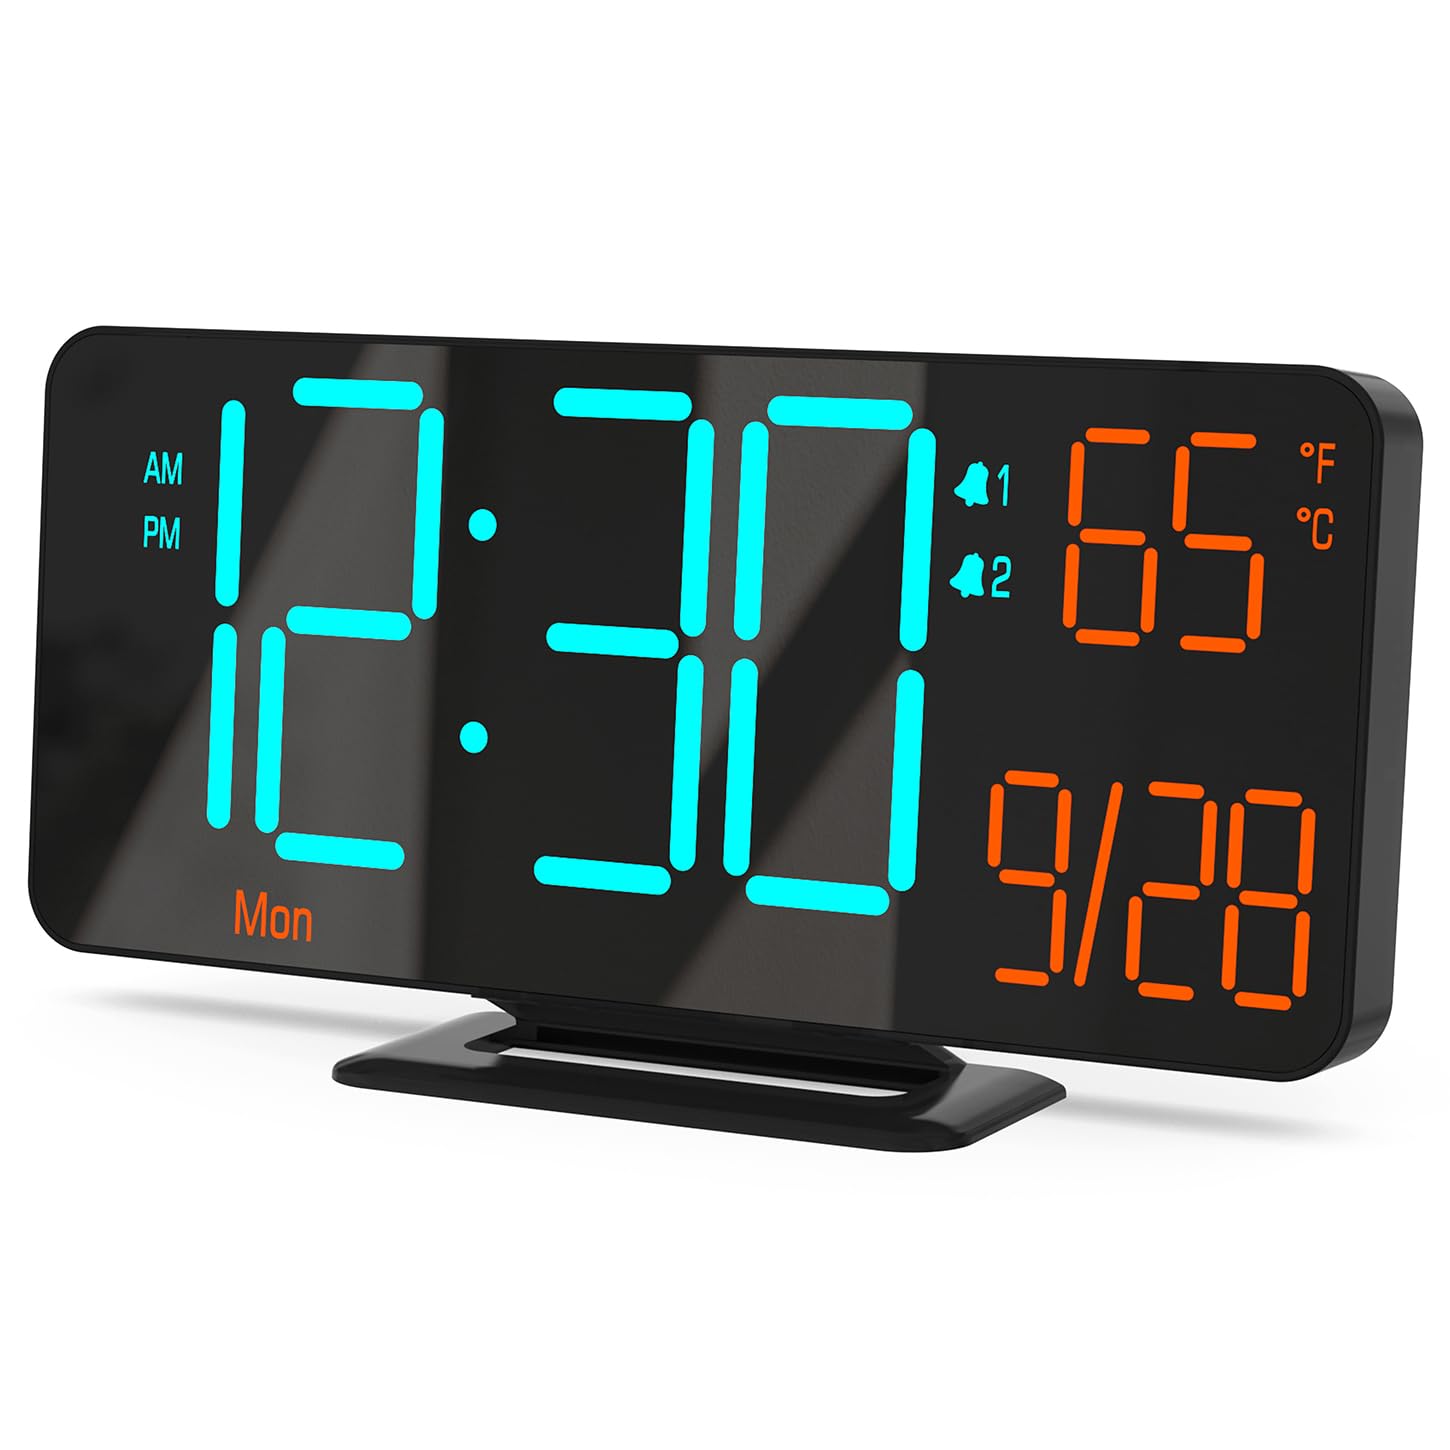
Figure 0: KOSUMOSU Digital Alarm Clock, Model ACD-330.
1. Introduzione
This user manual provides detailed instructions for the KOSUMOSU Digital Alarm Clock, Model ACD-330. Please read this manual thoroughly before operating the device to ensure proper use and to understand all features. Keep this manual for future reference.
2. Prodotto finitoview
2.1 Caratteristiche principali
- 6.7-inch LED display with cool blue and orange light digits.
- Automatic and manual dimming capabilities (High, Medium, Low, OFF, Auto).
- Dual alarm clock with snooze function (5-minute snooze).
- Selectable 12/24 hour time format.
- Displays date, day of the week, seconds, and indoor temperature (Fahrenheit/Celsius).
- USB powered (requires 5V/1A AC adapter, not included).
- Includes a button battery for time preservation during power outages.
2.2 Contenuto della confezione
- KOSUMOSU Digital Alarm Clock (Model ACD-330)
- USB Power Cable (1.5-meter)
- Lithium Metal Button Battery (pre-installed for backup)
- Manuale dell'utente (questo documento)
2.3 Diagramma del prodotto

Figura 1: Posteriore view of the alarm clock with labeled function buttons and dimensions.
- 1. Sensore di luce: For automatic dimming.
- 2. Dimming Buttons (-/+): Adjust brightness manually.
- 3. ℉/℃/Sec Button: Toggle between Fahrenheit/Celsius and display seconds.
- 4. Pulsante SET: Enter setting mode for time, date, and alarms.
- 5. Alarm 1 Set Button: Set Alarm 1.
- 6. Alarm 2 Set Button: Set Alarm 2.
- 7. Snooze Button: Attiva la funzione snooze durante una sveglia.
- 8. USB-A Power Cable Input: Connects to 5V/1A AC adapter.
- 9. Vano batteria: For backup button battery.
3. Impostazione
3.1 Collegamento di alimentazione
Connect the provided USB power cable to the USB-A input port on the back of the alarm clock. Plug the other end of the USB cable into a 5V/1A AC adapter (not included) and then into a wall outlet. The clock display will illuminate.

Figure 2: Power connection setup. An AC adapter is required and not included.
3.2 Batteria di backup
The clock includes a pre-installed Lithium Metal button battery. This battery is solely for preserving time settings during a power outage and does not power the display. Ensure the battery is properly seated in its compartment for this function to work.
4. Istruzioni per l'uso
4.1 Impostazione di data e ora
- Premere e tenere premuto il tasto IMPOSTATO per circa 3 secondi per accedere alla modalità di impostazione dell'ora. Le cifre delle ore lampeggeranno.
- Utilizzare il + or - pulsanti per regolare l'ora.
- Premere IMPOSTATO di nuovo per confermare l'ora e passare all'impostazione dei minuti. Le cifre dei minuti lampeggeranno.
- Utilizzare il + or - pulsanti per regolare i minuti.
- Premere IMPOSTATO again to confirm the minute and move to 12/24 hour format selection.
- Utilizzare il + or - buttons to select either 12-hour (with AM/PM indicator) or 24-hour format.
- Premere IMPOSTATO again to confirm the format and move to year setting.
- Continua a usare + or - to adjust the year, month, and day, pressing IMPOSTATO after each adjustment to confirm and proceed.
- Dopo aver impostato il giorno, premere IMPOSTATO un'ultima volta per uscire dalla modalità di impostazione.
4.2 Display Modes (Seconds / Temperature)
The clock can display either seconds or indoor temperature. To switch between these modes, short press the ℉/℃/Sec pulsante.
When displaying temperature, you can toggle between Fahrenheit (℉) and Celsius (℃) by pressing and holding the ℉/℃/Sec pulsante per circa 3 secondi.

Figure 3: Various display modes including temperature and seconds.
4.3 Regolazione della luminosità (oscuramento)
The clock offers both manual and automatic dimming features.
- Dimmerazione manuale: Premere brevemente il tasto + or - buttons to cycle through brightness levels: High, Medium, Low, and OFF.
- Oscuramento automatico: Premere e tenere premuto il tasto + button for approximately 3 seconds to activate or deactivate auto-dimming. When active, the light sensor on the clock will automatically adjust the display brightness based on ambient light conditions.
Figura 4: Esamples of manual and automatic dimming levels.
4.4 Impostazione degli allarmi (allarme 1 e allarme 2)
The clock features two independent alarms. The setting process is identical for both.
- Premere e tenere premuto il tasto Alarm 1 Set or Alarm 2 Set per circa 3 secondi per accedere alla modalità di impostazione della sveglia. Le cifre dell'ora della sveglia lampeggeranno.
- Utilizzare il + or - pulsanti per regolare l'ora della sveglia.
- Premere il rispettivo Allarme impostato button again to confirm the hour and move to minute setting. The alarm minute digits will flash.
- Utilizzare il + or - pulsanti per regolare i minuti della sveglia.
- Premere il rispettivo Allarme impostato button again to confirm the minute and select the alarm cycle:
- 1-5: Weekdays (Monday-Friday)
- 1-7: Everyday (Monday-Sunday)
- 6-7: Weekends (Saturday-Sunday)
- Premere il rispettivo Allarme impostato button one last time to save the alarm settings and exit.
4.5 Attivazione/disattivazione degli allarmi
To turn an alarm ON or OFF, short press the Alarm 1 Set or Alarm 2 Set button. An alarm icon (1 or 2) will appear on the display when the alarm is active.
4.6 Funzione posticipa
Quando suona un allarme, premere il tasto grande POSTICIPARE button on the top of the clock to activate the snooze function. The alarm will pause for 5 minutes and then sound again. The alarm duration is approximately 5 minutes if not snoozed or turned off.
To turn off a sounding alarm completely, press any other button on the back of the clock (e.g., SET, +, -). The alarm will reset for the next scheduled activation.

Figure 5: Illustration of the snooze function.
5. Manutenzione
- Pulire la superficie dell'orologio con un panno morbido e asciutto. Non utilizzare detergenti abrasivi o solventi.
- Evitare di esporre l'orologio a temperature estreme, alla luce solare diretta o a elevata umidità.
- Do not disassemble the clock. This will void the warranty.
- If the backup battery needs replacement, use a compatible Lithium Metal button battery.
6. Risoluzione Dei Problemi
| Problema | Possibile causa | Soluzione |
|---|---|---|
| Il display è vuoto. | Nessuna alimentazione elettrica. | Ensure the USB cable is securely connected to a 5V/1A AC adapter and the adapter is plugged into a working power outlet. |
| L'ora è errata dopo lo spegnimentotage. | La batteria di backup è scarica o mancante. | Check or replace the Lithium Metal button battery. Reset the time manually. |
| L'allarme non suona. | L'allarme non è attivato o è impostato in modo errato. | Ensure the alarm icon (1 or 2) is visible on the display. Verify alarm time and cycle settings. |
| Il display è troppo luminoso/scurato. | Manual or auto-dimming settings. | Adjust brightness manually using +/- buttons or toggle auto-dimming by holding the + button. |
| La lettura della temperatura sembra imprecisa. | Clock placed near heat source/vent. | Spostare l'orologio in un'area con temperatura ambiente stabile. |
7. Specifiche
| Modello: | ACD-330 |
| Tipo di visualizzazione: | GUIDATO |
| Dimensioni dello schermo: | 6.7 pollici |
| Potenza in ingresso: | 5V/1A DC (USB powered) |
| Batteria di backup: | 1 x litio metallico (inclusi) |
| Dimensioni del prodotto: | 16.26 x 3.81 x 8.38 cm (6.4 x 1.5 x 3.3 pollici) |
| Peso del prodotto: | 131.54 g (0.29 libbre) |
| Caratteristiche speciali: | Auto Dimmable, Calendar Display, Dual Alarm, Snooze, Temperature Display (℉/℃) |
8. Garanzia e supporto
KOSUMOSU offers a 2-year warranty for this product. If you encounter any problems related to quality or usage, please contact KOSUMOSU customer service for assistance. Contact information can typically be found on the product packaging or the retailer's websito in cui è stato acquistato il prodotto.
For further support or inquiries, please refer to the official KOSUMOSU websito o contattare il loro team di assistenza clienti.