1. Introduzione
This manual provides detailed instructions for the setup, operation, and maintenance of your JoFomp 17.3" Large Digital Wall Clock. Please read this manual thoroughly before use to ensure proper functionality and longevity of the product.
2. Informazioni sulla sicurezza
- Ensure the clock is connected to a stable power source (5V/2A adapter included).
- Non esporre il dispositivo a temperature estreme, alla luce solare diretta o a elevata umidità.
- Tenere fuori dalla portata dei bambini.
- Non tentare di smontare o riparare da soli il dispositivo. Contatta l'assistenza clienti per assistenza.
- Il telecomando richiede 2 batterie AAA (non incluse).
- A 1 AAA battery (not included) is required for the memory function to retain settings during power outages.
3. Contenuto della confezione
Verificare che tutti gli articoli siano presenti nel pacco:
- JoFomp 17.3" Digital Wall Clock
- Telecomando
- Adattatore di alimentazione CC 5V/1A
- Cavo di alimentazione
- Mounting Hooks (2)
- Mounting Template Ruler
- Manuale dell'utente (questo documento)

Figura 3.1: Accessori inclusi e unità principale.
4. Prodotto finitoview
The JoFomp 17.3" Large Digital Wall Clock features a clear LED display and multiple functions for convenience.

Figure 4.1: Front display of the digital wall clock.
4.1 Funzionalità di visualizzazione
- Visualizzazione dell'ora: Large 17.3" LED digits.
- Visualizzazione della data: Mese e giorno.
- Giorno della settimana: Indicated by illuminated text (Mon-Sun).
- Temperatura: Displays in Celsius or Fahrenheit.
- Umidità: Displays relative humidity percentage.
- Doppi allarmi: Due impostazioni di allarme indipendenti.
- Indicatore DST: Daylight Saving Time status.

Figure 4.2: Labeled display functions.
4.2 Back Panel and Buttons
The back of the clock houses control buttons and connection ports.

Figure 4.3: Back panel with labeled components.
- Pulsanti di impostazione: Five buttons for manual adjustments (Light, SET, +, -, Alarm).
- Vano batteria di memoria: For 1 AAA battery (not included) to retain settings.
- Porta di alimentazione: Per collegare l'adattatore di alimentazione.
- Fori di montaggio: Per installazione a parete.
5. Impostazione
5.1 Collegamento di alimentazione
- Connect the power cord to the clock's power port.
- Plug the 5V/2A power adapter into a standard electrical outlet. The clock will power on and display.
Nota: The clock requires continuous power to operate. It is not battery-powered for primary display.
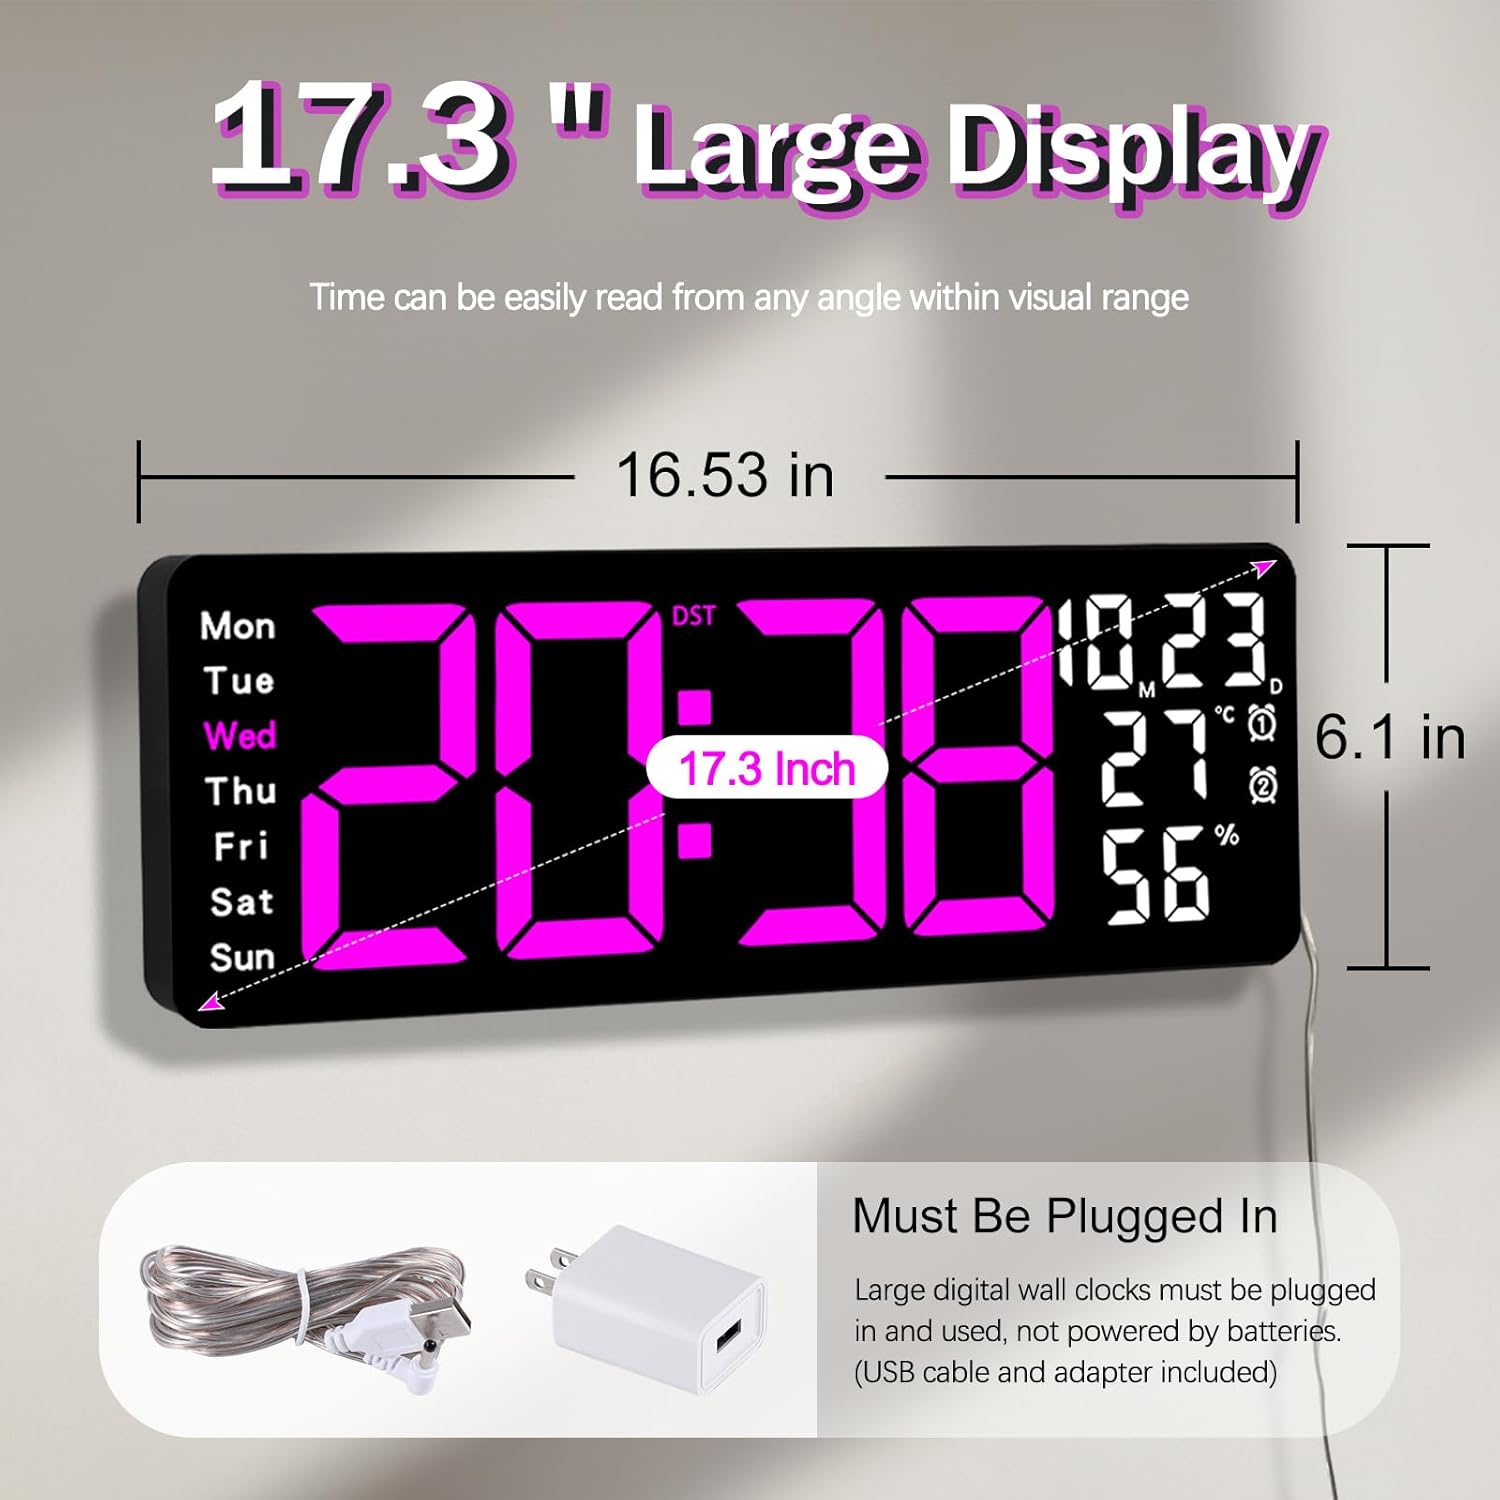
Figure 5.1: Power connection and dimensions.
5.2 Memory Battery Installation (Optional)
Per conservare l'ora e le impostazioni durante un'interruzione di correntetage, install a 1 AAA battery (not included) into the memory battery compartment on the back of the clock.
- Locate the memory battery compartment on the back of the clock.
- Aprire il coperchio del vano.
- Inserire una batteria AAA da 1.5 V, assicurandosi della corretta polarità (+/-).
- Chiudere saldamente il coperchio del vano.
5.3 Montaggio a parete
Use the included mounting template ruler and hooks for easy wall installation.
- Determine the desired location for your clock.
- Place the mounting template ruler on the wall at the desired height.
- Mark the positions for the mounting hooks according to the ruler's indications.
- Install the mounting hooks into the wall at the marked positions.
- Carefully hang the clock onto the installed hooks, ensuring it is level and secure.
6. Istruzioni per l'uso
The clock can be operated using either the remote control or the buttons on the back.
6.1 Impostazione dell'ora e della data
Use the remote control or the "SET" button on the back of the clock.
- Premere il tasto IMPOSTATO button (on remote or back of clock) to enter setting mode.
- Utilizzare il + E - pulsanti per regolare il valore lampeggiante (ad esempio, ora, minuto, anno, mese, giorno).
- Premere IMPOSTATO again to confirm the current setting and move to the next parameter.
- Repeat until all settings are configured.
6.2 12/24 Hour Format Conversion
To switch between 12-hour and 24-hour time formats:
- Premere il tasto dedicato 12/24H pulsante sul telecomando.
- Alternatively, during time setting, the format option will appear.

Figure 6.1: 12/24H format conversion.
6.3 Conversione delle unità di temperatura (°C/°F)
Per passare tra le unità di temperatura Celsius e Fahrenheit:
- Premere il tasto ° C / ° F pulsante sul telecomando.
6.4 Alarm Setting (Dual Alarms)
L'orologio supporta due sveglie indipendenti.
- Premere il tasto ALLARME button on the remote control or the back of the clock.
- Utilizzo + E - per impostare l'ora della sveglia desiderata.
- Premere ALLARME again to confirm and move to the next alarm or exit.
- To activate/deactivate an alarm, press the corresponding alarm button (e.g., AL1 or AL2) sul telecomando.
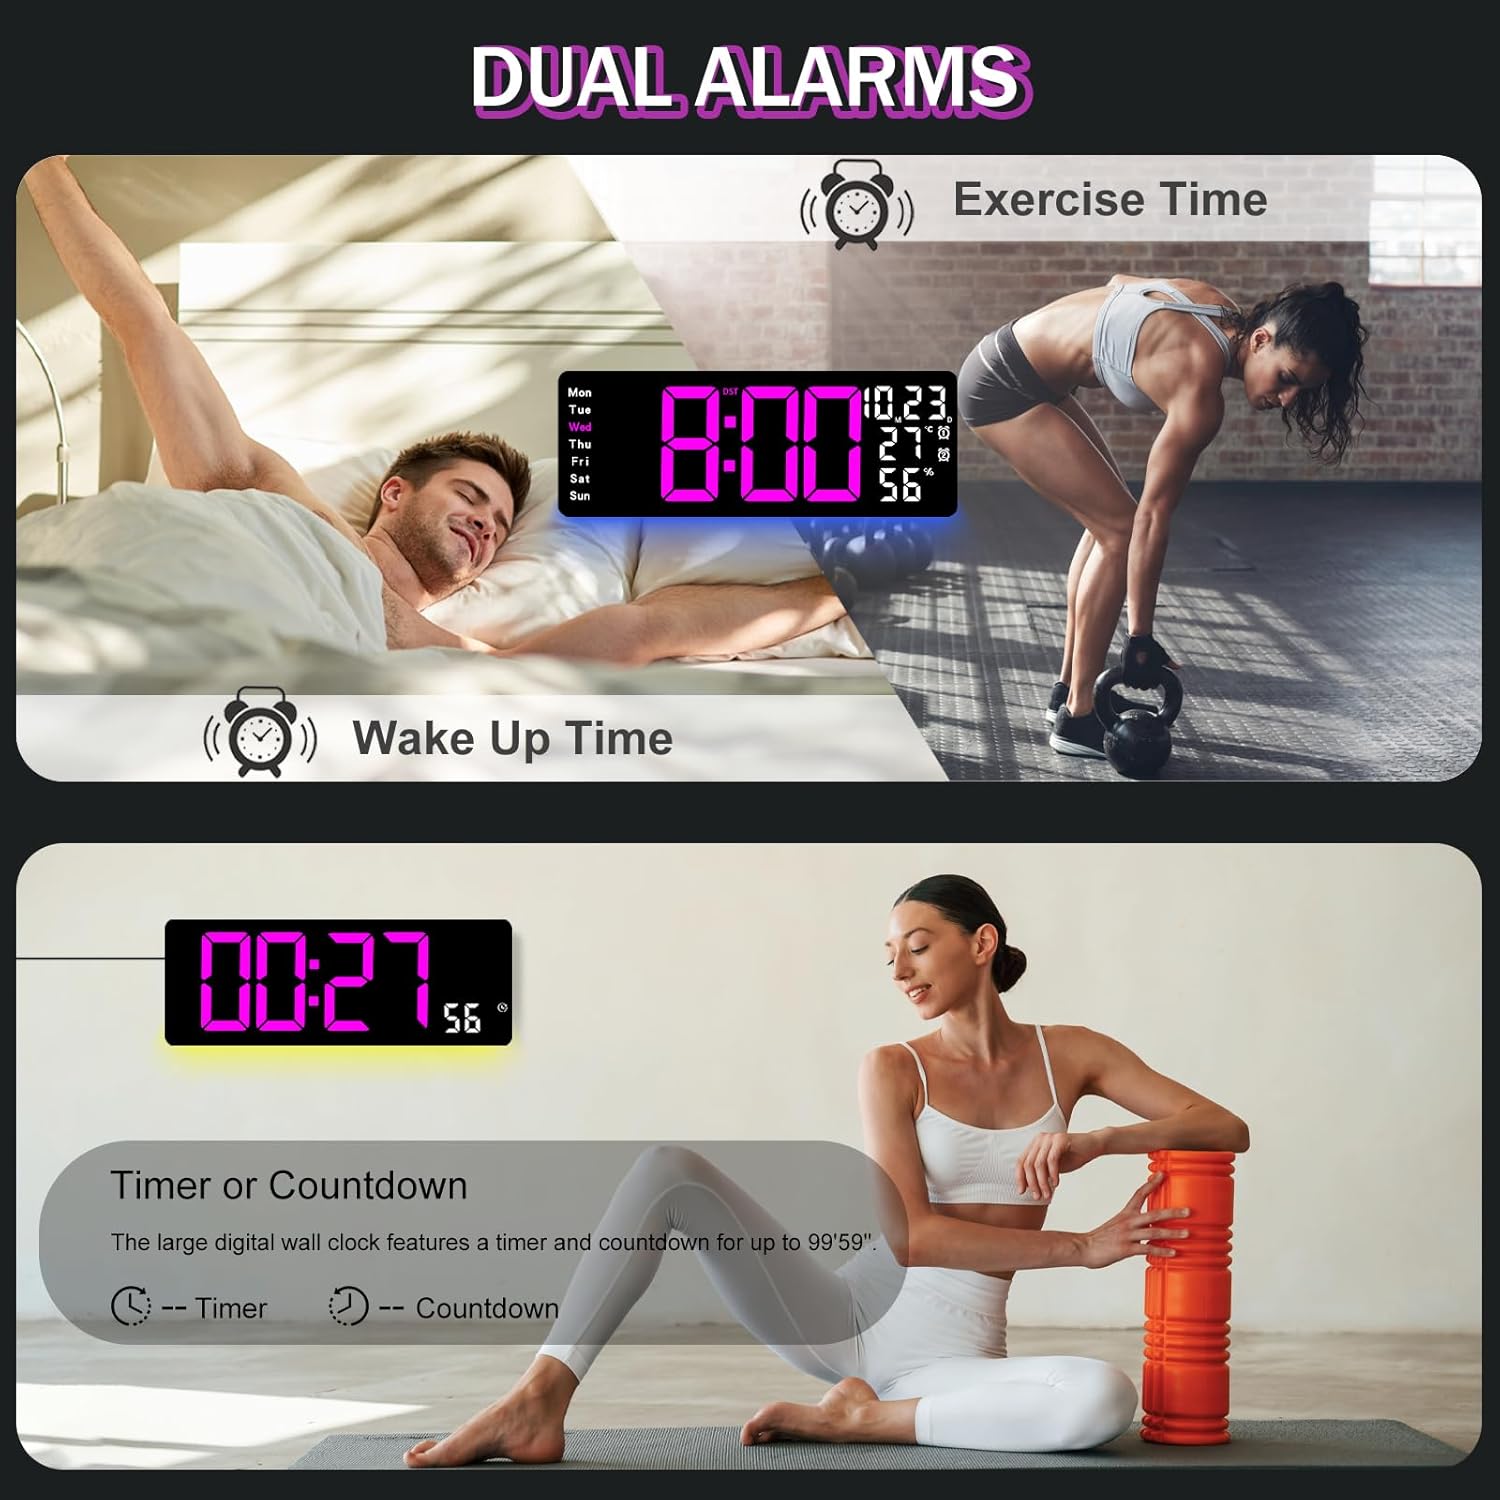
Figure 6.2: Dual alarm and timer functions.
6.5 Regolazione della luminosità
The clock offers 10 levels of brightness, adjustable manually or automatically.
- Luminosità automatica: The built-in light sensor adjusts brightness based on ambient light. Activate this mode by pressing the AUTO pulsante sul telecomando.
- Luminosità manuale: Premere il tasto LUMINOSITÀ button on the remote, then use + E - to select one of the 10 levels.

Figure 6.3: Custom and auto-brightness settings.

Figure 6.4: Brightness regulator illustration.
6.6 Caratteristiche della luce ambientale
The clock includes a night light feature at the bottom with multiple color options.
- Premere il tasto LEGGERO button on the remote control or the back of the clock to cycle through 8 fixed colors and 1 multi-color mode.
- In multi-color mode, the colors automatically convert. Press OK to fix a favorite color.
- Adjust the brightness of the ambient light using the + E - buttons when the ambient light is active.

Figure 6.5: Multiple ambient night light options.

Figure 6.6: 9 color ambient light options.
6.7 Funzione timer e conto alla rovescia
The clock features a timer (count-up) and countdown function up to 99 minutes and 59 seconds.
- Premere il tasto TIMER pulsante sul telecomando.
- Utilizzo + E - to set the desired time for countdown.
- Premere AVVIO/ARRESTO to begin or pause the timer/countdown.
- Premere RESET per cancellare il timer.

Figure 6.7: Timing function (count-up/countdown).
Video 6.1: Demonstration of multi-functional features including night light change, brightness control, count-up, and countdown. This video also shows the time, date, day, alarm clock, temperature, and humidity displayed on the same screen, along with 12/24 hour conversion, Celsius/Fahrenheit conversion, and DST enablement. The back design and buttons are also briefly shown.
6.8 Ora legale (DST)
If DST is observed in your region, you can enable or disable it.
- Premere a lungo il tasto - button on the remote control to enable or disable DST. The DST indicator will appear/disappear on the display.

Figure 6.8: Enabling and disabling Daylight Saving Time.

Figure 6.9: Daylight Saving Time (DST) functionality.
6.9 Utilizzo del telecomando
The remote control provides convenient access to all clock functions without needing to reach the clock directly.

Figure 6.10: Remote control and its functions.

Figure 6.11: Remote control in use.
- Ensure the remote control has 2 AAA batteries installed (not included).
- Point the remote control directly at the clock for optimal response.
- Each button on the remote corresponds to a specific function as described in this manual.
7. Manutenzione
- Clean the clock's display and body with a soft, dry cloth. Avoid abrasive cleaners or solvents.
- Ensure the power adapter and cord are free from damage.
- Replace the memory battery annually to ensure settings are retained during power interruptions.
8. Risoluzione Dei Problemi
| Problema | Possibile causa | Soluzione |
|---|---|---|
| Il display dell'orologio è spento. | Nessuna alimentazione elettrica. | Check if the power adapter is securely plugged into the clock and the outlet. Ensure the outlet is functional. |
| Telecomando non funzionante. | Low or dead batteries in remote; obstruction; remote out of range. | Replace remote batteries (2 AAA). Ensure no obstructions between remote and clock. Point directly at the clock within effective range. |
| Impostazioni perse dopo lo spegnimentotage. | No memory battery or dead memory battery. | Install a fresh 1.5V AAA battery in the memory compartment. |
| Lettura errata della temperatura/umidità. | Sensor interference or placement. | Ensure the clock is not placed near heat sources, direct sunlight, or in areas with extreme drafts. Allow time for the sensor to stabilize. |
| Ambient light not changing colors. | Stuck in fixed color mode. | Press the LIGHT button on the remote to cycle through modes. If stuck on a fixed color, press the OK button to release it from fixed mode. |
9. Specifiche
| Caratteristica | Dettaglio |
|---|---|
| Marca | JoFomp |
| Numero di modello | 6669 |
| Tipo di visualizzazione | LED digitale |
| Dimensioni dello schermo | 17.3 pollici |
| Dimensioni del prodotto | 16.5"L x 6.7"A |
| Fonte di alimentazione | Corded Electric (5V/2A adapter included) |
| Batteria di memoria | 1 x AAA (non incluso) |
| Livelli di luminosità | 10 (Auto/Manual) |
| Colori della luce ambientale | 8 Fixed + 1 Multi-color |
| Caratteristiche speciali | Large Display, Adjustable Brightness, Temperature Display, Humidity Display, Dual Alarms, Timer, Countdown, DST, Remote Control |
| Tipo di montaggio | Montaggio a parete |
| Peso dell'articolo | 1.95 libbre |
10. Garanzia e supporto
JoFomp products are designed for reliability and performance. For warranty information or technical support, please refer to the contact details provided with your purchase or visit the official JoFomp websito. Conserva la ricevuta d'acquisto come prova d'acquisto.