Introduzione
This manual provides detailed instructions for the safe and efficient operation of your CREWORKS 40x50 cm Heat Press Machine. This machine is designed for transferring designs onto various materials such as T-shirts, pillowcases, mouse pads, tote bags, masks, and backpacks using heat and pressure. Please read this manual thoroughly before use and keep it for future reference.
Istruzioni di sicurezza
- Utilizzare sempre la pressa a caldo su una superficie stabile e resistente al calore.
- Durante il funzionamento, tenere le mani e il corpo lontani dalla piastra riscaldante per evitare ustioni.
- Ensure proper ventilation in the work area to dissipate any fumes from materials.
- Non lasciare la macchina incustodita mentre è accesa o in fase di riscaldamento.
- Scollegare la macchina dalla presa di corrente quando non è in uso o prima di pulirla/manutenerla.
- Non utilizzare la macchina vicino all'acqua o in damp condizioni.
- The machine features an automatic shut-off after 30 minutes of inactivity for safety.
- The rubber-coated handle helps prevent accidental burns. Always use caution.
Prodotto finitoview
Familiarize yourself with the components of your heat press machine.
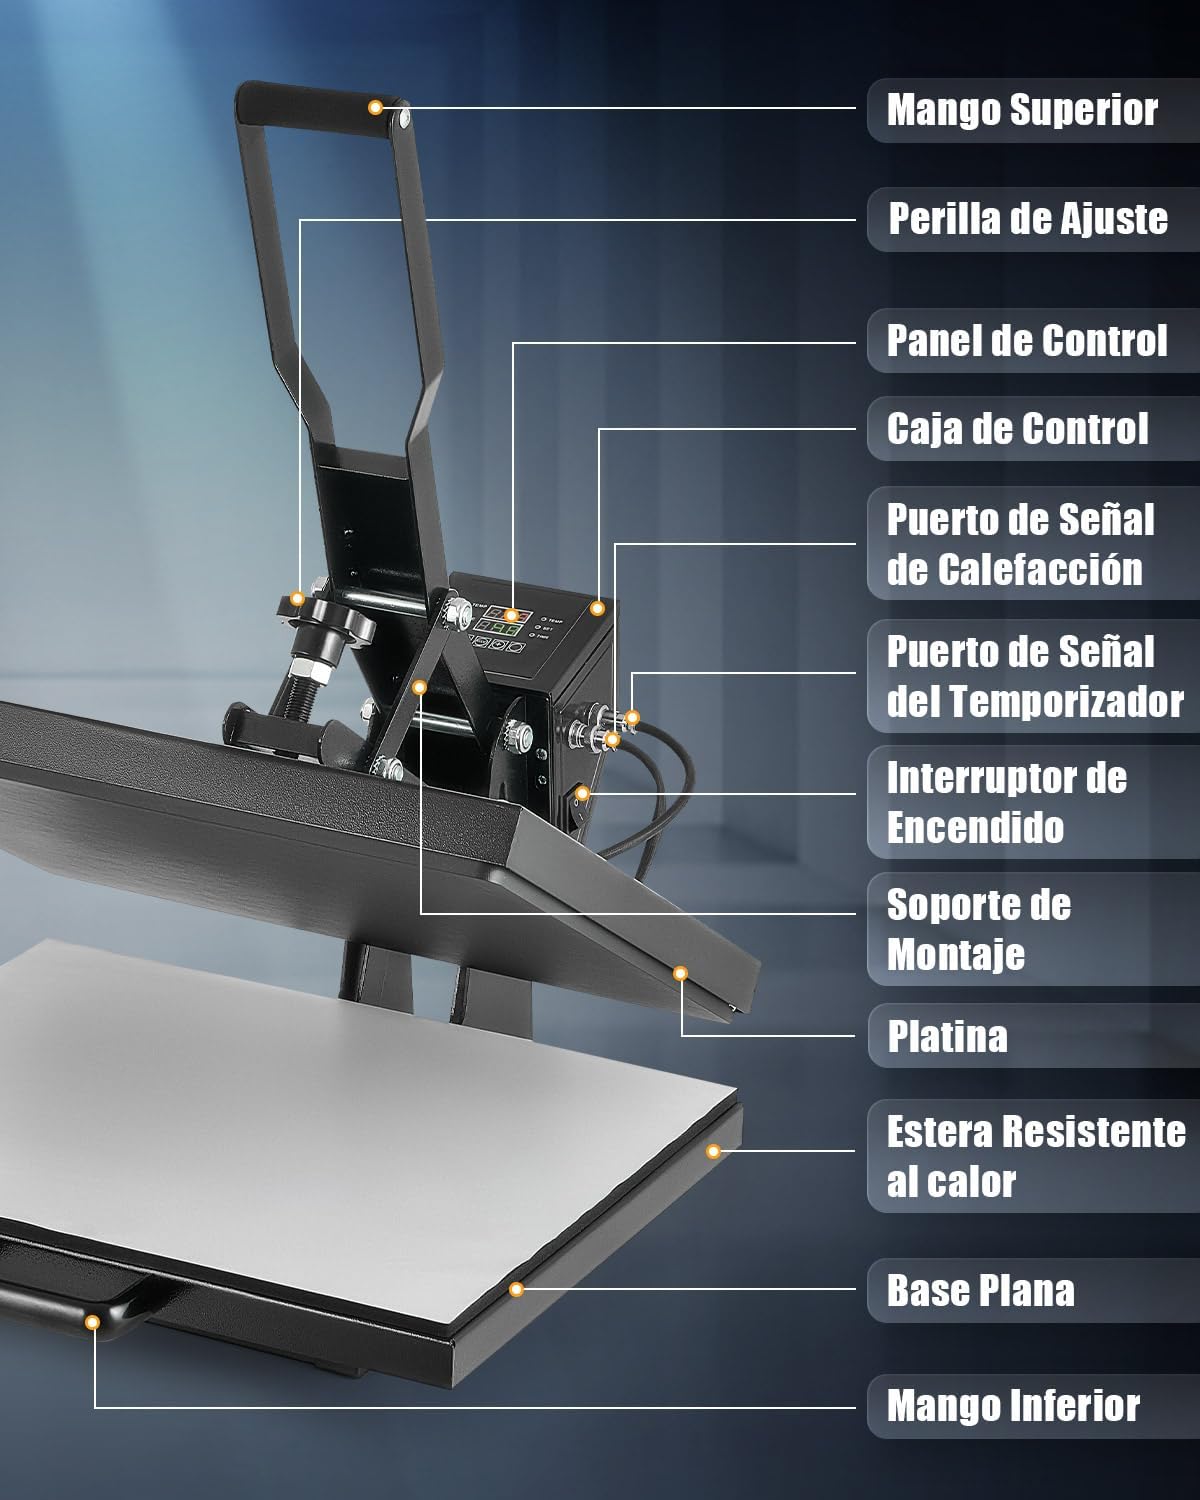
The machine features a top handle for operation, an adjustment knob for pressure, a digital control panel for temperature and time, and a sliding flat base for easy material placement.
Impostare
- Unpack the heat press machine and all its components.
- Place the machine on a sturdy, level, and heat-resistant surface. Ensure there is adequate space around the machine for safe operation.
- Collegare il cavo di alimentazione a una presa elettrica con messa a terra.
- Assicurarsi che l'interruttore di alimentazione sia in posizione OFF prima di collegarlo.
Istruzioni per l'uso
1. Accensione e impostazioni iniziali
Turn on the machine using the power switch. The digital control panel will illuminate.
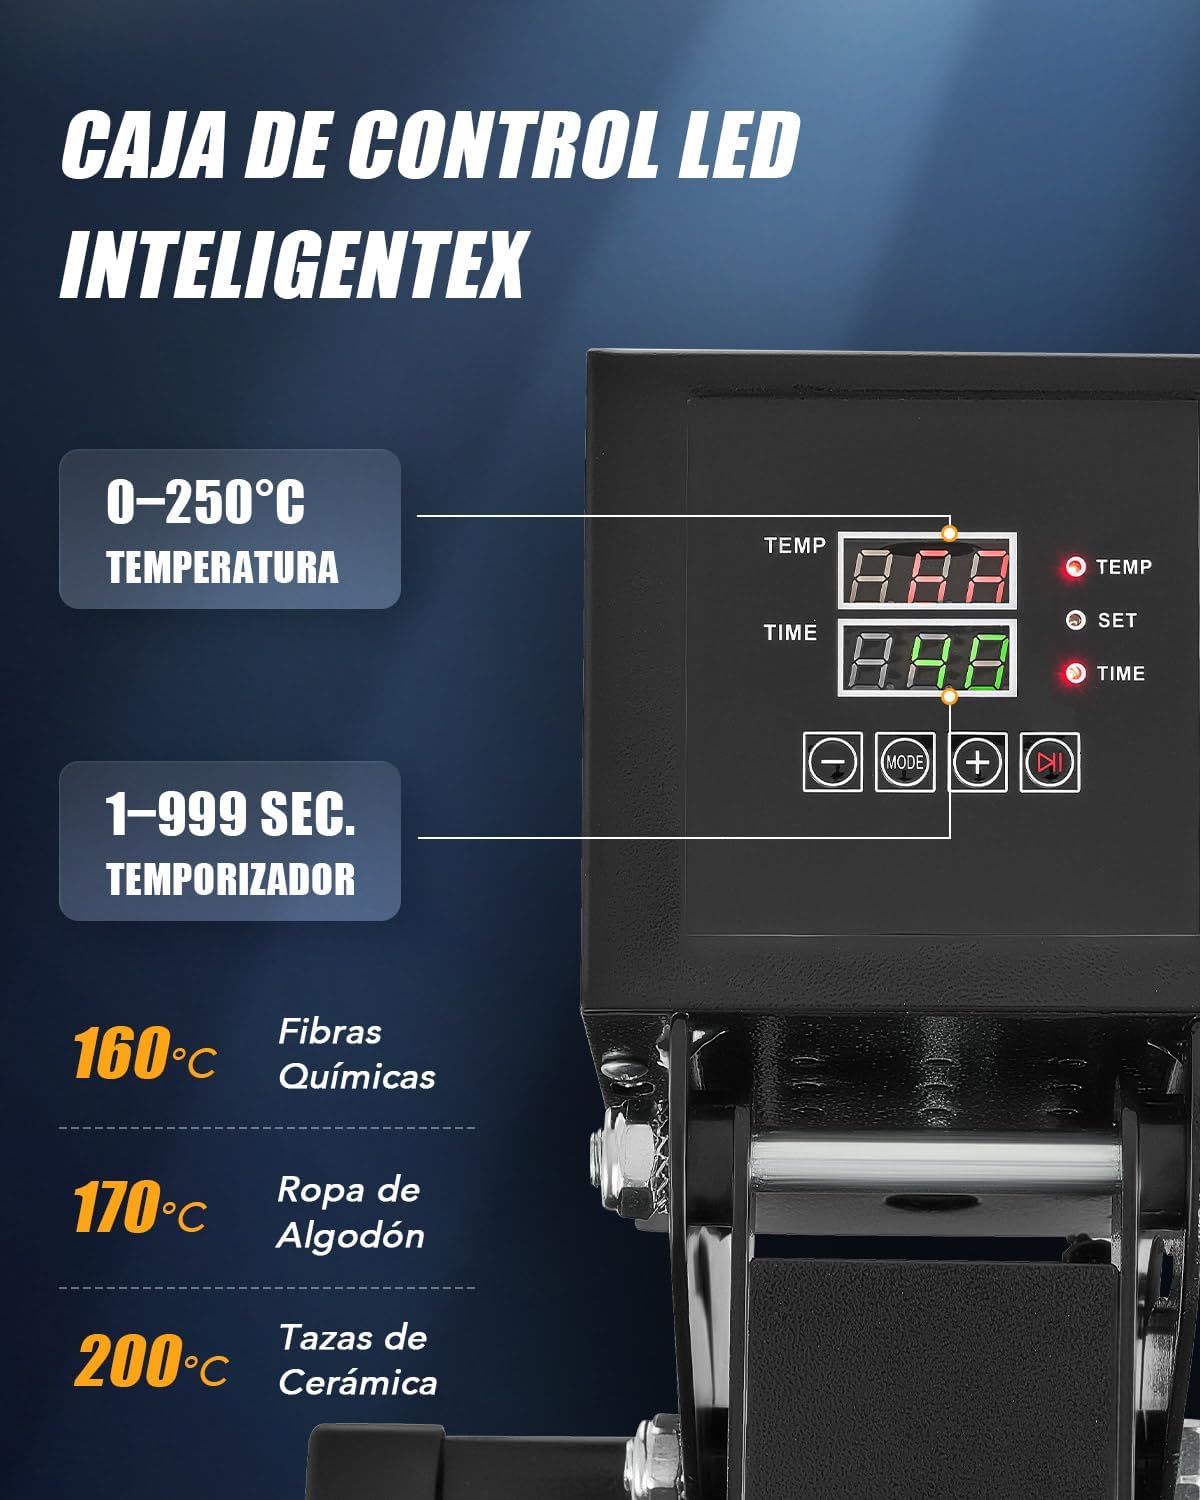
- Regolazione della temperatura: Press the "SET" button, then use the "+" and "-" buttons to set the desired temperature (up to 250°C / 480°F). Press "SET" again to confirm.
- Regolazione dell'ora: Press the "MODE" button, then use the "+" and "-" buttons to set the desired time (up to 999 seconds). Press "MODE" again to confirm.
- The machine will begin heating to the set temperature.
2. Regolazione della pressione
The pressure can be adjusted using the knob located on top of the heating platen assembly.

- Turn the adjustment knob clockwise for more pressure and counter-clockwise for less pressure.
- Test the pressure on a scrap piece of material before applying your final design.
3. Processo di trasferimento del calore
- Once the machine reaches the set temperature, pull out the flat base using the bottom handle.
- Place your material (e.g., T-shirt) onto the heat-resistant mat on the flat base. Ensure it is smooth and free of wrinkles.
- Position your transfer design (e.g., DTF, sublimation paper) onto the material.
- Slide the flat base back into position under the heating platen.
- Lower the top handle to bring the heating platen down onto the material. The timer will start automatically.
- When the timer alarms, lift the top handle to release the pressure.
- Pull out the flat base and carefully remove the transferred item. Allow it to cool before handling further, especially for "cold peel" transfers.

The dual heating tubes ensure uniform heat distribution across the platen for consistent transfer results.

Applicazioni versatili
This heat press machine is suitable for a wide range of items beyond just T-shirts.

Manutenzione
- Scollegare sempre la macchina e lasciarla raffreddare completamente prima di pulirla.
- Wipe the heating platen with a soft, dry cloth. For stubborn residue, use a specialized platen cleaner.
- Keep the control panel clean and free of dust.
- Regularly check all connections and moving parts for wear and tear.
- Conservare la macchina in un ambiente asciutto e privo di polvere.
Risoluzione dei problemi
| Problema | Possibile causa | Soluzione |
|---|---|---|
| La macchina non si accende. | Cavo di alimentazione non collegato correttamente; Interruttore di alimentazione spento; Nessuna corrente dalla presa. | Controllare il collegamento del cavo di alimentazione; assicurarsi che l'interruttore di alimentazione sia su ON; testare la presa con un altro dispositivo. |
| Trasferimento di calore non uniforme. | Uneven pressure; Material not flat; Heating element issue. | Adjust pressure knob; Ensure material is smooth; Contact support if heating element is suspected. |
| Design not adhering properly. | Incorrect temperature; Insufficient time; Insufficient pressure; Wrong transfer material. | Verify temperature and time settings; Increase pressure; Ensure correct transfer material for fabric. |
| La macchina emette segnali acustici continui. | Timer alarm; Error code. | Acknowledge timer alarm; Refer to control panel display for error codes and consult support if needed. |
Specifiche
- Numero modello: HPMES2024
- Marca: EQUIPAGGI
- Platen Size: Dimensioni: 40 x 50 cm
- Energia: 2000 Watt
- Temperatura massima: 250°C (480°F)
- Intervallo timer: 1-999 secondi
- Tipo di riscaldamento: Dual Heating Tubes
- Spegnimento automatico: Dopo 30 minuti di inattività
Video ufficiali dei prodotti
Watch these official videos for visual guidance on using your CREWORKS Heat Press Machine.
Prodotto finitoview and Operation (0:36)
Questo video fornisce una rapida panoramicaview of the CREWORKS Heat Press Machine and demonstrates basic operational steps.
Heat Transfer Demonstration (1:04)
A detailed demonstration of the heat transfer process, showing how to place materials and apply designs.
Features and Benefits (0:54)
This video highlights the key features of the heat press, including the digital control and dual heating elements.
Garanzia e supporto
For warranty information and customer support, please refer to the documentation included with your purchase or contact CREWORKS customer service directly. Keep your purchase receipt as proof of purchase.
For further assistance, please visit the official CREWORKS websito o contattare il team di supporto tramite le informazioni di contatto fornite nella confezione del prodotto.