1. Introduzione
Thank you for choosing the Katalic Automatic Cat Feeder APF01. This device is designed to provide scheduled meals for up to two cats, ensuring consistent feeding habits and convenience for pet owners. Please read this manual thoroughly before operating the feeder to ensure proper use and maintenance.
2. Prodotto finitoview e Caratteristiche
The Katalic APF01 is an automatic pet feeder equipped with features to enhance your pet's feeding experience and simplify your routine.
- Dual Feeding System: Designed with a meal divider and two stainless steel bowls, allowing two cats to eat simultaneously without conflict.
- Anti-Jam Design: Engineered to prevent food blockages, ensuring consistent food dispensing.
- Easy-to-Clean Components: Removable parts facilitate thorough cleaning and hygiene.
- Anti-Grain Spoilage: Features designed to maintain food freshness.
- Grande capacità: Holds approximately 20 cups of dry pet food, reducing the frequency of refills.
- Stable and Anti-Fall Measures: Constructed for stability to prevent accidental tipping.
- Opzioni doppia alimentazione: Operates via AC power adapter or backup batteries (not included) for uninterrupted feeding during power outages.
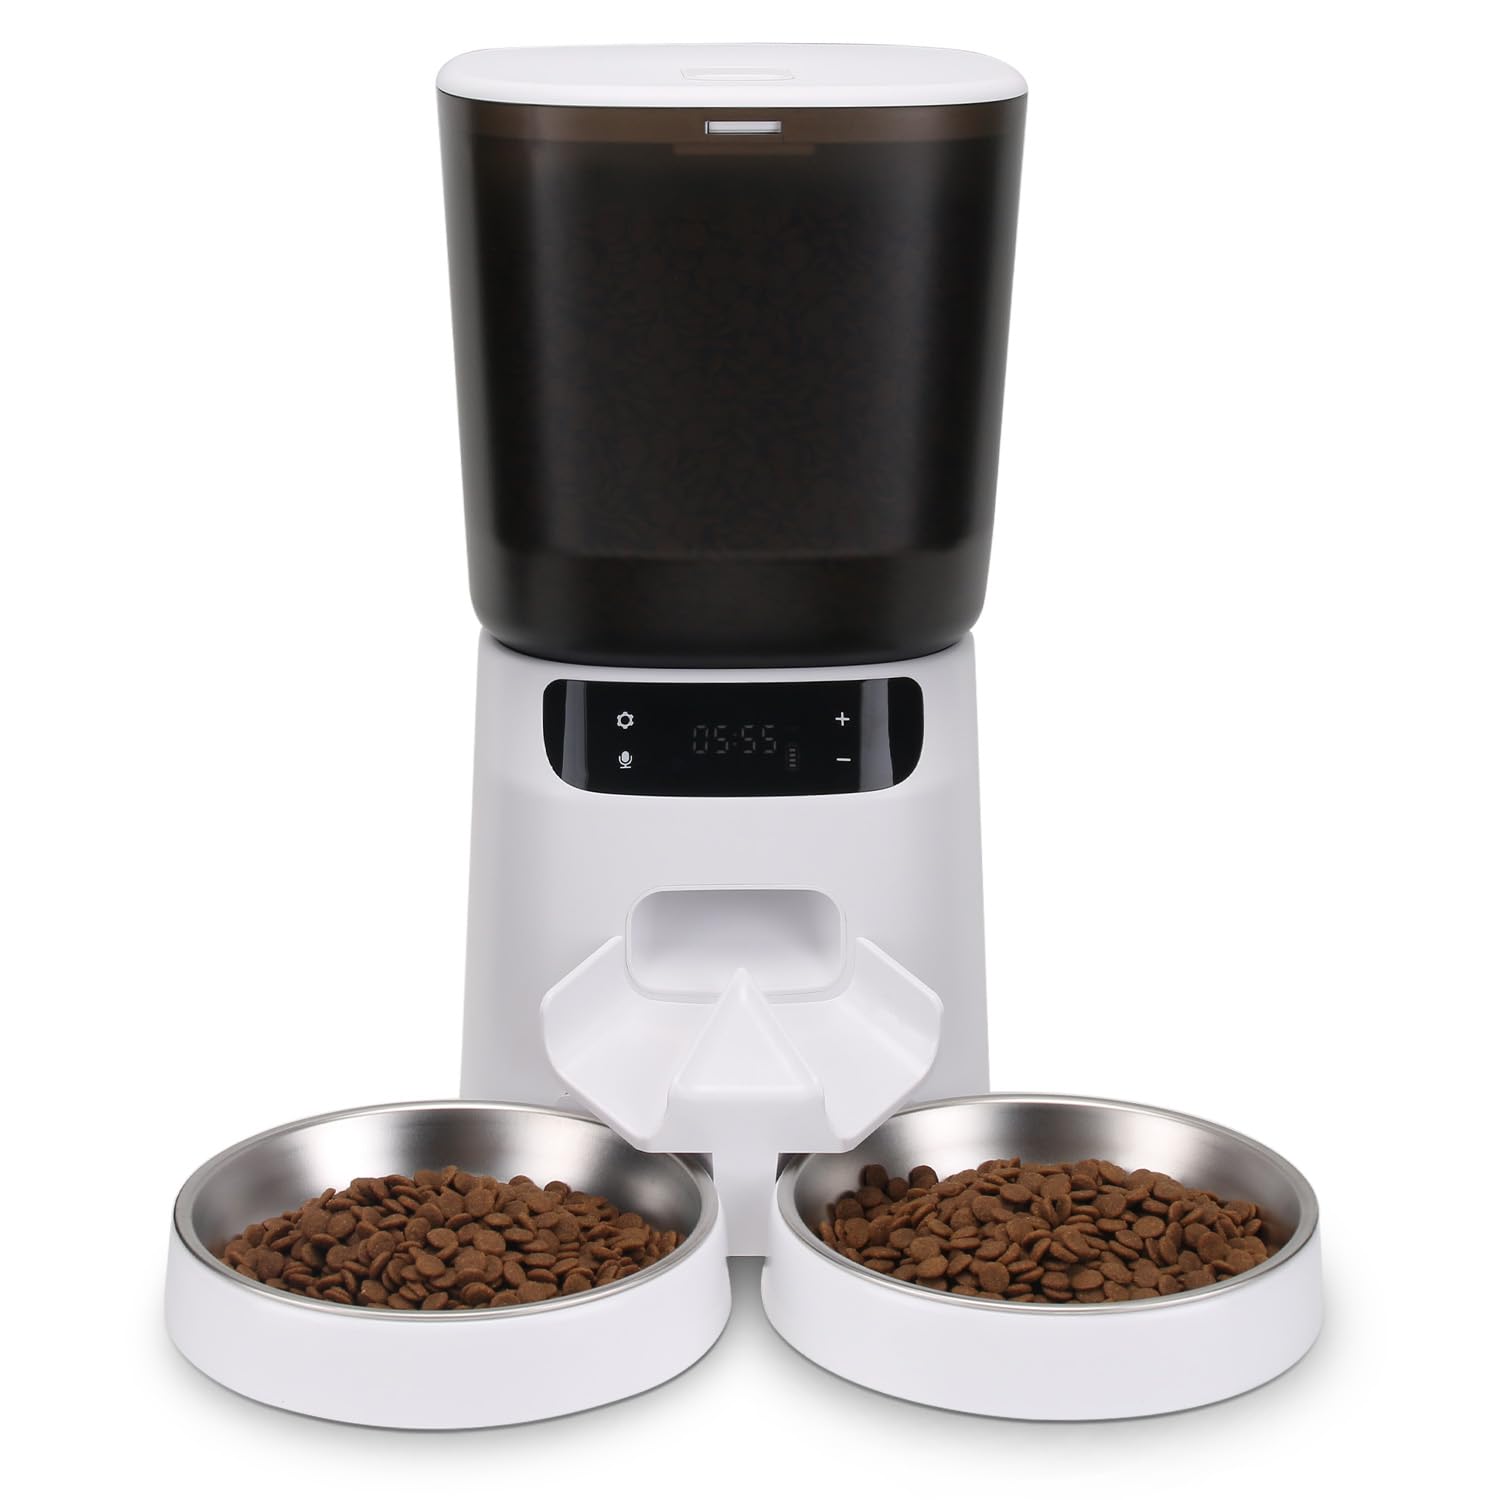
Figura 1: Katalic Automatic Cat Feeder APF01 showing key features and dimensions. The feeder has a 20-cup capacity, anti-jam design, and is easy to clean. Dimensions include a height of 12.6 inches, food container width of 6.7 inches, and bowl diameter of 6 inches with a height of 0.79 inches.
3. Contenuto della confezione
Si prega di controllare il contenuto della confezione dopo averla disimballata:
- Katalic Automatic Cat Feeder Unit (APF01)
- Food Container with Lid
- Ciotole per alimenti in acciaio inossidabile (x2)
- Divisore del pasto
- Adattatore di alimentazione
- Manuale d'uso
4. Istruzioni per l'installazione
- Disimballare: Rimuovere con attenzione tutti i componenti dalla confezione.
- Pulito: Wash the food container, lid, stainless steel bowls, and meal divider with mild soap and water. Rinse thoroughly and dry completely before assembly.
- Assemblare:
- Posizionare l'unità di alimentazione principale su una superficie piana e stabile.
- Insert the meal divider into its designated slot at the food outlet.
- Position the two stainless steel bowls beneath the food outlet, ensuring they are securely seated.
- Attach the food container to the main unit and secure the lid.
- Collegamento elettrico:
- Collegare l'adattatore di alimentazione alla porta di alimentazione dell'alimentatore e inserirlo in una presa a muro.
- For battery backup, insert 3 D-cell batteries (not included) into the battery compartment at the bottom of the unit. The LCD display may turn off when running on batteries to conserve power, but feeding schedules will remain active.
- Riempire il contenitore per alimenti: Open the lid and pour dry pet food into the container. Ensure the food kibble size is appropriate for the dispenser mechanism (typically 5-15mm in diameter). Close the lid securely.
5. Istruzioni per l'uso
5.1 Impostazione dell'orologio
- Premere e tenere premuto il pulsante "SET" finché la cifra dell'ora non lampeggia.
- Utilizzare i pulsanti "+" e "-" per regolare l'ora.
- Premere nuovamente "SET" per passare alla cifra dei minuti e regolare utilizzando "+" e "-".
- Premere "SET" per confermare l'ora.
- Nota: Some users have reported that the internal clock may lose time over several days. Regular checks and adjustments may be necessary.
5.2 Programmazione dei programmi di alimentazione
The feeder allows for multiple feeding times per day, each with adjustable portion sizes.
- Press the "FEED" button to cycle through available meal settings (e.g., M1, M2, M3...).
- When a meal setting flashes, press "SET" to enter programming mode for that meal.
- Adjust the feeding time (hour and minute) using the "+" and "-" buttons, confirming each with "SET".
- Next, the portion size will flash. Use "+" and "-" to select the desired portion (P1-P6, or similar range).
- Press "SET" to confirm the portion size and save the meal setting.
- Repeat for additional meal times. To disable a meal, set its portion size to P0.
- Important Note on Portion Sizes: User feedback indicates that portion sizes (P1, P2, etc.) may dispense smaller amounts than expected. It is recommended to test and adjust the portion settings to match your cats' dietary needs. For example, P4 might be closer to 1/2 cup, and P6 might be required for a full serving for some cats.
5.3 Recording a Voice Message (If Applicable)
Some models allow for a short voice recording to call your pets at mealtime.
- Press and hold the "REC" button. The indicator light may illuminate.
- Speak clearly into the microphone for up to 10 seconds.
- Release the "REC" button to save the recording.
- Press the "PLAY" button to listen to your recording.
- The recorded message will play automatically at each scheduled feeding time.
6. Manutenzione e pulizia
Una pulizia regolare garantisce l'igiene e prolunga la durata della mangiatoia.
- Scollegare l'alimentazione: Always unplug the power adapter and remove batteries before cleaning.
- Smontare: Remove the food container, lid, meal divider, and stainless steel bowls from the main unit.
- Lavare le parti rimovibili: Wash the food container, lid, meal divider, and bowls with warm water and mild dish soap. Rinse thoroughly to remove all soap residue.
- Asciugare completamente: Assicurarsi che tutte le parti lavate siano completamente asciutte prima di rimontarle, per evitare la formazione di muffa o il deterioramento degli alimenti.
- Pulisci l'unità principale: Pulire l'unità di alimentazione principale con un panno morbido eamp cloth. Do not submerge the main unit in water or allow water to enter the electronic components.
- Rimontare: Una volta che tutti i componenti sono asciutti, rimontare la mangiatoia.
- Frequenza: It is recommended to clean the feeder at least once a month, or more frequently if using wet food (though this feeder is primarily for dry food) or if food residue builds up.
7. Risoluzione Dei Problemi
| Problema | Possibile causa | Soluzione |
|---|---|---|
| La mangiatoia non distribuisce cibo. |
|
|
| Portion sizes are too small/large. |
|
|
| L'orologio perde tempo. |
|
|
| Difficoltà di programmazione. |
|
|
8. Specifiche
- Numero modello: APF01
- Marca: Catalico
- Materiale: Stainless Steel (bowls), Plastic (main unit, container)
- Dimensioni del prodotto: 17.27 x 27.43 x 17.27 cm (6.8 x 10.8 x 6.8 pollici)
- Specie bersaglio: Gatto
- Energia: AC Adapter (included), 3 x D-cell batteries (not included)
- Caratteristica speciale: Automatic, Dual Feeding
9. Garanzia e supporto
For warranty information or technical support, please refer to the contact details provided on the product packaging or the official Katalic websito. Conserva la ricevuta d'acquisto come prova d'acquisto.