Introduzione
This manual provides detailed instructions for the installation, operation, and maintenance of your XTRONS IQ72DLRP Car Stereo GPS unit. Please read this manual thoroughly before using the product to ensure proper functionality and to prevent damage. Keep this manual for future reference.
Informazioni sulla sicurezza
- Non tentare di utilizzare l'unità durante la guida. La distrazione alla guida può causare incidenti.
- Ensure all wiring is correctly connected before powering on the unit to avoid short circuits or damage.
- Consult a professional for installation if you are unsure about any steps. Incorrect installation can void your warranty.
- Evitare di esporre l'unità a temperature estreme, alla luce solare diretta per periodi prolungati o a umidità eccessiva.
- Do not disassemble the unit. This may cause damage and will void the warranty.
Contenuto della confezione
Prima di procedere con l'installazione, verificare che tutti gli elementi siano presenti nella confezione.
- XTRONS IQ72DLRP Head Unit
- Antenna GPS
- Cablaggio di alimentazione
- Cavi USB
- Cavi RCA
- Microfono esterno
- Manuale dell'utente (questo documento)
- Other accessories as pictured below.

Figura 1: Accessori inclusi
Impostare
1. Installazione finitaview
The XTRONS IQ72DLRP is designed for specific integration with the Land Rover Freelander 2. Professional installation is recommended. Ensure the vehicle's battery is disconnected before starting any electrical work.
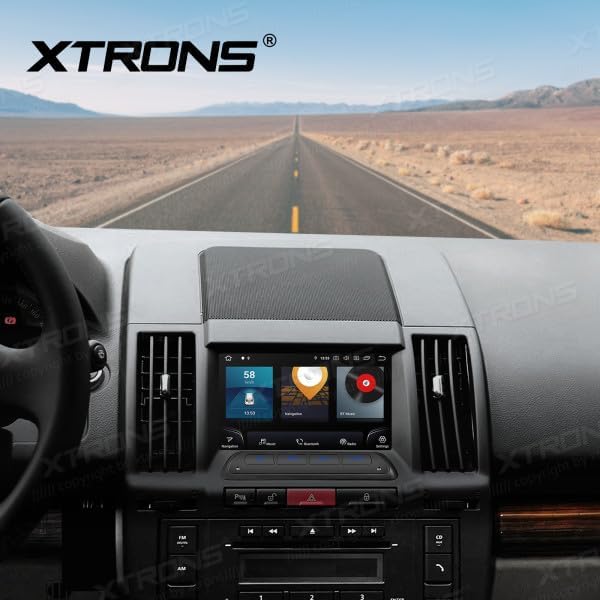
Figure 2: Unit installed in Land Rover Freelander 2 dashboard
2. Collegamenti elettrici
Connect the main power harness, speaker wires, and other auxiliary cables according to your vehicle's wiring diagram and the provided XTRONS harness. Pay close attention to the following connections:
- Energia: Collegare il filo giallo (12 V costanti), il filo rosso (accessorio 12 V) e il filo nero (terra).
- Relatori: Connect the speaker wires to the corresponding vehicle speaker wires (e.g., Front Left +, Front Left -).
- Antenna GPS: Montare l'antenna GPS in una posizione con una vista libera view del cielo, in genere sul cruscotto o sotto il parabrezza.
- USB: Collegare i cavi USB per l'archiviazione esterna o la connettività dello smartphone.
- Microfono esterno: Collega il microfono esterno per migliorare la qualità delle chiamate.
3. Accensione iniziale
After all connections are secure, reconnect the vehicle's battery. Turn on the ignition. The unit should power on automatically. Follow any on-screen prompts for initial setup, such as language selection and time zone.
Istruzioni per l'uso
1. Funzioni di base
- Accensione/spegnimento: Tenere premuto il pulsante di accensione (se disponibile) oppure accendere/spegnere l'accensione del veicolo.
- Controllo del volume: Utilizzare la manopola del volume o i controlli sullo schermo per regolare i livelli audio.
- Schermata iniziale: Tocca l'icona Home per tornare all'interfaccia principale di Android.

Figure 3: Main Android Home Screen
2. Navigazione del sistema operativo Android
The unit runs on Android 12. Navigate through menus and applications by tapping, swiping, and dragging on the touchscreen, similar to a smartphone or tablet.

Figure 4: Application Drawer
3. Funzionamento radiofonico
Access the "Radio" application from the home screen. You can scan for stations, save presets, and switch between AM/FM bands.
4. Connettività Bluetooth
Per associare il telefono:
- Vai a Impostazioni > Bluetooth.
- Enable Bluetooth on both the head unit and your mobile device.
- Cercare available devices on your mobile phone and select "XTRONS IQ72DLRP" (or similar name).
- Confermare il codice di associazione su entrambi i dispositivi.
Una volta effettuato l'abbinamento, è possibile effettuare chiamate in vivavoce e riprodurre l'audio in streaming.
5. CarPlay / Android Auto
Connect your compatible smartphone via USB to use Apple CarPlay or Android Auto. The system will automatically detect and launch the respective interface, allowing access to navigation, music, messages, and more directly from your phone.
6. Navigazione GPS
The unit comes with a built-in GPS module and antenna. You can use pre-installed navigation apps or download others from the Google Play Store. Ensure the GPS antenna is properly installed for optimal signal reception.
7. USB / Media Playback
Insert a USB drive into one of the provided USB ports. Use the "Music" or "Video" applications to browse and play media files. L'unità supporta vari formati audio e video.
8. Impostazioni DSP
The Digital Sound Processor (DSP) allows for advanced audio customization. Access the "DSP" application to adjust equalizer settings, balance, fader, and other sound effects to optimize your listening experience.

Figura 5: Interfaccia delle impostazioni DSP
9. Connettività Wi-Fi e 4G
Connettiti a una rete Wi-Fi tramite Impostazioni > Rete e Internet > Wifi. For 4G connectivity, insert a compatible SIM card (if the unit supports it and a slot is available) or use a USB 4G dongle (sold separately) and configure network settings.
Manutenzione
1. Pulizia dell'unità
Utilizzare un panno morbido e asciutto per pulire lo schermo e l'esterno dell'unità. Per le macchie ostinate, utilizzare un panno leggermenteamp cloth with a mild, non-abrasive cleaner can be used. Avoid spraying liquids directly onto the unit.
2. Aggiornamenti software
Periodically check for software updates to ensure optimal performance and access to new features. Updates can usually be found in the system settings or on the official XTRONS website. Follow the instructions provided with the update package carefully.
Risoluzione dei problemi
| Problema | Possibile causa | Soluzione |
|---|---|---|
| L'unità non si accende. | Cablaggio errato; Fusibile bruciato; Batteria del veicolo scollegata. | Check power connections (yellow, red, black wires). Inspect vehicle fuses. Ensure battery is connected. |
| Nessun suono dagli altoparlanti. | Cavi degli altoparlanti collegati in modo errato; Volume troppo basso; Funzione mute attiva. | Verificare il cablaggio degli altoparlanti. Aumentare il volume. Controllare se l'unità è in modalità silenziosa. |
| Il segnale GPS è debole o non disponibile. | Antenna GPS installata in modo errato o ostruita. | Assicurarsi che l'antenna GPS abbia una visuale libera view del cielo. Controllare il collegamento dell'antenna. |
| L'associazione Bluetooth non riesce. | Bluetooth not enabled; Incorrect pairing code; Device out of range. | Enable Bluetooth on both devices. Re-enter pairing code. Ensure devices are close. |
| Il touchscreen non risponde. | Temporary software glitch; Unit frozen. | Restart the unit (turn vehicle ignition off and on). If issue persists, perform a factory reset (refer to settings). |
Specifiche
- Numero modello: IQ72DLRP
- Marca: XTRONI
- Sistema operativo: Androide 12
- Dimensioni dello schermo: 7 pollici
- Connettività: Bluetooth, Wi-Fi, 4G (optional), Apple CarPlay, Android Auto, USB
- Dispositivi compatibili: Telefono cellulare
- Colore: Nero
- Processore: Octa-core
- Memoria RAM: 8 GB LPDDR4
- ROM: SSD da 256 GB
- Tecnologia di visualizzazione: QLED
- Uscita audio: Optical Coaxial, RCA Audio Out
Note: Specifications are subject to change without prior notice. Some product images may show Android 13, but the product title specifies Android 12.
Garanzia e supporto
1. Informazioni sulla garanzia
XTRONS products typically come with a limited warranty covering manufacturing defects. Please refer to the warranty card included with your product or visit the official XTRONS websito per termini e condizioni di garanzia dettagliati specifici per la tua regione.
2. Assistenza clienti
If you encounter any issues not covered in the troubleshooting section or require further assistance, please contact XTRONS customer support. You can usually find contact information (email, phone, or support portal) on the official XTRONS websito:
When contacting support, please have your product model number (IQ72DLRP) and purchase details ready.