1. Introduzione
This manual provides essential information for the safe and effective operation of the FNNEMGE MY2600D Digital Clamp Meter. This versatile instrument is designed for precise measurement of AC/DC voltage, AC/DC current, resistance, capacitance, frequency, duty cycle, diode, continuity, and temperature. It features True RMS measurement, Non-Contact Voltage (NCV) detection, Low Pass Filter (LPF), and Low Impedance (LowZ) functions, making it suitable for industrial, automotive, household, and educational applications.

Image 1.1: The FNNEMGE MY2600D Digital Clamp Misuratore, inclusi cavi di prova e custodia protettiva per il trasporto.
2. Informazioni sulla sicurezza
To ensure safe operation and prevent damage to the meter, please read and follow all safety instructions carefully. This device complies with IEC 61010-1, CAT III 600V, and CE standards.
- Sicurezza generale: Always use the meter according to the instructions. Do not operate the meter if it appears damaged or if the insulation is compromised.
- Voltage Limiti: Non applicare più del volume nominaletage, as marked on the meter, between the terminals or between any terminal and earth ground. The maximum operating voltage è 600 Volt.
- Misurazione corrente: Ensure the circuit is de-energized before connecting the clamp meter for current measurements, especially when measuring high currents.
- Puntali di prova: Use only the test leads provided with the meter. Inspect test leads for damage before each use.
- Circuiti attivi: Prestare la massima attenzione quando si lavora su circuiti sotto tensione. Evitare il contatto con conduttori o terminali scoperti.
- Ambiente: Non utilizzare lo strumento in ambienti con gas esplosivi, vapori o polverosi.
- Protezione da sovraccarico: The meter features overload protection, double ceramic fuses, and thermistors to protect the circuit. However, always operate within specified ranges.
- Sostituzione della batteria: Per garantire letture accurate, sostituire tempestivamente le batterie quando compare l'indicatore di batteria scarica.

Image 2.1: Illustration of the internal overload protection mechanism within the clamp meter, designed to prevent damage from misuse.
3. Prodotto finitoview
Familiarize yourself with the components of your FNNEMGE MY2600D Digital Clamp Misuratore:

Image 3.1: Detailed diagram of the clamp meter indicating its various parts and controls.
- Clamp: Utilizzato per la misurazione della corrente CA/CC senza contatto.
- Barriera di sicurezza: Indicates the safe limit for hand placement.
- Function Range Switch: Manopola rotante per selezionare le funzioni di misurazione.
- Pulsante di blocco dati (H): Blocca la lettura corrente sul display.
- Pulsante torcia: Attiva la torcia LED integrata.
- Schermo LCD: Digital display for readings, units, and indicators.
- Terminale d'ingresso: Ingresso positivo per i puntali di prova.
- Terminale di ingresso COM: Ingresso comune (negativo) per i puntali di prova.
- Backlight Reset Button: Controlla la retroilluminazione del display.
- Function Selection Button (SEL): Toggles between functions within a rotary switch position (e.g., AC/DC, Diode/Continuity).
- Indicatore di avviso: Visual alert for certain conditions (e.g., NCV detection).
- Grilletto: Apre e chiude il clamp mascella.
- Illuminazione Lamp: Fornisce luce all'area di misurazione.
- NCV Detection Probe: Area for Non-Contact Voltage rilevamento.
4. Impostazione
4.1 Installazione della batteria
The FNNEMGE MY2600D requires two AAA batteries (included). To install or replace batteries:
- Assicurarsi che il misuratore sia spento.
- Individuare il coperchio del vano batterie sul retro del misuratore.
- Utilizzare un cacciavite per allentare la/le vite/i e rimuovere il coperchio.
- Inserire due batterie AAA, rispettando la polarità corretta (+ e -) come indicato all'interno del vano.
- Richiudere il coperchio del vano batteria e fissarlo con la/le vite/i.

Immagine 4.1: Il clamp meter package contents, including the meter, manual, test leads, and AAA batteries.
5. Istruzioni per l'uso
Before operating, ensure the meter is in good condition and the batteries are properly installed.
5.1 Accensione/spegnimento
Rotate the Function Range Switch to any desired measurement function to turn the meter ON. Rotate it to the "OFF" position to turn the meter OFF. The meter features an automatic shutdown function to conserve battery life after a period of inactivity.
5.2 AC/DC Current Measurement (0-600A)
To measure current using the clamp:
- Rotate the Function Range Switch to the "600A" or "60A" position for AC/DC current.
- Press the "SEL" button to switch between AC and DC current measurement if necessary.
- Premere il grilletto per aprire il clamp mascella.
- Enclose only one conductor (not a cable with multiple conductors) within the clamp mascella.
- Release the trigger to close the jaw. The current reading will appear on the LCD.

Immagine 5.1: Il clamp jaw open, demonstrating how to enclose a single conductor for current measurement. The jaw opening is 26mm.
5.3 CA/CC voltage Misurazione
Per misurare il volumetage:
- Inserire il puntale di prova rosso nel terminale "INPUT" e il puntale di prova nero nel terminale "COM".
- Rotate the Function Range Switch to the "V~" (AC Voltage) o "V-" (Vol. DCtage) position. The meter may automatically detect AC or DC.
- Press the "SEL" button to switch between AC and DC voltage se necessario.
- Collegare i puntali di prova in parallelo al circuito o al componente che si desidera misurare.
- Leggi il vol.tage valore sul display LCD.

Image 5.2: Measuring voltage by inserting test leads into a power outlet.
5.4 Resistance, Diode, Continuity, Capacitance, Frequency, Duty Cycle Measurement
For these measurements, connect the test leads as described for voltage misurazione.
- Resistenza (Ω): Rotate the switch to the "Ω" position. Connect leads across the component.
- Diode (→|): Rotate the switch to the "Ω" position and press "SEL" until the diode symbol appears. Connect leads across the diode.
- Continuity (🔊): Rotate the switch to the "Ω" position and press "SEL" until the continuity symbol appears. Connect leads across the circuit. An audible beep indicates continuity.
- Capacità (F): Rotate the switch to the "F" position. Connect leads across the capacitor.
- Frequenza (Hz) / Ciclo di lavoro (%): Rotate the switch to the "Hz%" position. Press "SEL" to toggle between frequency and duty cycle. Connect leads to the signal source.

Immagine 5.3: Es.amples of various measurements including voltage, resistance, battery, and diode testing using the meter and its test leads.
5.5 Misurazione della temperatura
Per misurare la temperatura:
- Rotate the Function Range Switch to the "°C/°F" position.
- Insert the temperature probe into the "INPUT" and "COM" terminals, observing polarity.
- Posizionare la punta della sonda di temperatura sopra o vicino all'oggetto di cui si desidera misurare la temperatura.
- Read the temperature on the LCD. Press "SEL" to switch between Celsius and Fahrenheit.
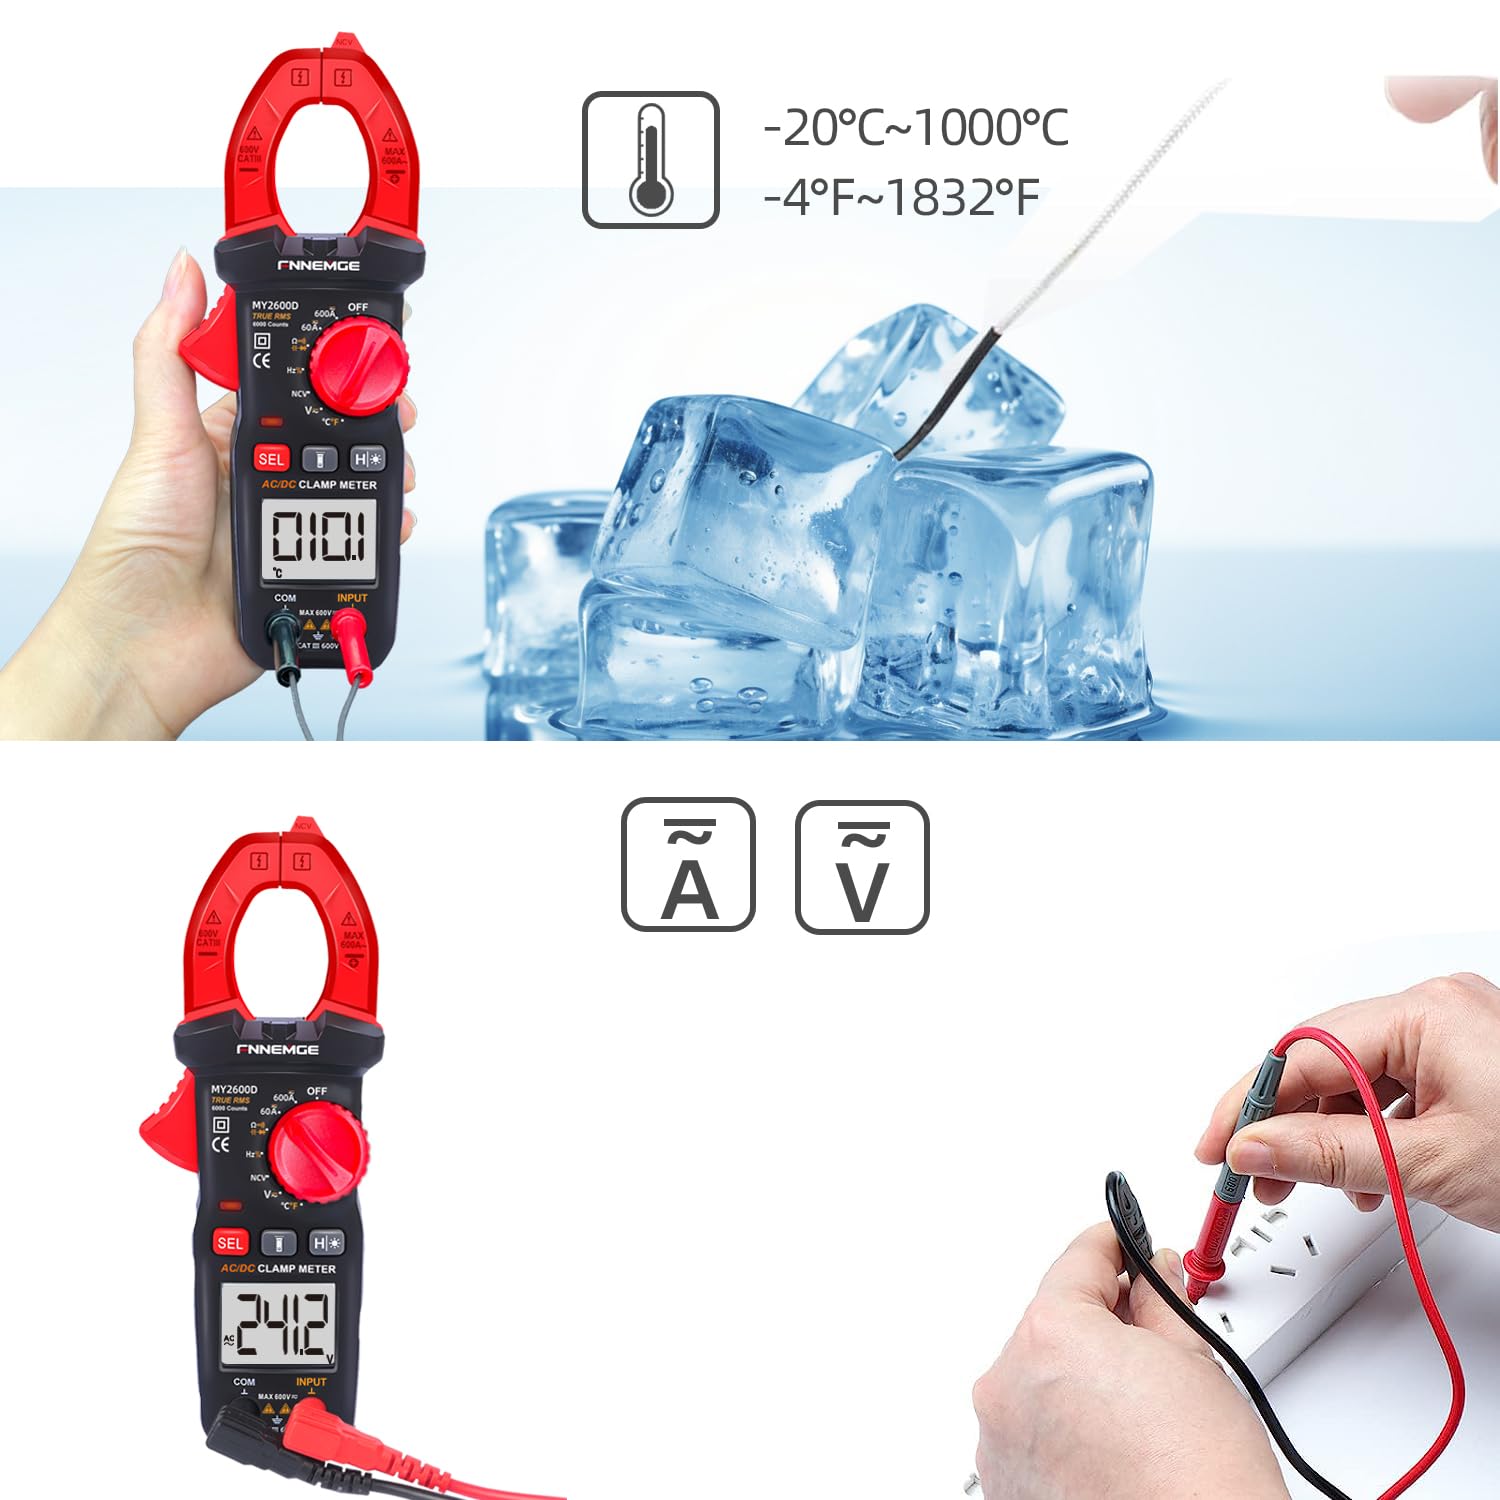
Image 5.4: Using the temperature probe to measure the temperature of ice, demonstrating the meter's temperature function.
5.6 Funzioni speciali
- Volume senza contattotage(NCV): Rotate the switch to the "NCV" position. Bring the NCV detection probe (top of the clamp jaw) near a live AC voltage sorgente. Il misuratore indicherà la presenza di voltage with an audible alarm and visual warning.
- Filtro passa basso (LPF): Quando si misura il volume CAtage or current in circuits with variable frequency drives or other noise sources, activate LPF by pressing the dedicated button (if available, or via SEL in AC V/A mode). This filters out high-frequency interference for more accurate True RMS readings.
- Low Impedance (LowZ): This function helps prevent ghost voltages by providing a low impedance input, which drains away stray capacitance. Activate LowZ by selecting the appropriate function on the rotary switch or via the "SEL" button.
- Vero valore efficace (TRMS): The meter automatically measures True RMS for AC voltage corrente, fornendo letture accurate per forme d'onda non sinusoidali.
- Conservazione dei dati (H): Press the "H" button to freeze the current reading on the display. Press it again to release.
- Retroilluminazione/Torcia: Press the backlight button to turn on the LCD backlight. Press the flashlight button to activate the LED flashlight for illuminating the measurement area.

Immagine 5.5: Il clamp meter's flashlight in use, illuminating a dark area for easier measurement, with the NCV indicator visible.
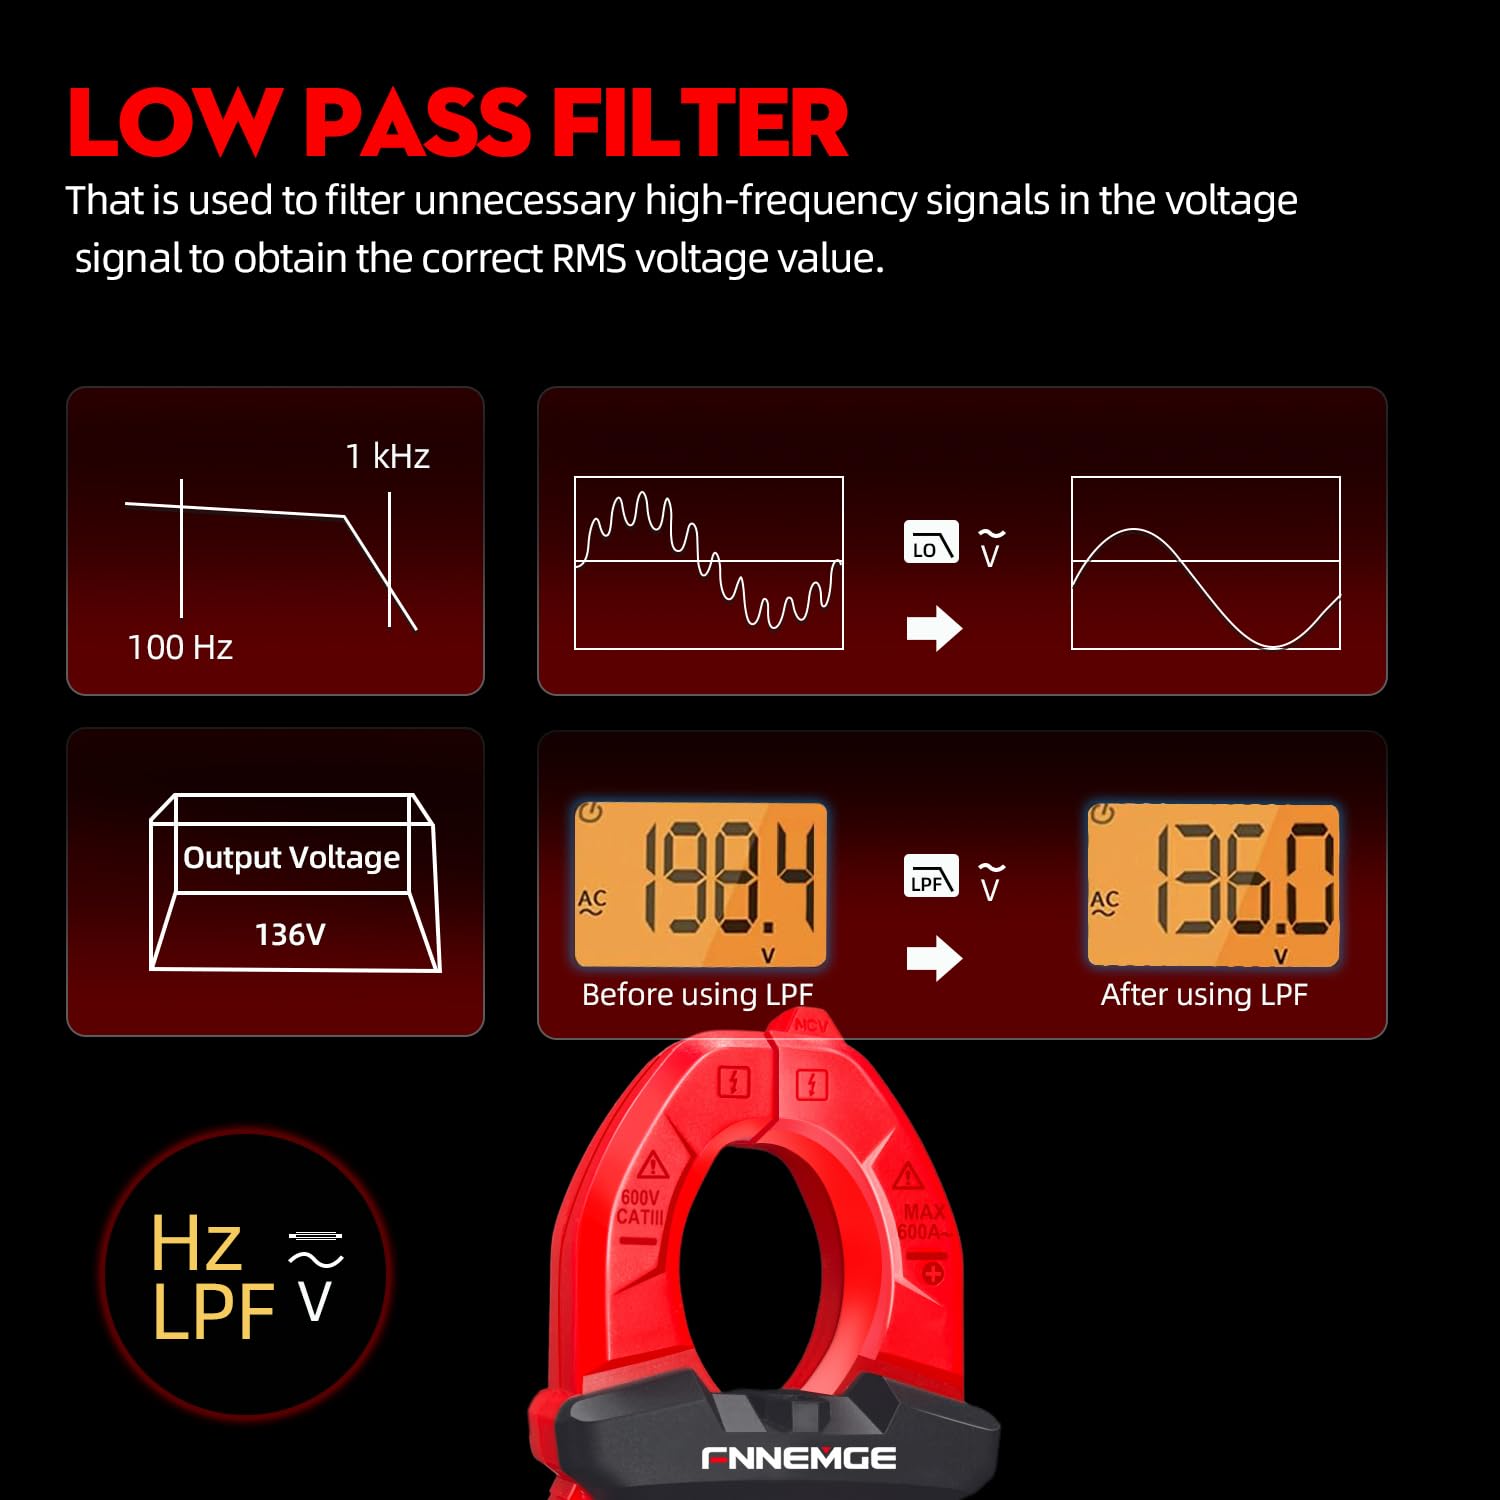
Image 5.6: An illustration detailing the function of the Low Pass Filter (LPF) in filtering out high-frequency noise for accurate voltage letture.
6. Manutenzione
6.1 Pulizia
Pulire il misuratore con un panno asciutto e morbido. Non utilizzare abrasivi o solventi. Mantenere i terminali puliti e privi di sporco e umidità.
6.2 Sostituzione della batteria
When the low battery indicator appears on the LCD, replace the batteries as described in Section 4.1. Remove batteries if the meter is not used for an extended period.
6.3 Conservazione
Conservare il misuratore in un luogo fresco e asciutto, lontano dalla luce solare diretta e da temperature estreme. Utilizzare la custodia per il trasporto fornita per proteggerlo.
7. Risoluzione Dei Problemi
If you encounter issues with your FNNEMGE MY2600D, refer to the following common problems and solutions:
- Nessun display/misuratore non acceso:
- Controllare l'installazione della batteria e accertarsi che la polarità sia corretta.
- Sostituire le batterie se sono scariche.
- Ensure the Function Range Switch is not in the "OFF" position.
- Letture imprecise:
- Verificare che sia selezionata la funzione di misurazione corretta.
- Assicurarsi che i puntali di prova siano collegati correttamente e non danneggiati.
- Per la misurazione della corrente, assicurarsi che solo un conduttore sia all'interno del clamp mascella.
- Verificare la presenza di interferenze esterne o di forti campi magnetici.
- For AC measurements, consider using the LPF function if high-frequency noise is suspected.
- "OL" o indicazione di sovraccarico:
- The measured value exceeds the meter's range for the selected function. Switch to a higher range if available, or ensure the input is within the meter's capabilities.
- NCV non rileva il volumetage:
- Assicurarsi che la funzione NCV sia selezionata.
- Bring the NCV probe closer to the live AC source.
- Verificare il volumetage source is active.
Se i problemi persistono, contatta l'assistenza clienti per assistenza.
8. Specifiche
| Caratteristica | Specificazione |
|---|---|
| Marca | FNNEMGE |
| Numero di modello | Modello MY2600D |
| Display | 6000 Conteggi |
| Tipo di misurazione | True RMS Digital Clamp metro |
| Gamma di corrente CA/CC | 0-600A |
| Volume operativo massimotage | 600 Volt |
| Intervallo di resistenza | Fino a 60 MΩ |
| Intervallo di capacità | Fino a 100 mF |
| Intervallo di temperatura | -20°C a 1000°C (-4°F a 1832°F) |
| Funzioni speciali | NCV, LowZ, LPF, Data Hold, Auto Ranging, Backlight, Flashlight |
| Standard di sicurezza | IEC 61010-1, CAT III 600 V, CE |
| Fonte di alimentazione | 2 batterie AAA (incluse) |
| Dimensioni del prodotto (L x P x A) | Dimensioni: 18 x 6.4 x 3.4 cm |
| Peso del prodotto | 400 grammi |
| Paese di origine | Cina |
9. Garanzia e supporto
FNNEMGE provides a 36-month after-sales service and lifetime technical support for the MY2600D Digital Clamp Meter. If you have any questions, require technical assistance, or need to claim warranty service, please contact FNNEMGE customer support through your purchase platform or the official FNNEMGE websito.