HEXIEDEN Electronic Pet Fencing System
HEXIEDEN Electronic Pet Fencing System User Manual
Model: Electronic Pet Fencing System (for 2 Dogs)
1. Introduzione
This manual provides detailed instructions for the installation, operation, and maintenance of your HEXIEDEN Electronic Pet Fencing System. This system is designed to create a safe and controlled environment for your pets within a defined boundary, utilizing an underground wire and a training collar.
Contenuto della confezione
- 1 x Indoor Wall-mounted Transmitter
- 2 x Adjustable Receiver Collars with Neck Straps (for 2 dogs)
- 1 x Power Adapter with Charging Cable
- 1 x Boundary Wire (300 meters / 984 feet)
- 20 x Training Flags
- 1 x Manuale utente
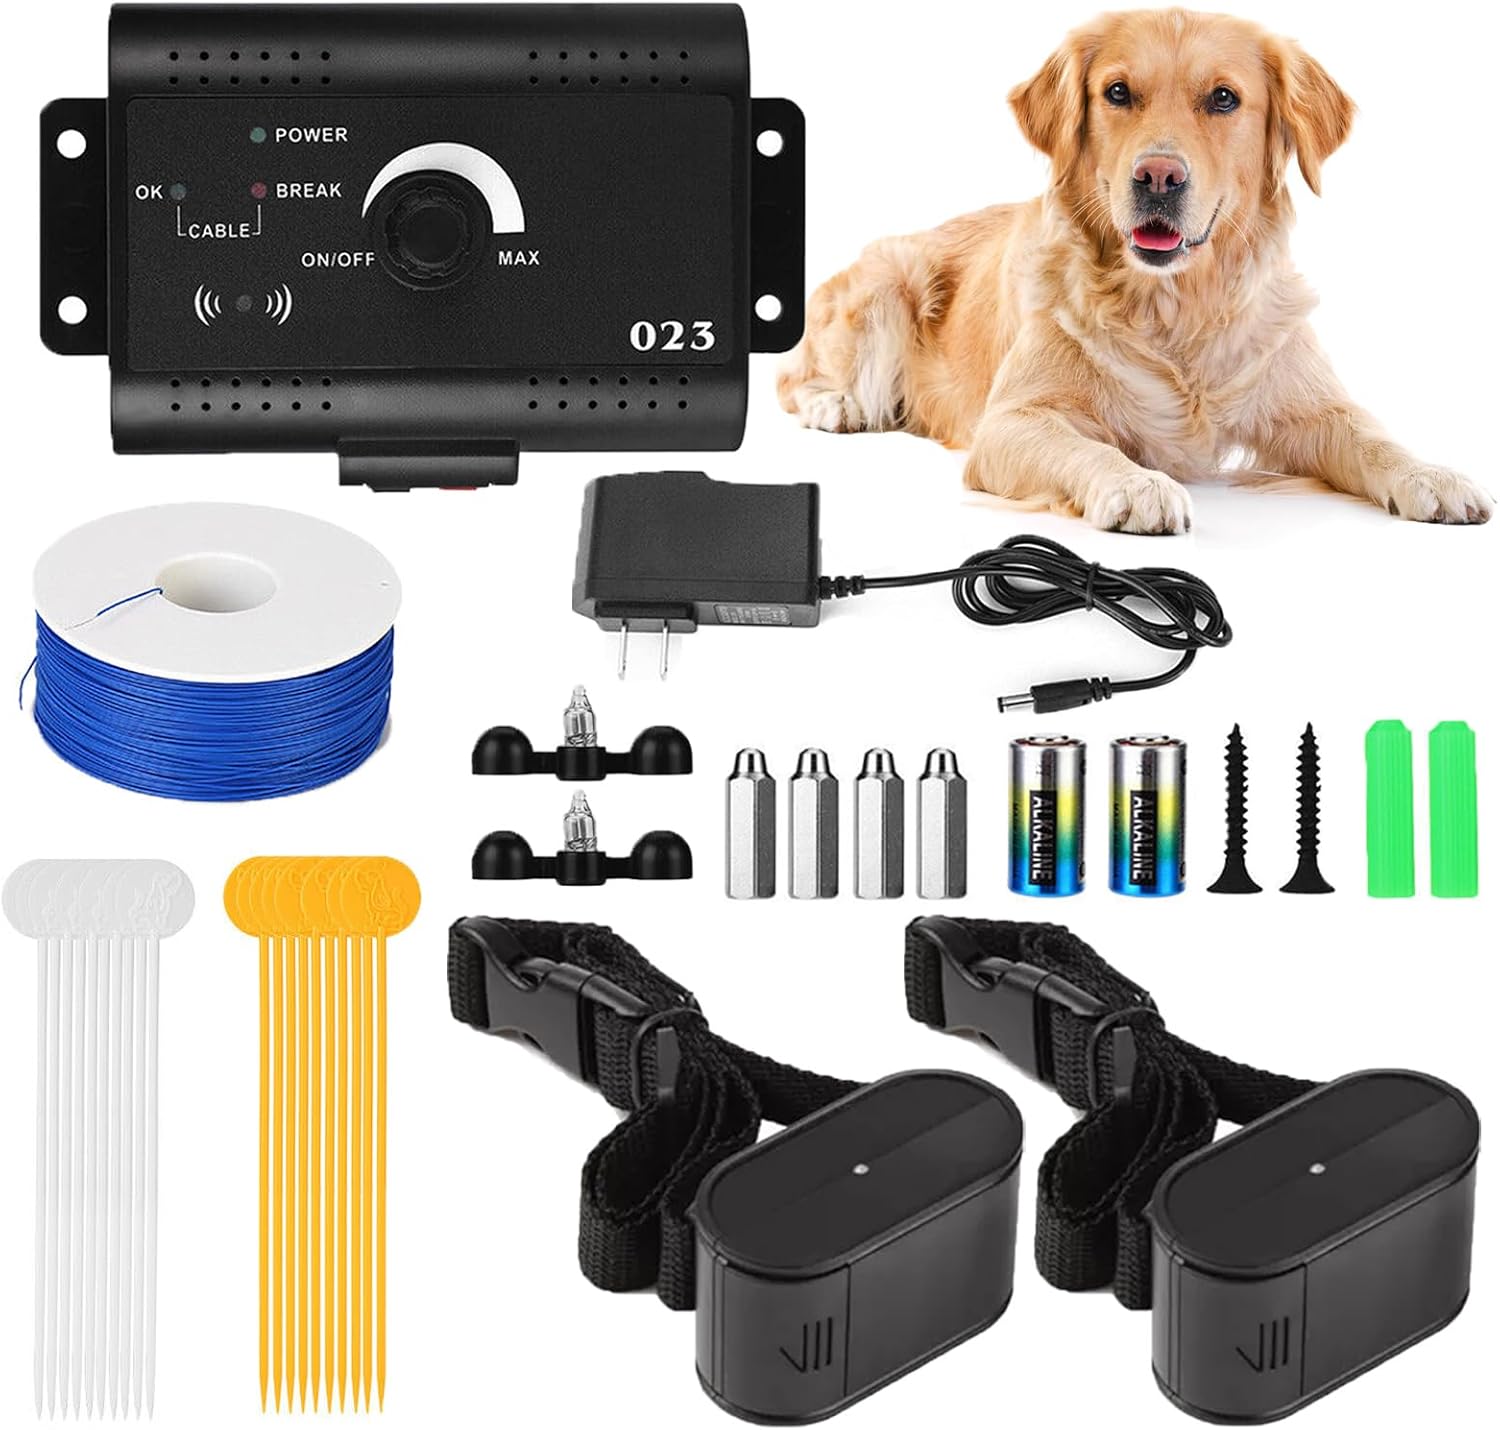
Image 1.1: Complete contents of the HEXIEDEN Electronic Pet Fencing System package.
2. Componenti del sistema
The system consists of a wall-mounted transmitter, receiver collars, boundary wire, and training flags. Understanding each component is crucial for proper setup and operation.
Unità trasmettitore
The transmitter is the central control unit for the entire electronic fencing system. It generates the radio signal that travels through the boundary wire.

Immagine 2.1: Dettagliata view of the transmitter unit with labeled indicators and controls.
- Indicatore di alimentazione: Si illumina quando l'unità è accesa.
- Cable OK Indicator: Illuminates when the boundary wire loop is intact and functioning correctly.
- Cable Break Indicator: Illuminates if there is a break in the boundary wire. An audible alarm will also sound.
- ON/OFF (Field Width Adjustment Knob): Controls the signal range, allowing you to adjust the width of the containment field. Turn clockwise to increase the range (MAX), counter-clockwise to decrease.
- Porta di alimentazione: Si collega all'alimentatore.
- Terminali filo: Connect the ends of the boundary wire to these terminals.
Collare ricevitore
The receiver collar is worn by your dog and detects the radio signal from the boundary wire. When the dog approaches the boundary, the collar emits a warning beep, followed by a static correction.
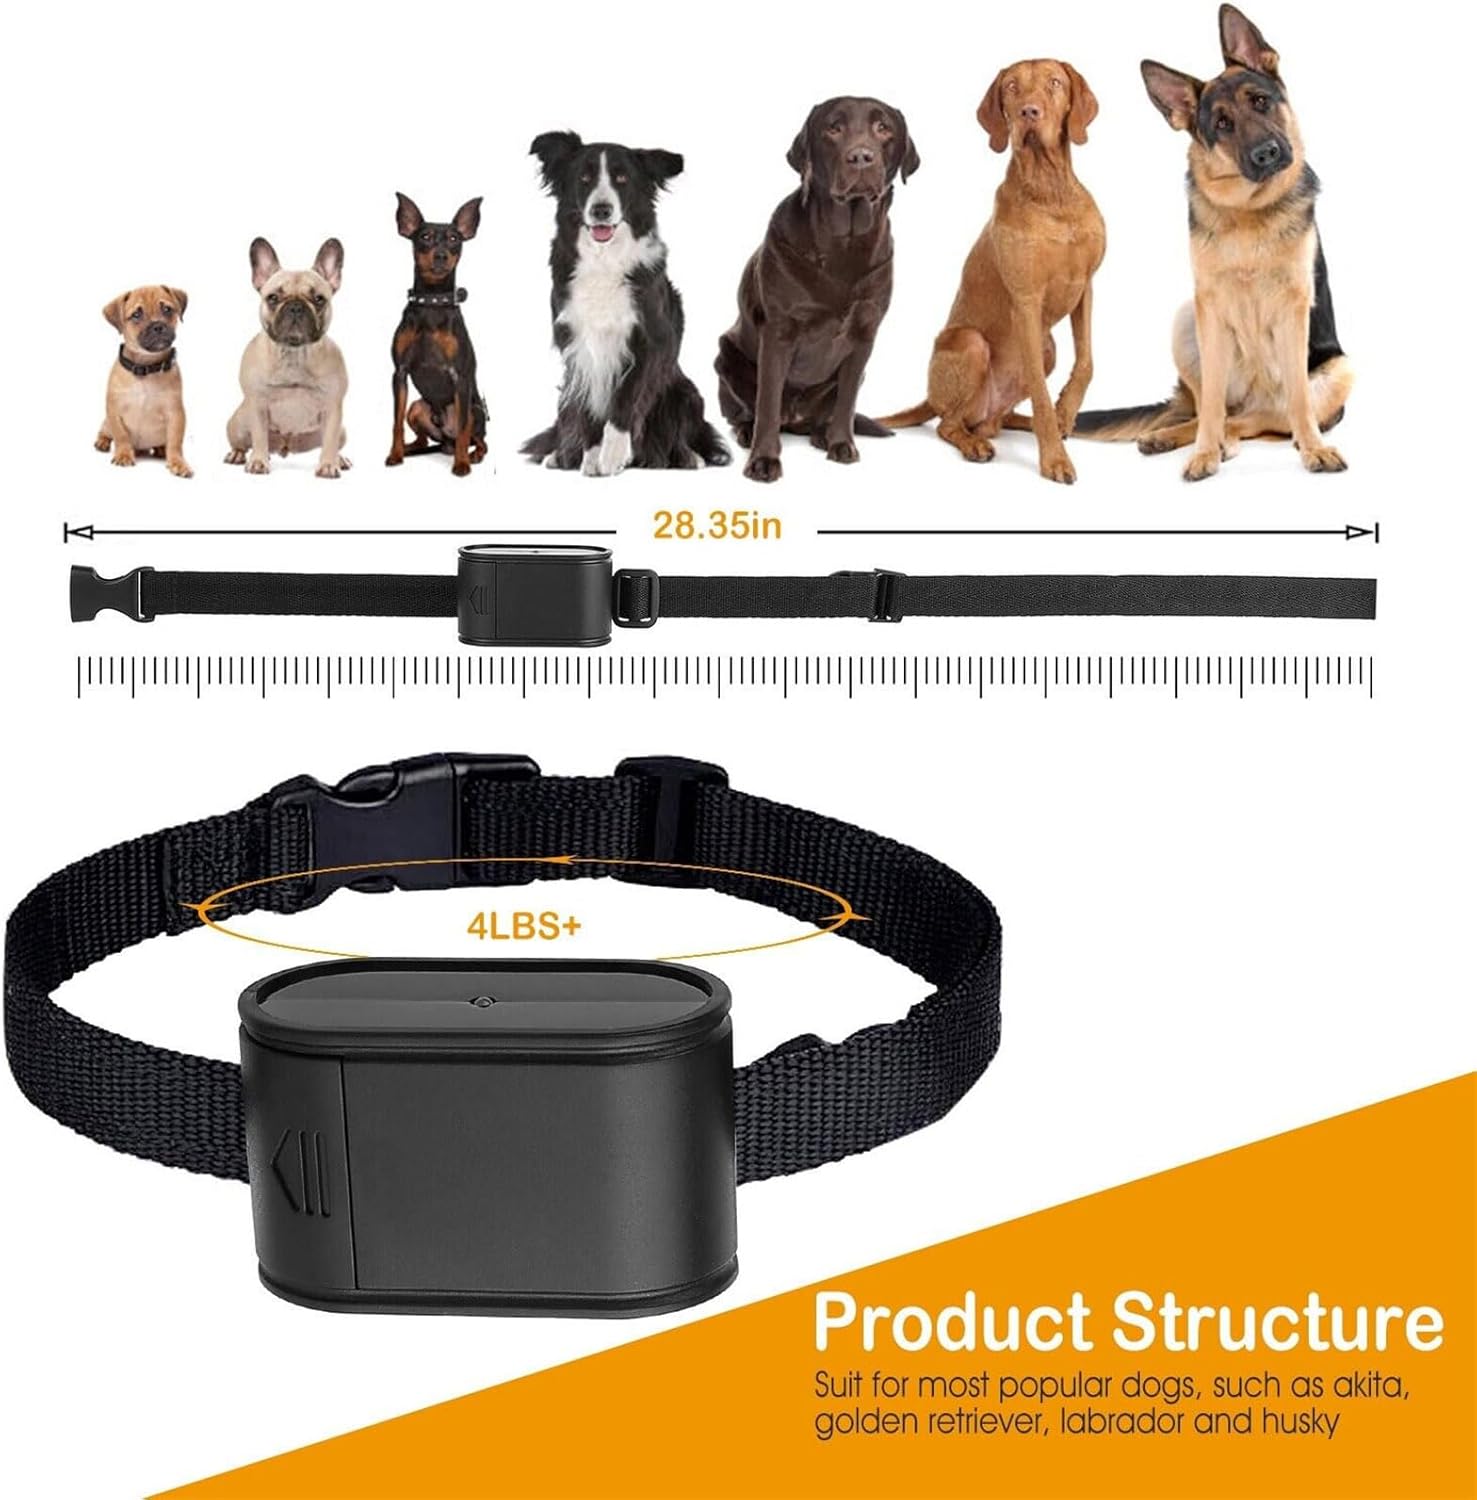
Image 2.2: Receiver collar showing dimensions and suitability for various dog breeds.
- Cinturino regolabile: Fits neck sizes from 7.5 inches to 17.92 inches, suitable for dogs weighing 4 lbs and above.
- Design impermeabile: The collar receiver is designed to be waterproof.
- Proportional Impulse Stimulation: The closer your dog gets to the boundary, the greater the intensity of the static correction.
- Speed Detector: The faster your dog moves towards the boundary, the quicker the intensity level of the correction increases.
- Operazione con collare multiplo: One transmitter can support up to three receiver collars simultaneously.
Boundary Wire and Training Flags
The boundary wire defines the containment area. Training flags are used as visual cues during the initial training phase to help your dog understand the boundary.

Image 2.3: Illustration of burying the boundary wire in the ground.
3. Configurazione e installazione del sistema
Careful planning and installation are essential for the effective operation of your pet fencing system.
3.1 Planning Your Containment Area
- Progettare il layout: Sketch your desired containment area, ensuring it forms a continuous loop. Consider areas you want your dog to access and areas to avoid.
- Calculate Wire Length: Measure the perimeter of your planned area to determine the required length of boundary wire. The system includes 300 meters (984 feet) of wire. If a shorter wire is needed, ensure it is still over 100 meters for optimal performance when adjusting the field width knob to maximum. For larger areas or to create a stronger signal, you can run a double or triple loop.
3.2 Installazione del trasmettitore
- Posizione: Install the wall-mounted transmitter in a dry, protected area, such as a garage or utility room, close to a power outlet.
- Montaggio: Securely mount the transmitter to a wall using appropriate hardware.
3.3 Laying the Perimeter Wire
- Temporary Layout: Initially, lay the boundary wire on the ground according to your planned design. This allows for adjustments before permanent installation.
- Burying the Wire: Once satisfied with the layout, bury the wire approximately 1-3 inches deep. Ensure the wire forms a continuous, unbroken loop.
3.4 Collegamento del sistema
- Connect Wire to Transmitter: Connect both ends of the boundary wire to the wire terminals on the transmitter unit. Ensure a secure connection.
- Accensione: Plug the power adapter into the transmitter's power port and then into a standard electrical outlet. The Power Indicator on the transmitter should illuminate.
- Verify Wire Loop: Check the Cable OK Indicator. If it is illuminated, the wire loop is intact. If the Cable Break Indicator is on and an audible alarm sounds, inspect the wire for any breaks or poor connections.
3.5 Setting Up Receiver Collars
- Charge Collars: Ensure the receiver collars are fully charged before use.
- Adjust Field Width: With the transmitter powered on, test the containment system by walking the collar receiver towards the boundary. Adjust the Field Width Adjustment Knob on the transmitter until the collar activates at your desired distance from the wire.
- Install Training Flags: Place the training flags along the boundary wire at regular intervals (e.g., every 10 feet). These flags serve as visual markers for your dog during initial training.

Immagine 3.1: Un example of a dog within a defined containment area, with boundary flags visible.
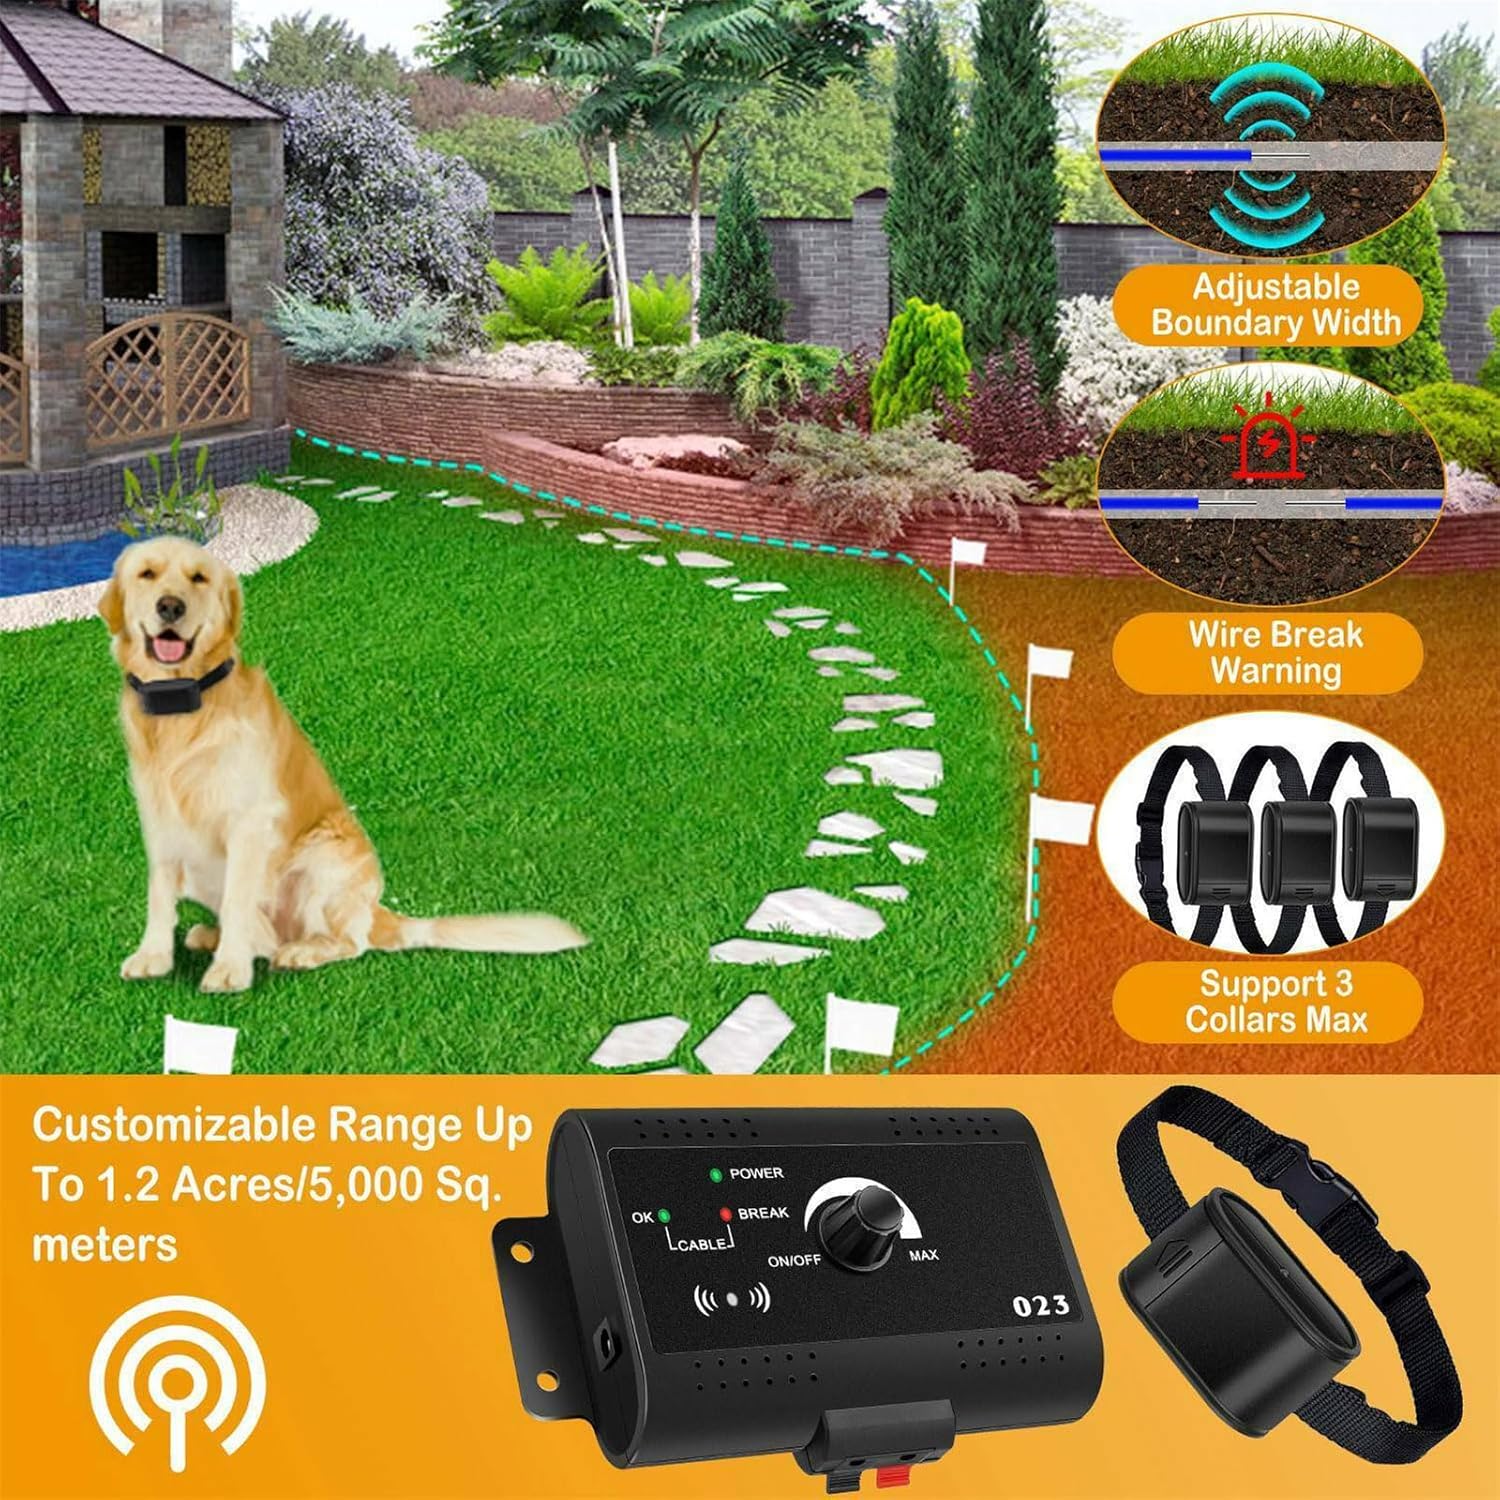
Image 3.2: Visual representation of adjustable boundary width and the wire break warning feature.
4. Operation and Dog Training
The system operates automatically once installed. Proper training is crucial for your dog to understand and respect the boundary.
4.1 Come funziona il sistema
When your dog, wearing the receiver collar, approaches the boundary wire, the collar will activate in two stages:
- Modalità segnale acustico: As the dog gets close to the boundary, the collar emits a warning beep. This is the primary cue for your dog to turn back.
- Shock Mode (Static Correction): If the dog continues to move past the warning beep zone and closer to the boundary wire, a low static correction will be delivered. The intensity of this correction increases proportionally as the dog gets closer to the wire, encouraging them to retreat to the safe area.

Image 4.1: Visual explanation of the beep and static correction zones as a dog approaches the boundary.
4.2 Montaggio del collare
- Vestibilità corretta: The collar should be snug enough for the contact points to touch your dog's skin, but not so tight as to cause discomfort. You should be able to fit one or two fingers comfortably between the strap and your dog's neck.
- Posizionamento: Posizionare l'unità ricevente al centro della gola del cane.
- Durata: Do not leave the collar on your pet for more than 12 hours a day to prevent skin irritation.
4.3 Training Your Dog
Initial training is essential for your dog to understand the system. Always supervise your dog during the training phase.
- Addestramento al guinzaglio: For the first few days, walk your dog on a leash around the perimeter of the containment area, allowing them to encounter the training flags and hear the warning beep. Gently guide them back into the safe zone when the beep activates.
- Rinforzo positivo: Praise and reward your dog when they respond correctly to the warning beep and stay within the boundary.
- Gradual Independence: Gradually reduce the use of the leash as your dog demonstrates understanding of the boundary. Continue to supervise closely.
- Coerenza: Consistency in training is key. Ensure all family members understand and follow the training protocol.
5. Manutenzione
Regular maintenance ensures the longevity and effectiveness of your pet fencing system.
- Pulizia del collare: Pulire periodicamente il collare del ricevitore e i punti di contatto con un adamp panno. Assicurarsi che i punti di contatto siano privi di sporco o detriti.
- Controllo della batteria: Monitor the collar's battery status. A red low-battery indicator will prompt you to replace or recharge the collar battery to prevent intermittent operation.
- Ispezione del filo: Regularly inspect the boundary wire for any signs of damage or exposure, especially after landscaping or severe weather. Repair any breaks promptly.
- Transmitter Location: Assicurarsi che il trasmettitore rimanga in un ambiente asciutto e protetto.
6. Risoluzione Dei Problemi
Refer to the following common issues and solutions before contacting support.
| Problema | Possibile causa | Soluzione |
|---|---|---|
| Il collare non si attiva al confine | Low battery in collar; Transmitter not powered; Wire break; Field width set too low. | Recharge/replace collar battery; Check transmitter power and indicators; Inspect boundary wire for breaks; Increase field width using the knob on the transmitter. |
| Transmitter Cable Break indicator is on/alarm sounds | Break in the boundary wire loop. | Carefully inspect the entire length of the boundary wire for cuts or damage. Repair any breaks using waterproof connectors. |
| Dog crosses the boundary | Insufficient training; Collar fit is too loose; Field width too narrow; Dog is highly motivated. | Reinforce training; Ensure collar contact points touch skin; Increase field width; Consider additional training or professional assistance. |
| Collar causes skin irritation | Collar worn for too long; Collar too tight; Poor hygiene. | Do not leave collar on for more than 12 hours a day; Ensure proper fit (one to two fingers space); Clean collar and dog's neck regularly. |
7. Specifiche
| Caratteristica | Dettaglio |
|---|---|
| Dimensioni del trasmettitore | 14.3 x 9 x 5 cm (5.63 x 3.55 x 1.97 pollici) |
| Receiver Collar Dimensions | 6.5 x 3.5 x 3 cm (2.56 x 1.38 x 1.19 pollici) |
| Collar Neck Size Range | Da 7.5 pollici a 17.92 pollici |
| Peso minimo del cane | 4 libbre |
| Lunghezza del filo di confine | 300 metri (984 piedi) |
| Area di copertura massima | Up to 1.2 acres / 5,000 sq. meters |
| Number of Collars Supported | Up to 3 collars per transmitter |
| Protezione contro i fulmini | Built-in protection for transmitter from power surges |

Image 7.1: Detailed dimensions of the transmitter and receiver collar.
8. Informazioni sulla garanzia
Specific warranty details for the HEXIEDEN Electronic Pet Fencing System are typically provided at the point of purchase or within separate documentation included with your product. Please refer to your purchase receipt or the manufacturer's official website for the most accurate and up-to-date warranty terms and conditions. Generally, products are covered against manufacturing defects for a specified period from the date of purchase.
9. Assistenza clienti
If you encounter any issues not covered in this manual or require further assistance, please contact HEXIEDEN customer support. Contact information can usually be found on the product packaging, the manufacturer's official websito o tramite il tuo rivenditore.
When contacting support, please have your product model name (Electronic Pet Fencing System) and purchase details readily available.
Documenti correlati - Sistema di recinzione elettronica per animali domestici
 |
Guida operativa del sistema di recinzione interrata per cani testardi PetSafe PRF-3004XW-20 Questa guida operativa completa descrive in dettaglio l'installazione, la configurazione, l'addestramento e la risoluzione dei problemi del sistema di recinzione interrata per cani testardi PetSafe PRF-3004XW-20. Scopri come creare un'area di contenimento sicura per il tuo cane utilizzando questa tecnologia di recinzione elettronica, inclusi avvisi di sicurezza, descrizioni dei componenti, istruzioni dettagliate e fasi di addestramento. |
 |
Guida all'uso e all'addestramento per la recinzione interrata PetSafe Little Dog Deluxe PIG20-11041 Questa guida fornisce istruzioni complete per la configurazione, l'installazione e l'addestramento con il sistema di recinzione interrata PetSafe Little Dog Deluxe (modello PIG20-11041). ... |
 |
Wireless Fence: Safe & Simple Pet Containment System - User Guide Learn how to set up and use the Wireless Fence, a safe and effective pet containment system. This guide covers features, installation, training, and troubleshooting for your dog's safety. |
 |
Manuale del prodotto PetSafe Rechargeable In-Ground Fence PIG00-14673 Questo manuale del prodotto fornisce istruzioni complete per la configurazione, l'installazione, l'addestramento e la risoluzione dei problemi del sistema di recinzione interrata ricaricabile PetSafe (modello PIG00-14673). Descrive dettagliatamente le precauzioni di sicurezza, il funzionamento del sistema, la configurazione dei confini, l'applicazione del collare, le fasi di addestramento e i test del sistema per garantire un contenimento sicuro ed efficace degli animali domestici. |
 |
Sistema di recinzione elettronica per animali domestici PcEoTllar: Guida operativa e istruzioni per l'installazione Questa guida completa descrive in dettaglio la configurazione, il funzionamento e la risoluzione dei problemi del sistema di recinzione elettronica per animali domestici PcEoTllar. Scopri come installare il filo perimetrale, montare il trasmettitore, adattare il collare, testare il sistema e mantenerlo per la sicurezza e il contenimento del tuo cane. |
 |
Dog Guard Customer Manual: Your Guide to Out of Sight Fencing Comprehensive customer manual for Dog Guard Out of Sight Fencing systems. Learn about installation, operation, troubleshooting, and maintenance for your pet containment solution. |
Ask a question about this manual
Ask about setup, troubleshooting, compatibility, parts, safety, or missing instructions. Manuals+ will review the question and use this page’s manual context to help answer it.