Erbauer EAG18-115
Smerigliatrice angolare senza spazzole Erbauer 18V EAG18-Li 115mm Manuale utente
Model: EAG18-115
1. Introduzione e informazioni sulla sicurezza
This manual provides essential information for the safe and efficient operation of your Erbauer 18V Brushless Angle Grinder. Please read all instructions carefully before use to prevent injury and ensure proper tool function. Keep this manual for future reference.
Avvertenze generali sulla sicurezza
- Always wear eye protection, hearing protection, and suitable gloves when operating the grinder.
- Assicurarsi che il pezzo sia saldamente clamped prima della macinazione.
- Tenere le mani e il corpo lontani dal disco rotante.
- Non utilizzare accessori danneggiati o non adatti.
- Scollegare la batteria prima di effettuare qualsiasi regolazione, cambiare accessori o riporre l'utensile.
2. Componenti del prodotto
Familiarize yourself with the parts of your Erbauer Angle Grinder:
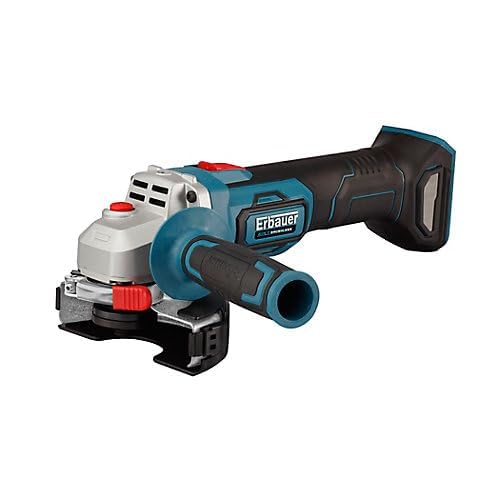
An image showing the Erbauer 18V Brushless Angle Grinder, model EAG18-Li 115mm. The tool is blue and black with a silver head, featuring a red power button and a black and blue side handle attached.
- Corpo smerigliatrice
- Pulsante di blocco del mandrino
- Interruttore On/Off
- Maniglia laterale
- Guardia protettiva
- Disco abrasivo (non incluso)
- Battery Port (battery not included)
3. Installazione e assemblaggio
3.1 Installazione della batteria
This tool operates with an Erbauer 18V battery pack (sold separately). Ensure the battery is fully charged before use.
- Allineare il pacco batteria con la porta della batteria sul macinino.
- Far scorrere la batteria in posizione finché non scatta in modo sicuro.
- Per rimuoverla, premere il pulsante di rilascio della batteria e farla scorrere fuori.
3.2 Fissaggio della maniglia laterale
The side handle can be attached to either side of the grinder head for optimal control.
- Screw the side handle clockwise into one of the threaded holes on the grinder head until it is tight.
3.3 Installazione della protezione
The protective guard must always be used to shield against sparks and debris.
- Allentare la protezione clampvite.
- Position the guard to cover the grinding disc and direct sparks away from you.
- Stringere la clampavvitare saldamente.
3.4 Mounting the Grinding Disc
Use only 115mm diameter grinding or cutting discs rated for the grinder's maximum RPM.
- Tenere premuto il pulsante di blocco del mandrino.
- Unscrew the outer flange using the provided spanner.
- Place the grinding disc onto the inner flange, ensuring it sits correctly.
- Screw the outer flange back on and tighten it firmly with the spanner while holding the spindle lock button.
- Rilasciare il pulsante di blocco del mandrino.
4. Istruzioni per l'uso
4.1 Accensione/Spegnimento
- To turn on: Slide the On/Off switch forward.
- To turn off: Slide the On/Off switch backward to the OFF position.
4.2 Tecniche di macinazione
- Hold the grinder firmly with both hands, one on the main handle and one on the side handle.
- Lasciare che il disco raggiunga la massima velocità operativa prima di entrare in contatto con il pezzo in lavorazione.
- Applicare una pressione leggera e uniforme. Non forzare l'utensile, poiché ciò potrebbe causare contraccolpi o danneggiare il disco.
- Maintain a shallow angle (typically 15-30 degrees) between the disc and the workpiece for grinding. For cutting, use a cutting disc and hold the tool perpendicular to the workpiece.
- Move the grinder smoothly across the surface to ensure an even finish and prevent overheating.
5. Manutenzione e conservazione
5.1 Pulizia
- Rimuovere sempre la batteria prima della pulizia.
- Regularly clean the ventilation slots to prevent dust buildup, which can lead to overheating. Use compressed air if available.
- Pulisci l'esterno dello strumento con un panno morbido eamp stoffa. Non utilizzare prodotti chimici aggressivi o detergenti abrasivi.
5.2 Conservazione
- Conservare il macinino in un luogo asciutto e sicuro, fuori dalla portata dei bambini.
- Remove the battery pack from the tool before long-term storage.
- Proteggere l'utensile dalla luce solare diretta e dalle temperature estreme.
6. Risoluzione Dei Problemi
| Problema | Possibile causa | Soluzione |
|---|---|---|
| Il macinino non si avvia | Battery not charged; Battery not inserted correctly; On/Off switch not fully engaged. | Charge battery; Reinsert battery securely; Ensure switch is in ON position. |
| Vibrazione eccessiva | Damaged or unbalanced disc; Disc not properly mounted; Loose side handle. | Replace disc; Re-mount disc correctly, ensuring flanges are tight; Tighten side handle. |
| Prestazioni ridotte | Battery low; Worn disc; Overheating. | Recharge battery; Replace disc; Allow tool to cool down, clean ventilation slots. |
7. Specifiche tecniche
- Marca: Erbaiolo
- Modello: EAG18-115
- Voltage: 18 Volt
- Diametro del disco: 115 millimetri
- Energia: 72 Watt
- Materiale: Metallo
- Colore: Blu
- ASIN: B0C7JWVC1F
8. Garanzia e supporto
This Erbauer product is covered by the manufacturer's standard warranty. For specific warranty terms and conditions, please refer to the documentation provided with your purchase or visit the official Erbauer website. For technical support, spare parts, or service inquiries, please contact Erbauer customer service through their official channels.
Per maggiori informazioni, potete visitare il sito Erbauer brand page on Amazon.
Ask a question about this manual
Ask about setup, troubleshooting, compatibility, parts, safety, or missing instructions. Manuals+ will review the question and use this page’s manual context to help answer it.