Introduzione
Thank you for choosing the Epson EB-L210SF projector. This manual provides essential information for the safe and efficient use of your projector. Please read it thoroughly before operating the device and keep it for future reference.
The Epson EB-L210SF is a 3LCD Full-HD projector designed for clear and vibrant image projection. It features a laser light source for long-lasting performance.
Informazioni importanti sulla sicurezza
- Sicurezza laser: Do not look directly into the projector lens when the laser light source is active. Avoid direct eye exposure to the laser beam.
- Ventilazione: Ensure adequate ventilation around the projector. Do not block ventilation openings. Overheating can cause damage.
- Fonte di energia: Utilizzare solo l'alimentatore specificato per questo proiettore.
- Gestione: Maneggiare il proiettore con cura. Evitare di farlo cadere o di sottoporlo a forti urti.
- Pulizia: Scollegare il cavo di alimentazione prima della pulizia. Utilizzare un panno morbido e asciutto. Non utilizzare detergenti liquidi o spray.
Impostare
1. Disimballaggio e posizionamento
Carefully remove the projector and all accessories from the packaging. Place the projector on a stable, level surface. Ensure there is sufficient space around the projector for proper ventilation.

Figura 1: Frontale e laterale view of the Epson EB-L210SF projector, showing the lens and ventilation grilles.
2. Collegamento dell'alimentazione
- Connect the supplied power cord to the projector's AC inlet.
- Collegare l'altra estremità del cavo di alimentazione a una presa elettrica con messa a terra.
3. Collegamento delle sorgenti di ingresso
The projector supports various input sources. Connect your device (computer, Blu-ray player, etc.) to the appropriate port on the projector's rear panel.

Figure 2: Rear panel of the projector, displaying various input and output ports including HDMI, Computer (VGA), Video, USB, and Audio connections.
- HDMI: Connect an HDMI cable from your device to one of the HDMI ports (HDMI 1 or HDMI 2).
- Computer (VGA): Connect a VGA cable from your computer to the Computer 1 or Computer 2 port. For audio, connect a separate audio cable to Audio 1 or Audio 2.
- Video: Connect composite video and audio cables to the Video and Audio (R/L) ports.
- USB: Use the USB-A port for connecting USB storage devices or the USB-B port for display over USB.
- LAN: Collegare un cavo Ethernet per il controllo e il monitoraggio della rete.
4. Accensione iniziale e regolazione dell'immagine
- Press the power button on the projector or remote control to turn on the device. The power indicator will illuminate.
- Regolare il anello di messa a fuoco around the lens until the image is sharp and clear.
- Utilizzare il zoom lever (if available) to adjust the image size.
- Se l'immagine appare trapezoidale, utilizzare il correzione trapezoidale feature (manual or automatic) to square the image. Refer to the Operating section for details on menu navigation.
Funzionamento del proiettore
1. Pannello di controllo finitoview
The control panel on top of the projector allows access to various functions and settings.
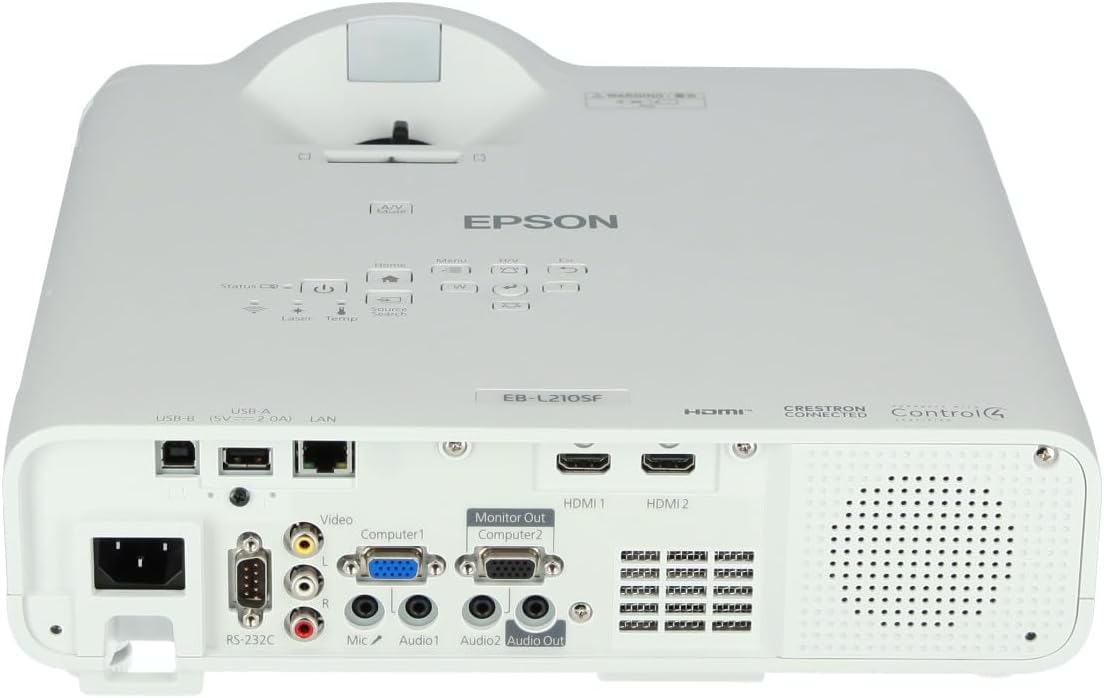
Figura 3: in alto view of the projector, highlighting the control panel with buttons for power, menu, source selection, and navigation.
- Pulsante di accensione: Accende o spegne il proiettore.
- Ricerca della fonte: Scorre le sorgenti di input disponibili.
- Pulsante Menu: Apre il menu OSD (On-Screen Display).
- Navigation Buttons (Arrow keys): Utilizzato per navigare tra le opzioni del menu.
- Pulsante Invio: Conferma le selezioni nel menu.
- Pulsante Esc: Esce dal menu corrente o torna alla schermata precedente.
- Pulsante Home: Accesses the home screen or quick settings.
- Disattivazione audio/video: Disattiva temporaneamente l'audio e oscura lo schermo.
2. Selecting an Input Source
Premere il tasto Ricerca fonte button on the control panel or remote control to cycle through the connected input sources (e.g., HDMI 1, HDMI 2, Computer 1, Video). The projector will automatically detect and display the active source.
3. Adjusting Image and Audio Settings
Premere il tasto Menu button to access the projector's on-screen display (OSD) menu. Use the navigation buttons to browse categories such as:
- Immagine: Regola luminosità, contrasto, colore, tinta, nitidezza e temperatura del colore.
- segnale: Configure input signal settings, aspect ratio, and overscan.
- Impostazioni: General projector settings like language, display options, and power management.
- Audio: Adjust volume, mute, and audio input selection.
Selezionare un'opzione e premere Entrare to modify its value. Press Esc per uscire dal menu.
Manutenzione
1. Pulizia del proiettore
- Esterno: Wipe the projector's exterior with a soft, dry, lint-free cloth. For stubborn dirt, dampInumidire leggermente il panno con acqua, quindi asciugare.
- Lente: Pulire delicatamente la lente con un panno o una carta apposita. Evitare l'uso di materiali abrasivi o di una forza eccessiva.
- Filtro dell'aria: Regularly check and clean the air filter to prevent dust buildup, which can affect performance and cause overheating. Refer to the projector's on-screen menu for filter maintenance reminders.
2. Sorgente luminosa laser
The Epson EB-L210SF uses a laser light source, which offers a long operational life and does not require lamp replacement. No user maintenance is typically required for the laser light source itself.
Risoluzione dei problemi
Se riscontri problemi con il proiettore, fai riferimento ai seguenti problemi comuni e alle relative soluzioni:
| Problema | Possibile causa/soluzione |
|---|---|
| Nessuna immagine proiettata |
|
| L'immagine è sfocata o fuori fuoco |
|
| L'immagine è distorta (trapezoidale) |
|
| Nessun suono |
|
| Projector is not wireless | The Epson EB-L210SF is not inherently a wireless projector. Wireless functionality typically requires an optional external wireless adapter, which is sold separately. Please consult Epson's official website or your retailer for compatible wireless adapters. |
| Overheating warning (Temp indicator) |
|
Specifiche
| Caratteristica | Dettaglio |
|---|---|
| Numero di modello | V11HA75080 |
| Risoluzione dello schermo | 1920 x 1080 (Full HD) |
| Tecnologia di connettività | HDMI, VGA, USB, LAN |
| Dimensioni del prodotto | 11.81 x 11.81 x 11.81 pollici |
| Peso dell'articolo | 10.14 libbre |
| Sorgente luminosa | Laser |
| Produttore | Epson |
| Usi consigliati | Monitoraggio |
| Caratteristica speciale | Leggero |
| Batterie richieste | 1 AAAA (for remote control, not included with projector unit) |
| Data prima disponibilità | 14 novembre 2023 |
Garanzia e supporto
For detailed warranty information, please refer to the warranty card included with your product or visit the official Epson websito. I termini e le condizioni della garanzia possono variare in base alla regione.
For technical support, product registration, or to download the latest drivers and software, please visit the official Epson support website or contact Epson customer service in your region. Contact information can typically be found on the Epson websito.