
1. Introduzione
This manual provides instructions for the installation, operation, and maintenance of your NETGEAR GS305P 5-Port PoE Gigabit Ethernet Unmanaged Switch. This device is designed to expand your network connectivity with both standard Gigabit Ethernet and Power over Ethernet (PoE+) capabilities, ideal for small office or home network environments.
2. Contenuto della confezione
Verifica che il pacco contenga i seguenti articoli:
- NETGEAR GS305P 5-Port PoE Gigabit Ethernet Unmanaged Switch (GS305Pv3)
- Adattatore di alimentazione
- Kit di montaggio a parete
- Guida rapida all'installazione

Image: The NETGEAR GS305P switch, power adapter, and power cord as typically found in the package.
3. Prodotto finitoview
The NETGEAR GS305P is an unmanaged switch featuring 5 Gigabit Ethernet ports, with 4 of these ports supporting PoE+ (Power over Ethernet Plus). It provides a total power budget of 63W for connected PoE devices. The switch is designed for plug-and-play operation, requiring no software installation or configuration.
Video: Un oltreview of the NETGEAR 5-Port PoE Switch, demonstrating its features and ease of use.
Pannello frontale

Image: Front panel of the GS305P switch, highlighting the 5 Gigabit Ethernet ports and LED indicators for power, PoE Max, link/activity, and PoE fault.
- LED di potenza: Indica lo stato dell'alimentazione.
- LED PoE massimo: Illuminates when PoE power consumption is near maximum capacity.
- Link/Activity LEDs (Ports 1-5): Green for 1000Mbps link, Yellow for 10/100Mbps link. Blinks to indicate activity.
- PoE Status LEDs (Ports 1-4): Green for PoE powered, Yellow for PoE fault.
- Porte Ethernet (1-5): RJ-45 ports for network connections. Ports 1-4 support PoE+.
4. Configurazione e installazione
The NETGEAR GS305P switch is designed for simple plug-and-play installation. No software configuration is required.
4.1 Collegamento dello switch
- Connect the power adapter to the switch's power input and then plug the power adapter into an electrical outlet. The Power LED on the switch will illuminate.
- Connect your router or modem to any of the 5 Gigabit Ethernet ports on the switch using an Ethernet cable.
- Connect your network devices (computers, printers, network storage) to the remaining Gigabit Ethernet ports. For PoE-powered devices (e.g., IP cameras, wireless access points), connect them to ports 1-4.

Image: A diagram illustrating the plug-and-play nature of the unmanaged switch, connecting various devices like WiFi Access Points, IP Cameras, Computers, and NAS.
4.2 Opzioni di montaggio
The GS305P switch can be placed on a desktop or mounted on a wall. A wallmount kit is included for secure installation.
- Posizionamento sul desktop: Ensure the switch is placed on a flat, stable surface with adequate ventilation.
- Wall Mount: Use the provided wallmount kit to secure the switch to a wall. Refer to the quick installation guide for detailed steps on wall mounting.
5. Funzionamento dell'interruttore
Once connected, the switch operates automatically. The LEDs provide visual feedback on the network status.
- Accensione: The Power LED will be green when the switch is receiving power.
- Network Activity: The Link/Activity LEDs will light up when a device is connected and blink to indicate data transmission.
- Alimentazione PoE: For PoE-powered devices, the PoE Status LED will be green when power is being supplied. If a PoE fault occurs, the LED will turn yellow.
- Funzionamento silenzioso: The fanless design ensures quiet operation, making it suitable for noise-sensitive environments.
6. Manutenzione
Per garantire prestazioni ottimali e longevità del tuo switch, segui queste linee guida per la manutenzione:
- Pulizia: Utilizzare un panno morbido e asciutto per pulire l'esterno dell'interruttore. Non utilizzare detergenti liquidi o spray.
- Ventilazione: Assicurarsi che le aperture di ventilazione non siano bloccate per evitare il surriscaldamento.
- Ambiente: Operate the switch within its specified temperature and humidity ranges. Avoid direct sunlight or extreme temperatures.
- Gestione dei cavi: Keep network cables organized to prevent strain on ports and improve airflow.
7. Risoluzione Dei Problemi
If you encounter issues with your NETGEAR GS305P switch, refer to the following common troubleshooting steps:
- Nessun potere: Ensure the power adapter is securely connected to the switch and a working electrical outlet. Check the Power LED.
- Nessun collegamento/attività: Verify that Ethernet cables are properly connected to both the switch and the connected device. Try a different cable or port. Check the Link/Activity LED.
- Dispositivo PoE non acceso: Ensure the device is PoE-compatible and connected to one of the PoE+ ports (1-4). Check the PoE Status LED for the port; a yellow light indicates a fault. Verify the total power budget (63W) is not exceeded by all connected PoE devices.
- Bassa velocità di rete: Ensure all connected devices and cables support Gigabit Ethernet for optimal performance. Check for excessive network traffic.
8. Specifiche
Key technical specifications for the NETGEAR GS305P switch:
| Caratteristica | Descrizione |
|---|---|
| Modello | GS305P (GS305Pv3) |
| Numero di porte | 5 porte Gigabit Ethernet |
| Porte PoE+ | 4 (Porte 1-4) |
| Budget totale di alimentazione PoE | 63W |
| Velocità di trasferimento dati | 1000 Mbps (Gigabit) |
| Tipo di interruttore | Non gestito |
| Materiale della cassa | Metallo |
| Dimensioni (L x P x A) | 9.5" x 6.7" x 3.4" (approximate, from product data) |
| Voltage | 240 Volts (Power adapter input) |
| Ambiente operativo | Designed for indoor use in U.S. & CA. |
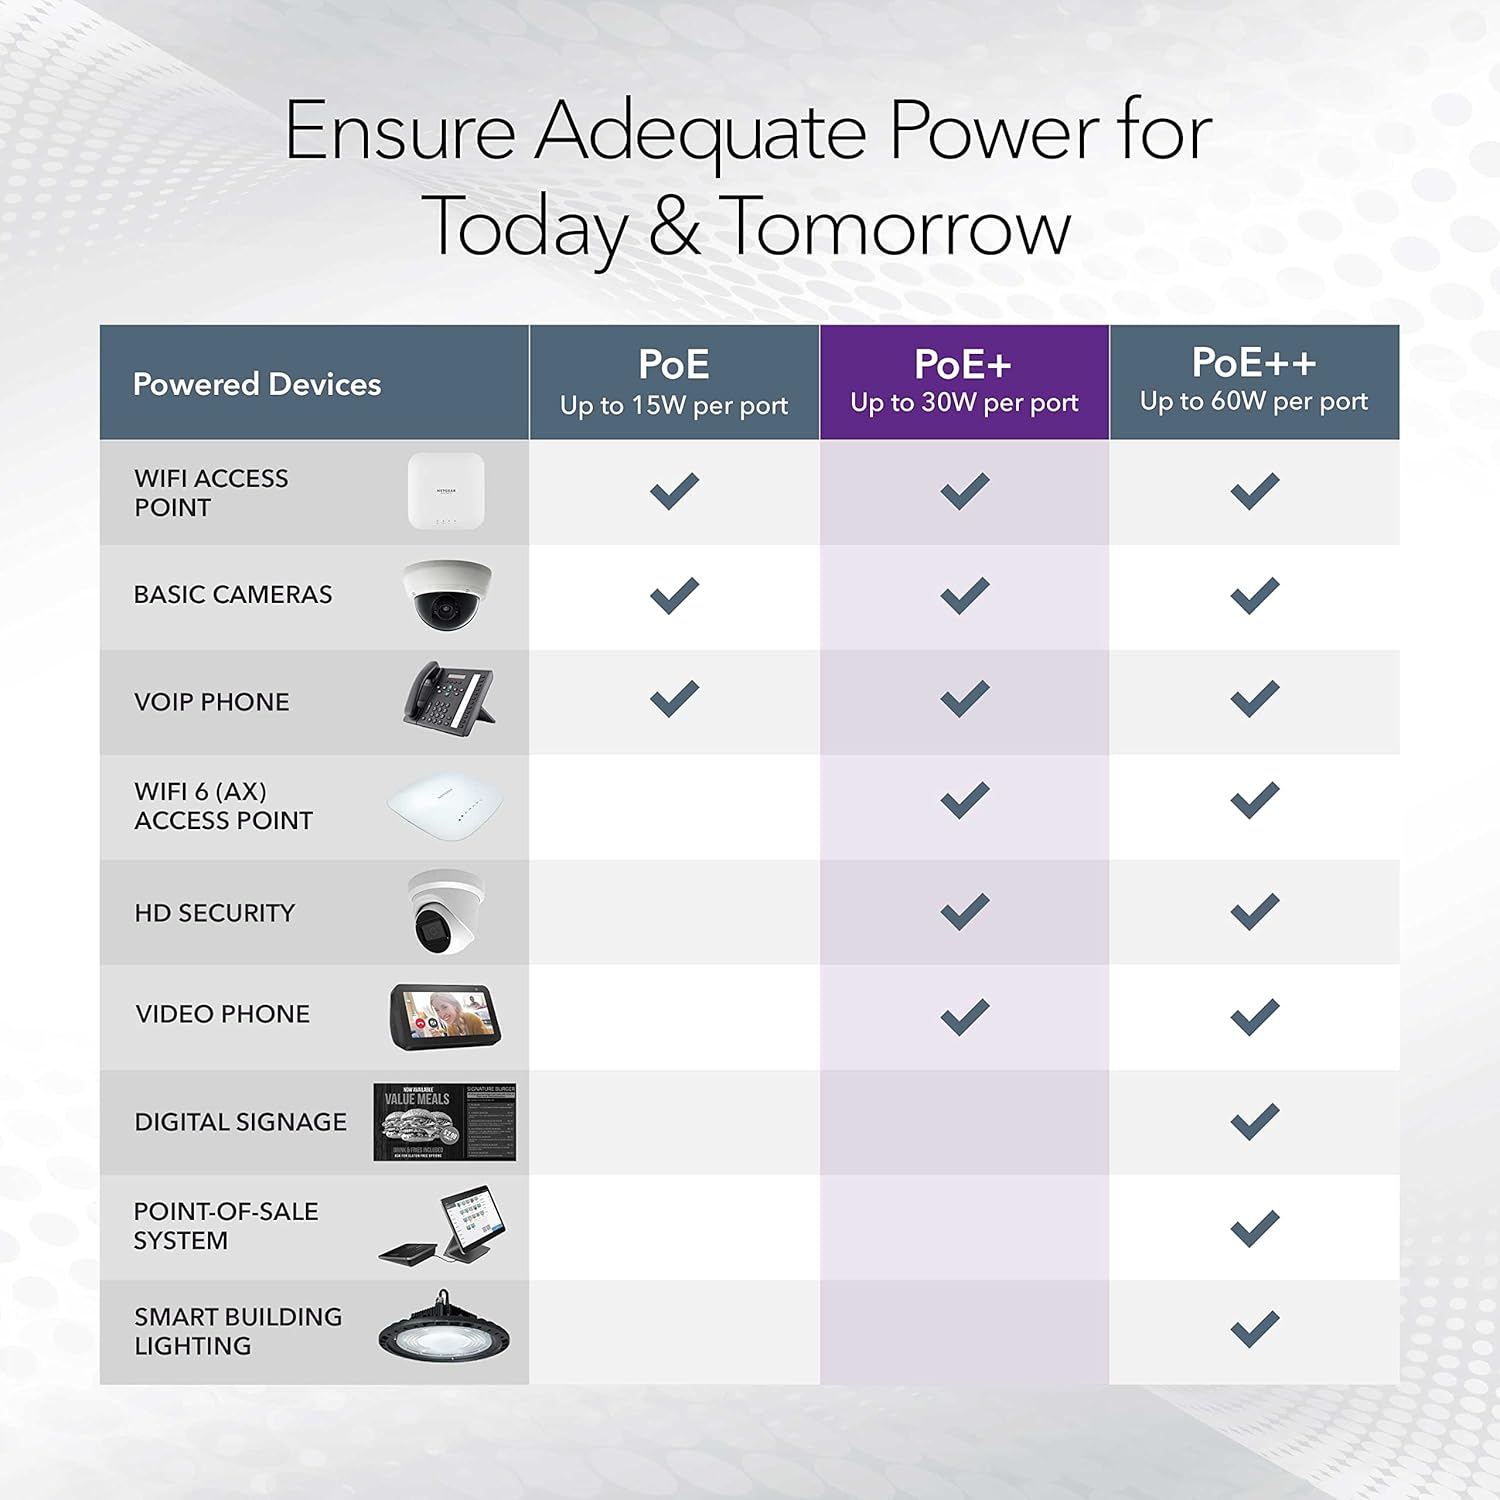
Image: A table illustrating the power capabilities of PoE, PoE+, and PoE++ for different powered devices.
9. Garanzia e supporto
9.1 Informazioni sulla garanzia
The NETGEAR GS305P switch comes with an industry-leading Garanzia hardware limitata di 3 anni. Please retain your proof of purchase for warranty claims. For full warranty terms and conditions, refer to the official NETGEAR websito o la documentazione inclusa nel prodotto.
9.2 Supporto tecnico
For technical assistance, product registration, or to access additional resources, visit the official NETGEAR support website. You can find FAQs, firmware updates, and community forums there.
Supporto NETGEAR Websito: www.netgear.com/support