1. Introduzione
Grazie per l'acquistoasing the Klipsch Reference Premiere RP-1400SW 14-inch High Excursion Subwoofer. This subwoofer is designed to deliver powerful and accurate low-frequency sound, enhancing your home theater or music listening experience. This manual provides essential information for proper setup, operation, and care of your new subwoofer.

Figure 1.1: Klipsch Reference Premiere RP-1400SW Subwoofer (Grille Removed)
2. Informazioni importanti sulla sicurezza
Please read all safety instructions before operating this product. Keep these instructions for future reference.
- Fonte di energia: Connect the subwoofer only to a power supply of the type described in the operating instructions or as marked on the appliance.
- Ventilazione: Assicurare una ventilazione adeguata. Non ostruire le aperture di ventilazione. Installare secondo le istruzioni del produttore.
- Calore: Non installare vicino a fonti di calore come radiatori, bocchette di riscaldamento, stufe o altri apparecchi (inclusi amplificatori) che producono calore.
- Acqua e umidità: Non utilizzare questo apparecchio vicino all'acqua o all'umidità.
- Pulizia: Pulire solo con un panno asciutto.
- Manutenzione: Affidare tutti gli interventi di assistenza a personale di assistenza qualificato. L'assistenza è richiesta quando l'apparecchio è stato danneggiato in qualsiasi modo, ad esempio se il cavo di alimentazione o la spina sono danneggiati, se è stato versato del liquido o sono caduti degli oggetti nell'apparecchio, se l'apparecchio è stato esposto a pioggia o umidità, se non funziona normalmente o se è caduto.
- Oggetto pesante: This subwoofer is heavy (85 lbs). Exercise caution when moving to prevent injury.
3. Cosa c'è nella scatola
Verificare che tutti i componenti siano presenti:
- Klipsch Reference Premiere RP-1400SW Subwoofer
- Cavo di alimentazione
- Manuale di istruzioni (questo documento)
4. Impostazione
4.1 Posizionamento del subwoofer
The Klipsch RP-1400SW features a front-firing driver and Aerofoil front slot port, allowing for flexible placement within your room. Experiment with different locations to find the optimal bass response for your listening environment. Generally, corner placement can enhance bass output, while placement along a wall can provide a more balanced sound. The shock-absorbing rubber feet help isolate the subwoofer from the floor.

Figure 4.1: Front-Firing Driver and Aerofoil Front Slot Port

Figure 4.2: Subwoofer Design Features (Rounded Corners, Shock-Absorbing Feet)
4.2 Connessioni
Your RP-1400SW subwoofer offers both wired and wireless connectivity options.

Figure 4.3: Subwoofer Rear Panel Connections and Controls
- Wired Connection (RCA/LFE):
Connect an RCA cable from the LFE output of your AV receiver to the LFE input on the subwoofer's rear panel. If your receiver does not have an LFE output, use a standard RCA stereo cable to connect the receiver's pre-out (subwoofer output) to both the left and right RCA inputs on the subwoofer.
- Wireless Connection (Optional WA-2 Kit):
For wireless operation, you can connect your subwoofer with a Klipsch WA-2 Wireless Subwoofer Kit (sold separately). This allows for flexible placement without the need for long RCA cables. Refer to the WA-2 kit's instructions for pairing and setup.

Figure 4.4: Wireless Connectivity with Optional WA-2 Kit
- Collegamento elettrico:
Once audio connections are made, plug the supplied power cord into the subwoofer's power inlet and then into a suitable wall outlet.
5. Utilizzo del subwoofer
5.1 controlli oltreview
The rear panel of your subwoofer features several controls to fine-tune its performance:

Figure 5.1: Easy-to-Use Controls on Rear Panel
- GAIN (Volume): Regola il livello di uscita del subwoofer. Inizia con un'impostazione bassa e aumentala gradualmente finché i bassi non si fondono perfettamente con gli altoparlanti principali.
- LOW-PASS (Crossover): This control sets the upper frequency limit for the subwoofer. If using an AV receiver with LFE output, set this to LFE (or bypass if available on your receiver). If connecting via stereo RCA, adjust this to blend with your main speakers' low-frequency cutoff.
- FASE (0°/180°): Regola la fase dell'uscita del subwoofer rispetto agli altoparlanti principali. Sperimenta entrambe le impostazioni per trovare quella che fornisce i bassi più incisivi e coerenti.
- POWER (ON/AUTO/OFF):
- SOPRA: Subwoofer remains continuously on.
- AUTO: Subwoofer automatically turns on when an audio signal is detected and enters a low-power standby mode after a period of inactivity.
- OFF: Il subwoofer è spento.
The 1/2-watt standby mode in AUTO setting ensures exceptional efficiency and reduces energy costs.
5.2 Accensione iniziale e regolazione
- Assicurarsi che tutti i collegamenti siano sicuri.
- Set the GAIN control to its minimum position.
- Set the LOW-PASS control to LFE if using an AV receiver, or to a suitable frequency (e.g., 80Hz) if connecting via stereo RCA.
- Impostare l'interruttore PHASE su 0°.
- Impostare l'interruttore POWER su AUTO.
- Play some audio with significant bass content. Gradually increase the GAIN control until the subwoofer output blends with your main speakers.
- Experiment with the PHASE switch (0° vs. 180°) to determine which setting provides the most impactful and seamless bass response in your listening position.
For optimal performance, consider using your AV receiver's automatic room correction system (if available) after initial setup.
5.3 Product Video: Reference Premiere Subwoofers
Video 5.1: An official Klipsch video showcasing the features and design of the Reference Premiere Subwoofers, including the RP-1400SW. This video highlights advanced acoustics, balanced performance, front-firing Cerametallic woofers, high-efficiency Class D amplifier, front-firing slot port, detailed design, and easy-to-use controls.
6. Manutenzione
To ensure the longevity and optimal performance of your Klipsch RP-1400SW subwoofer, follow these simple maintenance guidelines:
- Pulizia: Dust the cabinet regularly with a dry, soft cloth. Avoid using abrasive cleaners, solvents, or strong detergents, as these can damage the ebony vinyl finish.
- Posizionamento: Avoid placing the subwoofer in direct sunlight or near heat sources, which can cause discoloration or damage to the cabinet.
- Ventilazione: Assicurarsi che la parte posteriore amplifier panel has adequate airflow. Do not block the heat sink.
- Griglia: The durable woven cloth grille can be gently cleaned with a soft brush or vacuum cleaner attachment to remove dust.
7. Risoluzione Dei Problemi
If you experience issues with your subwoofer, consult the following table for common problems and solutions:
| Problema | Possibile causa | Soluzione |
|---|---|---|
| Nessun suono dal subwoofer |
|
|
| Bassi deboli o distorti |
|
|
| Il subwoofer ronza o ronza |
|
|
Se il problema persiste dopo aver provato queste soluzioni, contattare l'assistenza clienti Klipsch.
8. Specifiche
Key technical specifications for the Klipsch Reference Premiere RP-1400SW Subwoofer:
| Caratteristica | Dettaglio |
|---|---|
| Numero di modello | Modello RP-1400SW |
| Marca | Klipsch |
| Tipo di altoparlante | Subwoofer |
| Diametro del woofer | 14 pollici |
| Tipo di driver audio | Dynamic Driver (Cerametallic) |
| Potenza massima in uscita dell'altoparlante | 600 Watt |
| Potenza RMS | 500 Watt |
| Risposta in frequenza | 20Hz - 1kHz (approximate, based on A+ content) |
| Tecnologia di connettività | Wired RCA, LFE, and WA-2 Wireless Port |
| Modalità di uscita audio | Stereo, suono surround |
| Tipo di montaggio | Da terra |
| Materiale di recinzione | Legna |
| Colore | Ebano |
| Fonte di alimentazione | Elettrico con cavo |
| Dimensioni dell'articolo (P x L x A) | 25.67"P x 20"L x 21.34"A |
| Peso dell'articolo | 85 libbre |
| Codice UPC | 743878047424 |
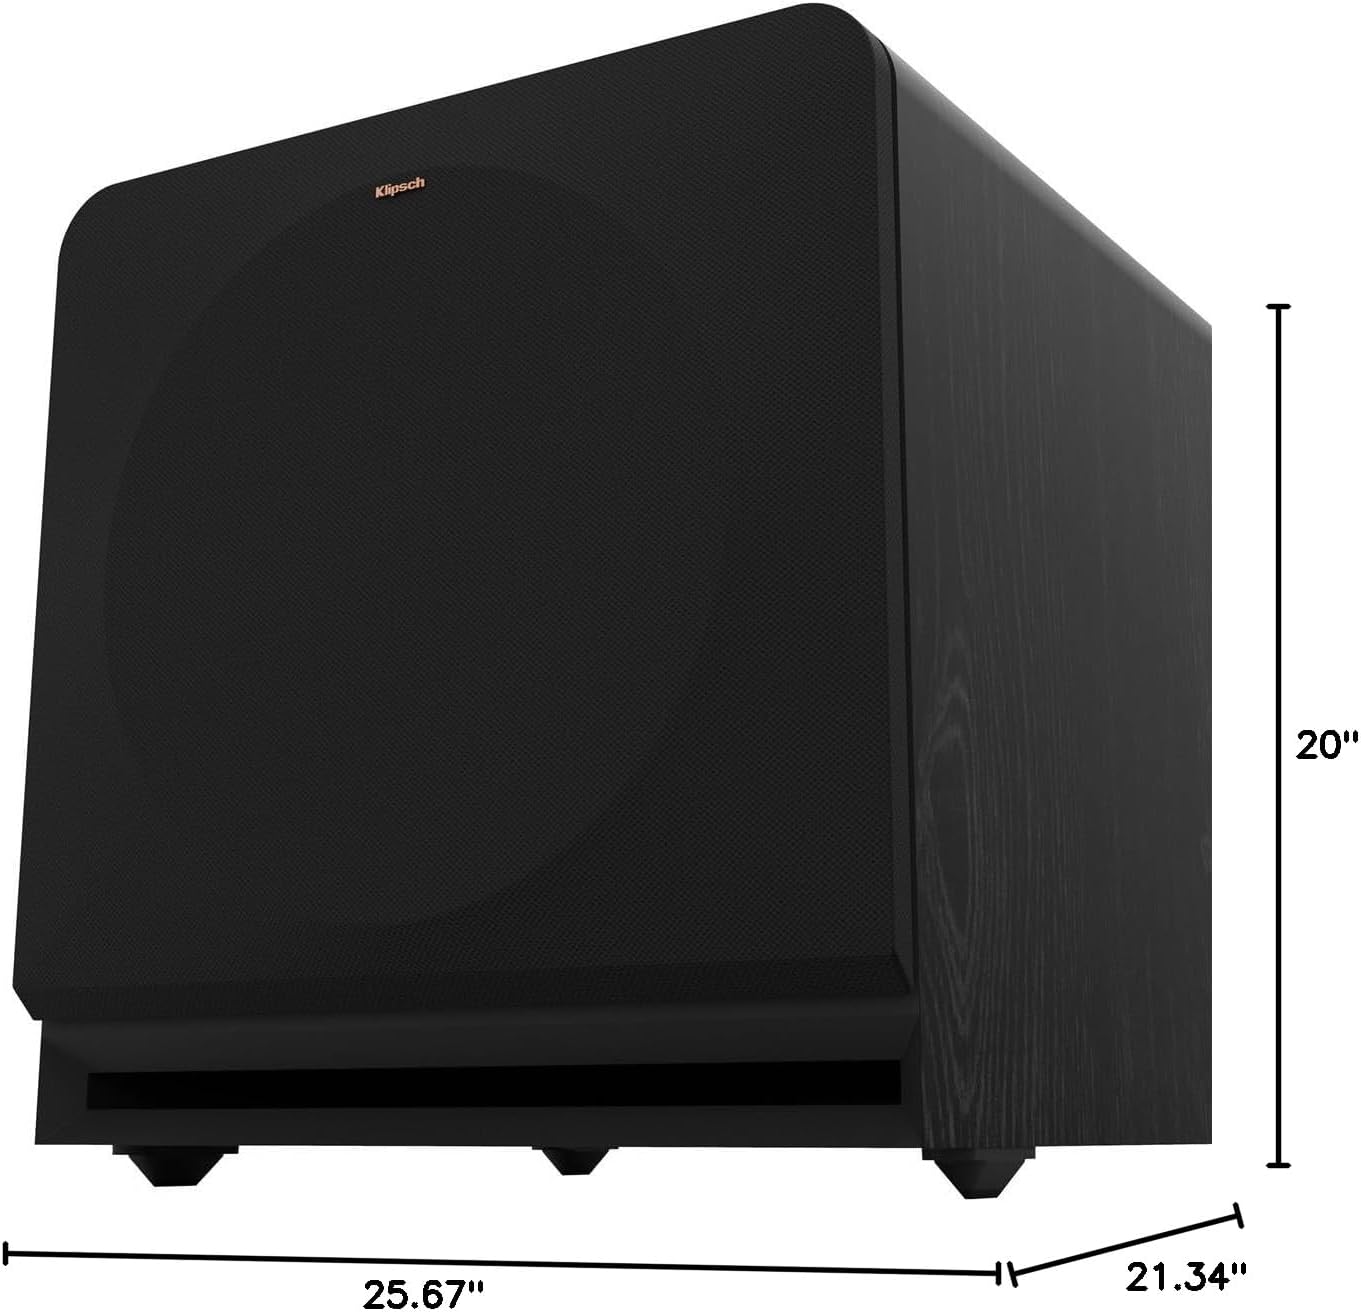
Figure 8.1: Subwoofer Dimensions
9. Garanzia e supporto
9.1 Informazioni sulla garanzia
The Klipsch Reference Premiere RP-1400SW Subwoofer comes with a limited warranty:
- Elettronica: Due (2) anni
- Woofer, Cabinet, and Non-Electrical Mechanics: Cinque (5) anni
Please retain your proof of purchase for warranty claims. For full warranty terms and conditions, refer to the official Klipsch websito o contattare l'assistenza clienti.
9.2 Assistenza clienti
For further assistance, technical support, or warranty inquiries, please visit the official Klipsch website or contact their customer service department. Contact details can typically be found on the Klipsch websito nella sezione "Supporto" o "Contattaci".