1. Introduzione
Thank you for choosing the XTRONS TIX125L 10.1-inch Android 12 Car Stereo. This advanced multimedia system features an Octa-core processor, 8GB RAM, 128GB ROM, built-in GPS, Wi-Fi, 4G connectivity, Apple CarPlay, Android Auto, and a Digital Sound Processor (DSP). Its rotatable QLED display offers a versatile and intuitive user experience. This manual provides essential information for installation, operation, maintenance, and troubleshooting to ensure optimal performance and user satisfaction.
2. Informazioni sulla sicurezza
- Installazione professionale consigliata: Data la complessità degli impianti elettrici delle automobili, si consiglia vivamente l'installazione da parte di un professionista per evitare danni all'unità o al veicolo.
- Alimentazione elettrica: Assicurarsi che l'unità sia collegata a un alimentatore da 12 V CC con messa a terra negativa. Vol. erratotagpuò causare danni.
- Cablaggio: Follow all wiring diagrams carefully. Improper wiring can lead to malfunctions, electrical shorts, or fire.
- Sicurezza di guida: Non utilizzare l'unità in modo da distrarti dalla guida. Dare sempre priorità alla sicurezza stradale.
- Temperatura: Evitare di esporre l'unità a temperature estreme o alla luce solare diretta per periodi prolungati.
- Umidità: Mantenere l'unità asciutta. L'esposizione all'umidità può danneggiarla.
- Ventilazione: Assicurare un'adeguata ventilazione attorno all'unità per evitare il surriscaldamento.
3. Contenuto della confezione
Si prega di verificare il contenuto del pacco in base all'elenco sottostante:
- XTRONS TIX125L Main Head Unit
- Cablaggio di alimentazione
- Cavi di uscita/ingresso RCA
- Antenna GPS
- Cavi USB (x2)
- Antenna 4G LTE
- Mounting Brackets (x2 pairs)
- Viti
- Microfono esterno
- Manuale dell'utente (questo documento)

Figura 3.1: Accessori inclusi e unità principale.
4. Configurazione e installazione
This section provides general guidelines for installing your XTRONS TIX125L car stereo. For specific vehicle models, additional adapters or professional assistance may be required.
4.1 Passaggi di pre-installazione
- Scollegare la batteria: Prima di iniziare, scollegare il terminale negativo della batteria del veicolo per evitare cortocircuiti.
- Rimuovere la vecchia unità: Rimuovere con cautela l'autoradio esistente dal cruscotto.
- Ispezionare il cablaggio: Identify the vehicle's wiring harness. You may need a vehicle-specific adapter harness (not included) to connect to the XTRONS unit.
4.2 Collegamenti di cablaggio
- Cablaggio di potenza: Connect the provided power wiring harness to the unit and then to your vehicle's wiring. Ensure all connections (power, ground, ACC, illumination) are correct.
- Antenna GPS: Collegare l'antenna GPS e montarla in una posizione con una vista libera view del cielo (ad esempio sul cruscotto o sotto il parabrezza).
- Antenna 4G LTE: Connect the 4G LTE antenna for cellular data connectivity.
- Antenna WiFi: The unit has a built-in Wi-Fi module. Ensure no obstructions block its signal.
- Cavi USB: Route the USB cables to an accessible location (e.g., glove compartment) for connecting USB drives or smartphones.
- Microfono esterno: Connect the external microphone for improved call quality during Bluetooth hands-free operation. Position it near the driver.
- Cavi RCA: Collegare i cavi RCA per esterni ampamplificatori, subwoofer o ingressi/uscite video ausiliari, a seconda delle necessità.
- Connessioni opzionali: Connect optional accessories such as a rear-view camera, DVR camera, DAB+ box, or TPMS kit according to their respective manuals.
4.3 Montaggio dell'unità
- Proteggere l'unità principale: Use the provided mounting brackets and screws to secure the main unit into the dashboard opening.
- Regola visualizzazione: The 10.1-inch display is rotatable and adjustable. Position it for optimal viewangolo di inclinazione e accessibilità.
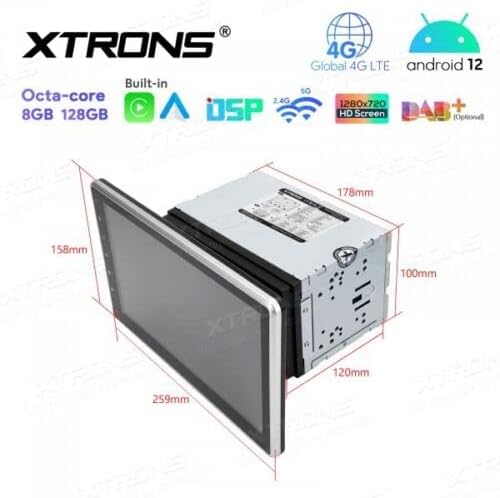
Figura 4.1: Dimensioni dell'unità per la pianificazione dell'installazione.
4.4 Post-installazione
- Ricollegare la batteria: Ricollegare il terminale negativo della batteria del veicolo.
- Accensione iniziale: Turn on the vehicle ignition and power on the stereo.
- Funzioni di test: Verify all functions, including audio, radio, GPS, Bluetooth, and touchscreen responsiveness.
5. Istruzioni per l'uso
This section details the operation of the XTRONS TIX125L car stereo's various features.
5.1 Funzionamento di base
- Accensione/spegnimento: Tieni premuto il pulsante di accensione (solitamente sul pannello frontale) per accendere o spegnere l'unità. Una breve pressione in genere disattiva/riattiva l'audio.
- Interfaccia touchscreen: Navigate the Android 12 interface by tapping, swiping, and pinching on the capacitive touchscreen.
- Controllo del volume: Regola il volume utilizzando i pulsanti fisici o i controlli sullo schermo.
- Schermata iniziale: The main screen provides access to frequently used applications and widgets.

Figure 5.1: Main user interface with navigation and media playback.
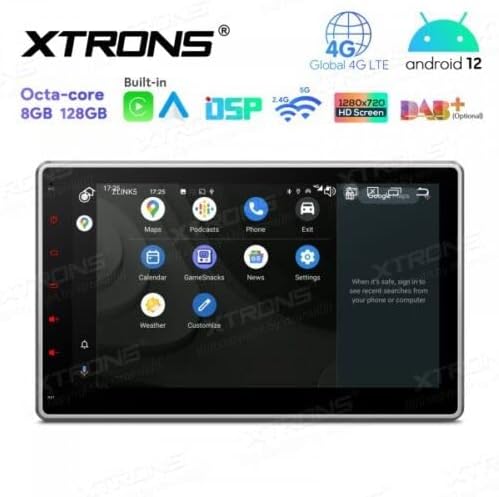
Figure 5.2: Android app drawer with various applications.
5.2 Navigazione GPS
The unit comes with a built-in GPS module. You can use pre-installed navigation apps or download others from the Google Play Store.
- Antenna GPS: Assicurarsi che l'antenna GPS sia collegata correttamente e abbia una visuale libera view del cielo per un posizionamento accurato.
- Aggiornamenti mappa: Keep your navigation maps updated for the best routing experience.
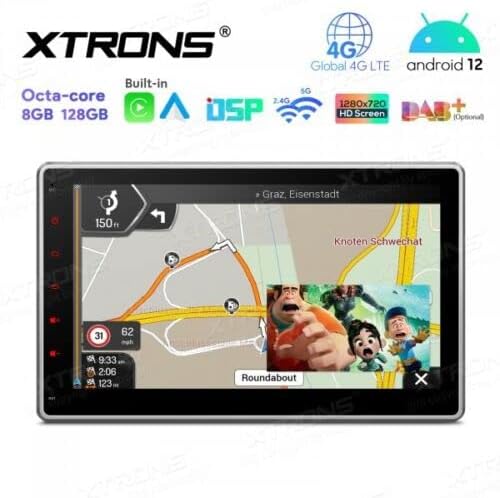
Figure 5.3: Navigation interface with split-screen functionality.
5.3Bluetooth 5.0
Collega il tuo smartphone tramite Bluetooth per effettuare chiamate in vivavoce e riprodurre contenuti audio in streaming.
- Abbinamento: Vai alle impostazioni Bluetooth sull'unità e sul tuo telefono. Cercare available devices and select the XTRONS unit to pair.
- Chiamate in vivavoce: Make and receive calls directly from the unit's screen. Use the external microphone for clear voice transmission.
- Streaming audio: Riproduci la musica dal tuo telefono attraverso gli altoparlanti stereo dell'auto.
5.4 Connettività Wi-Fi e 4G
Access the internet and online services using Wi-Fi or a 4G SIM card.
- Wifi: Connect to a Wi-Fi hotspot (e.g., from your phone or home network) via the Wi-Fi settings.
- 4G LTE: Insert a compatible 4G SIM card into the designated slot (if available) and connect the 4G antenna for mobile data access.
5.5 Apple CarPlay / Android Auto
Integra il tuo smartphone per un'esperienza di guida più sicura e intelligente.
- Connessione: Connect your iPhone or Android phone via USB or wirelessly (if supported by your phone and the unit's software).
- Caratteristiche: Access navigation, music, messages, and other compatible apps directly on the stereo display.

Figure 5.4: Apple CarPlay / Android Auto interface.
5.6 Processore audio digitale (DSP)
Personalizza la tua esperienza audio con il DSP integrato.
- Equalizzatore: Regola le bande di frequenza per ottimizzare l'uscita audio in base alle tue preferenze.
- Effetti sonori: Explore various sound presets and effects.
5.7 Mirroring dello schermo
Display your smartphone's screen directly on the car stereo.
- Connessione: Follow the instructions within the Screen Mirroring app on the unit to connect your phone (usually via Wi-Fi or USB).
5.8 Riproduzione USB/SD
Riproduci contenuti multimediali fileda unità USB o schede SD.
- Porte USB: Connect USB flash drives (up to 128GB) to the provided USB ports.
- Slot per scheda SD: Insert an SD card (up to 64GB) into the designated slot.
- Lettore multimediale: Use the built-in media player app to browse and play audio or video files.
5.9 Radio (FM/AM, DAB+)
Ascolta le tue stazioni radio preferite.
- FM/AM: Use the radio app to scan for stations, save presets, and switch between FM and AM bands.
- DAB+ (trasmissione audio digitale): This feature requires an optional DAB+ receiver box (not included). Once connected, you can enjoy higher quality digital radio broadcasts.
5.10 Comandi al volante
Control the stereo using your vehicle's steering wheel buttons.
- Configurazione: This feature typically requires a vehicle-specific CAN-Bus adapter (not included) and configuration within the unit's settings.
5.11 Rear Camera and DVR Input
Enhance driving safety with optional camera systems.
- Telecamera posteriore: Connect an optional rear-view camera. The display will automatically switch to the camera view quando il veicolo è in retromarcia.
- Telecamera DVR: Connect an optional DVR (Digital Video Recorder) camera to record your driving.
5.12 Supporto TPMS
Monitor your tire pressure with an optional TPMS (Tire Pressure Monitoring System) kit.
- Connessione: This feature requires an optional TPMS kit (not included). Once connected, tire pressure data will be displayed on the unit.
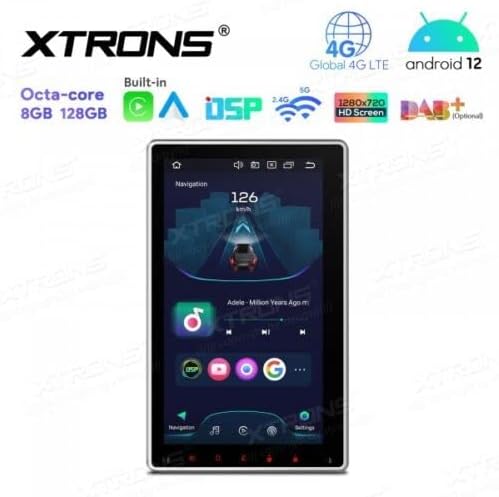
Figure 5.5: Vertical screen orientation for navigation.
6. Manutenzione
Una corretta manutenzione garantisce la longevità e le prestazioni ottimali dell'autoradio.
- Pulizia dello schermo: Utilizzare un panno morbido e privo di lanugine per pulire delicatamente il touchscreen. Per le macchie ostinate, strofinare leggermenteampPulisci il panno con acqua o un detergente per schermi. Evita prodotti chimici aggressivi.
- Pulizia generale: Keep the unit and surrounding area free from dust and debris.
- Aggiornamenti software: Controllare periodicamente il sito ufficiale XTRONS website for available software or firmware updates to improve performance and add new features. Follow update instructions carefully.
7. Risoluzione Dei Problemi
If you encounter issues with your XTRONS TIX125L, refer to the following common problems and solutions.
| Problema | Possibile causa | Soluzione |
|---|---|---|
| L'unità non si accende. | Nessuna connessione di alimentazione, fusibile bruciato, cablaggio errato. | Check power wiring, vehicle fuse box, and the unit's fuse. Ensure battery is connected. |
| Nessun suono. | Volume muted, incorrect audio source, speaker wiring issues. | Check volume level, ensure correct audio source is selected. Verify speaker connections. |
| Poor GPS signal or no signal. | GPS antenna not connected, antenna obstructed, faulty antenna. | Ensure GPS antenna is securely connected and mounted in a clear location. Replace antenna if necessary. |
| Problemi di connessione Bluetooth. | Dispositivo non in modalità di associazione, interferenza, processo di associazione non corretto. | Assicurati che entrambi i dispositivi siano in modalità di associazione. Elimina le associazioni precedenti e riprova. Avvicinati all'unità. |
| Il touchscreen non risponde. | Software glitch, screen dirty, hardware issue. | Riavviare l'unità. Pulire lo schermo. Se il problema persiste, contattare l'assistenza. |
| Apps crash or freeze. | Insufficient memory, software bug, incompatible app. | Close background apps. Clear app cache. Update software if available. Uninstall and reinstall problematic apps. |
Se il problema persiste dopo aver provato queste soluzioni, contattare l'assistenza clienti XTRONS per ulteriore assistenza.
8. Specifiche
Below are the technical specifications for the XTRONS TIX125L car stereo:
- Marca: XTRONI
- Modello: TIX125L
- Dimensioni dello schermo: 10.1 pollici
- Tipo di visualizzazione: QLED, Capacitive Touchscreen, LED
- Sistema operativo: Androide 12
- Processore: Octa-Core
- Memoria RAM: 8 GB
- ROM: 128GB (Expandable via USB/SD)
- Connettività: Bluetooth 5.0, USB, Wi-Fi, 4G LTE (SIM card reader included)
- Navigazione: Built-in GPS (Supports various map types)
- Caratteristiche speciali: Apple CarPlay, Android Auto, Digital Sound Processor (DSP), Screen Mirroring, Rotatable Display, Equalizer
- Archiviazione supportata: USB (fino a 128 GB), SD (fino a 64 GB)
- Metodo di controllo: Schermo tattile
- Tipo di montaggio: Nel cruscotto
- Tipo di veicolo compatibile: Motocicletta (Note: Product description states 'Motocicletta', but typically these units are for cars. Please verify compatibility with your specific vehicle.)
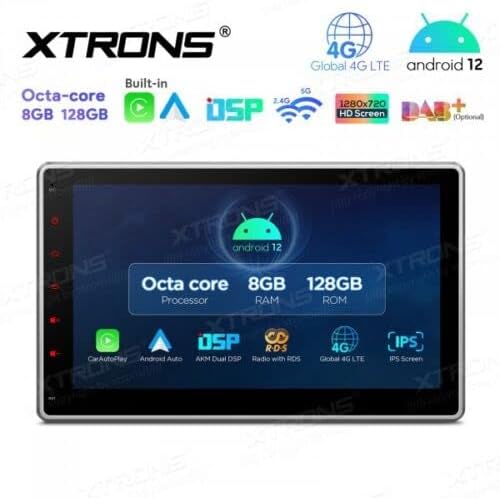
Figura 8.1: Caratteristiche principali e specifiche suview.
9. Garanzia e supporto
For warranty information, please refer to the warranty card included with your product or visit the official XTRONS website. If you require technical assistance, have questions about installation, or need troubleshooting beyond what is covered in this manual, please contact XTRONS customer support. Have your product model number (TIX125L) and purchase details ready when contacting support.
XTRONS Ufficiale Websito: www.xtrons.com (Please verify the exact support contact details on their webluogo.)