1. Importanti istruzioni di sicurezza
Always observe basic safety precautions when using electrical tools to reduce the risk of fire, electric shock, and personal injury. Read and understand all instructions before operating this tool.
Sicurezza generale dell'utensile elettrico
- Sicurezza dell'area di lavoro: Mantenere l'area di lavoro pulita e ben illuminata. Aree disordinate o buie possono favorire incidenti. Non utilizzare utensili elettrici in atmosfere esplosive, ad esempio in presenza di liquidi, gas o polveri infiammabili.
- Sicurezza elettrica: Le spine degli elettroutensili devono essere adatte alla presa. Non modificare in alcun modo la spina. Non utilizzare adattatori con elettroutensili dotati di messa a terra. Evitare il contatto del corpo con superfici collegate a terra, come tubi, termosifoni, cucine e frigoriferi.
- Sicurezza personale: Indossare sempre protezioni per gli occhi. Utilizzare protezioni acustiche durante l'uso prolungato. Vestirsi in modo appropriato; non indossare abiti larghi o gioielli. Tenere capelli, indumenti e guanti lontani dalle parti in movimento.
- Uso e cura dello strumento: Non forzare l'utensile elettrico. Utilizzare l'utensile elettrico corretto per l'applicazione desiderata. Scollegare la spina dalla presa di corrente prima di effettuare qualsiasi regolazione, sostituire accessori o riporre l'utensile elettrico.
Polisher Specific Safety
- Ensure the backing plate and polishing pad are securely attached before operation.
- Do not apply excessive pressure, especially at lower speeds, as this can cause the machine to stop and potentially damage the motor or surface.
- Keep hands and fingers clear of the rotating pad during operation.
- Always hold the polisher firmly with both hands to maintain control.
- Allow the polisher to cool down during extended use to prevent overheating.
2. Prodotto finitoview
Contenuto della confezione
The AOBEN AT3501-7 Car Buffer Polisher package includes the following items:
- 1 x AOBEN Car Polisher (Model AT3501-7)
- 1 x 6-inch Polishing Disc (Backing Plate)
- 3 x 6.5-inch Foam Pads (various densities)
- 1 x tampone lucidante in lana sintetica
- 1 x Chiave inglese
- 1 x Manuale utente

Image: The AOBEN AT3501-7 Car Buffer Polisher shown with its complete set of accessories, including foam pads, a wool pad, and a wrench.
Caratteristiche e componenti principali
Familiarize yourself with the main parts and features of your polisher:
- Dual Action Random Orbital Motion: Provides a swirl-free finish by preventing concentrated heat buildup.
- 6-Inch Polishing Disc: Standard size for various detailing tasks.
- 6 Variable Speed Settings (1000-4500 RPM): Allows precise control for different materials and applications.
- Maniglia staccabile: Can be fixed on either side for ergonomic use and reduced fatigue.
- Design ergonomico: Features a comfortable hand grip and a plastic head shell for heat insulation.
- Motore da 700 W: Provides sufficient power for polishing, waxing, and sanding.
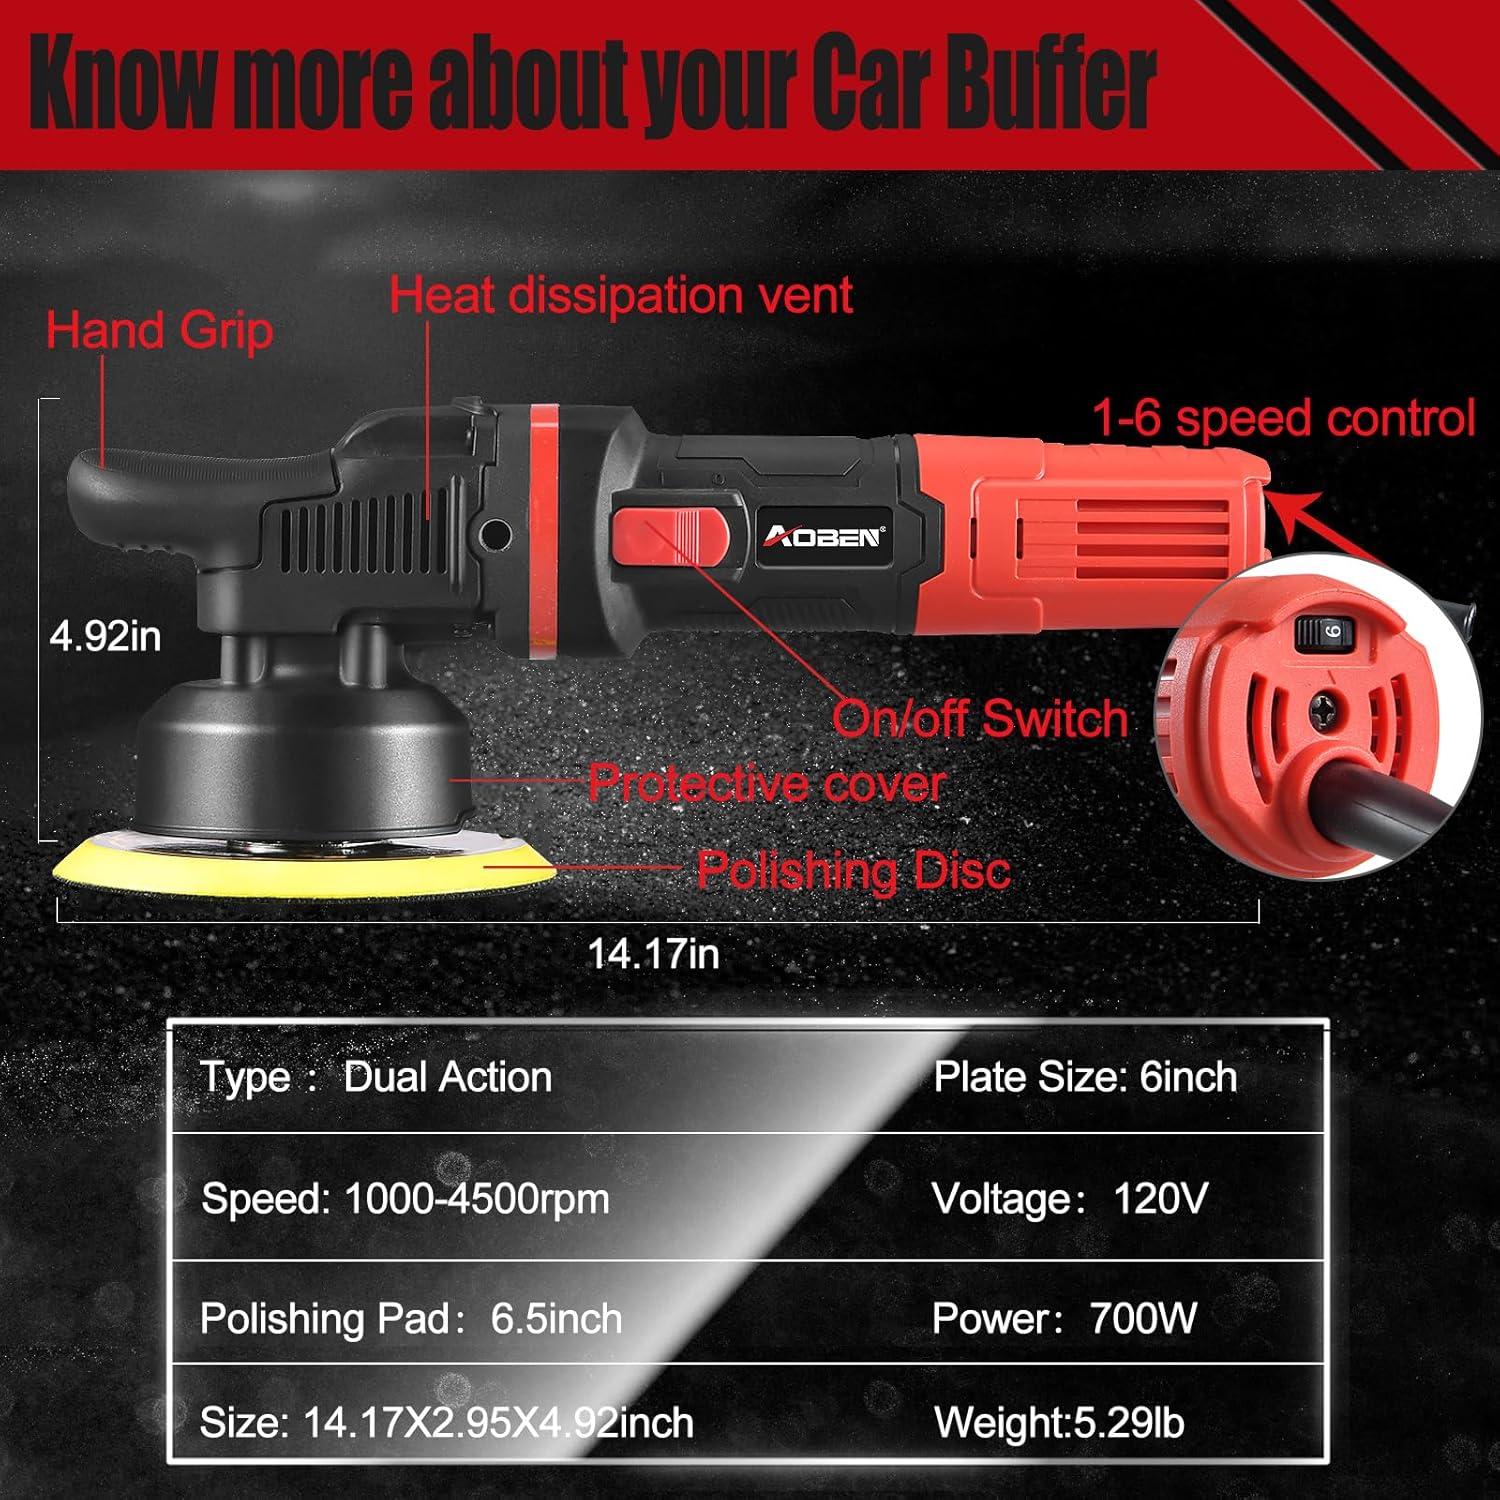
Image: A detailed diagram illustrating the components of the AOBEN polisher, including the hand grip, heat dissipation vent, on/off switch, 1-6 speed control, protective cover, and polishing disc. Key specifications are also listed.
3. Installazione e assemblaggio
Attaching the Detachable Handle
The auxiliary handle can be attached to either side of the polisher head to suit your preference and improve control.
- Identify the threaded holes on both sides of the polisher's head.
- Screw the detachable handle into the desired threaded hole until it is securely fastened.

Image: This illustration demonstrates the flexibility of the detachable handle, showing how it can be securely attached to either the right or left side of the polisher for user comfort and control.
Installing the Backing Plate and Pads
Follow these steps to correctly install the backing plate and attach the polishing pads:
- Fissare la piastra di supporto: The backing plate cannot be rotated onto the polisher by hand. Use the provided wrench to securely fasten the 6-inch polishing disc (backing plate) to the polisher's spindle. Ensure it is tightened properly to prevent detachment during operation.
- Attach the Foam/Wool Pad: The polishing pads (foam or wool) attach to the backing plate via a hook-and-loop (Velcro-style) system. Align the pad with the backing plate and press firmly to secure it.

Image: A four-panel guide demonstrating the correct method for attaching the backing plate using a wrench and subsequently securing a foam pad to the backing plate.
4. Istruzioni per l'uso
Controllo di potenza e velocità
The polisher features a 6-speed variable control dial, allowing you to adjust the RPM from 1000 to 4500 to match the task and material.
- Interruttore On/Off: Located on the top of the polisher, press to turn the tool on or off.
- Chiamata rapida: Rotate the dial to select the desired speed setting (1-6).

Immagine: un primo piano view of the 6-variable speed control dial, indicating recommended speed ranges for different applications such as waxing, buffing, polishing, cleaning, and removing paint defects or oxidation.
Impostazioni di velocità consigliate
| Impostazione della velocità | Gamma RPM | Applicazione |
|---|---|---|
| 1-2 | 1000-2000 giri/min | Waxing and Buffing |
| 3-4 | 2000-3500 giri/min | Polishing and Cleaning |
| 5-6 | 3500-4500 giri/min | Removing Paint Defects and Oxidation |
Linee guida per l'applicazione
This polisher is suitable for various tasks including car detailing, polishing, waxing, and sealing glaze. It can also be used on boats, furniture, pianos, flooring, and metal objects.
- Preparare la superficie: Ensure the surface is clean and dry before applying any compounds or waxes.
- Applicare il prodotto: Apply a small amount of polishing compound or wax directly to the pad or the surface area to be worked on.
- Inizia la lucidatura: Place the pad flat on the surface before turning the polisher on. Start at a low speed and gradually increase as needed. Move the polisher in a consistent back-and-forth or cross-hatch pattern, overlapping each pass.
- Lavora in Sezioni: Work on small sections at a time (e.g., 2x2 feet) to ensure even coverage and optimal results.
- Rimuovere i residui: After polishing, turn off the tool, lift it from the surface, and wipe away any residue with a clean microfiber towel.

Image: A visual guide demonstrating the four key steps of the car polishing process: washing and drying the car, applying polishing wax, using the polisher in a back-and-forth motion to remove defects, and finally removing residue with a microfiber towel.
Holding Positions
The ergonomic design allows for multiple comfortable holding positions to reduce fatigue during extended use.

Image: Three different images illustrating various ergonomic ways to hold the AOBEN polisher, showcasing flexibility for user comfort and control during operation.
5. Manutenzione
Cleaning the Polisher
- Always disconnect the polisher from the power source before cleaning.
- Pulisci l'esterno dello strumento con un panno pulito e asciutto.amp stoffa. Non utilizzare prodotti chimici aggressivi o detergenti abrasivi.
- Ensure the heat dissipation vents are clear of dust and debris to maintain proper airflow and prevent overheating.
Cura del cuscinetto
- Clean polishing pads immediately after use to prevent product buildup from hardening.
- Foam pads can be washed with warm water and a mild detergent, then rinsed thoroughly and air-dried.
- Wool pads may require specialized cleaning solutions.
- Ensure pads are completely dry before storage or next use.
Magazzinaggio
- Store the polisher and its accessories in a clean, dry place, away from direct sunlight and extreme temperatures.
- Tenere fuori dalla portata dei bambini.
6. Risoluzione Dei Problemi
Problemi comuni
- Polisher stops when excessive pressure is applied (Speed 1-3): This is a normal safety feature of dual-action polishers at lower speeds. If more power is needed for the task, restart the polisher and select a higher speed setting (4-6).
- Poor polishing results: Ensure the correct pad and compound are being used for the specific task. Verify that the pad is clean and not saturated with old product. Adjust speed settings as necessary.
- Vibrazioni o rumori eccessivi: Check that the backing plate and pad are securely attached and not damaged. Ensure there are no loose components.
7. Specifiche
| Specificazione | Valore |
|---|---|
| Numero di modello | AT3501-7 |
| Fonte di alimentazione | Elettrico con cavo |
| Voltage | 120 Volt |
| Potenza massima | 700 Watt |
| Velocità | 1000-4500 RPM (6 Variable Speeds) |
| Polishing Disc Size | 6 pollici |
| Dimensioni del tampone di lucidatura | 6.5 pollici |
| Peso dell'articolo | 6.79 libbre (circa 3.08 kg) |
| Lunghezza del cavo | 9.8 piedi (circa 3 metri) |
| Materiale | Plastica |
| Produttore | AOBEN |
8. Garanzia e supporto
Informazioni sulla garanzia
This AOBEN product comes with a Garanzia di 12 mesi dalla data di acquisto. La presente garanzia copre i difetti di materiali e fabbricazione in condizioni di normale utilizzo. Si prega di conservare la prova d'acquisto per eventuali reclami in garanzia.
Assistenza clienti
For technical assistance, warranty claims, or general inquiries, please contact AOBEN customer support. You can find more information and contact details by visiting the official AOBEN store: