
PHILIPS DST8021/36
Manuale utente del ferro da stiro a vapore Philips Azur serie 8000 DST8021/36
Modello: DST8021/36
1. Introduzione
Thank you for choosing the Philips Azur 8000 Series Steam Iron. This manual provides essential information for the safe and efficient use of your appliance. Please read it thoroughly before first use and retain it for future reference.

Image 1.1: The Philips Azur 8000 Series Steam Iron, showcasing its design and water tank.
2. Informazioni importanti sulla sicurezza
- Assicurare sempre il volumetage indicato sul ferro corrisponde al volume della rete elettrica localetage prima di effettuare la connessione.
- Do not use the iron if the plug, mains cord, or the appliance itself shows visible damage, or if it has been dropped.
- Tenere il ferro e il cavo fuori dalla portata dei bambini quando è acceso o in fase di raffreddamento.
- Non immergere mai il ferro da stiro in acqua o altri liquidi.
- Non lasciare il ferro incustodito mentre è collegato alla rete elettrica.
- La piastra può diventare estremamente calda e causare ustioni. Evitare il contatto diretto.
- Only use the iron for its intended household purpose as described in this manual.
- Scollegare il ferro da stiro prima di riempire il serbatoio dell'acqua, di pulirlo o dopo ogni utilizzo.
3. Prodotto finitoview
Familiarize yourself with the components of your Philips Azur 8000 Series Steam Iron:
- Ugello a spruzzo d'acqua
- Apertura di riempimento dell'acqua con coperchio
- Grilletto vapore / Pulsante getto vapore
- Temperature control dial (OptimalTEMP technology means no manual temperature setting is needed for most fabrics)
- Piastra SteamGlide Elite
- Quick Calc Release collector
- Cavo di alimentazione
- Water tank (transparent purple)
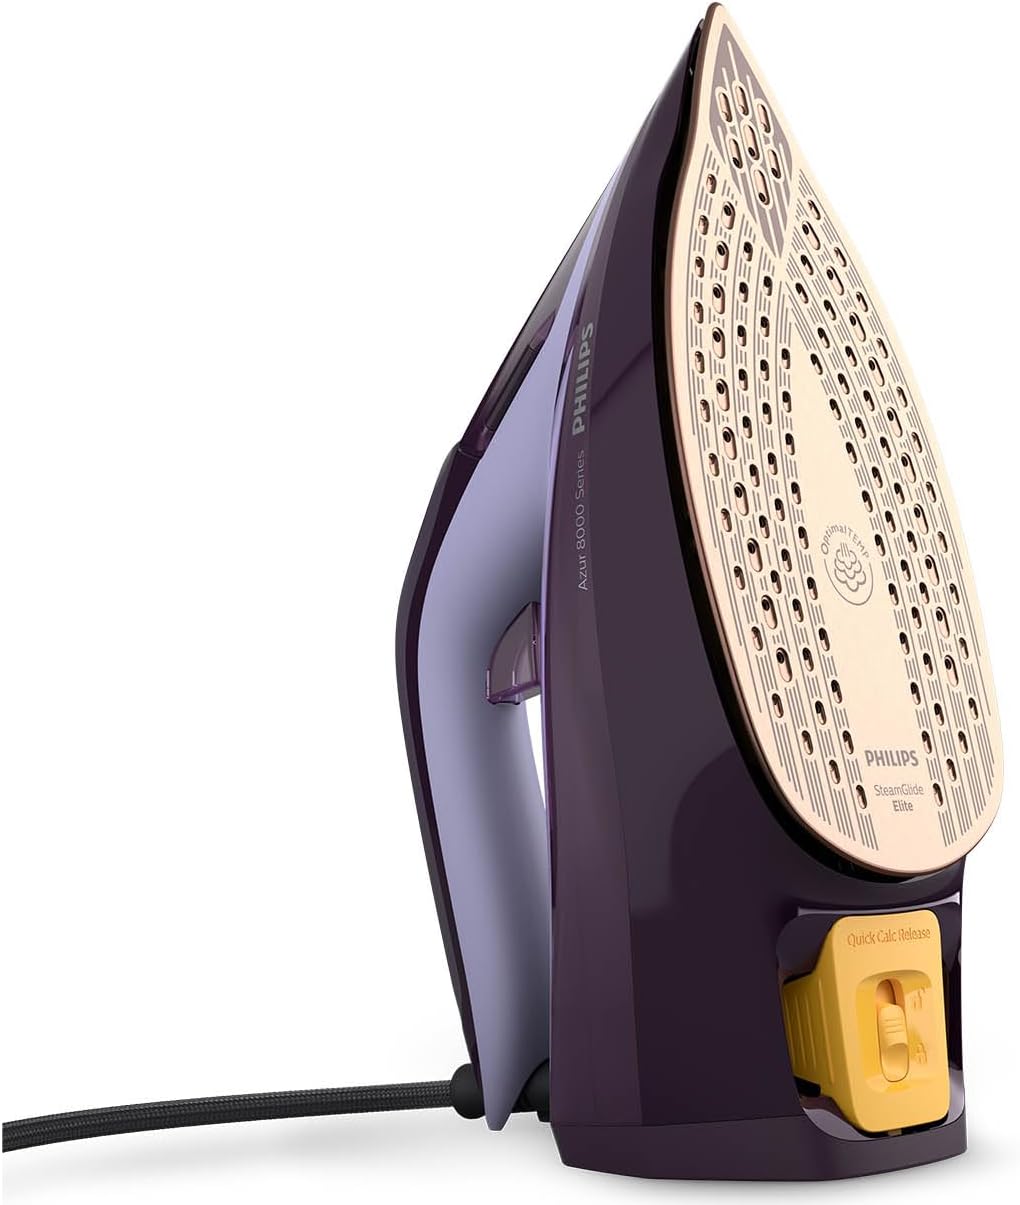
Image 3.1: The SteamGlide Elite soleplate and Quick Calc Release collector.
4. Configurazione e primo utilizzo
4.1 Prima del primo utilizzo
- Rimuovere eventuali adesivi o pellicola protettiva dalla piastra.
- È normale che il ferro da stiro emetta un leggero odore o fumo durante il primo utilizzo. Questo fenomeno scomparirà dopo poco tempo.
4.2 Riempimento del serbatoio dell'acqua
- Assicurarsi che il ferro da stiro sia scollegato dalla rete elettrica.
- Open the water filling opening cover.
- Hold the iron in a slightly tilted position and fill the water tank with tap water up to the 'MAX' indication. Do not overfill.
- Chiudere bene il coperchio dell'apertura di riempimento dell'acqua.

Image 4.1: Filling the water tank of the iron.
5. Istruzioni per l'uso
5.1 Stiratura a vapore
- Riempire il serbatoio dell'acqua come descritto nella Sezione 4.2.
- Plug the iron into a grounded wall socket. The iron will heat up quickly due to its 3000W power.
- The OptimalTEMP technology automatically sets the correct temperature for all ironable fabrics, eliminating the need for manual temperature adjustment.
- Press the steam trigger to release continuous steam (55 g/min). For stubborn creases, press the steam boost button for an extra burst of steam.
- Passare il ferro da stiro delicatamente sul tessuto.

Image 5.1: Ironing a garment with steam.
5.2 Cottura a vapore verticale
The iron can also be used for vertical steaming of hanging garments, curtains, or delicate fabrics.
- Tenere il ferro da stiro in posizione verticale, a qualche centimetro di distanza dal tessuto.
- Press the steam trigger or steam boost button to release steam.

Image 5.2: Using the iron for vertical steaming.
5.3 Auto Shut-off Feature
For safety and energy saving, the iron is equipped with an auto shut-off function. If the iron is left unattended on its heel rest for 8 minutes, or on its soleplate for 30 seconds, it will automatically switch off. To restart, simply pick up the iron or move it slightly.
6. Manutenzione e pulizia
6.1 Pulizia del ferro da stiro
- Scollegare sempre il ferro da stiro e lasciarlo raffreddare completamente prima di pulirlo.
- Pulisci la piastra con l'annuncioamp panno e, se necessario, un detergente non abrasivo.
- Pulisci la parte superiore del ferro con adamp stoffa.
- Do not use scouring pads, abrasive cleaning agents, or harsh solvents.
6.2 Quick Calc Release
The Quick Calc Release system helps to collect loose scale particles during ironing, maintaining optimal steam performance and extending the iron's lifespan. It is recommended to clean the Quick Calc Release collector every 1 to 3 months, depending on water hardness and frequency of use.
- Assicurarsi che il ferro sia scollegato e si sia raffreddato completamente.
- Place the iron on a flat surface.
- Pull the Quick Calc Release collector out from the back of the iron.
- Empty the collected scale particles into a sink.
- Rinse the collector under running water.
- Reinsert the collector back into the iron until it clicks into place.

Image 6.1: Removing and cleaning the Quick Calc Release collector.
7. Risoluzione Dei Problemi
| Problema | Possibile causa | Soluzione |
|---|---|---|
| Il ferro non si riscalda. | Non collegato, alimentazione spentatage, auto shut-off activated. | Check power connection. Move the iron to reactivate after auto shut-off. |
| Assenza di vapore o vapore insufficiente. | Water tank empty, iron not hot enough, calc build-up. | Fill water tank. Allow iron to heat up. Clean Quick Calc Release collector. |
| L'acqua gocciola dalla piastra. | Il ferro da stiro non è abbastanza caldo per il vapore, il serbatoio dell'acqua è troppo pieno. | Allow iron to heat up fully before using steam. Do not overfill water tank. |
| Dalla piastra fuoriescono fiocchi bianchi. | Calc build-up. | Clean the Quick Calc Release collector as described in Section 6.2. |
8. Specifiche tecniche
- Modello: DST8021/36
- Marca: PHILIPS
- Energia: 3000 L
- Emissione di vapore continua: 55 g/min
- Aumento di vapore: Fino a 240 g/min
- Piatto unico: SteamGlide Elite
- Capacità del serbatoio dell'acqua: Approximately 300 ml (estimated based on typical iron capacity)
- Peso: 1.93 chilogrammi
- Dimensioni (confezione): Dimensioni: 33.6 x 17.9 x 14 cm
- Caratteristiche speciali: OptimalTEMP Technology, Auto Shut-off, Quick Calc Release, Removable Tank

Image 8.1: Approximate dimensions of the iron.
9. Garanzia e supporto
This Philips appliance comes with a standard manufacturer's warranty. Please refer to the warranty card provided with your product for specific terms and conditions, including the warranty period.
For product support, frequently asked questions, or to register your product, please visit the official Philips website or contact Philips customer service in your region. You can find contact details on the Philips website or in the warranty booklet.
Supporto online: www.philips.com/support
Ask a question about this manual
Ask about setup, troubleshooting, compatibility, parts, safety, or missing instructions. Manuals+ will review the question and use this page’s manual context to help answer it.