1. Introduzione
Thank you for choosing the CLIKBUTM BYJ76-G Rechargeable Green Laser Pointer Presentation Clicker. This device is designed to enhance your presentations with its wireless control capabilities and bright green laser pointer. It offers seamless navigation through slides and is compatible with various operating systems and presentation software.

Image 1.1: The CLIKBUTM BYJ76-G Presentation Clicker, showcasinil suo design elegante.
2. Prodotto finitoview
Familiarize yourself with the components and controls of your presentation clicker.
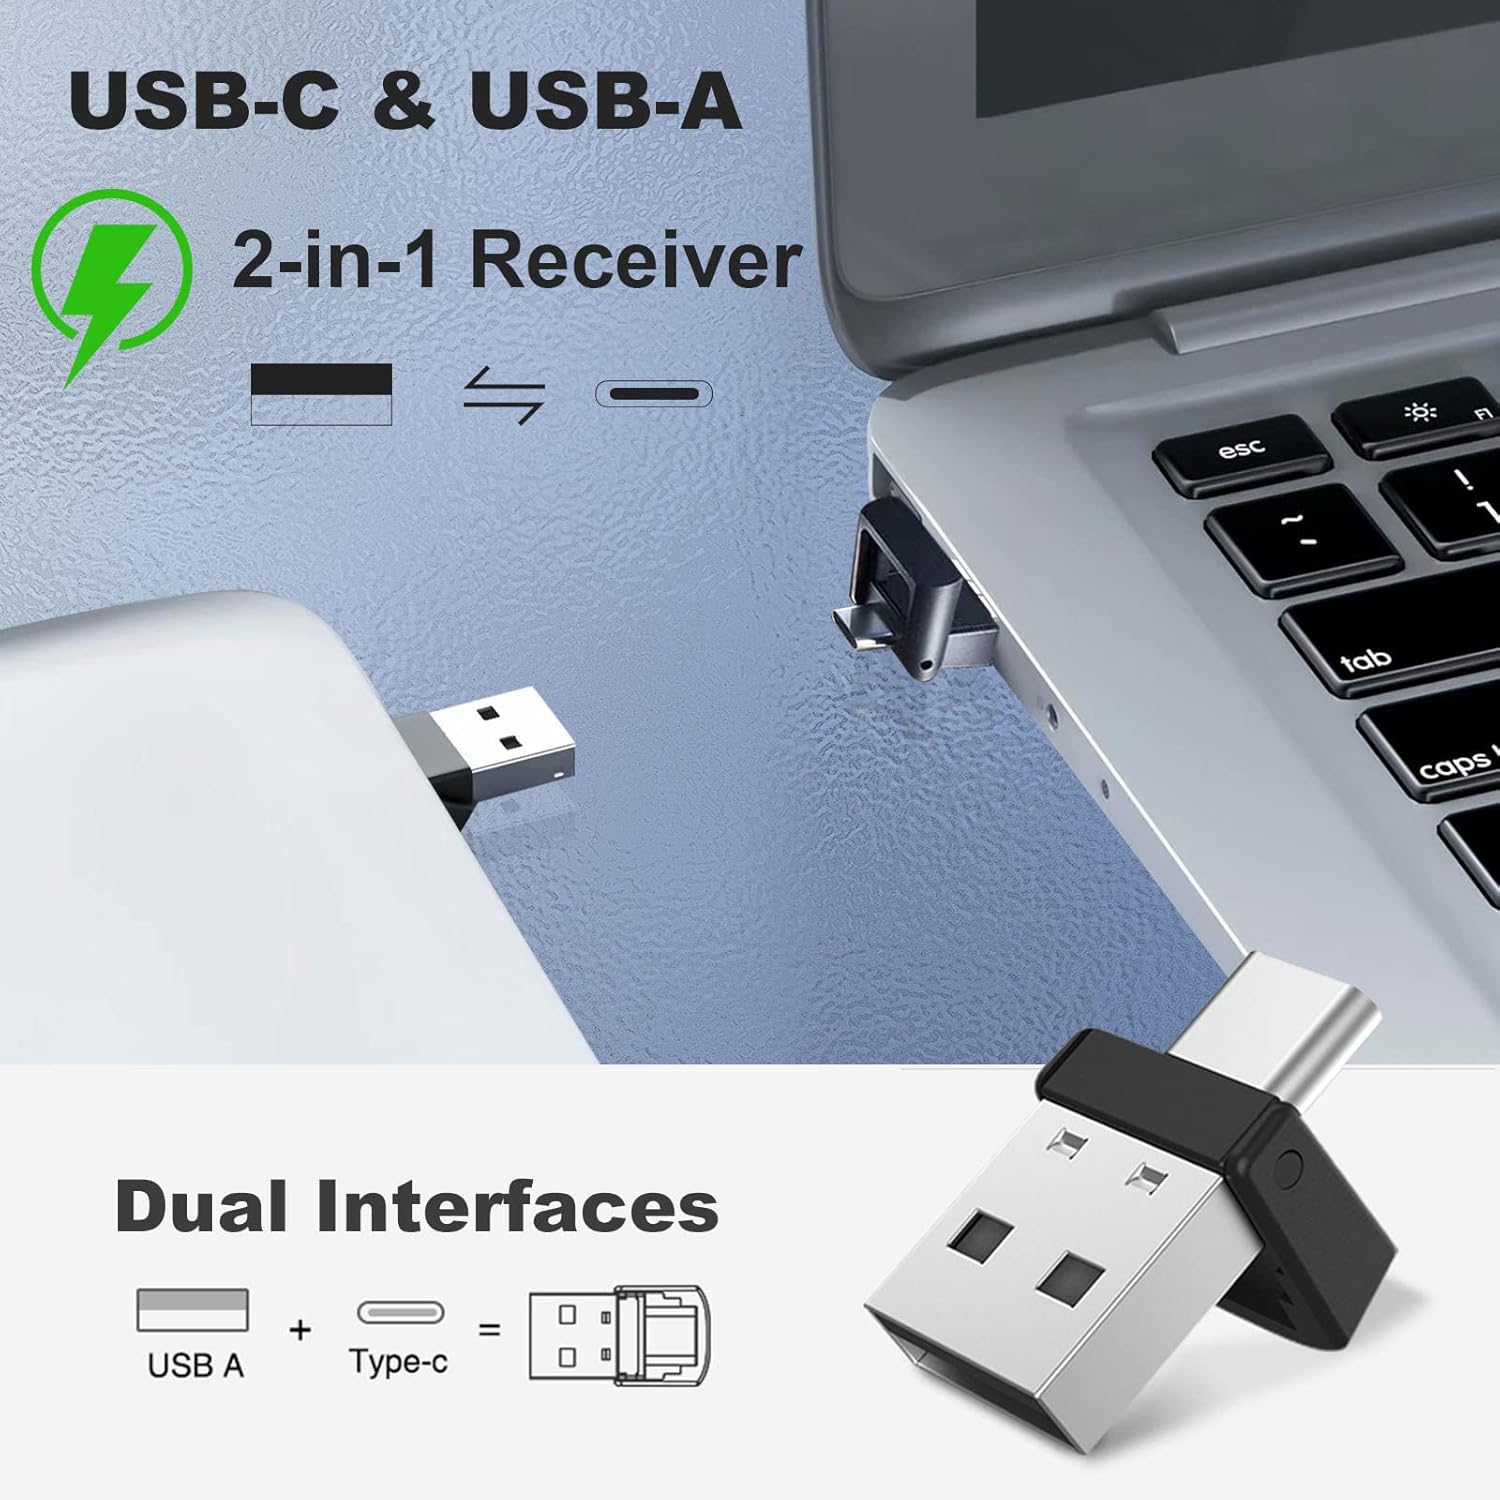
Image 2.1: Detailed diagram of the presentation clicker with key features labeled.
- Puntatore laser: Emits a green laser beam for highlighting.
- Pulsante Pagina su: Advances to the next slide or scrolls up. Also functions as Full Screen/Exit Full Screen.
- Pulsante Pagina Giù: Returns to the previous slide or scrolls down. Also functions as Black Screen.
- Pulsante laser: Activates the green laser pointer.
- Interruttore di alimentazione: Accende o spegne il dispositivo.
- Porta di ricarica: Porta USB-C per ricaricare la batteria interna.
- Spia luminosa: Visualizza lo stato della connessione e il livello della batteria.
- Pulsanti volume su / giù: Controlla il volume del sistema.
- Ricevitore USB: Wireless dongle for connecting to your computer.

Image 2.2: The magnetic design allows for secure storage of the USB receiver within the clicker body.
3. Impostazione
The CLIKBUTM BYJ76-G is a plug-and-play device, requiring no software installation.
- Recuperare il ricevitore USB: Gently pull the USB receiver from its magnetic storage slot at the bottom of the presentation clicker.
- Connessione al computer: Insert the 2-in-1 USB-A/USB-C receiver into an available USB-A or USB-C port on your computer. The system will automatically detect and install the necessary drivers.
- Accensione: Slide the power switch on the side of the presentation clicker to the 'ON' position. The indicator light will illuminate, signifying a successful connection.

Image 3.1: The versatile 2-in-1 USB-A and USB-C receiver for broad compatibility.
4. Istruzioni per l'uso
Once connected, the presentation clicker provides intuitive control over your slides and media.
- Pagina su: Premere il tasto Page Up (▲) button to move to the next slide in your presentation or scroll up in documents.
- Pagina giù: Premere il tasto Page Down (▼) button to move to the previous slide or scroll down in documents.
- Green Laser Pointer: Premere e tenere premuto il tasto Laser Button (💡) to activate the green laser pointer. Release the button to turn off the laser. The laser has a range of up to 328 feet (100 meters).
- Full Screen/Exit Full Screen: In presentation software, a quick double-press of the Page Up (▲) button may toggle full-screen mode.
- Schermo nero: In presentation software, a quick double-press of the Page Down (▼) button may toggle a black screen.
- Controllo del volume: Use the dedicated Volume Up and Volume Down buttons on the side of the clicker to adjust your computer's audio output.
- Portata del controllo wireless: The wireless control distance is up to 100 feet.
5. Ricarica
The CLIKBUTM BYJ76-G features a built-in rechargeable Lithium Ion battery.
- Indicazione di bassa potenza: The indicator light will turn red when the battery level is low.
- Collegare il caricabatterie: Connect the included USB-C charging cable to the charging port on the clicker and the other end to a USB power source (e.g., computer USB port, wall adapter).
- Stato di carica: The indicator light will show charging status (e.g., solid red while charging, turning off or blue when fully charged).
- Tempo di ricarica: A full charge typically takes less than 1 hour.
- Durata della batteria: A single charge provides over two months of worktime or up to 200 days of standby time.
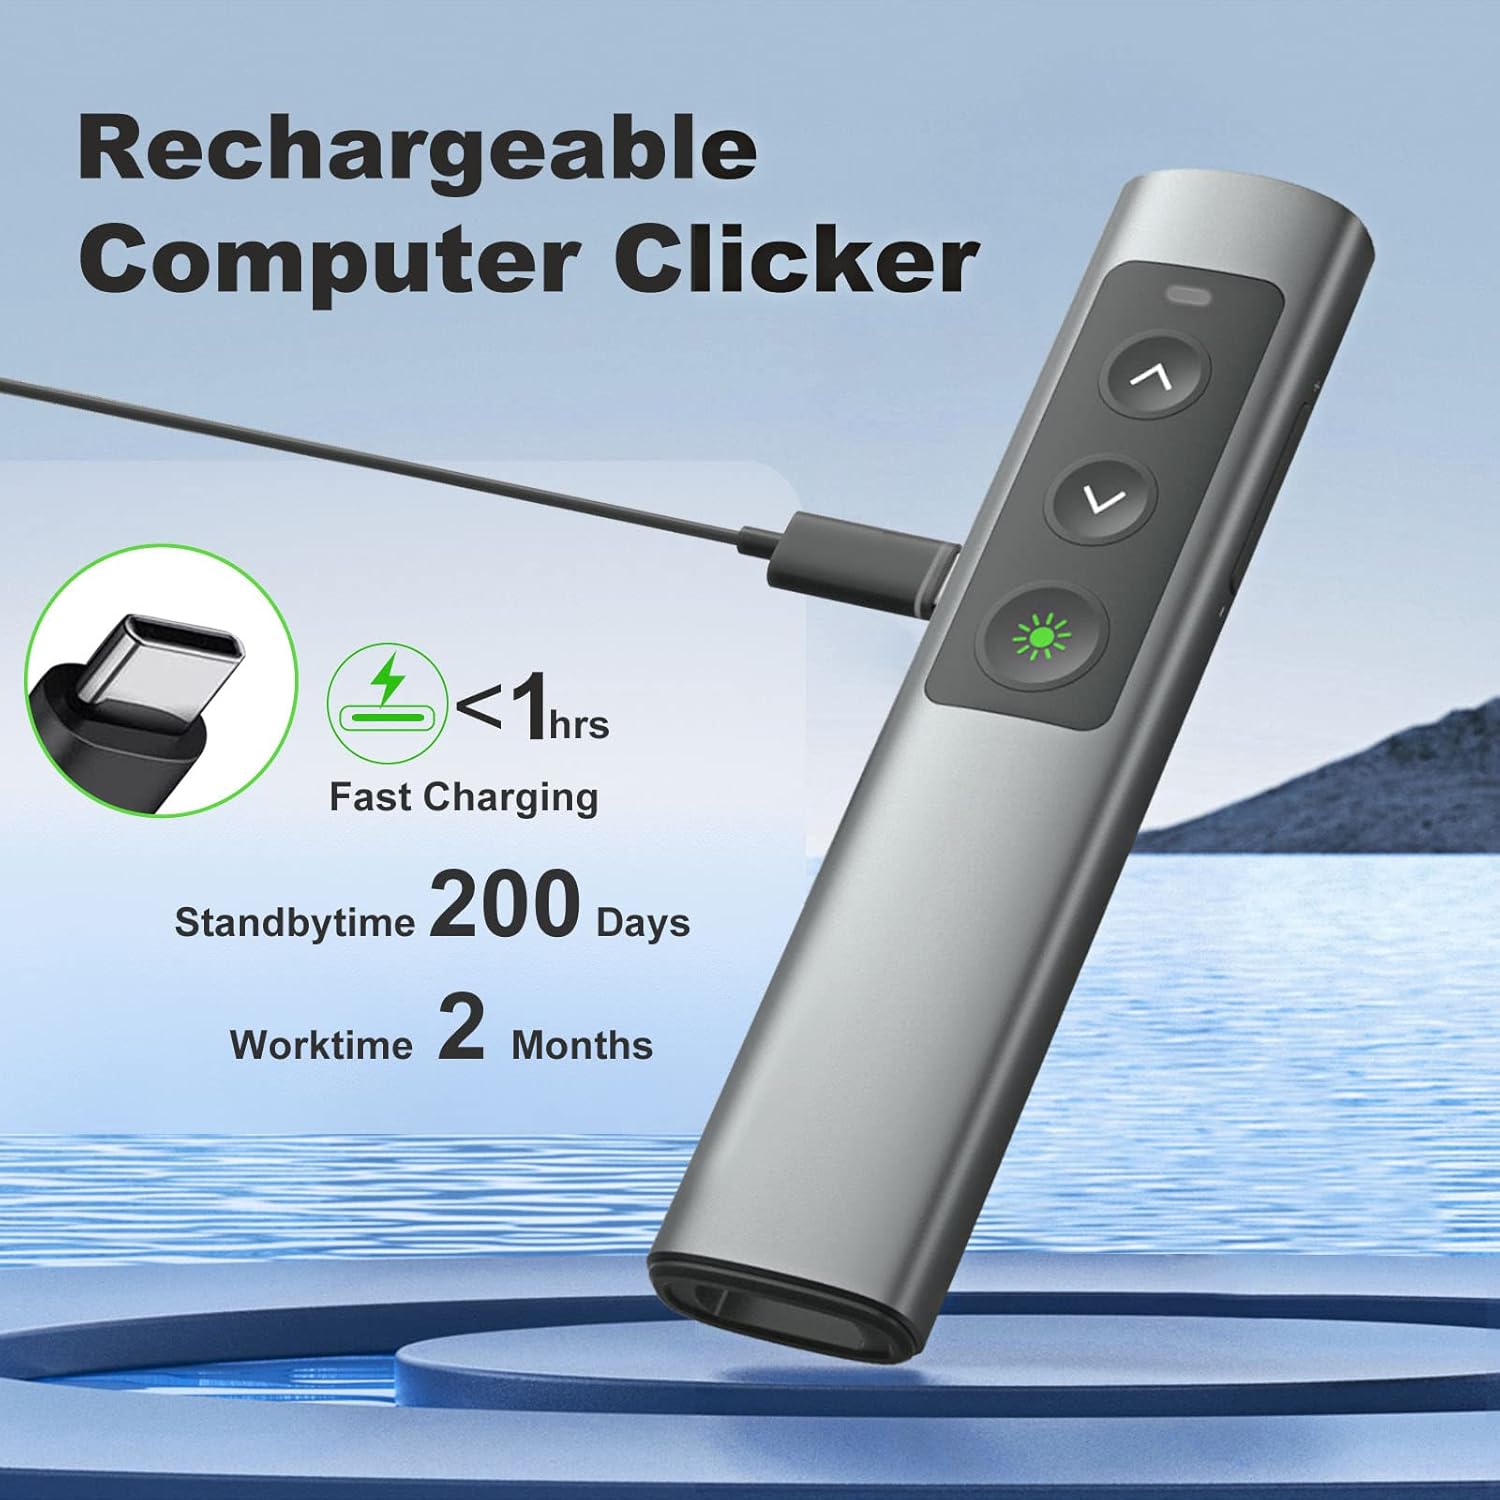
Image 5.1: The presentation clicker being charged via its USB-C port.
6. Compatibilità
The CLIKBUTM BYJ76-G is designed for broad compatibility with various operating systems and presentation software.
Sistemi operativi supportati:
- Windows 2003/XP/Vista/7/8/10
- Sistema operativo Mac
- Linux
Software supportato:
- Presa della corrente
- Discorso principale
- Prezi
- Parola
- Eccellere
- ACD Vedi
- iWork
- Presentazioni Google

Image 6.1: Visual representation of the clicker's compatibility with various systems and applications.
7. Manutenzione
To ensure the longevity and optimal performance of your presentation clicker, follow these maintenance guidelines:
- Pulizia: Pulisci il dispositivo con un panno morbido e asciutto. Evita di utilizzare prodotti chimici aggressivi o materiali abrasivi.
- Magazzinaggio: When not in use, store the clicker and its USB receiver in a cool, dry place. The magnetic storage for the receiver helps prevent loss.
- Cura della batteria: Avoid fully discharging the battery frequently. Recharge the device when the low power indicator appears.
- Evitare gocce: While designed with a durable metal casing, excessive drops or impacts can damage internal components.
8. Risoluzione Dei Problemi
If you encounter issues with your presentation clicker, refer to the following common solutions:
- Il dispositivo non risponde:
- Ensure the clicker is powered ON.
- Verificare che il ricevitore USB sia collegato saldamente a una porta USB funzionante del computer.
- Verify the battery level of the clicker and recharge if necessary.
- Prova a collegare il ricevitore USB a un'altra porta USB.
- Riavvia il computer.
- Puntatore laser non funzionante:
- Ensure the clicker is powered ON and connected.
- Premere e tenere premuto con decisione il pulsante laser.
- Controllare il livello della batteria.
- Pulsanti non funzionanti correttamente:
- Ensure the clicker is connected and has sufficient battery.
- Test the clicker with different presentation software or documents to isolate the issue.
- Assicurarsi che nessun altro dispositivo wireless stia causando interferenze.
- Corto raggio wireless:
- Ensure there are no large metallic objects or other electronic devices obstructing the signal path between the clicker and the receiver.
- Avvicinatevi al computer.
9. Specifiche
| Caratteristica | Specificazione |
|---|---|
| Numero di modello | BYJ76-G |
| Peso dell'articolo | 2.89 once (82 grammi) |
| Dimensioni del pacco | 5.79 x 2.2 x 0.75 pollici (14.7 x 5.6 x 1.9 cm) |
| Colore laser | Verde |
| Gamma laser | Fino a 328 piedi (100 metri) |
| Gamma di controllo wireless | Fino a 100 piedi |
| Connettività | 2.4GHz Wireless (USB-A & USB-C 2-in-1 Receiver) |
| Tipo di batteria | 1 batteria agli ioni di litio (inclusa) |
| Porta di ricarica | USB-C |
| Tempo di ricarica | Meno di 1 ora |
| Lunghezza | Over 2 months per charge |
| Tempo di standby | Fino a 200 giorni |

Image 9.1: Physical dimensions of the presentation clicker for size reference.
10. Informazioni sulla sicurezza
Please observe the following safety precautions when using the laser pointer:
- NON FARE puntare il raggio laser verso persone o animali.
- NON FARE look directly into the laser beam.
- NON FARE point the laser beam at reflective surfaces.
- NON FARE allow children to use the laser pointer unsupervised.
- Questo prodotto non è un giocattolo.
11. Garanzia e supporto
For warranty information or technical support, please refer to the product packaging or contact CLIKBUTM customer service through the retailer where the product was purchased. Keep your purchase receipt for warranty claims.