1. Introduzione
This manual provides comprehensive instructions for the installation, operation, and maintenance of your OAE 60A MPPT Solar Charge Controller. This device is designed to efficiently manage power flow from your solar panels to various battery types, including Lithium, Sealed, Gel, and Flooded batteries, ensuring optimal charging and system longevity.
2. Informazioni sulla sicurezza
Leggere attentamente tutte le istruzioni di sicurezza prima dell'installazione e dell'uso. La mancata osservanza di queste istruzioni può causare scosse elettriche, incendi o lesioni gravi.
- Ensure all power sources are disconnected before installing or servicing the controller.
- Use appropriate personal protective equipment (PPE) such as insulated gloves and eye protection.
- Verify correct polarity for all connections (solar panel, battery, load) to prevent damage.
- Installare il controller in un'area ben ventilata, lontano da materiali infiammabili e dalla luce solare diretta.
- Do not disassemble or attempt to repair the controller yourself. Refer to qualified personnel.
- Assicurare la corretta messa a terra del sistema.
3. Caratteristiche del prodotto
The OAE 60A MPPT Solar Charge Controller offers advanced features for efficient solar power management:
- Auto 12/24/36/48V Battery System: Automatically detects and adapts to your battery voltage.
- Compatibilità versatile della batteria: Supports 4 charging options: Sealed, Gel, Flooded, and User-defined, compatible with lithium batteries.
- Tecnologia MPPT ad alta efficienza: Creative maximum power point tracking technology significantly increases energy utilization rate (up to 97% transfer efficiency). Quickly scans the entire I-V curve to track the maximum power point within seconds.
- Display LCD informativo: Clear display of operating data and working conditions. Features real-time energy statistics, Chinese and English language options, and a multi-function LCD screen with operation menu. Displays daily power generation and current curves, and fault records for timely troubleshooting.
- Funzioni di protezione complete: Built-in protections ensure system safety and longevity.
- Comunicazione RS485: Capable of Wi-Fi remote monitoring (additional purchase required) for real-time wireless monitoring via APP (Android & iOS compatible). Simple and convenient to set, with one-key factory settings restore.
4. Contenuto della confezione
Dopo aver aperto il pacco, verificare che tutti gli articoli siano presenti e integri:
- OAE 60A MPPT Solar Charge Controller (Blue)
- Staffa di fissaggio
- Manuale d'uso
- Cavo del sensore di temperatura
- Viti per il montaggio

Figure 1: OAE 60A MPPT Solar Charge Controller (Blue model).
5. Configurazione e installazione
Follow these steps for proper installation of your MPPT solar charge controller. For a visual guide, please refer to the installation video below.
Video 1: OAE 60A MPPT Solar Charge Controller Installation Guide. This video demonstrates the unboxing, physical setup, and wiring connections for the solar charge controller.
5.1 Installazione fisica
- Unboxing e ispezione: Carefully remove the controller from its packaging. Inspect for any visible damage. The package typically includes the controller, mounting bracket, and user manual.

Figure 2: The OAE MPPT Solar Charge Controller as packaged in its box.
- Montaggio del controller: Loosen the four screws on the bottom of the MPPT controller to detach the mounting bracket. Secure the bracket to a stable, vertical surface in a well-ventilated area, then reattach the controller to the bracket using the screws.

Figura 3: lato view of the controller showing dimensions and mounting points.
5.2 Collegamenti di cablaggio
Before making any connections, ensure all power sources are OFF. Connect the wires in the following order:
- Collegamento della batteria: Connect the battery wires to the "BATTERY" terminals on the controller. Ensure correct polarity (positive to positive, negative to negative). Loosen the terminal screws, insert the wires, and tighten securely.

Figure 4: Connection diagram illustrating solar panel, battery, and DC load connections.
- Connessione al pannello solare: Connect the solar panel wires to the "SOLAR PANEL" terminals. Observe correct polarity. The controller supports a maximum PV input of 150V.

Figure 5: Close-up of the controller's terminal block, showing connections for solar panel, battery, and DC load.
- Collegamento del carico CC (opzionale): If using a DC load directly from the controller, connect the load wires to the "DC LOAD" terminals, ensuring correct polarity.
- Collegamento del sensore di temperatura: Connect the temperature sensor cable to the designated "TEMPERATURE INTERFACE" port. This ensures accurate battery temperature compensation for optimal charging.
6. Istruzioni per l'uso
Once all connections are secure, the controller will boot up automatically. The LCD display provides real-time system information and allows for configuration.
6.1 Display LCD finitoview
The multi-function LCD screen displays various parameters and allows access to settings. Use the MENU, DOWN, UP, and ENTER buttons to navigate and adjust settings.
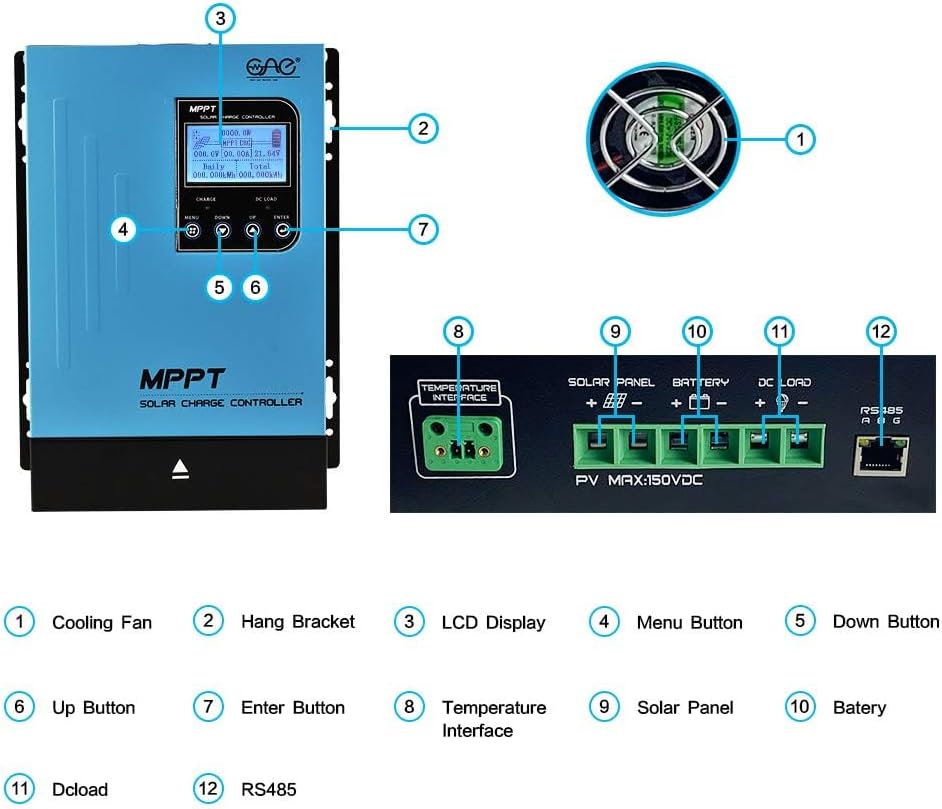
Figure 6: Detailed description of the main interface and display parameters.
6.2 Funzionamento di base
- Accensione: After connecting the battery, the controller will automatically power on. The display will show "Boot up, please wait..."
- Monitoraggio: The main interface displays PV module voltage, daily power generation, charging power, charging current, battery capacity indication, battery voltage, total power generation, date, time, charging state (MPPT tracking, floating charge, stop charge), external temperature, and internal temperature.
- Navigazione nei menu: Use the "MENU" button to cycle through different display screens and settings options. Use "UP" and "DOWN" to change values or navigate within a menu. Press "ENTER" to confirm selections.
- DC Load Control: The DC load output can be configured for automatic operation (e.g., time control) or manual ON/OFF. This is accessed via the "DC Output Setting" menu.
7. Manutenzione
Una manutenzione regolare garantisce la longevità e le prestazioni ottimali del tuo regolatore di carica solare:
- Pulizia: Mantenere il controller pulito e privo di polvere e detriti. Utilizzare un panno asciutto per la pulizia.
- Ventilazione: Ensure the cooling fan and ventilation holes are not obstructed. Periodically check for dust buildup in the fan.


Figure 7: Cooling fan and ventilation holes for proper airflow.
- Connessioni: Controllare periodicamente tutti i collegamenti elettrici per verificarne la tenuta e la corrosione. Collegamenti allentati possono causare surriscaldamento e scarse prestazioni.
- Stato della batteria: Monitorare il voltage and health regularly. Ensure the battery type setting on the controller matches your battery.
8. Risoluzione Dei Problemi
Questa sezione affronta i problemi più comuni che potresti riscontrare con il tuo regolatore di carica solare.
| Problema | Possibile causa | Soluzione |
|---|---|---|
| Il controller non si accende. | Nessuna batteria collegata o batteria scaricatage troppo basso. | Ensure battery is connected with correct polarity and has sufficient voltage (above minimum operating voltagE). |
| Nessuna corrente di carica dai pannelli solari. | Solar panels not connected, insufficient sunlight, or incorrect panel voltage. | Check solar panel connections and polarity. Ensure adequate sunlight. Verify panel voltage rientra nell'intervallo di input del controller. |
| DC load not working. | Load output disabled, overloaded, or incorrect wiring. | Check DC output settings on the LCD. Reduce load if overloaded. Verify load wiring and polarity. |
| Unusual noise from controller (e.g., fan). | Normal operation (fan activates under load) or obstructed fan. | Ensure proper ventilation. Clean fan if obstructed. If noise is excessive or unusual, contact support. |
9. Specifiche
Key technical specifications for the OAE 60A MPPT Solar Charge Controller:
- Numero modello: Modello MP-60A
- Marca: OAE
- Valutazione attuale: 60A
- Volume sistema batteriatage: Auto 12V/24V/36V/48V
- Max ingresso PV Voltage: 150V
- Tipo di visualizzazione: GUIDATO
- Materiale: Metallo
- Dimensioni del prodotto: 7.9 x 3.5 x 12.4 pollici
- Peso dell'articolo: 7.96 libbre (3.62 chilogrammi)
- Tipi di batterie compatibili: Sealed, Gel, Flooded, Lithium, and User-defined
10. Garanzia e supporto
For warranty information, technical support, or to purchase additional accessories, please visit the official OAE store or contact their customer service.
Sono disponibili piani di protezione per una copertura estesa:
- Piano di protezione biennale
- Piano di protezione biennale
- Complete Protect (piano mensile che copre gli acquisti idonei)
Per maggiori dettagli, visita il OAE Store on Amazon.