MXBAOHENG 9999
MXBAOHENG Polyurethane Grouting Injection Machine User Manual
Modello: 9999
1. Introduzione
This user manual provides comprehensive instructions for the safe and efficient operation, maintenance, and troubleshooting of the MXBAOHENG 910W High-Pressure Grouting Injection Machine. This machine is designed for concrete leak repair, specifically for grouting, consolidation grouting, crack reinforcement grouting, and similar applications in residential, engineering, and building structures, including concrete cracks, expansion joints, construction joints, and structural joints in buildings and underground concrete projects.

Figure 1.1: Complete kit of the MXBAOHENG 910W High-Pressure Grouting Injection Machine, including the main unit, high-pressure hose, nozzle, safety glasses, gloves, and various tools.
2. Istruzioni di sicurezza
Il rispetto delle seguenti linee guida di sicurezza è fondamentale per prevenire lesioni e danni all'attrezzatura.
- Prohibited Test Liquids: Do not use water or diluents such as ketone, Tianna water, or xylene for testing the polyurethane injection machine. These substances can cause damage to vulnerable parts, lead to stuck pumps, or burn out components due to lack of pressure.
- Recommended Test Liquid: Always use oil or edible oil for machine testing.
- Controllo della pressione: During testing, the pressure range must be controlled within 400 units (e.g., kg/cm² or psi, depending on the gauge scale).
- Manometro di monitoraggio: When operating the machine, continuously monitor the pressure value on the pressure gauge. Ensure the pressure does not exceed the yellow scale area on the gauge. Exceeding this limit can cause component deformation or failure.
- Dispositivi di protezione individuale (DPI): Always wear appropriate PPE, including safety glasses and gloves, when operating the machine.
- Ventilazione: Ensure adequate ventilation in the work area, especially when using grouting materials that may emit fumes.
- Alimentazione elettrica: Collegare la macchina a una presa di corrente con messa a terra e con la tensione correttatage and frequency (220V AC/50Hz).
- Connessioni sicure: Before operation, ensure all connections, including the high-pressure pipe and nozzle, are securely fastened to prevent leaks or disconnections under pressure.

Figura 2.1: dettagliata view of the pressure gauge, highlighting the shock-resistant glycerin filling, double dial for high precision, and the critical yellow and red warning zones for pressure monitoring. Do not exceed the yellow scale area.
3. Prodotto finitoview
3.1 Componenti
The MXBAOHENG Grouting Injection Machine consists of several key components:
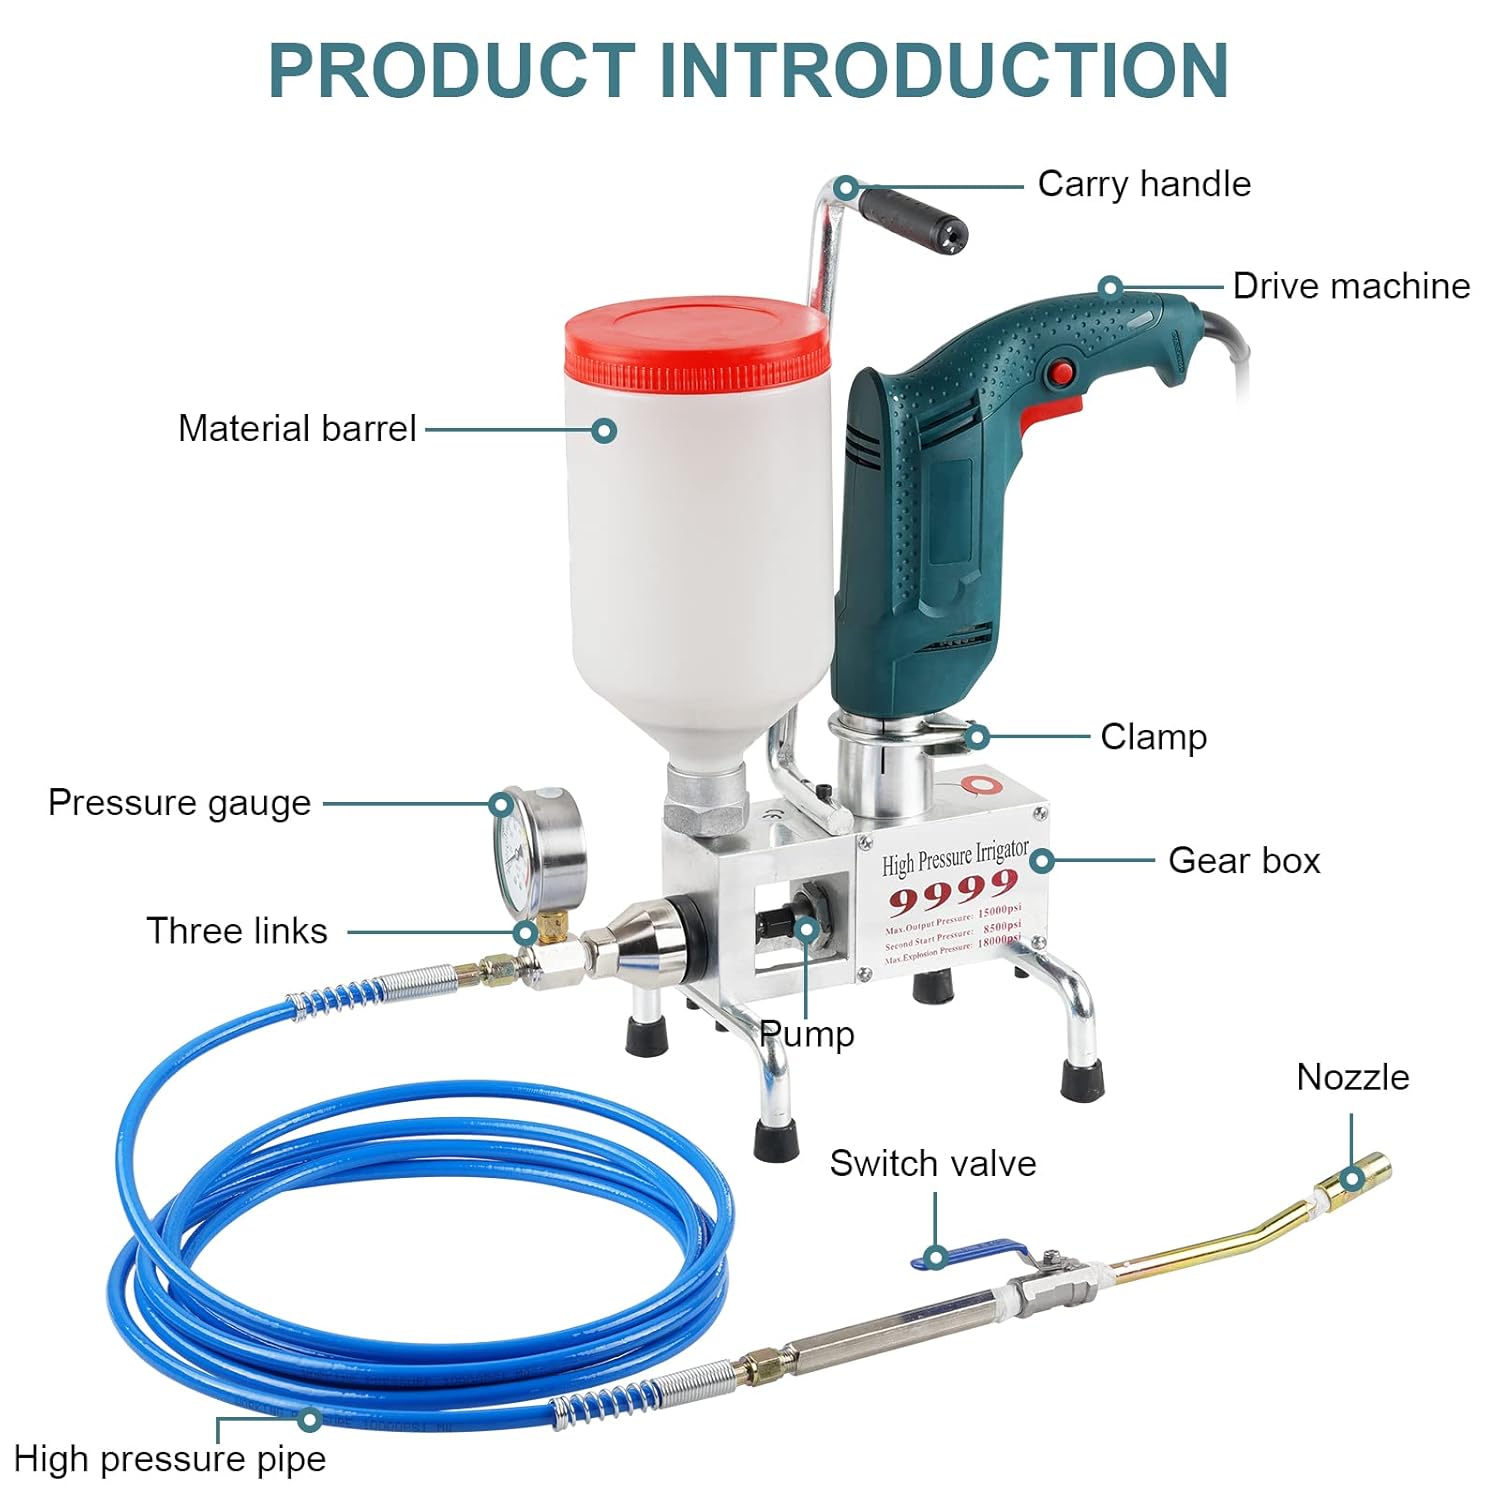
Figure 3.1: Labeled diagram of the grouting machine components, including the Carry handle, Drive machine, Material barrel, Pressure gauge, Three links, Pump, Switch valve, Nozzle, High pressure pipe, Clamp, and Gear box.
- Maniglia per il trasporto: For easy transport and positioning of the machine.
- Drive Machine: The electric drill unit that powers the pump.
- Material Barrel: Container for the grouting material. Made of corrosion-resistant ABS plastic.
- Manometro: Displays the current operating pressure. Features a shock-resistant glycerin filling and a double dial for high precision.
- Three Links: Connects the pump to the high-pressure pipe.
- Pompa: High-precision stainless steel alloy pump core, offering good sealing, corrosion resistance, and wear resistance.
- Switch Valve: Controls the flow of grouting material.
- Ugello: Directs the grouting material into the injection point.
- High Pressure Pipe: Durable, explosion-proof pipe designed to withstand high pressures.
- Clamp: Secures the drive machine to the main unit.
- Scatola del cambio: Transmits power from the drive machine to the pump.
3.2 Caratteristiche principali
- Materiali di alta qualità: The machine features an ABS plastic barrel that is corrosion-resistant and durable. The pump core is made of stainless steel alloy, ensuring high precision, good sealing, and resistance to corrosion and wear for a long service life.
- Potente ed efficiente: Equipped with a high-performance, all-copper wire motor electric drill, providing strong power, fast heat dissipation, and low noise. It can achieve a working pressure of 0-50 MPa in seconds, with a maximum supported pressure of 700 kg.
- Environmental Protection and Low Noise: The design minimizes environmental pollution and operates with low noise levels. The electric drill's ventilation holes ensure rapid heat dissipation.
- Effective Penetration: Due to continuous high pressure, the grouting agent effectively penetrates concrete structures, filling micro-cracks, micropores, and capillaries.

Figure 3.2: Details of the high-pressure explosion-proof tube and the corrosion-resistant ABS plastic material barrel, highlighting their durability and robust design.

Figura 3.3: primo piano views of the stainless steel alloy pump core, known for its precision and sealing, and the high-power electric drill with an all-copper wire motor for reliable performance.
4. Impostazione
Before initial use, it is essential to perform a machine test to ensure proper functionality and to familiarize yourself with the equipment. This test should always be conducted using oil or edible oil, never water or diluents.
4.1 Initial Machine Test
- Versare l'olio: Pour oil (edible oil is also suitable) into the material barrel.
- Controllare eventuali ostruzioni: Verify that the high-pressure tube and the gun barrel are not obstructed.
- Turn Off Gun Head Switch: Ensure the switch on the gun head is turned off.
- Observe Pressure Gauge and Start: Observe the pressure gauge value. Press the start switch to begin the test.
- Check for Low Pressure Stop: Confirm if the machine stops when the pressure is low (the manometer should stop around 500 kg/cm²).
- Pressione di rilascio: Open the gun head to release any remaining pressure.

Figure 4.1: Visual guide for performing the initial machine test, demonstrating the process of filling with oil, checking for obstructions, and monitoring pressure.
5. Istruzioni per l'uso
Follow these steps for effective grouting operation:
- Preparare la superficie: Clean the base surface thoroughly and identify the exact leak point. Drill holes at approximately 45-degree angles, 2-8 cm on both sides of the crack or leak point.
- Insert Water-Stop Needle: Insert the black rubber part of the water-stop needle into the drilled hole. Use tools such as a T-shaped wrench to lock and fix the needle securely in place.
- Load Slurry and Connect Power: Install the grouting slurry into the material barrel. Plug the machine into a suitable power supply. Fasten the machine gun head and the water-stop needle head together.
- Start Perfusion and Monitor Pressure: Turn on the switch located on the handle to begin the perfusion process. Continuously pay attention to the pressure value displayed on the machine's pressure gauge. It is critical that the pressure does not exceed the yellow scale area on the gauge.
- Stop Grouting: Continue grouting until the grout visibly overflows from the crack, indicating complete filling. Then, turn off the machine.
- Remove Needle and Finish: After at least 48 hours, carefully remove the water-stop needle. Finally, fill and finish the base surface to complete the repair.

Figure 5.1: Step-by-step visual instructions for operating the grouting machine, from preparing the surface to finishing the repair.
6. Manutenzione
Regular maintenance ensures the longevity and optimal performance of your grouting machine.
- Pulizia dopo l'uso: After each use, thoroughly clean the material barrel, high-pressure pipe, and nozzle to prevent material hardening and blockages. Use appropriate cleaning agents recommended for your specific grouting material.
- Pump Core Inspection: Periodically inspect the stainless steel alloy pump core for any signs of wear or damage. Ensure it remains free of debris.
- Integrità del sigillo: Check all seals and connections for leaks. Replace any worn or damaged seals promptly to maintain pressure and prevent material leakage.
- Ventilazione del motore: Keep the ventilation holes on the electric drill clean and unobstructed to ensure proper heat dissipation and prevent overheating.
- Magazzinaggio: Store the machine in a clean, dry place, away from extreme temperatures and direct sunlight. Ensure all components are dry before storage.
- Lubrificazione: Refer to the specific grouting material's guidelines for any lubrication requirements for the machine's moving parts, if applicable.
7. Risoluzione Dei Problemi
Questa sezione affronta i problemi più comuni che potresti incontrare e le loro possibili soluzioni.
| Problema | Possibile causa | Soluzione |
|---|---|---|
| Machine not starting or no power. | Power cable disconnected; faulty power outlet; internal electrical issue. | Check power cable connection. Test outlet with another device. If problem persists, contact support. |
| Pump stuck or burned out. | Used water or prohibited diluents (ketone, xylene, etc.) for testing or cleaning. | Do not use water or prohibited diluents. Always use oil or edible oil for testing. If pump is damaged, it may require professional repair or replacement. |
| Pressure not building or too low. | Material barrel empty; pump or hose blockage; worn seals; air in the system. | Refill material barrel. Check for and clear any blockages. Inspect and replace worn seals. Bleed air from the system if applicable. |
| Pressure exceeds yellow scale area on gauge. | System blockage; incorrect material viscosity; machine malfunction. | Immediately stop operation. Check for blockages in the nozzle, pipe, or pump. Ensure grouting material viscosity is appropriate. If problem persists, contact support. |
| Grout not flowing or inconsistent flow. | Nozzle clogged; material too thick; air bubbles in material. | Clean the nozzle. Adjust material viscosity as per manufacturer's instructions. Ensure material is properly mixed and free of air bubbles. |
8. Specifiche
Detailed technical specifications for the MXBAOHENG 910W High-Pressure Grouting Injection Machine.
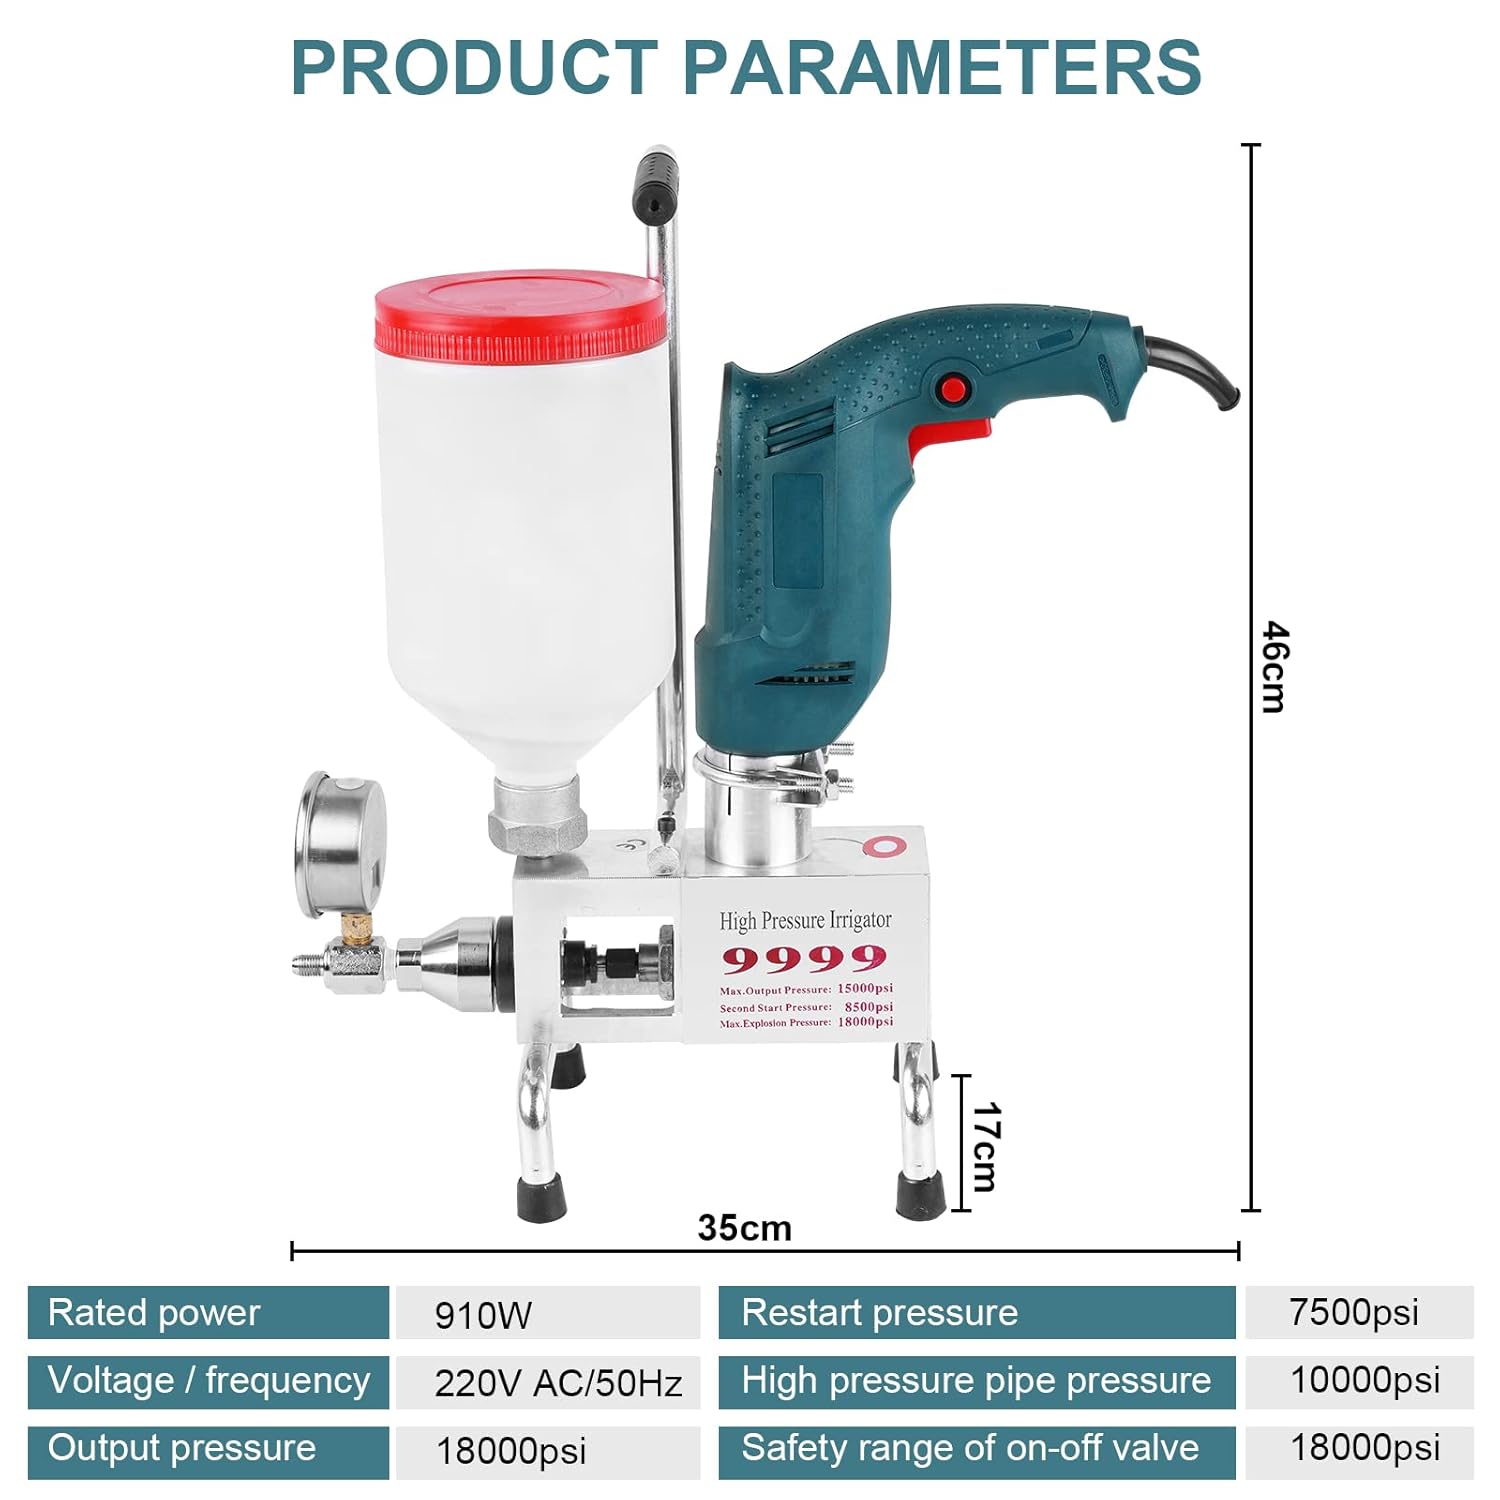
Figure 8.1: Diagram illustrating the product dimensions and key electrical and pressure parameters.
| Parametro | Valore |
|---|---|
| Numero di modello | 9999 |
| Potenza nominale | 910W |
| Voltage / Frequenza | 220 V CA / 50 Hz |
| Pressione di uscita | 18000 psi |
| Riavviare la pressione | 7500 psi |
| High Pressure Pipe Pressure | 10000 psi |
| Safety Range of On-Off Valve | 18000 psi |
| Maximum Supported Pressure | 700 kg |
| Dimensioni del pacco | Dimensioni: 44.1 x 40 x 16.3 cm |
| Peso netto | 6.4 kg |
| Paese di origine | Cina |
9. Garanzia e supporto
For warranty information, technical support, or service inquiries, please contact the manufacturer or the seller directly.
- Produttore: MXBAOHENG
- Venditore: MXBAOHENGES (as per Amazon listing)
- Informazioni sui contatti: Please refer to your purchase documentation or the seller's information on the platform where the product was purchased for specific contact details.
Nei dati forniti non erano disponibili video ufficiali del prodotto da incorporare in questo manuale.
Ask a question about this manual
Ask about setup, troubleshooting, compatibility, parts, safety, or missing instructions. Manuals+ will review the question and use this page’s manual context to help answer it.