1. Impostazione
1.1 Installazione della batteria
The U UNNI Wireless Weather Station requires batteries for both the main display unit and the remote sensor. Ensure you have the correct battery types before beginning installation.
- Unità di visualizzazione principale: Richiede 3 batterie AAA (non incluse).
- Sensore remoto: Richiede 2 batterie AA (non incluse).
To install, open the battery compartments on the back of each unit, insert batteries according to polarity markings, and close the covers securely.

Figure 1: Battery installation for the main unit and remote sensor.
1.2 Unit Pairing and Synchronization
The main display unit and remote sensor are designed to pair automatically upon battery installation. Allow a few moments for the units to establish a connection. The remote sensor updates and transmits data every 30 seconds.

Figure 2: Wireless transmission range of up to 330 feet.
1.3 Linee guida per il posizionamento
Optimal placement ensures accurate readings and reliable performance.
- Unità di visualizzazione principale: Can be placed on a tabletop using its integrated kickstand or mounted on a wall using the hang hole. Choose a location indoors that is easily visible.
- Sensore remoto: For the most accurate outdoor temperature and humidity readings, place the remote sensor in a shaded area, away from direct sunlight and heat sources (like vents or appliances). While the sensor has an IPX4 waterproof rating, it is recommended to cover it in a shaded, protected spot to extend its lifespan and accuracy.

Figure 3: Main unit placement options: tabletop or wall-mounted.

Figure 4: Recommended outdoor sensor placement for optimal accuracy and longevity.
2. Istruzioni per l'uso
2.1 Fine displayview
The large, clear LCD display provides comprehensive environmental data at a glance:
- Sezione esterna: Displays current outdoor temperature and humidity, along with a weather forecast icon.
- Outdoor Index: Shows either Heat Index, Dew Point, or Mold Index.
- Sezione interna: Visualizza la temperatura e l'umidità interne attuali.

Figure 5: Key display areas of the weather station.
2.2 Modifica delle unità di temperatura (°F/°C)
To switch between Fahrenheit (°F) and Celsius (°C), you must do so during the initial battery installation or immediately after resetting the unit. While the display is flashing (shortly after inserting batteries), press the "INDEX" button on the back of the main unit once. The unit will automatically switch to the desired temperature scale after a few seconds.
2.3 Outdoor Index (Heat, Dew Point, Mold)
The Outdoor Index section provides valuable environmental insights. By default, it displays the Mold Index. To cycle through Heat Index, Dew Point, and Mold Index, press the "INDEX" button located on the back of the main display unit.
- Indice di calore: Indicates how hot it feels when relative humidity is factored in. Take caution when the Heat Index is above 91°F (32°C) to reduce risk of heat exhaustion and heat stroke.
- Punto di rugiada: The temperature at which air becomes saturated with water vapor and dew begins to form. Useful for monitoring dampness.
- Indice di muffa: Indicates the likelihood of mold and mildew growth, which happens more rapidly in damp environments where humidity is above 60%.
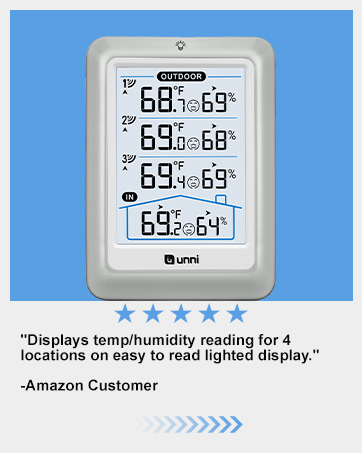
Figure 6: Heat Index display.

Figure 7: Dew Point display.

Figure 8: Mold Index display.
2.4 Attivazione della retroilluminazione
To activate the backlight for easy viewing in low-light conditions, simply tap the light bulb icon at the top of the main display unit. The backlight will illuminate for 10 seconds.
3. Funzionalità finiteview
- Sensore ad alta precisione: Equipped with a Swiss-made Sensirion sensor for exceptional accuracy in temperature and humidity readings.
- Portata wireless estesa: Patented wireless technology allows for powerful and consistent data transmission up to 330 feet, updating every 30 seconds.
- Dati completi: Provides real-time indoor/outdoor temperature and humidity, weather forecasts, heat index, dew point, and mold index.
- Display intuitivo: Large, clear LCD with bold black information and a convenient 10-second backlight for readability in the dark.
- Supporto multi-sensore: The main unit can connect to and monitor data from up to 3 remote sensors (additional sensors sold separately).

Figure 9: High-precision sensor details.
4. Manutenzione
4.1 Sostituzione della batteria
Replace batteries in both the main unit and remote sensor when the low battery indicator appears on the display. Refer to Section 1.1 for battery types and installation instructions.
4.2 Pulizia
Wipe the units clean with a soft, dry cloth. Avoid using abrasive cleaners or solvents.
4.3 Outdoor Sensor Protection
Although the remote sensor has an IPX4 waterproof rating, prolonged exposure to direct sunlight, extreme temperatures, or heavy rain can affect its accuracy and lifespan. For best results, place the sensor in a protected, shaded location.
5. Risoluzione Dei Problemi
- No Reading from Remote Sensor: Ensure batteries are correctly installed in both units. Check that the remote sensor is within the 330ft transmission range and on the correct channel. Avoid major obstructions between units.
- Inaccurate Outdoor Reading: Verify the remote sensor is not in direct sunlight or near any heat sources. Relocate if necessary.
- Unità di temperatura non cambia: The °F/°C switch can only be performed when the display is flashing, typically right after battery installation or a unit reset.
6. Specifiche
| Marca | U UNNI |
| Numero di modello | ONU0581 |
| Dimensioni del prodotto | 5.71 x 1.38 x 5.71 pollici |
| Peso dell'articolo | 1.87 libbre |
| Intervallo di temperatura interna | Da + 14.2 ° F a + 122 ° F |
| Intervallo di temperatura esterna | da -58°F a +158°F |
| Intervallo di umidità interna/esterna | Dal 1% al 99% |
| Precisione della temperatura | +/-0.5°F |
| Precisione dell'umidità | +/-2% |
| Tecnologia di connettività | Senza fili |
| Fonte di alimentazione (unità principale) | 3 batterie AAA (non incluse) |
| Fonte di alimentazione (sensore remoto) | 2 batterie AA (non incluse) |
| Componenti inclusi | 1 x Hygrometer, 1 x User Manual, 1 x Remote Sensor |
7. Garanzia e supporto
Your U UNNI Wireless Weather Station comes with a one-year warranty (excluding batteries).
For any questions, concerns, or support needs, please contact U UNNI customer service:
- E-mail: unni_technology@hotmail.com
You can also refer to the full user manual for more detailed information: Scarica il manuale utente (PDF)