BuTure BR600
Manuale utente dell'avviatore portatile per auto BuTure BR600
Modello: BR600
1. Prodotto finitoview
The BuTure BR600 is a powerful and versatile portable car jump starter designed to provide emergency starting power for 12V vehicles. It also functions as a portable power bank with wireless charging capabilities and a multi-mode LED flashlight. This manual provides essential information for safe and effective use of your device.
Caratteristiche principali:
- Avviamento potente: Delivers 2500A peak current to start all gasoline engines and up to 8.0L diesel engines.
- Batteria ad alta capacità: 27000mAh lithium battery for multiple jump starts and device charging.
- Ricarica wireless: Integrated 10W wireless charging pad for compatible smartphones.
- Banca di alimentazione portatile: Equipped with USB 1 (Quick Charge 3.0: 5V 3A / 9V 2A / 12V 1.5A), USB 2 (5V 2.4A), and USB-C (5V 3A) outputs for charging various electronic devices.
- Smart Protection Clamps: Features intelligent protection against short circuits, overheating, over-voltage, over-charge, deep discharge, over-current, and reverse polarity.
- Torcia LED multimodale: Includes Flashlight, Strobe, SOS, and Warning Light modes for emergencies.
- Design durevole: Operates effectively in extreme temperatures, including cold winter conditions.
2. Contenuto della confezione
Si prega di controllare il contenuto della confezione all'apertura. Se qualche articolo risulta mancante o danneggiato, contattare l'assistenza clienti.

Image: Contents of the BuTure BR600 package.
- 1 x BuTure BR600 Jump Starter
- 1 x cavi jumper intelligenti
- 1 cavo USB-C
- 1 x adattatore per accendisigari EC5
- 1 x Manuale utente
- Caso di stoccaggio 1 x
3. Informazioni importanti sulla sicurezza
Leggere tutte le avvertenze e le istruzioni di sicurezza prima di utilizzare questo prodotto. Il mancato rispetto di queste istruzioni può causare scosse elettriche, incendi e/o lesioni gravi.
- Non immergere il prodotto in acqua né esporlo alla pioggia.
- Non aprire o smontare il prodotto. All'interno non sono presenti parti riparabili dall'utente.
- Tenere fuori dalla portata dei bambini.
- Utilizzare solo i cavi di avviamento intelligenti forniti.
- Non avviare una batteria congelata.
- Assicurarsi che la polarità sia corretta (contatto rossoamp a positivo, nero clamp a negativo).
- Non collegare il positivo e il negativo clampsono insieme.
- If the product becomes excessively hot during use, discontinue use immediately.
- Conservare il prodotto in un luogo fresco e asciutto, lontano dalla luce solare diretta.
- Quando si avvia un veicolo con i cavi, indossare occhiali protettivi e guanti.
- Consult your vehicle's owner's manual for specific jump-starting procedures.

Image: The BuTure BR600 features multiple protection modes for safe operation, including error detection and intelligent indicators.
4. Charging the BuTure BR600
Prima del primo utilizzo, caricare completamente l'avviatore di emergenza. Si consiglia di ricaricare il dispositivo ogni 3-6 mesi per preservare la salute della batteria, anche se non in uso.
4.1. Charging via USB-C Input
- Collegare il cavo USB-C in dotazione alla porta di ingresso USB-C dell'avviatore di emergenza.
- Collegare l'altra estremità del cavo USB-C a un adattatore da parete USB (non incluso) o a un caricabatteria per auto.
- The LED indicator lights will illuminate and flash to show the charging status. All four lights will be solid when fully charged.
4.2. Indicatore del livello della batteria
The LED indicator lights on the device show the remaining battery capacity:
- 4 luci: 75% - 100%
- 3 luci: 50% - 75%
- 2 luci: 25% - 50%
- 1 light: 0% - 25% (Recharge immediately)

Image: The BuTure BR600 features a 27000mAh battery designed for long standby times, up to 12 months.
5. Avviamento di emergenza di un veicolo
Ensure the jump starter is at least 50% charged (2 LED lights) before attempting to jump start a vehicle.
- Preparare il veicolo: Turn off the vehicle's ignition and all accessories (headlights, radio, air conditioning, etc.). Engage the parking brake.
- Collegare i cavi jumper:
- Insert the blue plug of the smart jumper cables into the 12V jump start port on the BuTure BR600. Ensure a firm connection.
- Collegare il ROSSO positivo (+) clamp al terminale positivo (+) della batteria del veicolo.
- Collegare il NERO negativo (-) clamp al terminale negativo (-) della batteria del veicolo.
- L'intelligente clamp indicator light will show the connection status. Refer to the smart clamp manual for specific light indications.
- Avviare il veicolo: Una volta che la smart clamp indicator shows a safe connection, start your vehicle's engine. If the vehicle does not start immediately, wait 20-30 seconds before trying again. Do not crank the engine for more than 3 seconds per attempt.
- Rimuovere i cavi di collegamento: Non appena il veicolo si avvia, scollegare il NERO negativo (-) clamp prima, poi il ROSSO positivo (+) clamp from the vehicle battery. Finally, unplug the smart jumper cables from the BuTure BR600.
Importante: Se la smart clamp indicates an error (e.g., reverse polarity), correct the connection before attempting to start the vehicle.

Image: Illustration of connecting the BuTure BR600 to a car battery for jump starting.
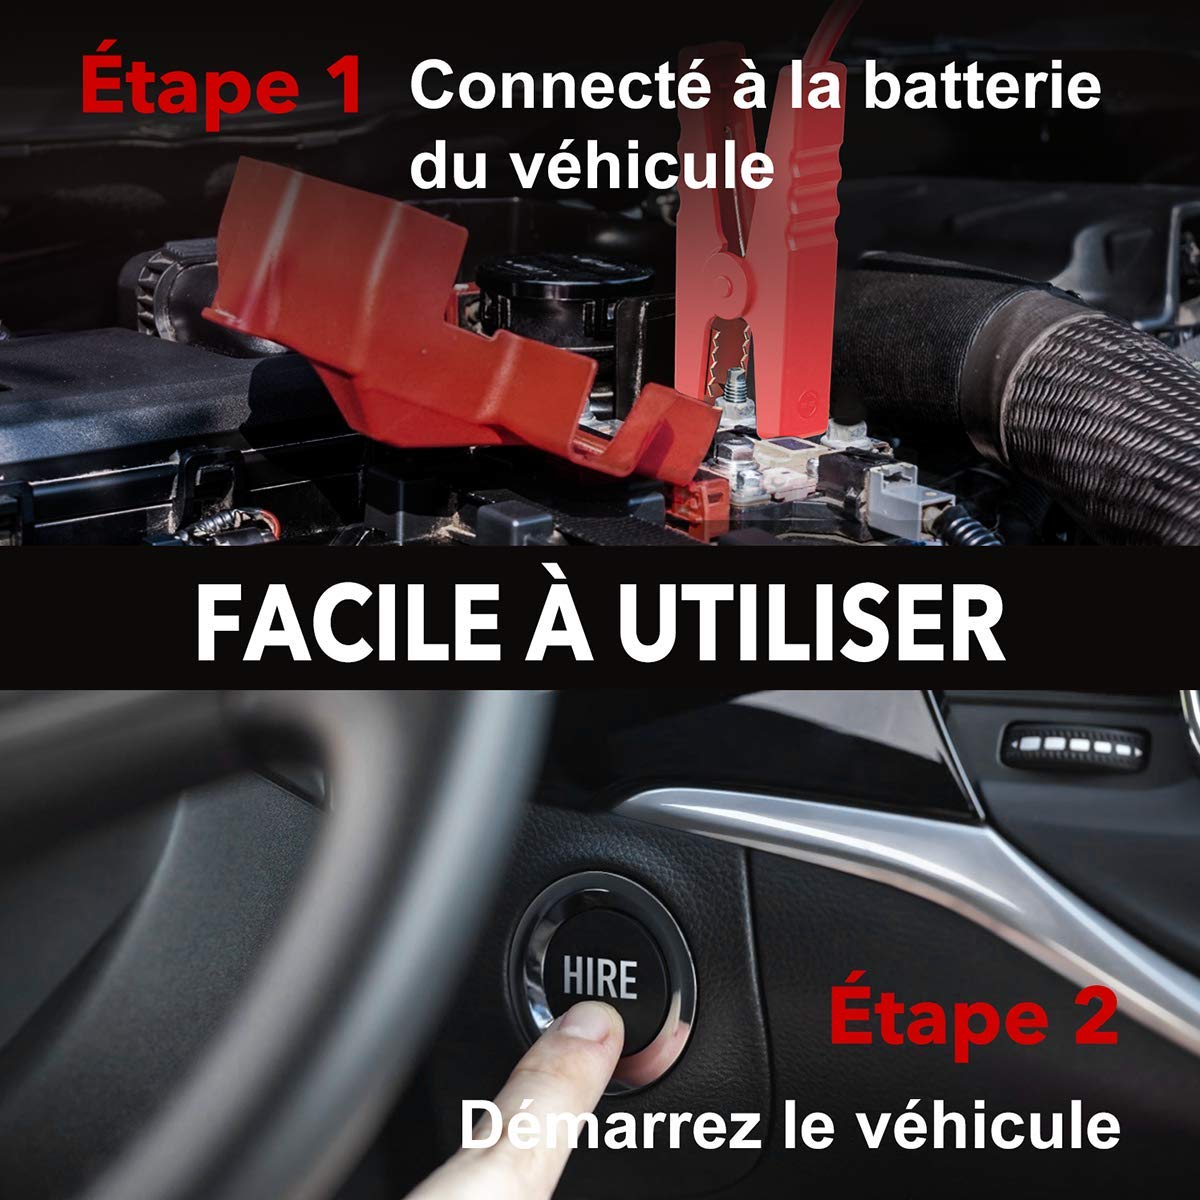
Image: Step-by-step guide showing how to connect the jump starter to the vehicle battery and then start the vehicle.

Image: The BuTure BR600 is designed to perform reliably even in cold winter temperatures down to -20°C.
6. Operating Other Functions
6.1. Utilizzo come Power Bank (uscita USB)
The BuTure BR600 can charge various electronic devices via its USB output ports.
- Connect your device's USB charging cable to either the USB 1 (Quick Charge 3.0) or USB 2 port on the jump starter.
- L'avviatore di emergenza inizierà automaticamente a caricare il tuo dispositivo.
6.2. Ricarica wireless
For devices compatible with 10W wireless charging:
- Posiziona il tuo dispositivo compatibile con la ricarica wireless (ad esempio uno smartphone) sul tappetino di ricarica wireless situato sulla superficie superiore dell'avviatore di emergenza.
- Per una ricarica ottimale, assicurarsi che il dispositivo sia centrato sul pad.
- The wireless charging indicator light will illuminate to confirm charging is active.

Image: The BuTure BR600 offers both 10W wireless charging and Quick Charge 3.0 USB output for multiple devices.
6.3. Torcia a LED
The built-in LED flashlight has multiple modes for different situations.
- Press and hold the power button for 3 seconds to turn on the flashlight (steady light mode).
- Press the power button again to cycle through modes: Strobe → SOS → Warning Light → Off.
- Press and hold the power button again for 3 seconds to turn off the flashlight from any mode.

Image: The BuTure BR600 features an ultra-bright LED flashlight with Flash, SOS, Strobe, and Warning light modes for various emergencies.
7. Manutenzione
- Pulizia: Utilizzare un panno morbido e asciutto per pulire il dispositivo. Non utilizzare detergenti abrasivi o solventi.
- Magazzinaggio: Store the jump starter in a cool, dry place between 0°C and 45°C (32°F and 113°F). Avoid direct sunlight and high humidity.
- Ricarica: Recharge the device every 3-6 months to prevent battery degradation, even if not in use.
- Durata della batteria: The internal lithium battery is designed for long life, but like all rechargeable batteries, its capacity will decrease over time.
8. Risoluzione Dei Problemi
| Problema | Possibile causa | Soluzione |
|---|---|---|
| Il jump starter non si accende. | La batteria è completamente scarica. | Charge the jump starter for several hours. |
| Il veicolo non si avvia. |
|
|
| cl . intelligenteamp l'indicatore mostra un errore. | Reverse polarity, short circuit, or other fault. | Disconnetti clamps, check connections, and reconnect ensuring correct polarity (Red to +, Black to -). Refer to smart clamp manual for specific error codes. |
| La ricarica wireless non funziona. |
|
|
9. Specifiche
| Modello | BR600 |
| Corrente di picco | 2500A |
| Capacità della batteria | 27000mAh |
| Volume inizialetage | 12V |
| Uscita USB 1 (QC3.0) | 5V/3A, 9V/2A, 12V/1.5A |
| Uscita USB 2 | 5V/2.4A |
| Ingresso/uscita USB-C | 5V/3A |
| Uscita di ricarica wireless | 10W |
| Temperatura di esercizio | -20°C a 60°C (-4°F a 140°F) |
| Dimensioni (L x P x A) | Dimensioni: 24.5 x 15.4 x 9.6 cm |
| Peso | 1.21 kg |
| Composizione della batteria | Lithium Metallic |
10. Garanzia e assistenza clienti
BuTure products are designed and manufactured to the highest quality standards. This product comes with a standard manufacturer's warranty. For detailed warranty information, product support, or technical assistance, please refer to the warranty card included in your package or visit the official BuTure websito.
If you encounter any issues or have questions regarding your BuTure BR600, please contact our customer support team. Provide your model number (BR600) and purchase details for faster service.
Ask a question about this manual
Ask about setup, troubleshooting, compatibility, parts, safety, or missing instructions. Manuals+ will review the question and use this page’s manual context to help answer it.